With this tutorial you will learn how to drill a hole in glass. Instead of throwing away your glass, turn it into something beautiful and practical. A bottle from a trash can can turn into a real treasure. But first, you need to learn how to drill holes in glass or mirror.
In this article we will look at methods of drilling in glass and analyze the mistakes.
Here are some rules to follow when drilling through tempered glass:
- Be careful!
- Be patient.
- Be smart.
If you have any doubts when drilling glass at home, go to rule No. 1.
How to drill a hole in glass at home and why make a hole in a bottle
With this tutorial you will learn how to drill a hole in glass. Instead of throwing away your glass, turn it into something beautiful and practical. A bottle from a trash can can turn into a real treasure. But first, you need to learn how to drill holes in glass or mirror.
In this article we will look at methods of drilling in glass and analyze the mistakes.
Here are some rules to follow when drilling through tempered glass:
- Be careful!
- Be patient.
- Be smart.
If you have any doubts when drilling glass at home, go to rule No. 1.
Decorative decorations
Using your creative imagination, fill the clear lamp bulb with soil, moss, small rocks, shells or twigs.
Such crafts are hung or mounted on a support, which is most easily made from thick copper wire. The stand also uses sticky silicone holders, sold in many stores.
How to make a hole in a glass bottle with your own hands
If you need to make a hole in a glass bottle, then you do not need to buy special equipment. This can be done at home with your own hands. You can drill with either a regular drill or a screwdriver.
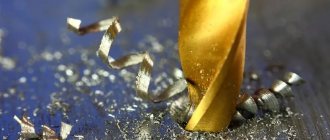
It is preferable to use a screwdriver, since it has fewer revolutions (high speeds are not needed for drilling glass). It is recommended to use a drill with pobedit inserts, but if you don’t have one, you can take a regular drill for metal work, for example, in this instruction we use a drill with a diameter of 8.2 mm made of P6M5 steel. Don’t believe those who say that you only need to use pobedit drills and nothing will work with ordinary ones. Now we will make sure of this.
You can learn how to make a hole in a glass bottle by watching the video:
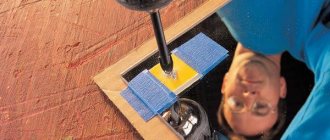
So, to drill a hole in a bottle you will need: - The bottle itself, for example, from wine; — Bottle stand to prevent the bottle from rolling around when drilling a hole; - Paper tape; — A regular drill or screwdriver; — Regular drill; — Water for cooling; — Drills — And a syringe.
It is necessary to secure the bottle from rotation. To do this, a stand was made in advance from ordinary wooden blocks: two long and two short, fastening them together with nails. If it is not possible to make such a stand, then you can make a small depression in the ground if you are drilling outside, or place two bricks or something else on the sides. In general, it depends on your imagination.
First thing to do
- This is to wrap paper tape (several layers) around the bottle approximately where you plan to make a hole. After this, put a mark on the tape with a felt-tip pen - the center of the future hole.
The most important thing when drilling a hole is not to press too hard on the drill, as the glass may crack and the bottle will be damaged.
Let's get started Drilling in stages, adding a few drops of water from a syringe to the hole in between. This is necessary so that both the drill and the glass bottle do not overheat.
To avoid cracks on the inside of the bottle, you need to monitor the pressure and not overpress the drill, especially at the end of the job. When the drill has gone through, you need to carefully drill the hole, making light rotational movements. This will make the hole cut smoother.
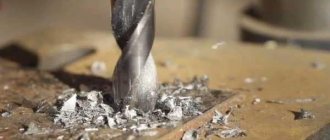
The hole is drilled, remove the tape and look at the result. This hole was made using a standard drill bit with a diameter of 8.2 mm and a conventional drill. It took 10-15 minutes to complete the work.
Source: https://usamodelkina.ru/2396-kak-sdelat-otverstie-v-steklyannoy-butylke-svoimi-rukami.html
LiveInternetLiveInternet
—Categories
- Interior design, decor (63)
- Clocks, panels and other small items for the home (52)
- Decoupage (39)
- We do it ourselves (37)
- There are different master classes on decor. (37)
- Sewing, patchwork, accessories (31)
- Glass, stained glass, painting (29)
- Useful tips for home (29)
- Books and magazines on decor (27)
- Paper, quilling. (19)
- Light, lamps, fixtures. (19)
- Modeling, plastic, fimo (17)
- Useful links (17)
- New life for old things (15)
- Creative materials (15)
- Drawing and painting lessons (10)
- For furry and tailed pets. (8)
- Green corner in the house. Flowers and plants. (8)
- DIY soap (5)
- Candles (5)
- Batik, fabric painting (4)
—Tags
-I'm a photographer
Terrarium
A cute craft made from a burnt out lamp, a souvenir - a terrarium. Yes, some will say that the craft is completely useless, but still it is quite cute and will complement the interior.
Numerous photos of crafts made from light bulbs confirm this - it seems like a cute little thing, created with your own hands, but how perfectly it fits into the interior of a particular room.
The terrarium can be filled with moss, pebbles, toys, cute twigs, shells - whatever you want.
The terrarium is installed on a structure made of wire or on any other stand. The wire should be made of copper, thick - it is flexible and will fit perfectly with the lamp.
How to drill a hole in a glass bottle when making a lamp. MK
How to make a lamp base from a bottle.
I am often asked HOW to make a hole in a bottle to create a lamp base. Here is a short master class on how I do it.
* Wide-neck wine bottle with screw cap * E14 lamp socket * electric cord with switch * Matte ENERGY-SAVING light bulb with E14 base, power 7-8W * Metal tool * Screwdriver * Drill for glass and ceramics * Diamond needle file (forcon recommendation
) * Jar of water * Scissors * Glue gun * Safety glasses (
ntl
) * Protective mask
I am often asked how to make a hole for a cord in a bottle. To do this, you need to purchase a special drill for glass and ceramics at a hardware store. For the Hole, I use a #6 or #8 feather drill bit. You will also need a drill or screwdriver. Here are a few photos of the materials you will need.
Procedure: Take a bottle and wrap the area where the hole will be located with masking tape 2-3 times.
Mark the drilling location with a cross. Please note that bottles have seams, it is best not to drill directly into the seam of the bottle. Move the drilling location 1-2 cm.
We begin the drilling process. We dip the drill in the water and try to hold the drill very evenly at medium speed and begin to drill. The most important thing is not to put pressure on the bottle under any circumstances. Act confidently, but not harshly.
Drilling will take 10-15 minutes. The pen drill will seem to scratch out the glass.
While drilling, regularly lower the drill into water and drip onto the drilling site.
After the drill has gone through, carefully drill the hole for some time, making light rotational movements. This will make the cut of the hole smoother.
Use a regular file or coarse sandpaper to sand the edge of the cut. This is what you should get:
Now take the cord with the switch
And we pass it through the hole, pulling it up.
I want to immediately make a reservation that if you plan to decorate a bottle, then the order of work should be as follows: First you make a hole, then you decorate the bottle, then you put everything together. Now a few words about light bulb sockets. I use light bulb sockets with a base size of E14. A regular light bulb has a power of 40W or an energy-saving one 7-8W. I prefer energy-saving lamps; they do not heat up the lampshade. There are two types of cartridges: “without a skirt” and with a “skirt”. We need cartridges with a skirt and a fastening ring.
These are NOT the correct cartridges, WITHOUT a “skirt”
The CORRECT cartridge with a “skirt” and a ring.
Now we take a bottle cap (I wasn’t free, so I took a regular cap as an example).
We make a mark on it with the middle. We measure the diameter of the cartridge and select the appropriate perk for metal.
What to do if there are no metal perks? I suggest this method: Punch holes in a circle with an awl, often and close to each other, and then saw through with utility scissors or a needle file.
The entire hole is ready and we begin to put everything together. We bring the cord through the neck of the bottle. We connect the cord and the cartridge. We pass the cartridge through the hole in the lid. The lower “skirt” of the cartridge will prevent the lid from falling off. For reliability, we drip some glue from the gun around the skirt and attach the lid to the skirt.
Close the bottle with a lid. All our cartridges are securely fastened. Using the upper clamping ring, you can subsequently attach the lampshade to the socket.
Attention, there are situations when the lampshade mount is larger in diameter than the fastening ring. What to do? It is necessary to make a gasket that equalizes the diameter of the lampshade and the diameter of the fastening ring.
To make the lamp stable, I recommend putting pebbles inside the bottle.
Your imagination for decorating bottles and lampshades remains in your hands! Create and you will definitely succeed!
Source: https://www.liveinternet.ru/users/allinka_decor/post119908920
Hole in glass
When making a homemade shade for a lamp or candle, it may be necessary to drill a central hole in the glass bulb. You may need to make a hole in the glass for other purposes. You can drill anything, glass jars, bottles or other containers, beads, glass doors.
You can drill glass at home in several ways and with several types of drills. Here we show how this is done using a special kit. But this option is not essential; you can purchase a diamond drill and diamond bits separately.
A diamond drill (drill) is suitable for drilling holes of small diameter. A crown is a special circular drill; unlike a drill, it drills around the circumference without touching the central area. Thanks to this, the crown is suitable for drilling large-diameter holes.
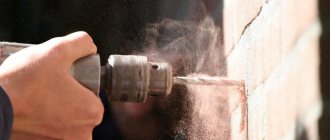
We cover the drilling area with adhesive tape crosswise to reduce glass chipping. It is advisable to tape the inside as well, so the edges of the hole will be smoother and you won’t have to sand them for a long time.
Mark the center and start drilling. If you use special crowns, they have a spring-loaded guide drill in the center.
To use such a tool, you first need to drill out the center with a drill, and then continue drilling with a hole saw.
In other crowns there may not be a center. Of course you can drill, but it will be more difficult to start in the right place. It is more convenient to do this on a stationary drilling machine, but in a pinch, a screwdriver will do.
Snowball
Have you always dreamed of a snow globe? You can make it yourself from a lamp. It is necessary to mix water (70%) and glycerin (30%), but in principle, the proportions may be slightly different.
The basic rule is that the less glycerin is used, the slower the glitter will sink to the bottom. If there is too much glycerin, then the glitter will remain in place, no matter how long and how hard you shake the ball.
That’s why a simple recommendation is to experiment in search of optimal proportions.
How and with what polymer to seal a hole in a glass bottle?
How and with what polymer to seal a hole in a glass bottle?
#1 Post by strannik » Aug 24, 2012, 12:57 pm
Re: How and with what polymer to seal a hole in a glass bottle
#2 Post by Maks42 » Aug 24, 2012, 4:03 pm
Re: How and with what polymer to seal a hole in a glass bottle
#3 Message PlastSter » 24 Aug 2012, 19:02
Re: How and with what polymer to seal a hole in a glass bottle
#4 Post by kei0112 » Aug 24, 2012, 7:23 pm
Re: How and with what polymer to seal a hole in a glass bottle
#5 Post by strannik » 24 Aug 2012, 21:54
Re: How and with what polymer to seal a hole in a glass bottle
#6 Post by kei0112 » Aug 24, 2012, 9:59 pm
Re: How and with what polymer to seal a hole in a glass bottle
#7 Post by Serjio » Aug 24, 2012, 11:30 pm
Re: How and with what polymer to seal a hole in a glass bottle
#8 Post by MASV » 25 Aug 2012, 15:59
Re: How and with what polymer to seal a hole in a glass bottle
#9 Post by Behemoth » Aug 25, 2012, 4:50 pm
Re: How and with what polymer to seal a hole in a glass bottle
#10 Post by sonarr » 27 Aug 2012, 09:24
Re: How and with what polymer to seal a hole in a glass bottle
#11 Post by Maks42 » Aug 27, 2012, 11:03 am
Re: How and with what polymer to seal a hole in a glass bottle
#12 Post by Sergpolimer » Aug 27, 2012, 12:19 pm
Re: How and with what polymer to seal a hole in a glass bottle
#13 Post by strannik » 05 Sep 2012, 17:19
Re: How and with what polymer to seal a hole in a glass bottle
#14 Post by Sergpolimer » 05 Sep 2012, 18:25
Source: https://forum.e-plastic.ru/plastics-and-polymers-f5/-t13461.html
What can lamp elements be used for?
Most often they are used to make such crafts as:
- florarium for mini-plants;
- miniature aquarium;
- flower vase;
- kerosene lamp;
- container for storing paper clips or other small items.
Miniature florarium
To make a florarium for plants out of a light bulb, you need to remove everything unnecessary from it and leave only the base and bulb. You can put beautiful stones at the very bottom. Next, filler is laid, it can be forest moss. Sometimes soil and pieces of tree bark are added. If there are stones below, you can pour sand on top of them.
Fig. 7 – florarium made from an incandescent lamp.
Next, you need to take the plant with tweezers and carefully insert it into the soil or sand. You can close the flask not only using the base. A cork cut from wood or an acorn cap is suitable for this. It is better to use a large incandescent lamp.
Inside the hermetically sealed flask, oxygen is produced, carbon dioxide is consumed, and the water cycle occurs. There is no need to water a closed florarium. It's like a miniature planet with its own climate.
The open option requires moderate watering as the soil dries. If you overfill the water, mold will appear. Mosses can be sprayed occasionally. Just like on earth, plants in a light bulb will gradually grow and develop.
It will be useful to read: Why light bulbs explode.