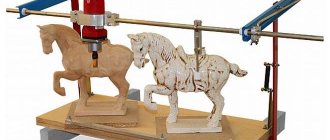
We propose to build a metal lathe with your own hands with smooth adjustment of the spindle speed.
To create such a small metal lathe, you will need spare parts from various faulty power tools.
The machine is small in size and has a powerful engine.
The manufacture of the speed controller will be shown in step 5.
The video below shows a miniature metal lathe in operation at various speeds. The coupling causes vibration, which becomes greater as the number of revolutions increases.
There is another video in step 9.
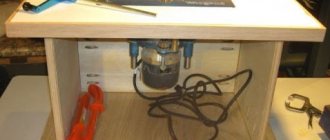
How to make it yourself
To make the device yourself, you need to prepare three nuts, a long bolt and old pads.
The whole process will consist of four simple steps:
- Take a drill according to the diameter of the fastener and drill a hole in the block exactly in the center.
This tool is only suitable for front calipers. For the rear ones, you need to add a special hook to the end of the fastener, which will rotate the rod.
Structural units
Any lathe, including a homemade one, consists of the following structural elements: a supporting frame - a bed, two centers - a drive and a driven, two headstocks - front and rear, a spindle, a support, a drive unit - an electric motor.
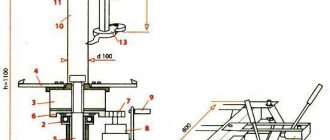
Design of a small-sized metal lathe
All elements of the device are placed on the bed; it is the main load-bearing element of the lathe. The headstock is a stationary structural element on which the rotating spindle of the unit is located. In the front part of the frame there is a transmission mechanism of the machine, with the help of which its rotating elements are connected to the electric motor.
It is thanks to this transmission mechanism that the workpiece being processed receives rotation. The tailstock, unlike the front one, can move parallel to the direction of processing; it is used to fix the free end of the workpiece being processed.
A simple diagram of the components of a homemade woodworking machine will suggest a simple option for making a bed, headstock and tailstock
A homemade metal lathe can be equipped with any electric motor, even if it is not very powerful, but such a motor can overheat when processing large-sized workpieces, which will lead to its stop and, possibly, failure.
Typically, electric motors are installed on a homemade lathe, the power of which is in the range of 800–1500 W.
Even if such an electric motor has a small number of revolutions, the problem is solved by choosing an appropriate transmission mechanism. To transmit torque from such electric motors, belt drives are usually used; friction or chain mechanisms are very rarely used.
Mini-lathes, which are equipped in home workshops, may not even have such a transmission mechanism in their design: the rotating chuck of the unit is fixed directly on the electric motor shaft.
Direct drive machine
There is one important rule: both centers of the machine, leading and driven, must be located strictly on the same axis, which will avoid vibration of the workpiece during its processing. In addition, it is necessary to ensure reliable fixation of the part, which is especially important for frontal-type models: with one leading center. The issue of such fixation is resolved using a jaw chuck or faceplate.
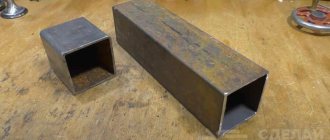
In fact, you can make a lathe with your own hands with a wooden frame, but, as a rule, metal profiles are used for these purposes. High rigidity of the lathe frame is required so that the accuracy of the location of the driving and driven centers is not affected by mechanical loads, and its tailstock and support with the tool move freely along the axis of the unit.
The use of channels in the manufacture of the frame and headstock of the machine
When assembling a metal lathe, it is important to ensure reliable fixation of all its elements, be sure to take into account the loads to which they will be subjected during operation. The dimensions of your mini-machine and what structural elements it will consist of will be influenced by the purpose of the equipment, as well as the size and shape of the workpieces that are planned to be processed on it. The power of the electric motor, which you will need to use as a drive, will depend on these parameters, as well as on the size of the planned load on the unit.
Option for bed, headstock and drive
To equip metal lathes, it is not recommended to choose commutator electric motors that differ in one characteristic feature. The number of shaft revolutions of such electric motors, as well as the centrifugal force that the workpiece develops, increases sharply as the load decreases, which can lead to the part simply flying out of the chuck and can seriously injure the operator.
Such electric motors can be used if you plan to process small and light parts on your mini-machine. But even in this case, the lathe must be equipped with a gearbox that will prevent an uncontrolled increase in centrifugal force.
Asynchronous three-phase electric motor connected to a 220 Volt network through a capacitor
It has already been proven by practice and design calculations that for turning units that will process metal workpieces up to 70 cm in length and up to 10 cm in diameter, it is best to use asynchronous electric motors with a power of 800 W or more. Engines of this type are characterized by stable rotation speed when there is a load, and when it decreases, it does not increase uncontrollably.
If you are going to make your own mini-machine for metal turning, then you should definitely take into account the fact that its chuck will be affected not only by transverse but also longitudinal loads. Such loads, if a belt drive is not provided, can cause destruction of the electric motor bearings, which are not designed for them.
If it is not possible to use a belt drive, and the driving center of the device is directly connected to the electric motor shaft, then a number of measures can be taken to protect its bearings from destruction. A similar measure can be a stop that limits the longitudinal movement of the motor shaft, which can be used as a ball installed between the electric motor housing and the rear end of its shaft.
The tailstock of the lathe houses its driven center, which can be stationary or freely rotating. The simplest design has a fixed center: it is easy to make on the basis of a regular bolt, sharpening and grinding the part that will come into contact with the workpiece to a cone. By screwing or unscrewing such a bolt, moving along a threaded hole in the tailstock, it will be possible to adjust the distance between the centers of the equipment, thereby ensuring reliable fixation of the workpiece. This fixation is also ensured by moving the tailstock itself.
In order for the workpiece to rotate freely in such a fixed center, the pointed part of the bolt that comes into contact with it will need to be lubricated with machine oil before starting work.
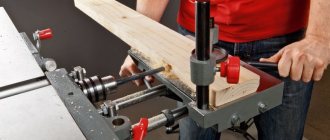
Homemade tailstock for benchtop lathe
An example of a homemade lathe with drawings
Let's take a closer look at one of the working options for a lathe assembled on our own, the fairly high quality of which rightfully deserves the closest attention. The author of this homemade product did not even skimp on the drawings, according to which this device was successfully manufactured.
Of course, not everyone needs such a thorough approach to business; often simpler designs are built for home needs, but as a donor for good ideas, this machine is perfectly suited.
DIY lathe
Machine appearance
Main nodes
Caliper, tool holder and chuck
Side view
Tailstock
Bottom view of the tailstock
Guide shafts
Caliper design
Motor driven
Drawing No. 1
Drawing No. 2
Drawing No. 3
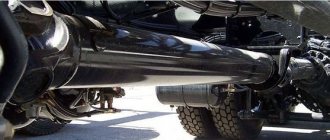
What is the tool used for?
The pressing device is used during brake system repairs.
When the caliper is removed from the disc, the rod remains in the pressed-out position and does not allow the part to be installed back.
To complete the repair, you need to press it into place. Many car enthusiasts use for this purpose everything that is at hand: a vice, keys, etc. However, you can make a special device that will greatly facilitate the task.
The piston is pressed down due to a screw-in worm mechanism.