A properly working hammer drill is a beautiful assistant in production. This universal tool, which has an abundance of functions, allows you to comfortably solve even the most complex problems. If a hammer drill breaks down, it is not at all necessary to immediately take it in for repair. A home craftsman can disassemble and repair such a tool without the help of others. How to repair a hammer drill yourself?
In contrast to a drill, also an impact drill, a hammer drill has an enhanced impact function, which puts it many times higher in situations where it is necessary to apply significant mechanical impact on the materials being processed.
This occurs due to the design features of the hammer drill device. The device is equipped with an independent mechanism for generating a massive pneumatic push of the working tool, and this ability frees the master from the use of physical effort when drilling and chiseling concrete and stone.
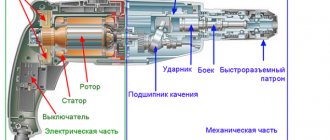
Impact mechanism of a hammer drill in section
The rotational motion of the electric motor is converted into translational vibration of the impact mechanism by creating compression between the pistons. This movement is transmitted to the drummer. The striker, made of high-strength steel, usually sends high-pressure air energy directly to the working tool - a drill, chisel or shovel. This design of the unit increases the impact power to a great destructive force - 20 kJ.
Based on the location of the motor, drill-type and barrel-type hammer drills are distinguished.
- The first type of device is similar to a drill; here the motor is located in the same axis with the drill.
- In hammer drills of the second type, the engine is installed perpendicular to the drilling axis.
Barrel hammer drills are larger in size, but at the same time they have a more advanced cooling system, which allows you to operate the tool for a long time without stopping. Devices such as drills are even more compact; they are comfortable when working in cramped circumstances, when access to the object is limited.
If, during use, problems with the operation of the hammer drill become apparent, you should disconnect it from the power supply and carry out an external inspection. If external signs of failure are not found, you will have to disassemble the case and find the problem inside.
The main reason for device failure is a break in the power cord. In this case, the hammer drill engine does not turn on. To diagnose it, you need to carefully examine the cable connecting the tool to the network. It must not be damaged, broken or melted. A working power cord remains cool during operation. If the wire is faulty, it should be replaced with an equivalent one. The cross-section of conductive parts must correspond to the power consumed by the equipment.
It is recommended to use a multimeter to test electronic circuits. Using this device, of course, you can not only detect a break in the mains power, but also “ring” the coils of the motor windings and find the presence of voltage on the start button.
Conventionally, our client is left with hammer drill malfunctions divided into two categories - mechanical and electronic.
Burnt or not? That is the question. / The windings have turned black / The grinder is smoking / Makita 9555
The following signs indicate dilemmas with the electronic part of the hammer drill:
- the motor does not spin when turned on;
- the brushes on the commutator spark intensely;
- the body smells of burnt insulation;
- Acrid smoke comes out of the tool during operation.
In order to find out and remove the cause of all these phenomena, the hammer drill needs to be disassembled.
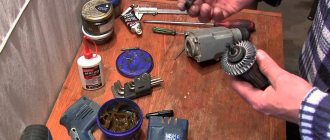
You should begin disassembling without the help of others only if you have the appropriate tools and equipment. When repairing a rotary hammer yourself, the following will be useful:
- screwdrivers with various slots;
- vice;
- wrenches and socket (hexagonal) keys;
- bearing pullers.
Today, spare parts for replacement, rubber seals and gaskets will be needed. To lubricate the gears of the devices, the following will be useful:
- grease;
- rags;
- cleaning solvent.
If you repair the electric motor yourself, in addition to a multimeter, you will need:
- spare carbon (or graphite) brushes;
- copper wire of the required cross-section;
- template for rewinding reels.
Disassembling the hammer drill begins with removing the cartridge. Usually this is a cartridge that allows accounting (software) SDS-plus, which can be disassembled using a flat-head screwdriver. With all this, there is no drill or chisel in the cartridge.
There are times when the drill gets jammed and it is not easy to get it out. Then you need to use a rubber hammer to carefully tap the cartridge around the circumference and pour a few drops of lubricant like WD-40 inside. After a few minutes, try again, the drill should simply come out. Then we proceed to disassembling the cartridge itself. Procedure:
- Pull the plastic skirt down.
- Use a screwdriver to remove the rubber protective boot.
- Unclench and remove the retaining ring located behind the boot.
- Remove the plastic boot, spring, locking plates and balls.
- All our client needs to do is clean the parts from old grease and put them in a clean place.
To remove the operating mode switch, you need to:
- Move the switch to the “impact” position (pictogram with a hammer) and turn it approximately 1 cm lower.
- Release the lever from its socket.
- Pull the lever towards you only.
To get to the commutator brushes and the start control button, you need to remove the back cover. For this purpose, two or, in other words, three self-tapping screws are unscrewed from the plastic case (depending on the model).
If the cause of the malfunction lies in the wear of the brushes, there is an option to remove it by installing a new pair. The working length of the brush must be more than 8 mm. The rubbing surface is without traces of scale or chips.
The start button is checked using a multimeter. Do not forget that the engine speed control system is also located inside the trigger mechanism. If melted plastic is visible on the button body, it should be completely replaced, because it will no longer work properly.
Attention! It is strictly forbidden to inspect the operation of the button while the instrument is connected to the network!
After changing the button, you need to install the housing cover to its destination, and do not forget to tighten the screws securely. Only after a while can you inspect the operation of the hammer drill.
To disassemble the electric motor, you need to disconnect the electric motor housing from the gearbox. They are fastened to each other with 4 screw-shaped screws. If you unscrew them, the mechanical part simply separates from the plastic casing. During disassembly, the motor rotor is removed from the guide sleeve, freeing access to the gearbox. Accordingly, it is easy to examine the electrical parts of the motor.
The motor consists of a movable rotor and a rigidly fixed stator. The rotor rotates under the influence of an electromotive force arising on windings consisting of turns of copper conductor. Inspection of the windings is to determine the integrity of the insulation and the absence of short circuits between the turns. This is done using a multimeter by alternately measuring the resistance on the lamellas. If the passage detects an interturn short circuit, the armature must be replaced or repaired. The stator windings can be rewinded independently with your own hands, using a special template.
The anchor, you, changes completely, along with the bearings and the air intake plate.
Lubricate the gearbox
You will need to disassemble the tool body. Follow the steps:
- Disassemble the cartridge. To do this, first remove the rubber ring. Then use a screwdriver to pry up and remove the retaining ring. Next, carefully remove the outer casing of the cartridge, and then remove the pressure ring, ball and spring.
- Now disconnect the mode switch. This is done differently depending on the model. At the end of the article, I provided a number of links to videos that tell how it is filmed on one or another model. If your unit is not among them, then you can look at any similar one to understand the principle. And then, I think, it won’t be difficult for you to disconnect it yourself.
- Remove the commutator from the brushes. To do this, unscrew the back cover of the case and remove the brushes.
- Unscrew the screws that longitudinally tighten the housing and separate it.
- Remove the gearbox along with the motor armature.
Now thoroughly rinse the gearbox itself, as well as the inside of its housing. Washing can be done, for example, with gasoline.
After this, the individual most critical parts are smeared first. And then the entire gearbox is completely enveloped in lubricant.
Well, all that remains is to assemble everything in reverse order.
Should the Hammer be heated and does it need rest? Should I take straight Bochkovo silt?
The reason for equipment incontinence lies in wear or breakage of the cartridge. The cartridge needs to be disassembled and found out what the problem is. You see, the balls have become deformed, a wear has appeared on the restrictor ring, or the retaining spring has sagged. Usually, after replacing the damaged part, the cartridge starts working normally again.
Sparking brushes is a fairly common phenomenon when working with equipment in extremely dusty conditions. Typically, sparking is a consequence of the deterioration of the material of the brushes themselves. Changing the latter to new ones will help improve the situation; not only will sparks not fly out.
In that case, no, the reason must be found in the stator or rotor windings. It is possible that significant amounts of dust penetrating the engine led to abrasion of the protective varnish covering the copper conductors. This amounts to a short circuit. The presence of an interturn short circuit is checked using electrical devices (multimeter).
Preventative maintenance of the tool: changing brushes, lubrication of the rotor shaft bearings and additional varnishing of the windings on the coils will reduce the possibility of breakdowns.
Even today, it should be taken into account that dust can adhere to the lubricant of the bearing located next to the collector. To prevent this, the collector is degreased using a swab dipped in alcohol or solvent.
If the hammer gets extremely hot during operation, this is an obvious sign that the normal operation of the electric motor is not working. First, to prevent overheating, you must follow the operating mode of the device:
- take breaks at certain intervals;
- After loading, give the tool the opportunity to idle.
When drilling, it is recommended to use a repeating mode: apply the highest power for less than 1 minute, then turn on idle for 3-4 seconds.
Rules to follow
At work, hammer drill
heats up quickly. In order to maintain the functionality of the tool for a long time, it is necessary to take a break of at least 10 minutes after 20-30 minutes of work.
In the process of work, when turning the tool idle, you need to remove crumbs and dust, clean the hole being punched in order to make the tool easier to work with. When drilling holes with a large cross-section, first drill with a thin drill, then with a medium one, making the hole in three steps. Long through passages must be drilled first with short nozzles, gradually replacing them with longer ones.
After work, it is necessary to put the punch and used nozzles in order. Tools must be cleaned of dust and placed dry in a container.
The grinder gets very hot and the brushes burn. Another little-known breakdown.
When the housing temperature does not decrease, it is necessary to inspect the electric motor. If you notice a corresponding smell from under the tool casing, you must immediately finish the work and disconnect the device from the network. You can disassemble it only after it has completely cooled down.
There is a situation when the cartridge and the equipment fly off while the hammer drill is running. This occurs due to wear of the cartridge body fastening at the base of the raster bushing, which is essentially a retaining ring. If it breaks, the fixation is broken and at the time of the push, the rubber boot flies off, followed by the spring and balls.
Return the cartridge to normal operation, of course, by installing a new retaining ring. This is done quickly and does not require any additional tools other than an ordinary screwdriver.
It is preferable to replace the main parts without performing a high-quality installation, as the part is subject to destruction. This will protect the instrument from more severe damage, the correction of which will be more expensive and will take more than just time. As a rule, you have to make a shift:
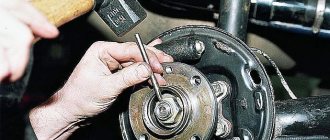
If, during a preventive inspection, grease leaks are noticeable on the bearing, it crackles or crunches when turned by hand, this means that it is time to change it. Bearing dismantling is done using a special puller, consisting of a screw-shaped part and a device for gripping the bearing sleeve housing. Tightening the thread creates a force that removes the bearing from the shaft.
Installing a new bearing into place is done with a rubber or wooden hammer. For installation, it is important to prevent misalignment of the bearing axis relative to the shaft axis. Lubricant is applied to the part after installation.
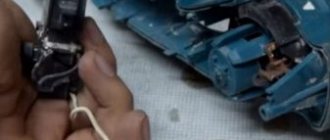
To change the start button, you need to remove the cover covering the electrical equipment of the hammer drill. Then you should disconnect the contacts of the conductors connected to it and remove the button body from the seat. Here, install the new button, connect the contacts and put everything back together.
The commutator carbon brushes are replaced using an electrical screwdriver. If you unscrew the cover, you will have access to the brushes. Each part is removed one by one from the brush holder slots. Some models differ in the design of the pressing mechanism; usually it is a spiral spring, which must be removed at the time of change.
Attention! Before changing brushes, the hammer drill must be disconnected from the power supply.
There is almost always an option to repair the cartridge. If the wear of individual parts has exceeded the permissible limits or the rubber boot and plastic skirt are damaged, it is more advisable to replace the cartridge completely.
The procedure for changing the cartridge is clear from the procedure for disassembling the hammer drill described just above.
What remains for our client to do? The described procedures for assembling and disassembling hammer drill devices are valid for the barrel variety. But there are several aspects that need to be taken into account when repairing it. Placing the motor vertically at right angles to the impact mechanism somewhat changes the disassembly order. So, to gain access to the gearbox and piston, you need to remove the plastic cover located at the top of the tool casing. This makes it easier to repair the mechanical part of the device if the shock function is lost.
Access to the electrical part of such a hammer drill is achieved after removing the lower casing. And changing the brushes is easier because there are holes along the edges of the glass through which they can simply be removed.
It should be noted that probably professional barrel perforators do not have a drilling mode. Because their purpose is primarily to drill and chisel heavy concrete surfaces, they are equipped with an SDS-max chuck with an 18 mm shank. There is no fundamental difference in the design of the SDS-plus cartridge, but the dimensions are noticeably different. L-shaped hammer drills are recognized as more reliable in operation and belong to the rank of professional tools.
In order for the tool to serve for a long time and properly, it is necessary to follow the usual rules.
- Before starting work, conduct a quick inspection of the technical condition of the tool. Do not ignore signs of malfunction if any are found.
- After completing the work, clean the rotary hammer from dust and debris. It is better to blow it with a stream of air from a vacuum cleaner.
- When transporting in winter, before starting work, give the device more than 20 minutes to “acclimatize” the device. The grease should thaw and become elastic.
- Work in compliance with the operating standards outlined in the technical data sheet of the tool.
The hammer drill should be stored in a dry and warm place. For long-term preservation, it is recommended to pack in a plastic bag and cardboard box. Do not allow water to come into contact with electronic parts, including condensation from the air.
Aware means armed. Knowing the intricacies of the hammer drill mechanism, you can repair the tool independently and in the shortest possible time. But if you look under the casing of the hammer drill in time, clean and lubricate the mechanisms, then it is possible that you will not have to resort to repairs at all. Regular maintenance of the device will help extend its service life.
Source
Why do hammer drill elements need lubrication?
many moving parts inside the hammer drill that experience heavy loads. After applying lubricant, friction is reduced, mechanisms and components last much longer. Why else do you need lubrication? When friction occurs, parts heat up, and lubricants help remove heat. The compositions retain metal dust and particles that are formed as a result of friction, and also protect mechanisms from moisture and dust entering from outside. After the procedure, efficiency increases . The efficiency of work depends on how to lubricate the Makita hammer drill and other models, and with what frequency.
Preventive measures
It is better to prevent breakdown, so it is better to adhere to the following recommendations.
- Change the lubricant twice a year.
- Every six months, preventive inspection of brushes.
- Thorough cleaning every time after work.
- Before work, lubricate the back of the drill or chisel to reduce the load on the striker.
If the hammer drill stops working normally or breaks down, read the instructions and inspect it carefully. Before you start making repairs yourself, really evaluate your capabilities. If you are sure, try to fix it yourself, otherwise, if in doubt, it is better to contact a specialist. And remember that already repaired mechanisms are not subject to warranty and service centers are reluctant to accept them for repairs.
Features of oil selection
One of the main parameters that is taken into account when purchasing a lubricant is the viscosity of the oil. High quality products are usually expensive, but in this case there is no need to save. A hammer drill is an expensive tool, so you should constantly take care of its performance. Typically, the types of lubricants are listed in the instructions, but if there is no information, you can always seek advice from the manager of the service center or retail outlet where the device was purchased. Specialists will select the optimal composition for the hammer drill.
There are also universal compounds that can be used to lubricate different types of drills. In recent years, graphite lubricants have become very popular because they have good viscosity and a high level of quality.
Experienced specialists confirm that many branded mixtures are of much lower quality than mixtures made on the basis of graphite. In addition, they have a fairly affordable price, so many people confidently choose them.
For hammer drills, you should take substances such as grease and lithol. Litol - 25 is a high-quality, long-lasting material that has a low cost. Therefore, it is very popular among power tool owners.
Do not forget that such mixtures can cause slight braking of rotating structures, and can also significantly increase the heating of the tool during operation.
And to lubricate the gearbox, a more liquid composition is required, which must completely cover the contacting parts, filling the free cavities. But if the gearbox has plastic parts, then lubricant
can only be silicone.
The transmission mechanism can also be lubricated with plastic compounds, but not all equipment can function without interruption when using products with a similar consistency.
Thicker mixtures are suitable to reduce tail tip wear. Usually the packaging indicates that they are intended for processing drills.
For cartridges, you can use silicone lubricants. Lubricants are branded, produced by manufacturers of electrical tools, for example, Hitachi or Metabo, as well as AEG, Bosch or Interskol. They can also be produced by enterprises specializing in the production of lubricant mixtures.
The most popular brands are:
- Bosch – produces oils for lubrication of gearboxes and tail attachments;
- Makita – purchased for drills;
- Lubcon Thermoplex – produce products for gearboxes;
- Turmogrease – universal lubricants;
- Nanotek. used for shanks;
- Interskol – optimal for processing drills;
- PRORAB. is a composition used for processing the seats of tail parts;
- Kress – used for lubrication and lubrication of drills.
How to repair a Makita hammer drill, Makita HR 2470 does not turn, the cartridge is leaking, the oil seal is leaking, Repair
Lubricate the chuck and drill shank
This operation is very simple, so its description will be quite short.
Simply take the drilling fluid and add it directly to the chuck. Another option involves applying it to the shank and then installing it in the chuck socket. But no one forbids combining these two methods for reliability.
It is necessary to ensure that the lubricant
was constantly present and added a new one as needed. If this procedure is neglected, the shank will overheat, which will lead either to its separation from the rest of the drill or to flattening. So don't be lazy and add.
READ How to Hammer a Wall with a Hammer
That's all you need to know about the chuck and shank.
As promised, I am attaching at the end a link to a video with the switch disconnected:
This is all the information I have on the issue of lubrication of the hammer drill. I hope it was clear and accessible. With this I say goodbye - see you again!
How to properly lubricate parts?
When it comes to lubricating a hammer drill at home, as a rule, we mean replacing the lubricant on its individual parts yourself. First of all, you should lubricate the gearbox - this mechanism is quite easy to disassemble, but has a complex structure, so all actions must be carried out in a strictly defined order.
First you need to prepare the necessary materials:
- dry clean cloth - rags;
- plumbing tools that are necessary for assembling the gearbox;
- the lubricant itself.
In most cases, world-famous manufacturers such as Bosch and Makita indicate in the instruction manual the entire procedure for disassembling and assembling devices and provide important recommendations. Owners of rotary hammers who are faced with such work for the first time, following these tips, can master all the manipulations quite quickly, spending a minimum of effort.
But if such a guide is not at hand, then you should work according to a certain algorithm.
- The tool must be kept free of dust and dirt.
- When disassembling and subsequently reassembling a drill and hammer drill, you need to remember as accurately as possible the order of arrangement of all functional parts, so as not to confuse them during disassembly. It is better to use video recording.
- All work related to lubrication of parts is carried out only after a certain time after stopping the drill. It must cool down, otherwise the cooled lubricant
can cause interruptions in the operation of the power tool if it comes into contact with hot areas. - After all the basic parts are removed, including the gearbox, they are washed with spindle oil or gasoline, and then thoroughly dried from excess moisture. Particular attention should be paid to the gearbox.
- Each part of the device should be inspected as carefully as possible. In some areas there is no lubricant, which means that there is no need to apply a new compound to this place.
- After applying the composition, the gearbox is carefully reassembled in the reverse order. If this is done correctly, the hammer drill
can be used immediately.
In addition to the gearbox, the drill should also be lubricated. In this case, the tail part of the mechanism, just as in the first case, is washed with gasoline, cleaned and dried, and only then carefully coated with specialized oils.
At the same time, it makes sense to treat the cartridge seal with your own hands; this will significantly increase its service life and also protect it from dust. However, one should not lose sight of the fact that it is lubricated only when the hammer drill
a system with an open type cartridge is installed. If the system is closed, then there is no need for lubrication.
Stator assembly assembly
The stator assembly of the Interskol P-26/800ER hammer drill is no different from the stator assembly of any other hammer drill.
into the stator housing , secured with screws pos. 73 and closed with a diaphragm pos. 72.
The rotor pos. 69 is inserted into mesh with the helical gear of the intermediate shaft.
Installing the brush holder and carbon brushes
Having secured the housing cover, proceed to installing the brush holder pos. 81. Installing the brush holder does not cause any difficulties.
Install carbon brushes, pos. 83, into the brush holder, secure them with spiral pressure springs, pos. 84.
All that remains is to insert the switch button pos. 87, connect the wires to the stator terminals, and hide the wires in the handle of the hammer drill.
Piston assembly
Piston assembly pos. 47 begin by installing a pin, pos. 48, and two rings, pos. 49, on it. The finger acts as a driver from the rolling bearing pos. 60. A firing pin, pos. 45, with a pre-installed sealing ring, pos. 46, is inserted into the piston.
Before inserting the firing pin into the piston, the inner surface of the piston must be checked for roughness. There should be no traces of scratches on the surface.
After lubricating the inner surface of the piston with a thin layer of Tsiatim-221, insert the firing pin inside.
Assembling the housing of the Interskol P-26/800ER rotary hammer
the Interskol hammer drill is completed by installing the stator housing cover pos. 77.
Assembly of Interskol P-26/800ER
Sources:
https://sdelalremont.ru/perforatory-interskol-neispravnosti-i-sposoby-ustraneniya-svoimi-rukami.html https://sdelalremont.ru/sborka-perforatora-interskol.html
Tool Receiver Assembly
In the design of the Interskol P-26/800ER rotary hammer, the working tool is inserted into a special tool receiver and clamped in a chuck.
Should the Hammer be heated and does it need rest? Should I take straight Bochkovo silt?
Details of the keyless chuck and tool receiver of the Interskol P-26/800ER hammer drill
The tool receiver, item 12, is easy to assemble.
The assembled industrial mass assembly, pos. 16, is inserted into the internal part of the receiver. On the industrial mass you must first put on the bushing pos. 15, cuff pos. 14, rubber ring pos. 13. Before assembly, be sure to lubricate the rubber o-ring and the inside of the barrel receiver with Tsiatim-221 lubricant.
The assembled tool receiver is inserted into the barrel, pos. 36.
Intermediate shaft assembly
In Interskol P-26/800ER rotary hammers, the intermediate shaft is a complex assembly.
Assembling the intermediate shaft is not difficult.
First, the components of the rolling bearing opz.60 are assembled. A needle bearing, pos. 61, and a combined gear wheel, pos. 62, are inserted into the bearing.
Details of the shaft of the Interskol P-26/800ER rotary hammer before assembly
The assembled unit is inserted into the housing , pos. 53, while simultaneously installing the piston, pos. 47. Before installation, the rolling bearing driver is inserted into the pin pos. 48.
The installed intermediate shaft is fixed with a bracket pos. 50.
Installing the Retaining Bracket
Basic faults
There are more than a dozen of the most common causes of rotary hammer malfunctions. Breakdowns can be caused by mechanical or electrical problems.
When the motor is running, the following mechanical breakdowns may occur: the drill does not rotate, it does not make impact movements, the drill is not fixed in the chuck or is stuck in it, there are extraneous noises when the equipment is operating.
The following characteristic signs indicate an electrical malfunction: there is no attempt to rotate the electric motor, strong sparks are generated on the electric brushes of the commutator during operation, acrid smoke is emanating from the device or there is a corresponding unpleasant odor.
Makita HR 2450 no shock
If the power tool has finished peeling, you can limit yourself to disassembling the spindle assembly in this order:
- dismantling the mode switch lever - the parts are usually made of polymers and therefore are quite fragile;
- detachment of the boot - the rubber corrugation must be replaced from time to time, as it often comes into contact with destructible materials, wears out, and cracks;
- with a dismountable cartridge, the brushes are first removed; screws are loosened and unscrewed;
- the body is divided into two halves.
Visual inspection in 90% of cases allows you to identify a malfunction and replace the warped/worn part. Before assembly, lubricant is immediately added and replaced.
Source
Trouble-shooting
hands has some advantages. That's it, repairs in a workshop are an expensive pleasure, but it takes a significant amount of time and, thirdly, the breakdown may not be difficult, so fixing it is quite simple and you can soon continue working.
Before starting the repair, the unit needs to be disassembled. Each model has its own disassembly aspects. Alas, as a rule, any model consists of two parts : front and rear halves, connected with screws. Before unscrewing them, you need to remove the cartridge. In some models, the cartridge does not need to be removed.
Impossibility of fixing the working tool in the quick-release chuck
Sometimes a malfunction occurs, which manifests itself in the impossibility of fixing the working element in the quick-release chuck.
Interskol rotary hammers are equipped with two types of chucks: SDS-plus and SDS-max.
The clamping of the working tool shanks is ensured by their special design.
Failure of the clamping device occurs due to wear of the locking ball.
Repair of the Interskol , and specifically its quick-release chuck, consists of replacing the balls and lubricating the drill shanks with a special lubricant. It is recommended to use a specially developed ointment as a lubricant for drill shanks.