In a private home and country house there is always a need to cook something. In order not to contact professionals for small details (and not to pay them), you can buy an inexpensive welding machine and learn it yourself. To acquire these skills, it is recommended to purchase DC welding machines, and in particular, welding inverters. They have small dimensions, weigh little, and with their help you can get a high-quality seam even without much experience. What is equally important, in this category there are good devices at a low price (5-10 thousand rubles). Therefore, welding with an inverter for beginners is the best that the market can offer today.
What is this device and how does it work
The main feature of the described product is that it is capable of converting 220V current into high-frequency oscillations, and then into direct current. In this way, it is possible to achieve high efficiency and not worry about huge energy costs.
Almost all converters operate from a regular household network, and they can also operate at reduced voltage, which is very convenient. It is ideal for beginners, as you can learn how to use it quite quickly. We’ll talk further about how exactly to do this.
We choose, we buy
Table of characteristics for welding with an inverter.
It would be useful to google and read about domestic and foreign manufacturers whose products are offered on the Russian market. These are mainly European and Asian countries.
Equipment from Asia is usually inexpensive and of very decent quality, with the exception, of course, of handicraft fakes.
European inverters are distinguished by qualities with the obligatory adjective “high” in front: high price, high reliability, high quality. There are few Russian devices on the market.
Understand the brand of welding cable and its cross-sectional area. The right choice will help you avoid difficulties with power surges if they occur during welding.
The second thing to do is figure out the availability of service centers around the country. If you live in a city with a population of one million, a service center for a specific product is unlikely to be a problem for you. But if you live in a remote region, this issue will become one of the most important for you.
To be honest, you won’t be able to buy one device. Be sure to buy a welding helmet with a light filter. You need to protect yourself from splashes of molten metal and combustion products.
But the main thing is protection from ultraviolet radiation from a hot arc. The most primitive option is a mask made of plastic and a light filter, which is selected depending on the current strength, lighting and your vision.
A more expensive and much more comfortable option is a mask with a Chameleon-type light filter, which automatically changes its characteristics and can be adjusted to suit the ambient light and the condition of your eyes.
There are many tables on the Internet with data that will help you choose the right filters. It is better to choose them for a number larger or smaller. The best solution would be to check the lighting in the work area and your vision.
Okay, we agree, you don’t have to buy a whole suit made of special fabric. But a canvas apron with gloves is not a whim, but your protection. It is better to choose mittens from split leather. Pay attention to your shoes: be aware that drops of molten metal may fall on your feet.
How to cook using inverter welding - choosing a technique
Before answering this question, it is important to understand whether you really need such a unit for joining metal parts. There are household, semi-professional and professional. An inverter is a machine for using electrodes. We recommend choosing a device for occasional use at home, in the country or in the garage. It’s better to buy an inexpensive one, but we don’t recommend buying very cheap models from little-known brands.
Since this practice is a whole science that is taught in colleges, you should not immediately do a large project such as a workbench or gazebo. It's better to try yourself on scraps. And then try to build a simple thing, for example, a bookshelf.
How does the welding process proceed if welding is done using inverter welding?
When a conductor comes into direct contact with a metal surface, a discharge is generated. It has a high temperature, so the element itself and the processed object begin to melt.
Upon completion of manipulation and cooling, the coating of the rod becomes slag, covering the resulting seam. You can knock off these remains with a hammer.
During operation, the electrical conductor melts. It is necessary to maintain the distance between the elements. This is also called arc length. The desired can be achieved by feeding the conductor into the weld pool area at a constant speed.
Base current
An indicator that, in combination with the peak current, produces a pulsed arc with a certain frequency that can be adjusted. The base current sets the lower limit of the pulse. Used when welding thin sheet metal to prevent overheating, burnout of alloying elements, burns and warping. The base current allows you to keep the weld pool from failure and from burning through. The standard adjustment range is from 5–15 Amps to the maximum value of the welding current of the machine.
This parameter will only be active in AC Pulse and DC Pulse mode, i.e. when welding with a pulsed arc, in other modes this parameter will not work.
Electric welding with an inverter for beginners: let's start with the basics
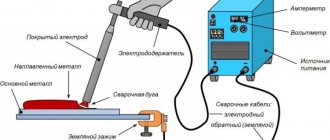
First we need to figure out what we will have to use. The device itself looks like a small box, weighing up to 7 kg. The panel has a power switch, as well as main indicators.
There are also two outputs - the first is a plus, the second is a minus. The master connects cables to them. One of them ends with a special clamp attached to the part. The second is allocated under the electrode and is equipped with a holder. This is such a simple design. After that, all that remains is to figure out how to learn how to properly weld metal using inverter welding - we’ll tell you the basics of working with an inverter for beginners. There is nothing complicated here.
If you are just choosing a device, make sure that the cables are of sufficient length. Their flexibility is also important; this will simplify the work.
Equipment used, equipment and safety rules
Such activities are always associated with electrical voltage, so it is so important to take care of your own safety. The first thing to check is the cables. Visually inspect them and, after making sure that everything is in perfect order, turn on the device. If we see that the cooling fan runs smoothly and does not make noise, then everything is normal.
Consider the weight and stability of the metal structure. There were frequent cases when structures collapsed and crushed workers under their weight. If we are just learning how to weld metal with an inverter, be sure to remember safety precautions.
The welding process is closely related not only to electricity, but also to high temperature. Therefore, take care of your equipment:
- special canvas or canvas mittens;
- mask to protect eyes and face;
- work suit;
- in confined spaces you need a respirator;
- shoes with rubber soles.
The electrodes themselves should be selected in accordance with the type of alloy that will be processed.
Equipment appearance
Here is a list of all sensors and indicators that are displayed on the panel:
- toggle switch to turn the device on and off;
- knobs for determining the required voltage;
- indicators that allow you to understand when the device has overheated, as well as providing information about the power supply;
- two outputs - plus and minus.
You can connect the equipment through a special connector located at the back of the device.
Hazardous factors
Regardless of where welding equipment is operated - indoors or outdoors - there are always dangerous factors that affect both the welder and the people standing nearby. Protective equipment is needed not only by specialists, but also by assistants. It is worth considering, for example, that sparks from electrodes can scatter within a radius of up to five meters. You can catch the reflection of welding (the so-called “bunny”) from a distance of three meters.
There are many reasons that cause accidents and injuries:
- sparks easily burn through all types of fabric, except special ones, and can cause burns;
- the melt easily burns through modern shoes made from artificial materials;
- flammable materials may ignite in the area where sparks fly;
- hot fumes rise from the hot metal, which can injure the skin of the face or eyes;
- sparks can hit exposed skin and cause minor burns;
- Poor cable insulation may result in electric shock;
- if equipment or additional equipment explodes, fires may occur;
- poorly secured structural elements fall to the ground, injuring people;
- When performing welding work at height, the welder may fall.
Chemical and physical factors:
- operating welding equipment generates high levels of noise;
- infrared and ultraviolet radiation;
- when electric arc welding operates, blinding light is emitted;
- when working with metal alloys, lead, zinc, chromium, cadmium and other substances hazardous to the respiratory tract evaporate into the air;
- there is a high-temperature suspension with microinclusions above the bath;
- there is a high probability of thermal effects from a burner or electric arc.
Learning to cook using inverter welding - step-by-step instructions for working with an inverter for dummies
The preparatory stage begins with the acquisition of protective equipment. A welding machine alone is not enough. To take care of your safety, you need to prepare a place to work:
- remove everything unnecessary that may interfere;
- install quality lighting;
- the process should be carried out on a wooden flooring, this will protect you from electric shock.
Then you can proceed. We select electrodes with a diameter from 2 to 5 mm. The housing indicates what the current strength should be in accordance with the selected materials. This step can be skipped if you are using newly purchased items whose quality has not yet been checked. Every beginner can understand how to learn how to properly weld metal with an inverter; just delve into the topic and read the necessary articles for this.
We connect the mass clamp to the fragment that will be welded. In this case, the material itself must be properly processed:
- carefully remove all rust using a file or angle grinder;
- Clean the edges with gasoline to completely remove dirt.
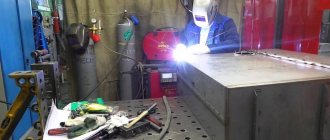
We have covered the basics, now we will talk in detail about how to cook, observing all the necessary measures.
Arc gap control
The arc length is the gap that is formed when the electrode touches a metal surface. There are several variants of this condition.
With a short discharge, not exceeding 1 mm, a convex seam is formed, since the layer is heated over a small area. When, on the contrary, a long one is formed, it is very difficult to achieve stability - the connection is not deep enough.
The ideal option is a constant gap of 2-3 mm, which results in excellent penetration. Understanding how to properly operate an inverter welding machine, you need to delve into any nuances of this process.
How to learn to weld metal with an inverter
Begin training by igniting the arc. To do this, in addition to the apparatus, metal (5-6 mm thick) and an electrode, you will also need a welder’s mask and leggings (thick leather gloves), as well as thick clothing and boots made of thick leather to protect against sparks and scale.
Start work by connecting the welding cables. Then the selected electrode is inserted into the holder (to start, take MP 3 with a diameter of 3 mm - they light easily and cook well). After turning on the power, set the welding current (see table). For an electrode with a diameter of 3 mm, the current is set to 90-120 A. The current can be adjusted during the welding process. If you see that the result is not a roller, but just some disjointed stripes, increase it. If, on the contrary, the metal is very liquid and it is difficult to move the weld pool, reduce it. The settings greatly depend on the device and the selected electrode. So try it, change it. Having set the current, put on a welder’s mask (it will be easier for beginners to work in a chameleon mask), and you can work.
General recommendations for choosing the diameter of the electrode depending on the thickness of the metal
Welding with an inverter for beginners begins with learning how to ignite an arc. There are two methods: tap the tip of the electrode on the part several times or strike it like a match. Both methods work. Whichever is more convenient for you, use it. But for the future, keep in mind that you need to scratch along the seam line so that there are no marks left on the product. To consistently strike an arc, you will have to practice for a while and burn several electrodes.
When the arc lights up without any problems, you can move on and master the movements. This is done by laying rollers on thick metal. On a metal plate, draw a line with chalk that will replace your seam. Then you strike the arc. In the place where it rests, the metal melts and becomes covered with a film of liquid slag. This place is called the weld pool. So you will have to move it along the drawn line. Do this with one of the movements shown in the figure above.
In order for the bath to move, the electrode must be tilted slightly, approximately at an angle of 50-45°. Some have a larger angle, some have less. In general, by tilting the electrode, you change the size (width) of the weld pool. You can experiment: there are a lot of different techniques in welding and the only important thing is that the seam is of high quality, and how you achieve this is your business, especially since you will be working for yourself and for yourself.
There are two main working positions of the electrode: forward and backward. When welding at an angle forward, we get less heat and the seam will be wider. This technique is used when welding thin metals . Thick ones are usually welded at an angle backwards.
Electrode positions for welding and their use
But the angle of inclination is not all the parameters that will have to be maintained. There is also the length of the arc. This is the distance from the tip of the electrode to the surface of the part. The average arc is 2-3 mm, the short one is 1 mm or even right next to each other, the long one is 5 mm or more until it comes off. Practice begins with working on the average length of the arc. Maintain 2-3 mm to metal. Then the seam will be smoother and of better quality: if the gap is too large, the arc begins to jump, the heating of the metal is insufficient, the seam turns out to be smeared, and the connection is unreliable. With a short arc, another problem arises - the seam is too convex due to the fact that the heating zone is too small. This is also not good, since undercuts remain - grooves along the seam on the part - reducing the strength of the connection.
The length of the welding arc and its effect on the quality of the seam
After practicing for some time laying beads using different movements, and when the beads are the same width and the surfacing flakes are approximately the same size, you can try welding the seams. You can read about the types of seams and joints, as well as their preparation, here, or you can watch another lesson, “Welding for Dummies.”
All the basics of welding with an inverter for beginners. All you have left is practice: you need to use more than one electrode for training. Even, maybe, more than one kilogram. When your hand makes all the movements itself, everything will seem completely uncomplicated to you.
To consolidate the acquired knowledge, first try to train your hand a little without an electrode, practicing movements while holding a pencil in your hand. This is also a good option, maybe it will seem more acceptable to you. This video tutorial on welding with an inverter for beginners explains everything very clearly, simply and easily. If there are any uncertainties, please review. You will understand how to cook using inverter welding. Lots of useful information for beginner welders.
And finally, about some features of the operation of welding inverters. They are very afraid of dust, especially metal dust. Therefore, it is advisable not to use an angle grinder near them and carry out regular cleaning with a vacuum cleaner inside (after the warranty period has expired). It is not recommended to use them in the rain or in damp areas. This is especially true for inexpensive household models. Although they have protection against electric shock, it is still better to be safe.
When choosing electrodes, pay attention to the area of their use: they must be suitable for direct current operation. When welding at the highest current or voltage, the operating mode is intermittent. It is indicated for each device in the passport.
What are the types of polarity?
Melting occurs under the active influence of heat emanating from the arc. The process can be carried out in two versions, differing in the type of connection.
Straight polarity means that the electrical conductor is connected to the minus, the surface to be processed to the plus. This allows for a reduction in heat transfer levels. There is also reverse polarity; here, accordingly, the connection completely changes. Our article will help those who want to understand the issue of how to learn how to properly weld a seam using an inverter welding machine for beginners.
How does the conductor feed speed affect
For work to proceed normally, it is important that the required amount of molten metal enters the weld pool. If there is too little of it, undercutting occurs.
If you move the electrode very quickly, the arc will not be able to produce enough power to heat the alloy. This leads to the formation of a shallow adhesion. If you move the rod very slowly, there will be overheating, and the risk of burning the surface increases.
How does current influence
The pace of movement and the set current influence the weld simultaneously. The higher the voltage, the greater the depth of penetration. Accordingly, in this case, it is possible to increase the speed of movement of the electrode element through the material. If you combine the optimal wiring speed and current strength, you get an even connection of the required penetration depth.
We will help everyone understand how to use inverter welding correctly. All you need to do is carefully study the information received and put everything into practice.
Design and advantages of inverter welding machines
Before buying inverter-type welding equipment, it is advisable to familiarize yourself with its structure and strengths.
The inverter design consists of 4 key parts:
- Transformer. In inverter-type models, this element is no larger in size than a cigarette pack. It is designed to reduce high frequency alternating voltage.
- High frequency rectifier. This element equalizes the alternating current coming from the general network. After it, the current enters the high-frequency filter and exits in a constant flow.
- Filter. It consists of a capacitor and a choke. Designed to smooth out rectified current.
- Rectifier. A diode that receives the initial current flow from the general network.
All elements are placed in a metal or plastic case on which the device control system is located.
Inverter advantages:
- The efficiency of such devices can reach 90%. Almost all the energy that the equipment consumes goes to creating and maintaining the arc.
- Power consumption is lower than models with a larger transformer.
- Small dimensions. Low weight. Thanks to this, the welding machine can be used in hard-to-reach places.
- Minimum amount of molten metal splashes during operation.
- Minimum load level on the general electrical system.
- Possibility to select electrodes of the required characteristics.
The inverter is easy to work with. For a person without experience, it is enough to try welding parts together 2-3 times in order to understand how to make a seam correctly.
Inverter welding machine
Processing of thin materials
When working at home, preference is given to small details. In this case, even minor mistakes should not be made, as they will instantly lead to burning of the surface. To achieve a perfectly even seam, you first need to practice on thicker metal.
- Welding operations should be carried out with a set current value close to the minimum.
- Create the seam at an angle forward.
- One of the main problems when joining thin parts is their deformation. Make sure that the canvas does not overheat.
Welding thin galvanized steel and its features
To weld galvanized steel, you must first remove the zinc layer from the edge of the metals being joined. This layer is removed manually or by using a machine that performs sanding.
The edge of the metal is also burned out by welding, but this is done very carefully. Zinc tends to emit very toxic fumes when welded, and if they are inhaled, they can cause serious harm to the body. It is recommended to carry out all work in the presence of a hood, or to weld surfaces in the fresh air.
Step-by-step instructions for welding with an inverter
The work process begins with ignition of the arc. You can do this in two ways:
- Strike - this method is somewhat reminiscent of lighting a match. By creating tangential movements, launch is provoked. The principle is to touch the rod to the alloy, smoothly move it across the surface and lift it a short distance.
- Tapping - the principle is similar here, but the difference is that the element is not moved along the plane, but only touches the material and is returned to its original position.
Basics of welding with an inverter - how to weld with a welding machine, video lessons for beginners
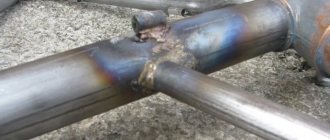
Welding of elements
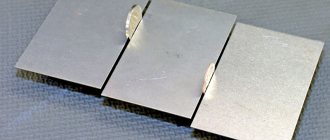
Having confidently mastered the basics of the welding process, you can move on to connecting elements into a single structure. And here, too, there are subtleties associated with the reaction of the metal to such an impact.
First of all, you need to correctly assess the length of the seam and ensure that it does not pull the parts being connected at the joints. To do this, they must be fixed in a given position using clamps or other methods. And to secure the fixation, they are secured with transverse seams in several places. And only then are they scalded.
The welding order depends on the length of the joint. Only short seams up to 300 mm long can be welded in one direction and in one pass. If this distance is greater, it is necessary to compensate for the resulting stresses by applying stitches in small sections.
Seam patterns depending on length
When the work is finished, not very beautiful seams can be carefully cut off and sanded with a grinder.
Common mistakes made by newbies
Always make sure that consumables are completely dried and, if possible, calcined. The fact is that it will be extremely difficult for an inexperienced person to ignite an arc using unheated electrical conductors. First, read in detail about how to properly weld and operate an inverter welder - for beginners, it is recommended to use a Resanta-type inverter welding machine when learning. First theory, then practice.
Another common mistake is choosing a unit that is not easy to handle. There are devices whose control system requires in-depth knowledge. A novice master should start with the simplest models.
A beginner should only use masks in which the light filter is adjusted automatically. The problem is that products without this function must be configured again each time, and without the proper experience, you can make mistakes and get an eye burn.
M. Gladwell's “10,000 hours” rule
Of course, you won’t succeed in everything right away. Take it calmly. When learning to weld metal, it is recommended to follow the 10,000 hour rule developed by Malcolm Gladwell. To achieve a level of unsurpassed skill, you need to devote that much time to your craft. Yes, for most of us this is very far away. Here are the intermediate steps:
- one thousand hours to master level;
- one hundred hours to the professional level;
- and at least ten hours to master the basics - they look quite realistic!
You are at the very beginning of your journey. Train, study, and with every hour you spend studying, your skills in metal welding will become stronger. Good luck!
Let's sum it up
The converter is a fairly simple welding apparatus in its design; it can also be used at home. This is the best option. A video for beginners and rules for working with an inverter will help you understand how to properly weld metal using inverter welding.
You can achieve the desired result in a short time. Don’t forget to prepare your work area, read about safety precautions and practice a little, following the methods described in the article. If you need additional advice from professionals, contact us, we sell band saw machines and are ready to provide assistance in selecting equipment, contact us by phone.
Preparation of the workplace
Before starting work, think about what, how and in what order to do so that it is safe for you and others. Before you start work, you need to prepare your workplace:
- Check the completeness of the equipment: welding cables, the condition of the insulation of wires, power supply cables from the network to the inverter, the device itself;
- remove foreign objects;
If a violation of the integrity of the insulation of wires, power supply cables, as well as a violation of the integrity of the connectors for connecting them to the network is detected, you cannot begin work until the faults are eliminated!
- Prepare the parts to be welded;
- check whether there is sufficient ventilation of the workplace;
- check whether the work area is sufficiently illuminated; if there is insufficient natural light through window openings, provide additional lighting by installing lamps;
- prepare a place where you will sit while working;
- prepare to inspect the necessary auxiliary tools;
- check the electric grinder (electrical safety requirements are the same as indicated above);
- prepare the necessary abrasive wheels (grinding, cutting), the wheels must be marked, there should be no cracks or chips on them;
- Check the availability of fire extinguishing means (fire extinguisher, sand) at the workplace.
After completing these routine but mandatory activities, you can begin preparing the parts to be welded.