A bearing is a small element of technical equipment of a car. It requires replacement at a certain interval, and all repair work is carried out according to regulations, otherwise it will be difficult to decide how to remove the bearing and replace it on time. When making repairs yourself, you can encounter a lot of difficulties, thinking not only how to remove the bearing, but also first unscrew this or that nut. There are cases when the fastenings do not give in, and you have to use force or additional leverage. But in everything you need to have moderation, not to damage parts that will be difficult to find later, and to adapt them to a car of a certain brand.
Why do you need to change bearings?
- Maximum or average bearing wear;
- Finding an element under prolonged pressure during aggressive driving;
- Impaired balancing of the chassis system, so an urgent decision is made on how to remove the bearing and replace it with a new one;
- The appearance of atypical sounds, creaks when the car is moving, impacts of the cardan on the lower body of the vehicle;
- Detection of wheel play will also force the driver to think about how to remove the bearing from the shaft, carefully install new parts in their seats and return safe maneuverability to the car;
Replacing the bearing
The main purpose of the bearing is to reduce friction and protect mechanisms from rapid wear. There is a wide variety of bearings. They differ in purpose, size and location. The part is subject to wear and therefore requires timely replacement. But in solving the problem of how to remove a wheel bearing, a lot of difficulties arise, so experienced craftsmen and amateurs have come up with reliable ways to remove the bearing. Let's look at some of them.
Stator protection with thermal relay
During operation, the electric motor may consume increased current from the network and experience strong heating. The reasons may be different, for example, too much load on the shaft, frequent turning on and off of the motor, increased ambient temperature. Such abnormal operating conditions can lead to overheating of the stator windings and their failure. To prevent damage to the electric motor, one or two bimetallic thermal relays are installed in the stator system - these are thermal switches called klixons.
Klixon thermal switch
When the stator temperature rises above the set value, the bimetallic klixon contact opens. The thermal switch opens the power supply circuit to the control coil of the power contactor, which supplies voltage to the electric motor. The contactor disconnects the electric motor from the power supply. Further switching on of the contactor and, therefore, the electric motor is possible only after cooling the stator windings and closing the bimetallic pair of the thermal switch.
Method one, how to dismantle the bearing
There are a large number of special devices that, even at the factory, received a single purpose - to quickly dismantle the bearing, without requiring power investments and financial costs from the auto mechanic or the car owner. Using special tools to remove the bearing from the shaft is an excellent and easiest solution to carry out repairs. You can save yourself from unforeseen situations. And to do this you just need to follow the instructions. Typically, a standard puller is a threaded shaft that is screwed onto special auxiliary holders. They act as fasteners. Using such a simple puller, the bearing is fixed and removed. Everything ingenious is simple!
Bearing puller
Stages of working with the puller
- We take a puller and bring it to the worn bearing.
- We clamp the bearing with a puller.
- We begin with moderate rotational movements to “pull” the bearing from its seat. Remember that movements should be progressive, without much pressure, so as not to damage the elements of a coherent system.
Thus, the question of how to remove the wheel bearing in car services is resolved. The use of special tools and auxiliary equipment makes the work easier, reduces the cost and speeds up the repair process.
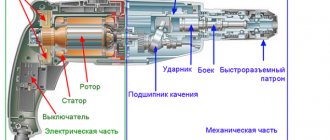
The procedure for disassembling the hammer drill
Place the hammer drill on a clean surface.
When disassembling the mechanical part of a Makita 2450 or Makita 2470 rotary hammer, you should always remove the mode switch handle.
At the beginning of work, the handle is set to the “Impact” mode (far right position clockwise). Use a screwdriver to pry up the latch on the handle and remove it. After removing the latch, the handle is moved to the extreme left position, into the “Drilling” mode. The handle, clamped with your fingers, is removed from the grooves of the body.
Method two, how to dismantle a bearing using heat
Apply the effective laws of physics associated with heating metal. After all, it is 100% known that metal expands at high temperatures, so there is a possibility that the bearing will jump out of its seat on its own, and there will be no need to use physical force, which is sometimes destructive to the entire system.
Tool for mounting and dismounting bearings
Important to remember! If you use this method for the first time, you may not calculate the temperature conditions or your hand will tremble, and as a result, scale may appear along the edge of the nest. And now it will block the path of the bearing. It is recommended to knock off the scale first, only then continue using the second method.
Prices for repairing an electric motor armature
| Power, kWt) | Rotation speed, rpm | |||
| 3000 | 1500 | 1000 | 750 | |
| Up to 1.5 | 2740 | 2806 | 3417 | 4057 |
| 2.2 | 3090 | 3245 | 4154 | 4897 |
| 3 | 3642 | 3901 | 4973 | 5179 |
| 4 | 5012 | 4652 | 5413 | 6804 |
| 5.5 | 5296 | 5301 | 5978 | 7511 |
| 7.5 | 6630 | 6919 | 7312 | 11021 |
| 11 | 8139 | 8147 | 9937 | 13182 |
| 15 | 12088 | 12049 | 11737 | 14803 |
| 18,5 | 13001 | 13345 | 15217 | 24450 |
| 22 | 15057 | 15805 | 23408 | 25522 |
| 30 | 17648 | 18202 | 25857 | 29275 |
| 37 | 23803 | 25949 | 30677 | 40080 |
| 45 | 29055 | 28737 | 38389 | 48070 |
| 55 | 34546 | 32811 | 41481 | 60759 |
| 75 | 44670 | 48812 | 64472 | 82899 |
| 90 | 47893 | 51078 | 78166 | 99898 |
| 110 | 67202 | 73052 | 95759 | 122517 |
| 132 | 80848 | 87962 | 114110 | 147423 |
| 160 | 98012 | 106439 | 138740 | 179116 |
| 200 | 123101 | 132548 | 173924 | ———- |
| 250 | 154120 | 167435 | ———- | ——— |
| 320 | 237156 | ————— | ———- | ———— |
| kW | 3000 rpm | 1500 rpm | 1000 rpm | 750 rpm |
COEFFICIENTS USED IN THE CALCULATION:
- Single-phase - 1.5;
- Foreign production -1.5;
- Explosion-proof – 1.3;
- Urgent – 1.5;
- Two-speed – 1.5; Two-speed with independent windings – 2.
- Old model type AO, A, VAO -1.5
The third way to remove the bearing
If it is not possible to use the first method when deciding how to remove the bearing with a puller, then use the third method. It will require skill and the use of force and auxiliary tools. What is the procedure for action?
- Study the features of the procedure, how to remove a bearing, evaluate your capabilities and level of skills.
- Select the necessary tools: a sledgehammer with a soft tip, wooden stands, a vice.
- Fix the removable shaft in a vice and use a hammer and wooden blocks to knock the shaft out in the opposite direction. Be careful not to damage the entire structure of the part with an awkward blow, because it can be used in the future.
Thus, the third method is used if the bearing is completely worn out and does not come out of its seat, so force must be applied. There are times when it is difficult to solve the problem of how to remove the rear bearings from the shaft, so you simply have to cut them out. This radical method is resorted to by experienced craftsmen who have received a completely worn-out chassis system for repair, and there is no other way to get a bearing to replace it. Beginners are not recommended to use the third method, because they simply will not cope and can damage other elements of the chassis system. In this case, a simple bearing replacement will cost a pretty penny.
Read also: DIY philips steam generator repair
Which way is better
There is no definite answer, because every repair is a special case. It all depends on the age of the car, the wisdom of the vehicle owner, and his responsibility for the technical condition of the car. If a person bought a car to ride and then sell the “tortured steel horse”, then the auto mechanic will have to work on such a car for quite a long time, almost all components of the system will be worn out. In this case, the second or third option is suitable. Ideal car repairs are carried out in a short time and do not require additional financial investments. The first method - the most professional and effective - is used by a car mechanic and will very quickly return the car to operation.
Thus, we have outlined three main ways to remove a bearing, but each craftsman chooses the most optimal one, that is, the one that is most suitable in a particular case. Good luck to everyone with their DIY repairs. If you are not sure, then contact a specialist.
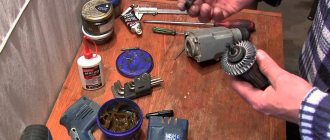
Today, many home craftsmen and professional craftsmen have a whole arsenal of power tools that help them cope with household and repair and construction tasks. Hammers, jigsaws, grinders, drills - all of them significantly simplify and speed up work. However, it happens that a power tool breaks down. Don't rush and throw it in the trash because of this. Due to intensive use, parts wear out, and therefore the equipment cannot operate in normal mode. If you know how to remove the bearing from the armature of a power tool, you can extend the life of your “assistant”. Timely replacement and lubrication of parts allows you to operate the device for a longer time.
The main task of a power tool motor is rotation. The armature is the important part of the device that causes the working mechanism to rotate. The service life of the part depends on the power and rotation speed, as well as the activity of using the equipment. To reduce friction during the movement of parts, bearings are needed. They ensure smooth rotation and improve the running of the working mechanism of the power tool. If you take care of the bearings and lubricate them in a timely manner, their service life increases several times.
Rewinding motors of drills and grinders
To begin with, the device should be disassembled and the engine inspected. The winding should not be removed immediately: first of all, you need to find out the number of its turns. This is not difficult to do: just separate the top of the coils and cut it off. After this, you need to burn it with a burner. Now you can count the number of its turns.
If you decide to rewind the rotor yourself, then you do not need to remove the collector. It is worth examining it and measuring the value of its resistance in relation to the body (this value should not be less than 0.2 Mohm). The collector should be cleaned of what remains of the previous winding and grooves should be cut in its contact part. This is necessary in order to then insert the ends of the coils into these places and seal them.
After cleaning, the anchor must be sleeved. The sleeves are made of electrical type cardboard, 0.2 millimeters thick, after which they are inserted into the anchor grooves. Only after completing these procedures can you begin to rewind the motor coils.
If it is decided to use circular winding, then the coil should be laid in a sequential manner until all the slots are filled. The laying direction should be chosen in the direction opposite to the clock hand (if the anchor lies with the shaft towards the winder). This type of installation is called “right-hand installation”.
In the collector area, the winding is fastened with a bandage. This should be done using a thick thread of cotton fabric, laid in several tight turns and tied tightly. There is no need to use nylon threads, since nylon can easily melt during operation of the device.
After this, you need to check the product for the absence of interturn short circuits and breaks in the winding. This is best done before the product goes into impregnation, because before impregnation it is much easier to change the winding on the armature.
To secure the resulting winding, you need to impregnate it. This can be done using regular epoxy, designed to be hot cured with the addition of a plasticizer. If this procedure is performed at home, then any varnish can be used. When the impregnation is completed and dried, it is necessary to perform a grooving. How you do this will determine how much the armature will spark. The amount of beating should not be more than 5 hundredths of a millimeter, and the cutter must be properly sharpened to work with copper. After completing all these procedures, you need to re-check the product for short circuits.
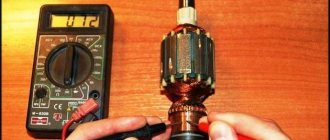
How to remove a bearing from an armature to check its functionality?
The condition of the bearing on the motor of a power tool must be given due attention. When it wears above the permissible limit, overheating occurs and the motor begins to operate noisily. If you do not remove the bearing from the armature in time, then in a neglected state, when rotating, the stationary and moving parts will begin to touch each other. And this, in turn, threatens serious damage to the electric motor. This will require replacement of the rotor or armature. Checking bearings is quite simple. To do this, you need to install the engine on a hard surface, place your hand on top of it and rotate the shaft. The rotor should move freely and not jam. If you hear scratching sounds or feel uneven rotation, this will be the first sign that you need to remove the bearing from the armature and repair the problem.
Any bearing has play, that is, gaps. Their presence is quite acceptable, but it is important that the indicators do not go beyond acceptable limits. It is necessary to check the play:
- radial, or longitudinal . To do this, you need to place the engine on a hard surface and try to tilt the shaft in different directions with your hand. The amount of offset depends on the size of the part. For household models of power tools, deviations should be barely noticeable;
- axial _ The check in this case is simpler. You need to grab the shaft with your hand and pull it towards you or push the rotor in the opposite direction. In motors of household appliances, deviations should not exceed 3 mm. The closer this indicator is to zero, the better.
If during disassembly of the electric motor you notice traces of friction of the parts, it means that the bearings have worn out. It is necessary to immediately remove the bearing from the armature and replace spare parts. This will avoid negative consequences such as engine breakdown or complete failure of the tool.
We diagnose problems
When you notice that the tool is not operating normally, unplug it and check visually. Did you find any signs of trouble? We will disassemble the instrument and find the reasons for the breakdown.
If the engine does not start, the power cord may be broken. Carefully inspect the wire responsible for connecting to the electrical network. If it is damaged, broken, or melted, it must be replaced. An undamaged wire will not heat up.
To do an open circuit test, a very useful tool is a multimeter. Use it also for winding ringing.
Almost all breakdowns in a hammer drill are divided into two types:
1. Mechanical failure.
2. Electrical fault.
The mechanical part often has the following problems:
- the crown cannot be pulled out (it is jammed);
- the drill stops hammering;
- the rotation of the drill has stopped;
- the chisel falls out of the chuck;
- you hear previously absent sounds in the middle of the device, and a strong vibration is also felt.
Electrical component failures:
- the engine is turned on, but there is no rotation;
- commutator brushes emit sparks;
- you feel an unpleasant odor of combustion products in the insulation;
- started working with the tool - smoke began to appear.
To determine the location of the malfunction, it is necessary to disassemble the hammer drill.
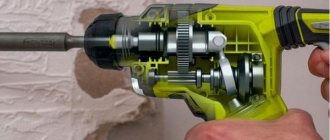
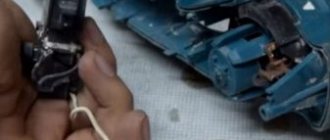
How to remove the bearing from the armature of an angle grinder?
Today, home and professional craftsmen use several methods to solve this problem. If it becomes necessary to remove the bearing from the armature of an angle grinder or other tool, this can be done using the following devices:
- Pullers . These are special devices that allow you to easily and safely remove bearings of different sizes from the angle grinder’s armature. Using pullers requires virtually no physical force, even if the bearing is tightly seated. Thanks to the centering mechanism, simultaneous installation of the device's grips is ensured. It can be used in any position. Before removing the bearing, you need to clean the armature shaft of the angle grinder from old grease, chips, sand, so that nothing interferes with removing the part. The centering mechanism allows the puller to precisely occupy the seat. If the bearing is intact, and the dismantling process is carried out for inspection, it should be pulled out by the inner ring so as not to damage it. For large armature shafts, grinders use massive pullers with three or four gripping arms, and for small ones, devices with replaceable plates or strips are suitable.
- Hammers, chisels, wrenches and other improvised tools . In this case, in order to remove the bearing from the armature of the angle grinder, it is heated with gas, compressed with a vice, ground off, chopped and many other operations are performed. These methods, of course, can be effective, but there is a high risk that the part’s seat will be mechanically damaged. And often the bearing itself, after such manipulations without a puller, will be unsuitable for further use. In addition, the performer may be injured due to pieces of the clip getting into the face, eyes or head, which fly apart after impacts.
Read also: Charger circuit with desulfation
As practice shows, pullers are more effective in this situation. They allow you to quickly, easily and without much risk remove the bearing from the armature of a power tool and inspect or replace parts. If you have to periodically carry out such operations, you should acquire such a useful device. The use of improvised devices is only permissible if you have experience in repairing power tools and urgent replacement of the part is required.
Slip of an asynchronous motor. Rotor speed
A distinctive feature of an asynchronous motor is that the rotor speed n2 is less than the synchronous speed of the stator magnetic field n1.
This is explained by the fact that the EMF in the rotor winding rods is induced only when the rotation speed n2 is unequal, where s is the slip of the asynchronous electric motor, n1 is the rotation frequency of the stator magnetic field, rpm, n2 is the rotor rotation speed, rpm,
Let us consider the case when the rotor rotation frequency coincides with the rotation frequency of the stator magnetic field. In this case, the relative magnetic field of the rotor will be constant, thus no EMF, and therefore no current, will be created in the rotor rods. This means that the force acting on the rotor will be zero. This will slow down the rotor. After which an alternating magnetic field will again act on the rotor rods, thus the induced current and force will increase. In reality, the rotor of an asynchronous electric motor will never reach the rotation speed of the stator magnetic field. The rotor will rotate at a certain speed which is slightly less than the synchronous speed.
The slip of an asynchronous motor can vary in the range from 0 to 1, i.e. 0-100%. If s~0, then this corresponds to the idle mode, when the engine rotor experiences practically no counteracting torque; if s=1 - short circuit mode, in which the motor rotor is stationary (n2 = 0). Slip depends on the mechanical load on the motor shaft and increases with its growth.
The slip corresponding to the rated load of the motor is called rated slip. For low and medium power asynchronous motors, the rated slip varies from 8% to 2%.
Energy conversion
An asynchronous motor converts electrical energy supplied to the stator windings into mechanical energy (rotation of the rotor shaft). But the input and output power are not equal to each other since energy losses occur during conversion: friction, heating, eddy currents and hysteresis losses. This energy is dissipated as heat. Therefore, an asynchronous electric motor has a fan for cooling.