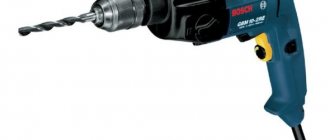
The drill acquired its modern appearance in the middle of the second decade of the last century, when two mechanics from Maryland, USA, decided to give it the appearance of a pistol with a start button instead of a trigger. Today this tool occupies a leading place in any construction; many different attachments make it universal and indispensable. But many users are still not aware of how to use a drill correctly - this article will help you find the answer.
Violations of work rules
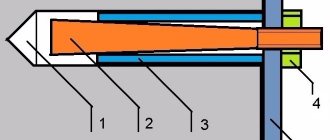
Safe drilling requires adherence to certain rules, failure to comply with them may result in injury or damage to the tool. The drill chuck is in greatest danger, taking on the main load when in contact with the surface. To avoid unpleasant consequences, it is not recommended to sharply change the drilling angle. It is also necessary to limit the applied force on the drill whose drill bit is in the process of drilling. Excessive load may cause the drill to break or jam in the chuck. To machine heavy-duty surfaces, you must use drills designed for this type of work.
Purposes of use
The main purpose of any drill is to drill holes in various materials, so all calculations by the developers of new models of this practical tool are aimed at improving the quality of drilling . The tool has several speeds; for this, a gearbox is used that connects the electric motor to the working shaft. How a gearbox works: by changing the gear ratio of the gearbox, we increase or decrease the rotation speed of the cutting tool.
Modern drills have 2 operating modes.
- Simple drilling is used when working with wood and tiles.
- Impact drilling is used when drilling particularly durable materials: walls made of stone or brick, concrete structures, thick metal.
For such drilling, special drills are used that have carbide brazing at the end. To make the drilling process faster, a force of up to 15 kg must be applied to the tool body.
Service station mechanics often use simple drills for high-quality polishing of a car or after painting a car, so that the paint looks impressive. Polishing various surfaces with a drill is also performed during home repairs.
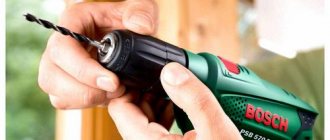
Replacing the cutting tool
The “tail” of the screwdriver drill is fixed in the chuck. It comes in different sizes, as do attachments. If the cutting tool is installed incorrectly, the screwdriver can cause damage to the work process and harm to health. For example, due to the “wrong” drill, holes of different sizes may result with a damaged surface. A sharp element flying out of the cartridge will cause serious injury.
Most modern screwdrivers have jaw chucks. They consist of a cylindrical body, as well as a sleeve and cams. When the sleeve rotates clockwise, the cams simultaneously press the drill.
The process of replacing it is simple, but has a number of individual features. The whole process can be described as follows:
- it is necessary to select the necessary attachment (bit) for the drill;
- then you need to take the cutting tool and install it in the center of the chuck (between the open “cams”);
- after this, it should be secured by turning the sleeve clockwise (with a key-type cartridge, the key is installed in the recess);
- twist the sleeve until the nozzle is secured.
Changing a drill is easy, but first you need to pull out the previous one. There are the following options for the development of the situation:
- standard removal of the drill (the chuck is not damaged);
- pulling out the drill in the absence of a key;
- removing a stuck cutting element.
If the screwdriver is working properly, there should be no problems when replacing its working tool - the operation is elementary. To do this, you need to take a key, which is designed to loosen the cartridge, and insert it into the recess. Turn counterclockwise. Unwinding is carried out due to special teeth that are found on objects. There is also another option for removing the drill. To do this, turn on the reverse rotation mode on the screwdriver, hold the outer body of the chuck and press the “start” button. This will allow the drill to come out easily.
If you do not have a special key, the drill can be removed using a Phillips screwdriver or a nail. It must be inserted into the recess on the cartridge and fix its half. We twist the opposite part of the cartridge by hand. However, if such unwinding does not bring results, then we take a gas wrench or a vice - these tools will help increase the rotation of the cartridge. If the previous options for pulling out the drill failed, then you should resort to “heavy artillery.” In some cases, external damage to the drill makes it difficult to get out. In this situation, it is necessary to relax the “fists” using gas wrenches and a vice. We completely clamp the cartridge with the keys and rotate (unscrew).
A radical option in the most hopeless situation would be to twist the cartridge from a screwdriver. To do this, you need to squeeze it in a vice and forcefully knock out the cutting tool from the inside using a punch. Naturally, after such a procedure, the screwdriver should be taken for repair. To summarize, it is worth noting that the procedure for inserting a drill into a screwdriver is quite simple and even someone who has never done this can handle it. The main thing in this process is to follow the recommendations.
To learn how to insert a drill into a screwdriver, see the following video.
Why does the drill fall out?
The main reasons for a cutting element falling out of a screwdriver include insufficient or incorrect tightening of the chuck, excessive contamination of the clamping jaws with dirt or dust, as well as their natural wear. When loaded, the fastening weakens, the nozzle begins to vibrate violently, and often falls out. In the latter case, you will need to replace the old equipment holder with a new one.
In the key chuck, you need to tighten the drill with a key evenly in each of the 3 grooves, otherwise the holder will gradually unwind, which will lead to the cutting element falling out. If you cannot tighten it well, it is recommended to lubricate the cartridge with a special liquid.
Prices in online stores
What to do if the key is lost?
If the key is missing, removing the drill will be quite difficult. The easiest option is to deal with the problem with brute force. The parts of the clamping device are held by the right and left hands and rotated in opposite directions. However, if the chuck is tightened too tightly or the drill has been used for a long time, it is unlikely that you will be able to unscrew the thread.
To enhance the applied impact, use various tools or homemade devices. Here are some ways:
Experienced craftsmen loosen the cartridge with several tangential blows with the edge of the right palm. The drill is held with the left hand in a position with the drill facing away from you. The disadvantage of this method is that if you are not used to it, you can injure your palm. And even with a tightly tightened (and even more so misaligned or jammed) mechanism, this is not a way to deal with it.
Select a metal shaft whose diameter allows it to be inserted into the hole on the chuck. For this purpose, you can use a nail, an old drill, or a hairpin. The main thing is that the metal is strong enough and does not bend from the applied force. The screwdriver is inserted into the slot of the cartridge and acts as a lever (the support goes to the shaft). It is enough to slightly loosen the thread, and you can pull out the drill by unscrewing the mechanism with your hands.
The cartridge is clamped in a vice or held tightly with a gas wrench. The shaft is inserted into the hole, and then, applying muscular force, the mechanism is unscrewed or tightened.
The effectiveness of the described folk methods is significantly less than when using a factory turntable. But it is possible to tighten or loosen the locking mechanism once or twice in this way. After finishing the work, you need to purchase a new key from the store.
Drilling different materials
In order to drill a metal surface efficiently and quickly, you need to choose the right drill - the sharpening of the cutting edge differs significantly, as does the grade of steel from which the cutting tool is made. When working, you need to set the speed to low, and the pressure should be strong, but such that the drill does not break. The location of the proposed drilling is marked with a mechanic's core. It is necessary to make a small recess so that the drill firmly clings to the metal and does not “walk” along its surface.
When drilling concrete or brick, you must turn on the impact mode and be sure to use a respirator, because there will be a lot of dust.
In order to drill through the tiles, some craftsmen use a thin wooden plank. We mark the location of the hole on the tile, then place a wooden spacer and carefully drill so that the delicate surface does not crack. Using this method, you can drill tiles in the bathroom or kitchen; the drill is set to maximum speed.
When you need to make large holes in wood, you use drills with a thicker diameter or special attachments. Some specialists use a powerful, but low-speed (no more than 600 rpm) drill to tighten screw piles in their garden plots. Installation is carried out by gradual pressing into the ground with simultaneous screwing of a pre-assembled pile structure, using special nut heads of various diameters.
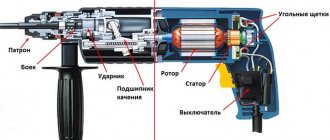
Why are sparks in a drill dangerous?
An electric drill, like any other power tool, requires systematic maintenance. Spare parts wear out during operation and the lubricant dries out.
Drill brushes require regular replacement. One of the manifestations of the problem is that the electric motor does not work at normal voltage in the network. A bright signal is the formation of a circular fire on the collector. The spectacle is beautiful, but dangerous. In order not to ruin the anchor of the drill, they are changed. It is advisable to buy original ones, not Chinese ones. With them the tool will last much longer.
Photo: brushes for electric drill
Graphite brushes for drill
The design of the drill allows you to replace the brushes yourself. There are models in which there are installation windows for brushes on the body. Replacement is simple:
- The plugs are unscrewed from the installation windows.
- Remove worn brushes.
- New brushes are installed.
- Screw in the plugs.
Other models require minimal disassembly of the drill:
- Remove all screws on the housing. Remove the cover. It is more convenient to leave the screws in their “native” places.
- Take out the brush holders and remove the worn brushes from them.
- Insert new brushes, pushing the spring firmly into place.
- Insert the brush holders into place, tighten the electrical contact of the supply wire well.
- Close the housing cover and tighten the screws.
How to release a double-sleeve chuck
Unlike a key cartridge, this type of cartridge does not have teeth and, accordingly, a stop. Its rings are relatively smooth. In this case, the ideal solution is a removable “magazine” holder, which often comes complete with modern drills. You will also need a hammer:
- Use the holder to grasp the upper coupling (ring) closest to the drill and fix it as securely as possible.
- Clamp the drill with a vice, clamp, in your hands or between your knees.
- Strike the “magazine” handle forcefully in the direction in which the upper coupling normally rotates.
One blow is enough - the ring moves and the drill is released quite easily. To make sliding easier, it is permissible to drop a little oil or grease between the chuck jaws or under the clutch.
Existing types of fastening
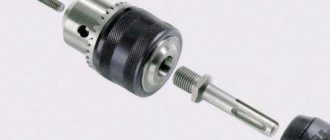
The chuck is attached to the shaft of any drill, screwdriver or hammer drill in two ways - using a threaded connection or on a cone. A variation of the threaded connection is the use of an additional locking screw.
Threaded fastening means that an identical thread is made on the drill shaft and on the internal channel - metric or inch. Consequently, in this case, during repairs, the question is raised of how to unscrew the cartridge. The type of thread and its main parameters are marked on the body. For example, the designation 1.5-15M13x1.2 is stamped on the body, which means the following:
The principle of removing the drill chuck.
- 1.5 and 15 – minimum and maximum diameter of the drill shank in mm;
- M13 – metric thread with a diameter of 13 mm;
- 1.2 – thread pitch.
If an inch thread is used, then the designation UNF is entered, and the diameter is indicated in inches (for example, 1/2). When replacing a cartridge, be sure to check that the markings match the mounting dimensions. Modern drills mostly have inch threads, which meets international standards and expands the possibilities of interchangeability.
To ensure secure fastening to the shaft, a locking screw is installed inside the device. This screw has a left-hand thread, i.e. In order to unscrew it, you need to twist it clockwise.
The second method of attaching the chuck to the drill shaft is based on the use of a Morse taper. In this case, the end of the motor shaft is made in the form of a cone. The internal channel at the bottom end has a similar conical part. The cartridge is simply pressed onto the shaft cone with force. The marking of such elements has several meanings: B10, B12, B16 and B18, where B means the use of a Morse taper, and the numbers indicate the maximum diameter of the drill shank that can be fixed in this chuck. This method of fastening is quite common, especially in screwdrivers.
Drilling various holes
Sometimes during repairs there is a need to drill holes at different angles and in different planes; this can be done in the following ways.
Vertical and horizontal planes:
- pre-mark the drilling location;
- fix the drill in the chuck of the product;
- bring the drill to the drilling site;
- smoothly press the button and lightly press the device body;
- Using the intended hole, make sure that the drill is in the desired plane, then continue drilling;
- pull out the drill without turning off the tool;
- wait until the rotating cartridge stops;
- put the drill aside.
When you need to drill a perpendicular hole with a drill, and the 90-degree angle must be perfect, you should use a special clamp. The tool is fixed strictly vertically - this is suitable for novice craftsmen. For experienced home craftsmen, an original method is suitable:
- Place an old CD in the drilling area;
- We align the cutting tool so that its visible part completely coincides with the reflection in the mirror surface of the disk;
- We drill a hole that will be perpendicular without any angle gauges.
When it is necessary to drill an exact hole at an angle, you can use the stand of the original design, shown in the photo below. Using it is simple: tighten the clamps at the desired angle, insert the drill and drill any holes.
Preparing for work
Proper preparation should be made before starting work. To determine whether a tool is ready to perform tasks, there are several conditions:
- When the drill is started using the power cord, it must be connected to the mains;
- If it operates using a battery, it must be connected and charged;
- A drill is inserted and fixed inside the drill.
To check the functionality of the drill, you need to click on the power button. If the chuck rotates fast enough, there is enough charge and you can start working. If it rotates very slowly, then the battery is discharged and needs to be recharged.
Concrete accessories
The drill bit sizes for concrete hammer drills may vary. This indicator depends on the diameter of the hole you need to get. But all drills for stone, brick and similar coatings have a hard tip. It is made from a special alloy, which gives it higher characteristics. Drilling of such coatings occurs through impact-rotational motion.
If conventional bits have a cylinder-shaped shank, then the drill bit for a hammer drill comes in other shapes. To drill a small hole in a concrete surface, use an auger drill with a carbide tip. Large holes are cut using a crown with carbide teeth along the edges. Diamond-coated tools are also popular due to their durability.
For granite surfaces, it is customary to use nozzles based on Pobedit. This tool has different softness and is therefore suitable for different surfaces. For ceramic tiles, an excellent solution would be a spear-shaped drill with a tungsten or pobedit tip. For glass, it is recommended to use a crown with a special coating around the edges.
Some general information
A drill is a tool for drilling holes. Varieties include a hammer drill and a screwdriver. In all designs, the movement of the working element is transmitted from the energy source through the cartridge in which the working element is fixed.
Drills use a tool that is a cylindrical metal rod. It consists of three parts - the working part, the shank and the neck. For fastening, a shank is used, which can differ in the shape of its cross section (circle, triangle, quadrangle). In most cases, devices with a round shank are used. Drills have different diameters, as well as the length of the shank and working part.
How to avoid losing your key?
To avoid being left empty-handed with unfinished work, it is important to properly organize your workspace. This organization will allow you not to lose sight of the key every time you change a tool.
The easiest way to protect against loss is in your own workshop. Here you need to create a permanent place to store the turntable and always put it there. In this case, the storage location should be quite convenient and at hand:
- Many manufacturers provide their instruments with an eyelet for attaching a turntable. It is placed either under the handle or close to the fork. By inserting the key into this hole, you can rest assured that it will not get lost. The only drawback is that over time the fastening wears out and breaks.
- The eyelet for the key is made from insulating tape. It is attached to the power cord. The attachment point is usually located 50–60 cm from the handle. This way the turntable will not interfere with your work and will always remain at hand.
- Having attached a ring to the key, you can hang it on a hook next to the workbench.
If during the work it turns out that the pinwheel from the clamping mechanism has been lost, the main thing is not to panic. Using traditional methods, it is quite possible to release the chuck, remove or change the drill, and finish the job.
For newbies
So, let's start with the simplest case - with inexperienced users. Screwdrivers have something called a torque regulator. It looks like a scale around the front of the screwdriver, which is right behind the chuck. There are numbers on it from 1 to 10, 15, 20 or even more - different for different models - and the last position on it is indicated in the form of a drill. If you rotate this regulator and set it opposite the special mark so that one of the numbers is next to it, then when a certain torque is reached, the cartridge will no longer rotate, but will begin to click. If you put it on a “drill”, then the screwdriver will try to twist with all its might, as much as the engine power allows it.
However, it is worth noting that with two-speed screwdrivers, at the second speed, even in the “drill” position, if the torque reaches a certain value, then a protective system is triggered, which simply turns off the current supply. At the very first speed, the screwdriver will also try to turn “to the last.”
And a beginner can start drilling or screwing screws, for example, when the torque regulator is set to one of the numbers, or the screwdriver is set to the second speed (and it is recommended to drill at it).
The drill can be clamped quite tightly, and as a result, when you start to release the drill or bit in the standard way (by turning on the reverse, holding the chuck and pressing the start button), either the torque limiter or the protective system may work.
Therefore, in such a situation, you just need to set the screwdriver to first speed and set the torque regulator to the “drill” position. On single-speed models, you only need to set the torque regulator to the “drill” position. Well, then again we unscrew it in the standard way.
How much does a screwdriver bit cost?
Bat
HAMMER PH2 50mm (2 pcs.) Ph2, Size: 2, Tip type: PH (Phillips), Shank: 1/4, Length: 50 mm, 2 pcs. 2 pcs. 128 rub.
Interesting materials:
How to properly decorate an artificial Christmas tree? How to properly cover wisteria for the winter? How to properly cover chrysanthemums for the winter? How to properly cover forsythia for the winter? How to properly cover a climbing rose for the winter? How to properly lay geotextiles under the lawn? How to properly install waterproofing on a roof? How to properly install waterproofing on a ceiling? How to properly install laminate flooring on a wooden floor? How to lay laminate flooring correctly?