Lumber cutting
Before cutting logs in a band sawmill, preparatory calculations should be made. It is necessary to take into account the direction of the cutting planes, the property of the wood, the number, as well as the volume of the upcoming product.
The variety of material can complicate the problem. For this reason, in order to prevent defects, a diagram of cutting the log trunk is made in advance.
After the log is fixed in the sawmill blade, a calculation is made based on the number of upcoming products.
For this purpose, appropriate measurements are created:
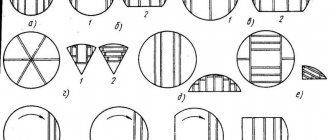
- In thoughts, wood is divided into 4 parts, and any one is also considered separately. A high-quality border is one that is free of damage, mold, chipping, and defects with insects. The best materials are made from it. The bars are often sawed from a plank removed from the worst side of the log.
- In the line of the sawmill, the volume is set to the diameter of the prepared part. The height of the unevenness is added to this value. It involves a difference in diameter among the apex, as well as the butt component.
- Use a tape measure to measure the height of the top of the log. Based on this value, the initial volume of the upcoming materials is calculated, including an allowance for sawing of 2 - 5 millimeters.
- Then, they turn the log 90 degrees, and also create similar calculations.
- The workpiece is unfolded in such a way that when sawing, the minimum number of slabs comes out.
After all the required measurements without exception have been made, and a diagram for cutting the log has been drawn up, it is necessary to decide on the sawing technology.
Design selection
The design of a circular sawmill is being developed for specific needs. Productivity, log width, even cut along the entire length of the workpiece require certain technical solutions in the assembled equipment. When feeding manually, the plane wave of the resulting board increases. The size of the saw blade and the limits of its displacement relative to the stop pad will determine the maximum size of the wood for sawing.
Main nodes
The components of the future machine must first be correctly positioned on the drawing. The device of any homemade disk sawmill includes:
- frame. Unites all components into a functional whole. At the same time, the distance between parts must allow for safe DIY work, maintenance, cooling, and waste disposal. The main qualities are stability, rigidity;
- engine. The electric three-phase version is selected according to power and number of revolutions. Operating voltage 380 V. If there is no connection to the network, install a gasoline engine with a step-up gearbox;
- cutting unit. Placed horizontally, vertically. Consists of one disk or two (corner). A single saw can be fixed in one specified position or rotated 90° to eliminate reverse idling (cutting an angle);
- supply line. A simple homemade product is limited to a fixed table with manual feed. This type is used for small DIY work with small workpieces. A massive log is fed under the knife on a carriage;
- Remote Control. Performs on/off operations, available control switches (revolutions, feed, indication). It is carried out to a place on the frame that is convenient for work and control of the process.
Two disks
The design of a circular sawmill with two simultaneously operating cutting tools allows the processing productivity to be increased. They are located at right angles to each other. Such homemade devices are more difficult to manufacture.
Each disk is equipped with its own motor and drive. The rotation frequency is selected to be the same.
Types of cuts
The horizontal movement of the angular pairs of the disk with the drive mechanism occurs on a movable carriage. Guides are placed under it. To adjust the relative position of circular saws with your own hands, each pair is equipped with adjustment devices.
Log cutting methods
Before sawing an entire forest, longitudinal cuts are made along the sides of the log, rarely from absolutely all edges. The released material is used to make double-edged timber, as well as unedged planks.
By changing the direction of the saw in relation to the annual rings in the log, it is possible to purchase timber with a unique pattern.
The properties of such planks will vary. This period is provided for when combining a log cutting scheme.
There are some types of sawing:
- Radial. Sawing is done vertically to the pattern of the rings. The section is valued because it produces a board with a uniform structure, as well as a color palette. It is highly resistant to moisture and shrinkage. This kind of material is high quality.
- Accelerator. Sawing of the log is carried out in parallel, or along the tangent line of relatively annual rings. The boards you buy are of low quality, but they have fascinating images. The materials are susceptible to high moisture and are recommended for use in dry conditions.
- Rustic. The section is made at different angles transversely to the log. The plank includes various imperfections in the form of knots and sapwood. It shows mediocre signs of shrinkage and swelling from moisture.
- Diametrical. The section is made in the middle of the log across the grain. The board has an image of a cross-section of annual rings. It stands out for its low quality.
In order to purchase the maximum number of materials at the lowest cost, it is possible to use special projects, or a drawing of a log cut in a band saw.
What needs to be provided?
Before making, you need to pay attention to the following things:
- The diameter of the logs being cut, if there are large diameters, then you need a more powerful saw, a longer bar with chain;
- Loading heavy logs for sawing, for this it is necessary to provide some kind of mechanism, or they can be rolled up either by additional jacks or, ideally, by a loader;
- The log must be fixed so that it does not play during sawing and the boards are even;
- The chainsaw guide and sled should not play, so they need to be strengthened;
- The more powerful the saw, the easier production will be. Therefore, when purchasing a saw, you need to take the most powerful one;
- Using electricity as an energy source allows you to save a lot;
- Do not forget that the chain must be for longitudinal sawing, this will significantly increase the speed of the process. Experts recommend using a 3*8 chain.
- It is advisable to buy a carbide chain. This is what he is doing today. Conventional circuits fail quite quickly;
- The length of the logs to be cut must take into account the maximum and minimum. So that the longest ones fit in, and the shortest ones don’t fall between the guides;
- Calculate in such a way that the saw does not vibrate or play on the guides during operation;
- The power of the saw, in some cases you want it to be both more powerful and more economical. In this case, folk craftsmen do the following. Instead of a chainsaw, an electric motor is installed, and the tire is left for sawing, see photo below;
- The height of the sawmill. It is necessary to provide in such a way that the back does not hurt to bend over and the logs do not need to be lifted high. If the wood is not heavy, it is better to make it higher. If the forest is heavy, you can go lower.
- Sawing of wood can be carried out either by the upper part of the tire or by the lower part. When sawing with the lower part, sawdust flies towards the chainsaw and clogs it. The upper part throws out sawdust from the chainsaw, this allows you to increase both the service life of the saw and the downtime during sawing;
- During the sawing process, the chain very often stretches on the saw and needs tensioning. Therefore, when installing the saw, it is necessary to provide access to the chain tension and secure the saw with access to the mechanism;
- When sawing, it is better to fix the position of the chainsaw handle, this simplifies the process;
- The cable, clothesline or lace should not drag, since the sawing process should be uniform over time.
Work organization
At the beginning of the activity, it is recommended to sort the trees, since their direction depends on this. You should clean them of dirt, remove branches, as well as cloves.
The distribution is made according to the following aspects:
- Transverse trunk size;
- Bend;
- Number of knots, various damages;
- Diameter of the core.
Before sawing you should:
- Check the properties of fasteners, as well as combinations of elements.
- Check the presence of electricity.
- Lubricate surfaces subject to rubbing.
- Check the accuracy of the saw designs.
- Check the movement of the belt in idle and in the opposite process.
- If necessary, change the arrow of the sawmill by moving the roller from the left side edge by 5 - 10 cm.
What do we need?
- Welding machine, electrodes;
- Lumber, posts, screws, nails;
- Chainsaw, electric saw or just an electric motor;
- Extended tires with chains, if you cut wood with large diameters, more on that below;
- Material for making the case, preferably a corner, as it is quite resistant to vibrations;
- Rollers and guides;
- Cord, clothesline or cable for moving the saw while sawing;
- Roller bearings.
Another cheaper and more economical option for using wood can be considered as a material. With high-quality fastening with screws and self-tapping screws, the wood will easily withstand the load from thin wood.
Cutting technology
When selecting a technological process for sawing logs into planks, the properties and scale of the wood are taken into account.
There are 3 methods of activity at the sawmill:
- Sawing into collapse. The wood is sawn along a straight line to the end without any turns. At the exit, unedged planks are purchased. The disadvantage is the low quality of the purchased material, as well as a huge amount of residues. Purchased planks should also be trimmed. During operation there is a significant possibility of their cracking.
- Sawing in a circle. After the first sawing, the log turns to the opposite edge. Typically, there are five reversals. The method makes it possible to cut logs to scale with the least amount of residue. The disadvantages of this method include the low production rate.
- Sawing timber. The main part of sawing a log is done around the circumference. The main part is cut out in the shape of a beam. For this purpose, as a rule, the largest logs are used.
Cutting in a band sawmill is considered one of the most important stages of logging.
The properties of the purchased product directly depend on the chosen scheme, activity, as well as the preparation of the necessary equipment.
Video on the topic
Andrey Noak was with you. Visit my blog and stay updated on all events. Subscribe to updates and invite your friends to read my tips. Good luck and see you again!
Cancel reply
I installed such an electronic ruler in Dzerzhinsk. They recommended it to MGGVUD, but then there were problems, it would have been better if I had just cut it by hand.
This happens if the line is of poor quality.
And you're not the only one caught up with these freaks
I have an extremely negative experience with this company. I strongly do not recommend anyone to contact them. In July 2016, he entered into a contract with MGGVUD-N, director Natalya Ivanovna Krigina, tel. +375297627645. The order was not completed on time. The contract was terminated. As of July 2022, the prepayment has not been fully refunded. I have never seen a more disregardful attitude towards clients from Krigina. It’s impossible to get through by phone, they don’t answer the phone. They don’t get in touch and don’t call back even if they promise. They can only get through from a number they don’t know, but this doesn’t guarantee anything. They talk in raised voices, hang up, and become hysterical. You literally have to get your money out with force and nerves. Constantly refers to a chronic lack of money. Judging by the negative reviews on the Internet, I am not the only one who has fallen into trouble with them. To summarize, if you have extra money, nerves and a lot of free time for endless calls and trips to showdowns in Dzerzhinsk, then feel free to sign an agreement with MGGVUD and make an advance payment. Otherwise, it is better to choose a more reliable supplier with a good reputation and proper attitude towards customers, or buy ready-made equipment, even if it is more expensive. Such as MGGVUD as a whole have no place on the market in principle.
Yes, SAM 5.1 is complete crap. RB already knows everything.
I read your reviews about the ZRK 5.1 electronic line. I came to a certain misunderstanding that you wrote on this page. I have a circular sawmill, assembled entirely with my own hands, sparing no expense or time. The unit was assembled, as they say, using the latest technology, almost completely automated, the operator is located away from the machine, controlling it using a remote control. While assembling it, I found the same ZRK5.1 electronic rulers on the Internet. Why are you so bad at the whole country? I was very interested in the device and without hesitation I contacted the seller, Andrey Rudenets.
After purchasing and installing I encountered a number of problems similar to yours. Naturally, I immediately contacted the seller. They talked to me willingly, clearly and intelligibly after all the time, they kept in touch with me despite my location, in the Urals, Sverdlovsk region, until I eliminated all the mistakes I made when assembling the machine and installing the rulers, I have 2 of them, one is responsible for horizontal, and the other for the vertical coordinate. The errors were such as the belt slipped on the electric pulley. engine, the idle sensor was adjusted incorrectly and the wires leading from the sensor to the devices were selected incorrectly.
We have been working on this machine for 2 years now and do not know of any problems associated with setting the dimensions of lumber. This summer in June, Andrei sent me 2 new re-flashed electronic rulers with full trust that I would return the old devices, after installation I did not have any problems, we are still working without problems.
Maybe you can buy a ruler with graduations?
I can’t see this electronic ruler and it’s mggwood, how much he suffered with it and with the “manufacturer” of the sawmill, he’s a rare swindler. It would really be better to cut it by hand. Until we installed a normal electronic ruler, nothing worked properly. The boards did not come out the right size and it took a long time to set up, although the problem may have been in the sawmill.
I had to pay twice, but now the experience will be there.
To process logs on a band sawmill, it is necessary to adhere to the accepted technology. This way you can get the maximum amount of high-quality materials - boards and timber. But first you should familiarize yourself with the basic cutting rules.
Photo of correct cutting of logs on a band sawmill
What you will need to build a sawmill
For those who think building their own sawmill is not a difficult task, let us say right away that creating a high-quality, efficient unit is not easy. And the point is not even that you cannot do without certain financial costs - as a rule, the budget of a homemade sawmill easily fits into the amount of 30 - 40 thousand rubles. Assembling a unit capable of producing high-quality lumber will require solving problems related to stability of operation, ensuring the strength of components and parts, setting up and adjusting mechanisms, making devices for sharpening a band saw and setting its teeth, etc. Are you not afraid of difficulties? Then check out what materials and tools you will need for the job.
As rail guides, you can use steel angles with a flange width of at least 50 mm, a channel or an I-beam. The main requirement for rails is their straight geometry. It must be borne in mind that any shortcoming of our miniature “railroad” will affect the quality of the cut, since the tape blade will copy every unevenness, transferring it to the surface of the board. That is why the best option would be T, N or U-shaped rolled metal. Unfortunately, corners are most susceptible to bending during manufacturing and transportation. The most ideal case would be to use factory rails, for example, from narrow-gauge transport, which, with some luck, can be found at scrap metal collection points.
The rollers that provide longitudinal movement of the sawmill can be turned on a lathe and hardened. In some cases, the use of conventional ball bearings is allowed.
Excellent rollers are made from linear guides based on ball bearings, which can be found on sale. This solution cannot be called the cheapest, but there is no doubt about the reliability and durability of such a unit
Actually, the frame, saw carriage and bed for laying logs are made of square and rectangular profile pipes. It is best to use rolled metal with maximum wall thickness. This will provide the equipment with the necessary strength, since the operation of the machine is associated with variable dynamic loads.
For the mechanism for adjusting the height of the carriage (traverse), you will need guides made of steel pipes with sliders and two long screws with nuts. For these purposes, you can use parts from decommissioned screw-cutting lathes (unlikely, but never mind), mechanical presses, or threaded rods from a construction store (the most affordable, but least preferred option). You can also order the production of parts from a turner - it’s still unlikely to be possible without contacting a specialist. In addition, you will need a chain drive, which is often borrowed from the gas distribution mechanism of automobile engines. Alternatively, you can use a bicycle chain and sprockets.
Pulleys from old domestic combine harvesters of the Kolos, Niva brands and other agricultural machinery are best suited as impellers for the belt blade. By the way, you can also get shafts and bearing housings from there. Please note that the diameter of the guides must be at least 30 cm (optimally 50 cm), otherwise excessive mechanical stress will lead to cracks at the base of the saw teeth.
Pulleys from decommissioned domestic agricultural machinery can be used in the design of the band saw drive
There are designs of homemade installations with guide pulleys in the form of wheels from passenger cars. For skeptics, we note that such a homemade solution has a lot of advantages, starting from the possibility of using assembled hubs and ending with the fact that fine adjustment of the belt tension during operation can be done by inflating the tires.
As for the tools that will be needed during the work process, every self-respecting owner should have one. In particular, you will need:
- welding machine;
- “grinder”, or, in professional language, an angle grinder;
- drill press or electric drill;
- a set of drills for concrete and metal;
- set of metalwork clamps;
- set of wrenches;
- hammer;
- pliers;
- fasteners (bolts, nuts, washers of various sizes);
- measuring instrument (ruler, caliper, tape measure);
- level (preferably laser type).
Don’t forget that you will need to prepare a strong, level foundation, so be prepared for concrete work - stock up on sand, crushed stone and cement, prepare a concrete mixer, tampers, formwork and a long rule.
Band saw machine: device and assembly
Band-type wood carpentry machines consist of a work table, which serves as the basis for other elements, and the elements themselves. The design provides for constant circular movement of the blade, supported by two pulleys.
A full-fledged unit with a frame and tabletop is made if there is a separate large room for installation: the equipment has impressive dimensions. In other cases, a tabletop manual mini-installation is made, which will not be able to unravel whole logs.
It is recommended to draw up drawings in special programs.
bed
The machine frame is a load-bearing element that must support the weight of the entire structure. It is better to make it from a metal profile, but wood will also work. Plywood and chipboard are usually not used; boards 20 mm thick are used. The frame is glued according to the rule of intersection of the fibers of each next layer relative to the previous one. Self-tapping screws are used to strengthen the frame. The structure must be rigid and at the same time elastic in order to act as a damper, dampening jerks of the cutting blade.
Pulley block
The upper pulley block does not hold the blade in tension when moving vertically. Hardwood is required to make the frame. On the inside of the frame there is a wooden insert to which the wheel shaft is mounted. The tilt of the axis is adjusted using a threaded rod and nuts mounted in the wood.
The vertical stroke is carried out along guides fixed in the upper part of the frame and is ensured by a screw mechanism. For reinforcement, the adjusting nuts are supplemented with washers or welded. When recessing the shaft, a flange is provided, due to which it will be fixed from the rear side.
Pulleys
Wheels about 30 mm thick are glued together in several layers of plywood circles, after which a hole for the bearing is formed in them. To make the sawmill stable, the bearing is fixed in the coupling. A washer is put on the shaft on the inside, and a flange is secured on the outside. So that the tape can self-center, the wheels are given a barrel shape and the treated surface is covered with a bicycle inner tube.
When installing the bearing, it is necessary to ensure that the shaft is perpendicular, otherwise the wheel will hit the plane during operation. As a result, the cutting blade may slip out of its seat. A drive pulley is attached to the lower wheel.
Tabletop
The tabletop is located on a pedestal base, inside of which a motor with a trigger mechanism is placed. The table is usually made from a sheet of thick plywood; the working side is covered with textolite. To make it more convenient to cut at a given angle, the tabletop is made rotating. A parallel stop is also provided; for this purpose, roller guides or a profile with clamps are used.
Finding the perfect place
Optimal conditions are your own workshop or other premises for processing such materials. The minimum area of such a building is 18 m2. The simplest way out of the situation is to “dislocate” the sawmill in the open air, but it has a big drawback. These are sawdust flying into their territory, as well as falling onto neighboring areas.
In this situation, the most reasonable solution is to build a solid fence around the unit. The material for the barrier can be plywood or polycarbonate. A large canopy placed over the sawmill is also not bad, since the roof will allow you to work in any weather conditions. The next requirement is the place where the manufactured lumber will be stored, so this issue must be resolved before the start of the project.
Another variant
There are a large number of similar attachments on the market. All of them are suitable for sawing logs into boards, they all have a similar design. But there are also differences. The photo below shows accessories for a chainsaw, which does not require additional accessories or tools to operate. In essence, this is a miniature manual sawmill, which is based on a gasoline saw.
Manual sawmill
The design is complemented by guides and wheels that move along the surface of the log, reducing resistance. There are two pairs of wheels, they are located on opposite sides of the workpiece. It’s convenient, easy, and, on the plus side, the quality of the cut material increases.
The nozzle is attached to the chainsaw in exactly the same way as in the previous case. The main requirement for the work is to accurately install the saw so that it is in a horizontal position. And although the oblique cut turns out the same, it is more convenient and easier when the tool is positioned evenly.
Secondly.
As soon as the width of the cut reaches the required size, and the remaining height of the log has reached the desired size, it is turned over. That is, if you cut a beam, for example, at 150, then both the width of the cut and the height of the remaining log should correspond to this value, even be greater, taking into account the removal of the slab.
Next, we know the final size of the material that needs to be obtained, and we will obtain it.
To do this, after turning the log over, start calculating from the final size until the full height of the log is used, but do not forget to take into account the size of the cut, which, as we already know, ranges from 2 to 5 mm.
For example, you have a log on your overpass that you have cut to a size of 260 mm. Let's turn the log over and continue.
The final result we want to achieve is a carriage with a thickness of 150 mm. Next, in a simple way, calculate that 260 mm-150 mm = 110 mm. We get as much as 110mm of extra material thickness. And it is precisely this that needs to be calculated correctly.
We take this additional size and calculate it to get the block, which has a size of 50 mm, 110-50 = 60, don’t forget the cut, and for us it is 2 mm, 60-2 = 58 mm, then the plank, equal to 25 mm, 58 -25-2=31 mm, hump 20 mm, 31-20-2=9 mm.
As you can see, from our calculations, we get 9 mm slab, 20 mm slab, 25 mm gorge and 50 mm block. And the final size will be 150 mm.
First cut
Of all the problems facing the sawyer, deciding which side of the log to start cutting on (and therefore which cut surface to open first) is the most important. (As already mentioned, we divide the log into 4 sides, each of which extends along the entire length of the log and occupies 1/4 of its circumference). The choice of the first face is determined by the position of all the others. Before sawing begins, a log can be cut in millions of ways, but only a hundred of them will actually be profitable! Having decided on the first cut, the sawyer only has a few thousand other decisions left to make.
In the case of circle sawing and sawing timber, two basic rules apply.
Rule 1. The worst edge of the log is cut first, without any regard to the taper of the log. (Running a log means raising or tilting the log so that the saw runs parallel to the bark). Since this is the worst part of the log, it will make short boards and a lot of slabs. Since we do not take into account the taper of the log, this gives us the opportunity to cut parallel to the bark from the opposite, better side of the log, without lifting or tilting the log. This means that from this best part of the log more boards of high quality will come out, which also match the length of the log.
Rule 2. Cut the best edge of the tree first, taking into account the taper of the log. This means that the log needs to be raised or tilted so that the first cut is made parallel to the bark.
The end result of both methods will be approximately the same, but the second method has one advantage: in this case, it is easier for the sawyer to position the log (i.e., rotate it), because the open edge is the cleanest and has no defects. In the case of Rule 1, the best part of the tree is opposite the open face. It is not visible, and it is impossible to accurately position the log. Typically, if the wood is of good quality, rules 1 and 2 work pretty much the same. However, if you encounter a worse log, take rule 2 into account.
Features of electronic measuring rulers
The lenses have chrome markings, which allows you to take measurements with high accuracy. The visualization system, consisting of four elements, is configured individually for each user. The lenses have a tenfold magnification, providing high-contrast images.
The rulers are equipped with a parallax system to control the location of the surface being measured. The measurement results are displayed on a monochrome display. The height of the characters is 6 mm.
The guides of the device are made of stainless steel. Smooth carriage movement. The device is supplied in a special case.