Anyone who has used a magnetic screwdriver at least once knows how convenient this thing is. Magnetism helps prevent your screws from falling and getting lost. No more mysterious disappearances and missing parts! Moreover, the coolest thing about magnetism is that you don't necessarily need to buy special screwdrivers, which are more expensive than regular ones. Did you know that you can magnetize any object if it contains iron? The following will tell you how to do this.
Description of the experiment
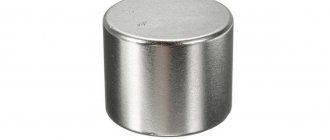
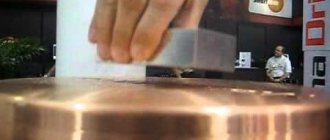
So, in the experiment we observe how a permanent magnet moves inside a hollow copper pipe at a constant speed. Let's fix an arbitrary point in the body of the copper tube and mentally draw a cross section. A magnetic flux created by a permanent magnet passes through this section of the copper pipe. Due to the fact that the magnet moves along the pipe, an alternating
magnetic flux appears in the cross section of the conductor, either increasing or decreasing, depending on whether the magnet approaches or moves away from the point where we mentally drew the section. An alternating magnetic flux, according to Maxwell's equations, generates a vortex electric field, generally speaking, throughout space. However, only where there is a conductor, this electric field sets in motion the free charges located in the conductor - a circular electric current arises, which creates its own magnetic field and interacts with the magnetic field of a moving permanent magnet. Simply put, a circular electric current creates a magnetic field of the same sign as a permanent magnet, and a certain dissipative force acts on the magnet, and more specifically, a frictional force. The reader may rightly ask the question: “Friction of what against what?” Friction occurs between the magnetic field of the dipole and the conductor. Yes, this friction is not mechanical. Or rather, the bodies do not touch. Well, let! There is still friction!
In general, in words everything looks more or less smooth, but can it be described in the language of mathematics? Let's get started...
Magnetization is illegal
Government Resolution No. 354, which caused a stir, allowed owners to be punished for damaging metering devices by billing them for water consumption based on the pipe’s capacity for six months. These are huge amounts of hundreds of thousands of rubles. Meanwhile, as it turned out, there is no legal basis for checking and measuring the so-called “magnetization”...
Who cares! Approximately this conclusion can be drawn after a round table on the topic “Theft of hot and cold water in apartment buildings by installing magnets on individual metering devices,” which was held on March 26 in the Legislative Assembly of the Ulyanovsk Region under the leadership of the head of the Housing and Communal Services Committee of the ZS Gennady ANTONTSEV.
How to magnetize a screwdriver at home: tips, methods
In order for repairs, installation and other work to proceed quickly and efficiently, nothing should interfere, especially if it is a small screw that tends to fall off the screwdriver. For convenience, you can buy a special analogue with a magnetic tip.
But don’t throw your regular screwdrivers in the trash, because you can make these out of them too. To do this, most craftsmen use magnetizers, but there are also other ways to make such a miracle screwdriver. And for this you don’t need services, everything can be done easier and faster. Read on to learn how to magnetize a screwdriver at home.
Screwdriver magnetizers
A screwdriver with a magnetic tip is, of course, good, but in some situations it can, on the contrary, interfere or even cause harm. For example, when working with electronics, a magnet can cause serious and irreparable damage to some parts.
And constantly juggling screwdrivers is quite stupid and inconvenient. Therefore, most craftsmen who often have to use a screwdriver use a special device, a magnetizer. With it you can quickly magnetize and demagnetize the tool without much manipulation.
Magnetizers are simple in design and use, which can change the corresponding parameter of metal objects. A huge advantage of the device is that it does not require additional connection to the network or recharging. And the small dimensions allow you to always have such a useful thing with you. And if we consider the design itself, the magnetizer consists of:
polymer case with slots for metal objects;
a set of magnets of different polarities.
Each of these holes is responsible for one or another function, magnetization, demagnetization. Usually, the slots are labeled, but even otherwise, you can very quickly check the parameters of each compartment.
The principle of operation is incredibly simple: place the object in the desired hole, wait a little. These devices differ in the size of the instrument itself and the size of the incision. The second parameter depends on how large the object needs to be magnetized.
How to magnetize a screwdriver without a magnetizer
As in the case of a special screwdriver, a magnetizer can become unnecessary and an unjustified waste of money and time. This is especially true in cases where the need for a magnetized screwdriver is extremely rare.
And then there is a need to find a handy way to solve the problem. There are several methods on how to magnetize a screwdriver at home without using the device described above:
Using a powerful magnet. If there is such an item, then you can bring the instrument to the desired state in a few minutes. You need to move the screwdriver from the tip to the middle with a magnet. If you always need such a tool, then after work you can leave it on the magnet.
Using an improvised reel. In cases where there is no good magnet, and you need a screwdriver right now, you can make the missing item yourself. To do this, you need to wrap a metal object with paper and varnished copper wire.
For a good result, the wire will need a lot, two to four hundred turns around the selected object. The result is a coil to which voltage must be applied. To do this, you can use a battery, batteries, charger, and so on.
Through the voltage of the household, general power supply network. The same coil is also used here, only the voltage is supplied from the outlet
An important difference is the presence of a fuse that can protect against short circuits. You should be especially careful, because the fuse will burn when connected
Each of these methods should be done following safety rules, otherwise it can cause harm to health. It is best if you do not have the appropriate skills or knowledge to seek help or advice from a person knowledgeable in this area.
Otherwise, each of these methods will be able to magnetize any metal object. The cheapness of each method should be considered individually, based on the availability of the necessary components.
video on how to magnetize and demagnetize a tool without special equipment
Demagnetization of pipes before welding
» Articles » Demagnetization of pipes before welding
Welding pipes and steel structures using direct current is often accompanied by the effect of “magnetic blowing,” which is caused by residual magnetization. At the same time, the stability of the process deteriorates, metal spatters, defects such as pores, lack of fusion, lack of penetration, slag inclusions form in the weld, and sometimes welding becomes simply impossible due to arc failure and electrode sticking.
The main reason for the magnetization of pipelines is the use of magnetic flaw detectors to diagnose their technical condition, after which the magnitude of the residual magnetic field in the cutting of a welded joint can reach 100-150 mT (1000 - 1500 Gas) or more.
Additional factors contributing to the magnetization of pipelines are the Earth's magnetic field, elastic mechanical stresses, and technological magnetization of pipes during their manufacture and transportation.
Since the magnetization of pipes does not allow obtaining a good quality weld, demagnetizing them before welding is a necessary technological operation. It is almost impossible to achieve complete demagnetization, therefore welding is allowed with insignificant residual magnetization, which does not have a noticeable effect on the welding process.
For example, the STO Gazprom standard 2-2.2-136-2007 “Instructions on welding technologies for the construction and repair of field and main gas pipelines. Part 1" established that the residual magnetization of the ends of pipes and pipeline connecting parts should be no more than 2 mT (20 G).
When magnetization is more than 20 Gauss, demagnetization must be performed.
razmagnit.wordpress.com
11.3.3 Demagnetization by welding current sources | Ugra training center
11.3.3.1
Demagnetization of pipes using pulsed welding current sources is performed in the following sequence:
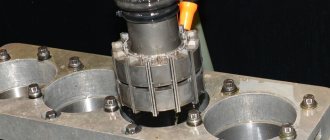
- wind the welding cable (from 18 to 20 turns) at a distance of 10 to 20 mm from the end of the pipe (Figure 11.13), while the ends of the two demagnetized pipes must be at a distance of at least 2500 mm;
— determine the initial value and direction of the magnetic field along the perimeter of the pipe at eight control points;
— set the minimum current on the welding current source (in the range from 30 to 70 A), close the contact to the plate;
— measure the magnitude of the magnetic field along the perimeter of the pipe at eight control points. If the magnitude of the magnetic field has not changed or increased, it is necessary to change the polarity of the current on the solenoid;
— set the maximum current on the welding current source (in the range from 240 to 300 A), close the contact to the plate, hold for 6-12 s, then open the contact and turn off the power source;
— dismantle the demagnetizing windings (solenoid).
1
- pipe; 2 - welding cable; 3 - DC welding power source; 4 - metal plate; 5 — detachable contact
Figure 11.13 — Installation diagram of equipment for demagnetizing pipes using the pulse method
11.3.3.2
Demagnetization of connections before welding with welding current sources using the compensation method is performed in the following sequence:
— determine the initial magnitude and direction of the magnetic field along the perimeter of the welded joint at eight control points;
— wind a welding cable with a cross-section of 35; 50 mm 2 on both ends of the pipes (Figure 11.14), while the winding should be in one direction, uniformly dense and single-row, the number of turns wound on the end of the pipe with a larger magnetic field is from 7 to 11, pipes with a smaller magnetic field fields - from 3 to 5 turns;
— connect the welding cable to a DC source;
- turn on the welding source and gradually increase the current value from the minimum value, while simultaneously monitoring the change in the magnetic field value;
— if the magnitude of the magnetic field in the welded joint increases, turn off the power source and change the polarity (change the ends of the welding cable on the power source);
— if the magnitude of the magnetic field in the pipe joint does not exceed 20 Gauss, proceed to welding the root layer of the seam, as the weld is completed, the current magnitude is reduced, while simultaneously controlling the magnitude of the magnetic field in the pipe gap;
What other ways are there?
If you have a round magnet with a hole in the middle in your house, you can use it to demagnetize a screwdriver.
To do this, simply thread the screwdriver through the magnet, starting from the tip and ending with the bottom of the handle. This action is performed at a leisurely pace. As a rule, one time is enough to demagnetize, but you can repeat it if necessary.
If there is no hole or it is not wide enough, there is a second method. Position the screwdriver in relation to the magnet at the minimum distance at which it is not attracted to it. Then, making small “oscillatory” movements, move it from one pole to the other, gradually moving away from the center. The further away it is, the less vibration should be. After this it should demagnetize.
For the third method we will need a magnetometer. First, determine the level of magnetic field strength of the screwdriver. Then find a field with the same voltage on the magnet, but at a pole with the opposite sign. After that, all you have to do is press the screwdriver exactly to this part.
About the special device
Magnetometers are available especially for this purpose, through which a tool can be both given a magnetic charge and removed. For those who do not know how to demagnetize metal, experts recommend doing the following:
- First you need to determine what voltage the magnetic field is at. This is a very important aspect, since a mistake can lead to the opposite result.
- You also need to measure the voltage on the magnet. It must have the opposite sign.
After these steps, you should touch the magnetometer area to the instrument, as a result of which the latter will be demagnetized.
How to magnetize a screwdriver at home: tips, methods
Anyone who often works with small screws or self-tapping screws has encountered the fact that at the most inopportune moment, the fastener inevitably falls. And it would be fine if it just fell, but no - it flies to the side and completely disappears from sight. After a dozen such accidents, work ceases to be enjoyable and the mood quickly deteriorates. And to prevent this from happening, today we will learn how to magnetize a screwdriver at home and talk about special magnetizers for screwdrivers.
What it is?
The magnetic detector is a plastic clip. Inside it there is a durable metal rod and balls on a spring. The built-in springs of the magnetic-acoustic sensor operate at a frequency of 60 KHz. The rod passes through the fabric and connects two cone-shaped plastic balls. The spring in the design acts as a retainer.
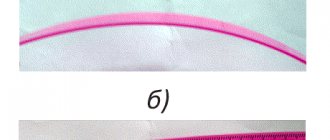
Manufacturers of this type of protective devices equip the design with capsules with neon paint. If you do not carefully demagnetize the magnet on your clothes, you risk losing your new item on the very first day. If you forcefully open the tag by hand, the neon paint will flood the fabric.
At first it seems that the magazine sensor has nothing to do with the magnet. But that's not true. To attach or remove a magnet from clothing, you will need a powerful device. It is located at the store checkout and is responsible for both the clutch and the release of the clip. The magnet for removing anti-theft sensors opens the sensor where the rod is located.
Capsules with paint and springs tightly press the rod, thanks to which it is securely fixed and immobilized. When the removable device touches the clip, different polarities of the magnetic field arise. At this moment, the pressure on the rod inside the protective mechanism decreases and the “lock” opens. Now you have learned about the principle of operation of an anti-theft clip and understand how to remove a magnet from clothes in a store.
Introduction
In order for repairs, installation and other work to proceed quickly and efficiently, nothing should interfere, especially if it is a small screw that tends to fall off the screwdriver. For convenience, you can buy a special analogue with a magnetic tip.
But don’t throw your regular screwdrivers in the trash, because you can make these out of them too. To do this, most craftsmen use magnetizers, but there are also other ways to make such a miracle screwdriver. And for this you don’t need services, everything can be done easier and faster. Read on to learn how to magnetize a screwdriver at home.
DIY magnetizing device
course "Antennas" lessons "Electricity" "Assembling step-up blocks" on assembling voltage converters VK "Scientific Criticism" - device, magnet, device for magnetization, magnet, magnetize, residual magnetization, ferromagnetism, how to magnetize magnets, magnetization, magnetic, do it yourself , magnetization of magnets, #magnetizing #device #magnet #for #magnetization #remanent #magnetization #ferromagnetism #magnetize #magnets #magnetization #magnetic #with your own #hands #magnets #entertaining #physics #magnet #magnetize #Magnetize #Residual Magnetization #Ferromagnetism #How to Magnetize Magnets #Magnetization #Magnetic #Do It Yourself #Magnetizing Magnets #Fun Physics
Social comments Cackle
Using neodymium magnet
Neodymium magnets have been widely used in recent years as a means of stopping or slowing down the operation of a meter. The production of these products is established by numerous companies offering these products to clients.
The magnet is selected depending on the brand of the installed meter, but it is impossible to guarantee the effectiveness of the result, since the developers of metering devices use all kinds of methods of protection against unauthorized influence.
In most cases, the use of a neodymium magnet reduces the flow rate of the water meter by up to 70%, which provides decent savings on payments.
If a magnet sticks to a metal surface
Sometimes the powerful rare earth neodymium magnet will stick to various metal surfaces. This could be an entrance door, a sewer hatch, or a car body. If it is a powerful search magnet, then to disconnect it you will have to put in a lot of effort or use improvised tools. How to separate neodymium magnets at home or unstick a magnet from a metal surface? The following method is proposed.
If the surface is flat and smooth enough, then the easiest option is to move the magnet to the edge of the sheet of metal. If this method is not effective, then it will be safer and more reliable to use wooden wedges.
DIY degausser
Craftsmen when working with various metals are faced with a problem - magnetization of tools.
In some jobs, magnetic properties help with actions, for example, with a magnetic screwdriver you can install a screw in a hard-to-reach place.
The build-up of metal shavings when using a caliper, file or drill can interfere with marking or a straight cut line.
How to demagnetize metal at home
The main reasons for metal magnetization
Magnets are media that create their own magnetic field. Main groups of magnets:
- paramagnetic materials;
- ferromagnets;
- Diamagnets.
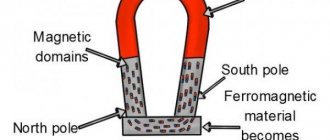
Steel products based on alloys of iron, cobalt or nickel refer to substances whose own magnetic field is higher than the external one, i.e. to ferromagnets. The magnetization of a substance is considered to be the sum of the magnetic properties of particles per unit volume.
At the moment the Curie temperature threshold is reached, spontaneous domains with magnetization are formed, which spread until they are completely filled.
Under normal conditions, it is possible to obtain a magnetized tool when working close to electric motors, magnetrons and other elements.
Magnetized screwdriverMagnetized paper clip
Working with small parts with a magnetized tool can cause a lot of trouble. Sharpening metals with increased magnetism properties is impossible to ideal sizes, because... the material is covered with shavings.
Using a demagnetization device
The demagnetization device comes in three variations.
The basic elements can be selected at home, using simple methods that do not require much effort to manufacture.
There are special devices that can both demagnetize and magnetize an element.
Magnetometer
Magnetometers are used in the following sequence:
- The magnetic field strength of the instrument is an important parameter that needs to be determined, because it is possible to get a negative result;
- the same parameter must be found on a magnet of the opposite sign;
- touching the tool to the area of the device will demagnetize it.
The process takes place within 10 seconds; at home, no connection to the electrical network is required.
The functionality is checked as follows: the self-tapping screw is brought to the magnetized metal, and the level of magnetization is checked.
Afterwards the demagnetization process occurs and is checked again.
Methods for demagnetizing metal
There are several ways to demagnetize metal structures.
Devices are used depending on the frequency of use, purpose and power.
Before you demagnetize metal at home, you need to understand the existing structures.
- An ordinary magnet is large in size; a tool is held over it at a minimum distance, on the verge of the attraction process. The magnet can be removed from an old speaker, most of which are round in shape. The process is carried out when the product is removed from the structure, loosening it; the further the tool is from the structure, the smaller the amplitude. The location of the axis on which there is no magnetic field depends on the design of the product.
- More frequent use will require a device operated at home from the mains. It is possible to make the device at home or purchase it at radio parts stores. The main component is a coil of wound wire connected to a transformer. The supply of alternating current allows you to demagnetize the element, direct current - vice versa.
Removing magnetization with a magnetometer
There are many variations and kits for demagnetizing metals in production.
Tunnel devices include a coil having an opening connected to a network.
The size of the hole can be different, depending on the purpose and dimensions of the parts being processed.
Multi-band magnets driven by motion, rotation of which occurs with speed control, the impact and change in amplitude is carried out by moving the part away from the body.
Electromagnets operate from a 220 or 380 volt network and allow you to demagnetize an element with a tap for a certain time. Container mechanisms allow you to install the product to a device in which the necessary environment is automatically created.
About working with large batches of parts
There are times when it is necessary to remove magnetization from many metal products. This is possible through the desired temperature. How to demagnetize metal by heating? According to experts, this will require heating the products to a certain state, which is also called the Curie point. Iron is heated to a temperature of 768 degrees. A ferromagnet will require a higher range. Upon reaching the desired temperature threshold, spontaneous magnetized domains are formed.
The process goes as follows. First, one part is brought to the Curie point. Next you should cool it. It is important that it is not affected by external magnetic fields (the only exception is the Earth’s magnetic field). Next, using a sensitive induction meter, the maximum magnetization is assessed. Next, in the control zone at a distance of no more than 2 cm from the part, the range of different values obtained by the MF-23 or MF-23M indicator is measured. Magnetic induction should be +/- 2 mT.
How to demagnetize an electricity meter after a magnet
In order to avoid a fine, you must make sure that the water meter is demagnetized.
There are 2 methods of demagnetization:
- Using a powerful electromagnet. Bring the device to the meter and turn it in different directions. Make sure that after removing the device the plastic blades work properly and do not stop.
- Using a magnet to remove residual magnetism. Attach the magnet to the drill bit, and then spin the device next to the meter. Rotational movements should neutralize accumulated magnetism.
- Replace the meter and that's it. Just throw out the faulty one. It will be cheaper than the amount of the fine issued. And for the future, don’t use neodymium magnets to stop the counter, just a small magnet from a small speaker? And anyway, stealing (even from thieves) is bad.
- Why does he stop?
There are gears in the drum of the counting mechanism; the magnet causes them to warp and jam. To remove their stopper, try knocking on the body (just not hard), move the magnet in circles, maybe you will find the right point where you will release it. Do all actions with the water turned off, so that they don’t bite under load. - Rather, it was not magnetized, but rather the impeller was clogged with rust and other components of clean drinking water.
- Give the water the opposite way, it might get dirty
- You can try a demagnetization loop.
I took the kinescope demagnetization loop: I folded it once: And I folded it twice: As a result, we get a demagnetizer coil that is already ready for use.
But due to the small working area and strong heating, I connected another loop in series: In order not to burn the coil or forget to turn it off, we connect the whole thing through a push-button and a fuse: Such a coil is good for demagnetizing a large tool, but use it for demagnetizing drills and taps will be inconvenient, so I made the second option - small and neat. In this version, I used a solenoid from a reel-to-reel tape recorder connected through a transformer.
If an inspector knocks on the attacker’s door, the attacker simply removes the magnet. What are the consequences of installing a magnet on a water or electricity meter in 2022? Additionally, utility employees will recalculate the amount of water or electricity used based on average indicators.
We invite you to read: How electricity charges are calculated
The punishment in this case is fair - you will need to contribute money to account for what the electricity suppliers did not receive.
- Homemade demagnetizer or how to demagnetize a tool
- What to do if the water meter breaks due to neodymium magnets?
- How to remove magnetization from a meter
- Magnet for water meter
- How to remove residual magnetization from an electric or gas meter?
How to remove residual magnetization from an electric or gas meter?
- How to remove magnetization from a water meter
- Payment for water Illegal use of magnets for meters is punishable!
- CYBERNET Forum
- How to demagnetize an electric meter after a magnet
- How to remove magnetization from a water meter Illegal use of magnets for meters is punishable! Anti-magnetic control seals on the protection of water and electricity meters!
Vladimirs Vorohobovs Buy a neodymium magnet for a water meter in Ukraine How to remove magnetization from the meter? Select your region
CYBERNET Forum walentin wrote: QUESTION. Can I prove to them that there was no magnet through the court or can they prove with their Expertise that there was a magnet. Or it’s cheaper to pay 3000 UAH. LEO counter type Nik 2102 Well, there was a magnet.
Vladimirs Vorohobovs
Many irresponsible residents take advantage of this. installing magnets near their meters and thus stealing water.. However, now there is an inexpensive seal that can be put on an already installed water or gas meter. Like a regular seal, it has its own unique number or letter code, which can be recorded in a journal and thereby verify that the seal has not been replaced. Installing such a seal on a meter does not require complex skills.
I didn’t find a single loss, I also found a court - a fine against them for tax evasion.
In general, to give more information against scammers:
1) We meet with them at the office to make a claim (in my case, I didn’t even find an office - at the specified address there is a nine-story residential building). There are no workers. The manager, a 24-year-old boy, refused to meet with me at a time convenient for him - he sent a written complaint about poor-quality measurements. I refused to pay the cost of measurements - 350 rubles for each meter (I have 4 of them and they all showed the same value, like other cases - very interesting, isn’t it? Do they have a scale with one value?) , because does not want to take repeated measurements in my presence and provide the documents required by law.
2) We look carefully at the measurement report - there are no signatures of the measurer (strange, the one who measured refused to sign the document...) and members of the commission. Only two negotiating bosses. Moreover, there was no commission - it stood on the site and did not enter the apartment. What then did the head of the HOA sign if she was not present during the measurements?
3) We read the laws and immediately forget about this piece of paper... We ask them for an accreditation certificate (costs 200 thousand, requires an office, equipment and at least two certified specialists) and a certified methodology (issued only by the Ulyanovsk Metrology Center)
4) We write to the manufacturer with a request for an independent examination and receive from them a colorful color letter with three seals and the signature of the deputy director that there are no norms, no standards, no GOSTs, and no internal specifications to refute or confirm the measurement result . No one has ever measured them and no one is going to do so. (Well, Ulyanovsk is ahead of the rest! And why is it that only we have come up with the idea of measuring something, but not Moscow?))
5) For insurance, we call the metrology center and present to the chairman of the HOA the specified certificates of verification of the certified (and ONLY
in Ulyanovsk an organization) that has the right to check water meters (it turns out that not everyone who gets there has the right to check them...)
You can stop the water meter with some tricky manipulations with a neodymium magnet. To do this, use a magnet in the immediate vicinity of the counter to find the point where it stops completely. This can be the front side, the side surface of the meter, and less often the back wall of the device. The reader performs all manipulations experimentally at his own risk. This information is taken from open sources on the Internet, is provided for informational purposes only, and does not oblige you or push you to anything.
How to demagnetize metal at home? — po4ki.ru — Garden, vegetable garden, dacha
Judging by numerous reviews, when starting to carry out any work, home craftsmen often encounter one problem - magnetization of tools.
According to experts, this property of the metal in some cases significantly helps in work, since the tools become better.
For example, using a magnetized screwdriver it is much easier to tighten screws in the most difficult to reach places.
But many are also interested in the other side of the issue. How to demagnetize magnetized metal? This interest is due to the fact that in some cases magnetization is undesirable.
It is unlikely that you will be able to make high-quality markings with a caliper with metal shavings stuck to it. It is also inconvenient to use a magnetized cutter. These tools, as a result of exposure to a magnet, noticeably reduce their performance properties.
You will find information on how to demagnetize metal at home in this article.
What is the cause of magnetization?
Before you become interested in how to demagnetize metal, you should understand the nature of this phenomenon. According to experts, magnetization is carried out by paramagnets, diamagnets and ferromagnets.
Products based on alloys of iron, nickel and cobalt have their own magnetic field, which is higher than the external one. Tools become magnetized if they are used near electric motors or other emitters.
As a result, they will take away some of the magnetic properties.
About a homemade device for demagnetization
Judging by numerous reviews, tunnel devices can be used for this purpose. The design of such a device includes a coil connected to the mains.
There is a hole inside the coil where the workpiece should be inserted. Demagnetization can be successfully performed using a homemade electromagnet.
It is not difficult to make it from some materials and available tools.
The operating principle is to control the current. Magnetization is carried out by constant voltage, and by alternating voltage - the opposite effect. The reels are made from old TVs.
It is enough to disassemble it and remove the demagnetization loop in the kinescope. Then it is folded at least twice. It all depends on what diameter the home craftsman needs.
It happens that one loop is not enough. In this case, it can be supplemented from another old TV. Further, the design is equipped with a fuse button, which will ensure uninterrupted operation.
A device designed for 220 Volts is suitable for permanent use, and 110 Volts are suitable for short-term connections. If the product is 12 V, then experts recommend using a transformer.
With such a homemade mechanism, you can successfully demagnetize even large parts.
Demagnetizing and magnetizing tool without using electricity
Tools are sometimes magnetized, this can be either beneficial or undesirable depending on the type of tool and the actual job you want to use it for. For example, there are times when having a magnetized screwdriver is useful for holding a screw when you need to tighten it in an awkward place. But if you don't need to do this, then excess magnetism can be a disadvantage because the magnetic field will magnetize any iron filings, nails and screws that are located nearby. Drills are precisely those tools that it is not advisable to magnetize, since they will be covered with chips when drilling ferrous metals.
However, a means of magnetizing and demagnetizing tools and other objects such as calipers would be a useful addition to the workshop. To magnetize a tool we only need to expose it to a strong unidirectional magnetic field, while to demagnetize we expose the object to an alternating magnetic field.
Do-it-yourself degaussing tools generally use some form of mains power to produce an alternating magnetic field. For many years, the author of this homemade project used a modified transformer to magnetize and demagnetize instruments. It worked well in every mode. The author feeds it with alternating current to demagnetize it and with direct current to create a magnetized instrument.
Step 1: Materials and Tools
As with most manufacturer projects, it's not so much the detail of the design that matters, but the idea. The design can be reproduced in a variety of ways depending on the materials and tools available to the individual maker, so the craftsman used the following tools relative to those available.
Materials:
– A piece of aluminum blank; – Plastic rod with a diameter of 50 mm, a length of 13 mm; – Four rare-earth magnetic buttons for a demagnetizing device, 12 mm in diameter; – Two longer (25 mm) bar magnets or a stack of button magnets for the magnetizing device. As shown above; – A tube of super glue;
Tools:
– Lathe with turning and boring tools; – Milling machine with 12 mm end mill for magnet recesses;
Step 2: Degausser
The principle behind this system is to create a device that magnetizes a tool from an alternating magnetic field. This is achieved by rotating adjacent magnets of opposite polarity.
How to demagnetize metal – Metalist's Handbook
Craftsmen when working with various metals are faced with a problem - magnetization of tools.
In some jobs, magnetic properties help with actions, for example, with a magnetic screwdriver you can install a screw in a hard-to-reach place.
The build-up of metal shavings when using a caliper, file or drill can interfere with marking or a straight cut line.
How to demagnetize metal at home
How to demagnetize metal at home - Metalist's Handbook
Craftsmen when working with various metals are faced with a problem - magnetization of tools.
In some jobs, magnetic properties help with actions, for example, with a magnetic screwdriver you can install a screw in a hard-to-reach place.
The build-up of metal shavings when using a caliper, file or drill can interfere with marking or a straight cut line.
How to demagnetize metal at home
How to demagnetize metal at home?
Judging by numerous reviews, when starting to carry out any work, home craftsmen often encounter one problem - magnetization of tools.
According to experts, this property of the metal in some cases significantly helps in work, since the tools become better.
For example, using a magnetized screwdriver it is much easier to tighten screws in the most difficult to reach places.
You will find information on how to demagnetize metal at home in this article.
Before you become interested in how to demagnetize metal, you should understand the nature of this phenomenon. According to experts, magnetization is carried out by paramagnets, diamagnets and ferromagnets.
Products based on alloys of iron, nickel and cobalt have their own magnetic field, which is higher than the external one. Tools become magnetized if they are used near electric motors or other emitters.
As a result, they will take away some of the magnetic properties.
How to demagnetize metal at home? — po4ki.ru — Garden, vegetable garden, dacha
Judging by numerous reviews, when starting to carry out any work, home craftsmen often encounter one problem - magnetization of tools.
According to experts, this property of the metal in some cases significantly helps in work, since the tools become better.
For example, using a magnetized screwdriver it is much easier to tighten screws in the most difficult to reach places.
You will find information on how to demagnetize metal at home in this article.
About the use of magnetized tools
According to experts, some instruments are deliberately magnetized. These are mainly screwdrivers that are used when repairing mobile phones, computers and various household appliances. Such screwdrivers will become indispensable in situations where you need to tighten a screw, but there is no way to support it with your hands.
It is better not to subject watch instruments to the magnetization procedure, since this can stop their working mechanisms. It is not advisable to work with a magnetized drill or cutter, since small metal particles sticking to the working part of the tool will cause a lot of trouble for the master. Read on to learn how to demagnetize metal.
Tips for choosing
In addition to their shape, the devices also differ in the strength of the radiation and the method of attaching the cable.
Experienced treasure hunters are advised to choose powerful double-sided magnets, since they are universal and easy to use, although they are more expensive.
Weight and ammunition
Any tool is most effective if it is selected in accordance with the task at hand. The choice of magnet is no exception. To begin with, you should decide what items it will be used to search for, and based on this, select the appropriate device.
In addition to the magnet itself, you will need a cable with which the search device can be lowered to the bottom of the reservoir. It is better to choose ammunition with a large margin of safety, exceeding the power of the magnet itself, in order to avoid ruptures and loss of the device. Finding him later is almost impossible.
Review of popular devices and their prices
The most well-known magnet manufacturers offer devices of varying power and cost:
Types of magnetic clips
There are many types of magnetic clips, let's look at the most common:
- Label. It is small in size, fixed directly to clothing, often in a place where the buyer does not look. If it is damaged in the store, the signal will immediately turn on. There is no splatter paint inside the label.
- RF tag. Triggers at the exit when trying to secretly remove an item. It can be easily removed at home without damaging clothes and does not contain paint inside.
- Magnetic-acoustic sensor. It looks like a plastic tag with a convex part, inside of which there is a bottle of paint. When you try to remove it without a special device, it closes even more tightly or splashes neon paint around itself.
What it is
A neodymium magnet is a magnetic element that is composed of neodymium rare earth boron and iron material. It has a crystal structure, tetragonal shape and formula Nd2Fe14B.
It was first created by General Motors in 1982. It is the strongest permanent magnetic element, the power of which is several times greater than usual. Equipped with a large magnetic induction of 12,400 gauss.
Note! This is a brittle alloy with the formula NdFeB, as well as a hard nickel-plated protective layer and the corresponding class. It is very popular and comes in various forms.
What do the letters and numbers mean in the classes of neodymium magnets?
Often, we, as manufacturers and sellers, want to hear the technical characteristics of the magnet, namely the letters and numbers in which they (the technical characteristics) are encrypted. And the buyer often thoroughly knows his field of application of magnets, but does not know the nomenclature, especially the international one. So, let's begin to understand the international nomenclature of magnets, namely classes, technical characteristics and designations.
First of all, neodymium magnets are divided into classes, which are designated by letters and numbers (for example, N35), which contain basic information about the magnet. Below is a standard nomenclature table of characteristics of neodymium magnets (look in the left column - the classes are indicated there).
In the table, we presented all numerical values in two units of measurement. The first, without brackets, is the measurement value in the SI system (this is the system in which our country operates), and the second (indicated in brackets) is the measurement in the international CGSE system (European standards). For your convenience, we decided to indicate both units of measurement in the table.
Neodymium magnet characteristics table
We begin to study the table from right to left. As you can see from the right column of the table, the main class difference between magnets is their operating temperature of use, that is, the permissible maximum temperature, above which the magnet begins to lose its magnetic properties. Thus, the temperature range of use of the magnet is indicated by the letter part of its marking (left column). Let's decipher these letters:
- Magnets brand N (Normal) – can be used at normal temperatures, that is, up to 80 degrees Celsius;
- Magnets brand M (Medium) – can be used at elevated temperatures, that is, up to 100 degrees Celsius;
- Magnets of grade H (High) – can be used at high temperatures, up to 120 degrees Celsius;
- SH (Super High) magnets
- Magnets of the UH (Ultra High) brand – can be used at temperatures up to 180 degrees Celsius;
- Magnets brand EH (Extra High) - can be used at temperatures up to 200 degrees Celsius.
It is worth mentioning that negative temperatures do not affect the magnetic properties of most magnets.
The numbers indicated in the magnet class designation: N30, 33M, 35H, 38SH, 40UH, etc., indicate Magnetic Energy (fourth column of the table), measured in kiloJoules per cubic meter. This criterion of magnets is responsible for their power or the so-called “tearing force,” that is, the force that must be applied to the magnet in order to “tear” it from the surface. It is necessary to understand that the surface (steel sheet) must be perfectly flat, and the applied force must be perpendicular to the sheet. These are the so-called ideal or theoretical conditions. It is absolutely clear that the higher the digital designation of the magnet, the higher its pull-out force.
Equation of motion
Now it's time for the equation of motion. Using Newton's second law, it will be very easy to write it down. Solving the equation for is not interesting, because, well, the coordinate simply changes at a constant speed. It is much more useful to know how quickly the fall stabilizes, what the steady-state speed of fall is. In general, we need to solve this equation for speed. And the solution will be like this. Here is the damping coefficient. The characteristic time for reaching a steady state of decline is . Initial speed - , steady speed - . In general, this is the equation of a parachutist. This is probably why the Popular Mechanics article is called “Magnetic Parachute”.