- June 19, 2019
- Production
- Daniil Belousov
It’s worth noting right away that using a homemade seal for official documents is prohibited. This is clearly stated in the Criminal Code of the Russian Federation, or more precisely, in Article 327. If a citizen forges a seal or stamp, he faces imprisonment for a period of 4 years. Therefore, under no circumstances should you break the law.
If the question arises of how to make IP printing at home, then you should forget about this idea once and for all. Such stamps are registered with the tax authorities and can only be produced by accredited companies. But such products are not always used only for official documents. For example, someone might be interested in how to make a stamp at home for letters that are sealed using a beautiful wax stamp. Also, such a product is suitable for a school or a club where children are given gaming certificates for participating in competitions, etc. You can create a beautiful drawing on the seal or indicate your initials and feel like a lord or even a king from a fairy tale.
What you need for regular printing
First of all, you need to have a laser printer with black and white ink. It is better not to use colored devices, as they usually contain a wax-based toner powder. This material is not capable of transmitting light rays, so the illumination will be of poor quality. The toner consumption on the printer should be set to the maximum value.
Also, before you print at home, you need to make sure that you have an ultraviolet lamp. You can buy the cheapest device for drying nails. Additionally, you need to purchase two glass plates measuring 8x8 cm and 2 paper clips. You will also need regular double-sided tape. It is better if its thickness is about 0.5 cm.
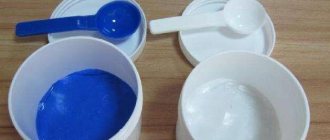
It is more difficult to obtain photopolymer. It is sold in specialized stores or on the Internet. It's easier with the other components. You need dish soap, a toothbrush, baby powder, a needle, a brush and a hair dryer.
Equipment and materials
First, let's get acquainted with the equipment and materials necessary for the production of seals, stamps and facsimiles using photopolymer technology.
- Exposure camera (in Fig. Soligor E60) with an automatic timer. It is a case with electronics and four ultraviolet lamps of 15 watts each.
- This camera comes with a print tanning tray.
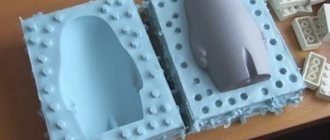
- 2 glasses to hold the print blank during exposure. There are 4 plastic stops glued to the glass, setting the thickness of the print, and 4 stationery clips.
- Border tape. It is necessary to create a closed loop around the print negative. It is a single-sided tape on a foam base and has a thickness equal to the height of the future print (2.3 mm). The protrusions on the glass are glued to the same height; they also prevent excessive squeezing of the uncured print.
- Scissors.
- Photopolymer. For example, Italian brand VE 108H. There are many photopolymers on the market today. You can choose the one that is most convenient for you to work with and which is cheaper.
- Density-toner is a spray with a pleasant smell. Designed to create optical density for a printed negative on film.
- Matte film for printing the negative of future printing on a laser printer. It is best to use matte film from the Japanese company Kimoto. It comes in A4 format, 100 per pack.
- Film substrate. This is a transparent film 100-150 microns thick. It is intended for the reverse side of the print and the polymer is covered with it. This film can be used from covers to bind documents.
Working with a drawing
Continuing to consider how to make printing yourself at home, let’s move on directly to the main work. To do this, the prepared negative must be printed on film.
The next step is to cover the side of the glass plate with double-sided tape. The result will be a kind of bath. It is necessary to pour photopolymer into it. It is best to use a syringe for this, as too much liquid may come out of the bottle. It is also important that no air bubbles get into this composition. Using this method, you need to fill the bath to the brim. If bubbles appear in the composition, then it is enough to pierce them with a regular sewing needle.
Next, if you decide to print at home, you need to attach the previously made negative to the photopolymer composition and lightly press it with your finger so that it sticks to the surface. In this case, a few drops of the composition may spill out of the bath, but this is not critical.
After this, you need to close the container using a second glass and secure the resulting structure with paper clips.
Thank you, your order is already being processed! We will call you soon!
You can continue to edit the ordered print, or create a new one
To continue, please pay 63
After payment, a button will appear in the designer
to download the layout, the layout will also be sent to your email
(If the button does not appear, refresh the F5 page)
.
Enter your email
If the payment page does not open, we recommend doing the following:
1. Disable the Adblock plugin (or other ad blocker
2. Clear your browser cache
3. Temporarily disable ad blocking in your firewall (antivirus) settings
An email will be sent to your email with a link to the saved layout.
Market relations are constantly developing, and the demand for documents and the equipment that produces them is increasing. And in order for each document to be made legal, it is necessary to fulfill a certain number of conditions, including: the mandatory presence of a date, information about an organization or person, the information that they want to convey, the signature of the person approving the legality of the transaction or the authenticity of a particular document.
If fake stamps and seals are discovered, authorities can throw a person in jail or ask for a huge fine.
Criminal liability may be attributed in cases where:
Working with a lamp
The resulting “sandwich” must be placed in an ultraviolet nail dryer with the negative side down. After this, turn on the lamp for one and a half minutes. You need to clearly record the time, so you should use a stopwatch. After this, we turn the “sandwich” over and send it out to dry again.
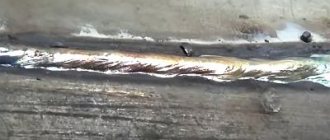
After this, you need to disassemble the structure. To do this, first remove the clamps, and then the sides. The seal itself will be sticky, so you need to rinse it under running water. Additionally, it is worth using a soft brush to wipe off the remaining polymer composition. You need to act with extreme caution. You need to wash the seal until it is completely clean. However, even after this it will be slightly sticky.
Photo paper
Of course, you can print photos on regular printer paper, but the durability and quality of such photos will be questionable. For photo printing, special paper is produced with a multilayer structure and a wide variety of coatings. We talked about them in detail in our guide to choosing photo paper. The most common are, of course, glossy and matte types. The glossy coating protects the photo from moisture, and the color shades will be bright and rich. At the same time, fingerprints are very noticeable on the surface of such photo paper, and the coating is also easy to scratch. So it’s better to store glossy photos in frames or photo albums.
Matte paper is more resistant to external influences. It does not produce such a rich range as glossy, but it conveys fine details better.
Before purchasing photo paper, be sure to check your printer's instructions to see what types and sizes of paper it supports. An image on the wrong paper will be of poor quality, or nothing will be printed at all.
In addition to the type of coating, photo paper is conventionally divided into branded and universal. Branded products include, for example, products from Canon, Epson, HP, which, in fact, also produce printers. Universal is the name given to paper from all other manufacturers. Branded photo paper, as a rule, is of higher quality and gives the best print, since its production takes into account the features of branded equipment and ink. In addition, you can download ICC color profiles for graphic editors from the manufacturer’s website. With their help, you can adjust the colors in your photos for better color reproduction and eliminate color distortions.
For compact photo printers, special kits are produced that include photo paper of the required size and a cartridge.
Drying the print
In order for the product to last a long time, additional processing will be required. First of all, the print must be dried using a regular hair dryer. This will help completely remove any remaining water. But that's not all.
Additionally, you need to sprinkle the finished product with baby powder and shake it off. After this, the seal will no longer be so sticky. But it is also necessary to remove the remaining powder. For this you will again need a toothbrush.
If the product is not hard enough, you can additionally illuminate it in an ultraviolet lamp. But, you should not hold the seal for more than 3 minutes. But you can do without this step.
Features of wax seals
Of course, today such products are used extremely rarely. Any stationery store has a lot of ready-made stamps for children, which differ in colors and low prices.
But there are also those people who love interesting experiments. For example, you can pleasantly surprise your beloved if you give her a beautiful confession, which is sealed in wax with a beautiful logo. Making such seals can be interesting as a hobby. Moreover, making such products is not difficult.
DIY stamp... made of plastic? Why not!
Once again, pay attention to the materials at hand that surround you every day. Plastic and polyethylene will help with this. By the way, plastic disposable forks can be used twice in this way in order to at least somehow justify their use.
Cocktail straws are a ready-made stamp in themselves. By the way, did you know that disposable cocktail straws are among the top items that pollute the ocean?
Take a closer look at plastic storage baskets, you may see interesting patterns on their bottom:
Beloved by many, bubble wrap solves the question of what to make a stamp from:
Like cling film:
How to make a round wax seal at home
To do this, you will first need to create a blank. So, you can use any small round block. Its base must be level, since it is on it that the engraving will be done. Additionally, you will need regular stain and a glass of sunflower oil. You also need a soldering iron or a special device for burning on wood (the first option is preferable).
The wooden piece should be treated with sandpaper to avoid getting a splinter during use.
If we talk about how to make a wax seal at home, the preparation begins with cutting out a small circle from paper, which in diameter corresponds to the size of the workpiece. After that, we draw on it our initials or any image that we want to immortalize in wax. Next, you need to very carefully cut out the image to create a template. Working with scissors is not very convenient, so the best option would be a blade or a special paper knife.
The next stage of how to make a print yourself is that the made pattern is applied to a piece of wood and carefully outlined with a pencil. It is best to use bold, this will make it much easier to translate the image. When everything is ready, you need to heat the soldering iron and burn out the picture. This will require some skill. Therefore, it is recommended to practice on another wooden surface first. The seal is quite small, so the work is almost like jewelry.
When the image appears on the wooden piece, it will be necessary to treat it with stain. After this, the wax seal can be considered ready. All that remains is to dry it and start using it.
Web services for creating stamps online
If you have a seal impression, you do not need to create its layout in the designer. Just contact a company that makes stamps. Our specialists will restore your stamp themselves and send it by mail.
MyStampReady
MyStampReady is a convenient stamp designer with a large number of ready-made templates with the ability to create a layout from scratch. Here you can choose one of three geometric shapes: circle, triangle or rectangle. You can independently adjust the line width, text location, and print color; add pictures – there are a lot of thematic images in the database. Plus, you can upload your own image in svg format to the service.
The downside is that you have to pay to download the created print: from $1.2 to $3.30 for one layout. The price depends on the number of formats in which the stamp can be downloaded: png, svg, pdf and docx.
I'll tell you how to create a seal/stamp using this site:
- Open the MyStampReady service. Click "New Seal" in the top right corner.
- Select the shape of the future seal/stamp: circle, triangle, rectangle.
- Specify the diameter of the circle, the length of the side of the triangle, or the width and height of the rectangle. The value is indicated in millimeters.
- The previously selected geometric figure will appear on the screen. Use the sliders on the right to adjust the line thickness and break. Use the Size (or Radius) slider to adjust the print scale.
- To add text along the circle line, click on the “Circle Text” button. Enter the desired text in the Sample field. For example, your company type (limited liability company, sole trader, etc.). Using special tools, adjust text parameters: font style, letter size, etc.
- You can add a second text to the same line in a circle using the same button. For example, you can enter the name of your city. Place the first text at the top of the circle, the second at the bottom. To do this, change the arc length and starting point for each text. You can switch between texts using the tabs located above the seal. Or you can click on the element on the print itself. To flip the bottom text, click on the upside down “A” icon (it’s located in the text options panel on the right).
- Or simply set up different text radii. Then they will be at different distances from the edge line of the circle, and, accordingly, will not merge. You can also add OGRN and TIN data to the second line of text.
- To add text to the middle of a geometric shape, click the Text icon. Here you can enter the name of the company or your full name (if you are an individual entrepreneur). Use the sliders to adjust the location of the central inscription if necessary: move it up or down, right or left. You can tilt the text (using the Rotation slider). You can also change the text parameters: font, letter size, thickness, slope.
- To add a themed picture to your stamp or your company logo, click on the last icon on the top toolbar. Click on the drop-down menu and select the subject of the image. Choose a suitable picture. Or click on the “Upload yours” button to add your logo (in svg format) to the service.
- Use the sliders to determine the size of the image and its position on the print: offset along the x and y axis, as well as tilt (Rotate tool).
- To change the print color, click on the paint can icon and select a color from the palette.
- If you want the stamp to have wear, click on the magic wand icon and click Continue.
- When the print is ready, click “Download print design”.
- Choose the tariff that suits you. Click "Download".
- Pay for your purchase with a bank card.
The service has a set of ready-made stamps where you can only change the text. The layout will make things easier for you. Click on the "Templates" button in the upper left corner. Find a stamp that matches your theme. You can use the search bar at the bottom left to find a seal for a similar company. Select the stamp with the left mouse button - it will appear in the designer.
Your task is to change the company name, TIN and OGRN data. You can also insert your company logo or any picture that matches your field of activity.
Print Expert
It’s even easier to work in the “Print Expert” service than in MyStampReady. Choose a suitable template (for individual entrepreneurs, LLCs, doctors, etc.), edit the text and order a print with delivery throughout Russia. Each template has a fixed price – 390 rubles.
Simply downloading a print will not work. Another disadvantage is that you cannot edit the print size manually. All stamps are created using a template only.
In addition to round seals, there are also rectangular and triangular designs.
I'll tell you how to work in the constructor:
- Open the service website. Choose a template that suits you. All layouts are grouped into sections: individual entrepreneurs, organizations, bookplates, stamps in the form of a triangle and rectangles. Click on the "Edit" link under the selected layout.
- Wait while the template editor loads. A list of elements on the layout will appear on the left, and the layout itself will appear on the right. Select the element you want to change, for example, last name. To do this, click on the corresponding item in the left panel. Or select this element on the seal itself, then click on the pencil icon in the upper right corner of the frame.
- Enter your last name in the field.
- Change the text for other print elements in the same way.
- To remove or change the position of some elements on the print, click on the arrow. It is located on the element item itself on the left panel. Select the required action: delete, clone, align centered or left/right (not suitable for all print elements), place in front or one level above/below.
- For some elements, such as stars, a Rotation option is available. Select an element on the layout and use the arrow button to position the icon.
- If you performed the wrong action, go back one step using the special arrow in the upper right corner of the constructor.
- To add any image to the print, click on the “Picture” button.
- Select a png image that is stored on your PC.
- Another item will appear on the left panel - for the newly downloaded image. Place the picture in the background so that it does not cover your name on the seal, for example. To do this, click on the arrow on the item and select the appropriate option in the menu.
- When the print is ready, click on the “Continue” button in the lower right corner of the designer.
- Place your print order. Select the delivery method and payment method (cash upon receipt or online payment by credit card).
Stamp Master
The Stamp Master service is similar in functionality to MyStampReady. Here you can simply download a print or order its production. Both services are paid. Simple download – from 69 to 129 rubles. Depends on the number of formats: png, pdf, eps, svg. Making a seal – 350 rubles.
You can add a QR code to the print. Use it to encode plain text, a phone number, or an email address.
I'll show you how to create a stamp in this service:
- Open the Stamp Master website. If you want to create a stamp from scratch, click on the “Create” button and select a layout form. If you want to use a template, select your organization type and preset print layout. The price for each template will be immediately presented.
- Scroll down the page a little and select the print size (cliché). Change the stamp color if necessary. To do this, click on the button with a can of paint and select the desired color in the palette. Only 4 colors available: blue, red, green and black.
- Use the Stroke slider to adjust the line thickness of the circle (rectangle or triangle, depending on what you chose in the first step). Using the third slider, the line of the figure can be made intermittent (that is, empty spaces and spaces will appear on the line).
- Enter text for the items in the appropriate fields.
- If you need to add a third element with text, for example, a phrase in the middle of the print, click on the first “Text” button (which does not have a circle). Another item will appear on the left panel - enter the required phrase there.
- Under the constructor itself there are text parameters: font type and size, bold and italic font. Change the parameter values as desired. Using the sliders, adjust the distance of the phrase from ), the length of the arc with the phrase (the distance between letters) and the starting point of the phrase on the print (“Rotation angle”). Using the left and right arrows you can undo any actions. I also recommend periodically clicking on the floppy disk icon to save changes to the layout.
- Click on the three dots icon for an element. A menu will appear. In it you can remove an element from the print, place it one level below/above, or in the background or foreground.
- Optionally, you can add a picture or QR code to the print. Click on the corresponding button on the vertical panel on the left. You can choose a thematic picture from the service gallery or upload your own from your PC. Accepted formats are svg, png, jpg and jpeg.
- If you added a QR code, enter its contents in the toolbar below: your phone number, email address, etc. Determine the size of the code (maybe it needs to be reduced) and its place on the print (specify the horizontal and vertical position, select the angle turn).
- When the print is ready, click on one of the buttons: “Download layout” or “Order print”. The cost of downloading and printing will be immediately indicated on the buttons. Delivery method: PickPoint points in your city. Delivery time is from 1 to 5 days from the date of production. You can pay for your order using a card from any bank.
How to Apply Wax Seal
In this matter everything is extremely simple. First you need to prepare the wax. It is best to take material of a thicker consistency without impurities, dyes and flavoring additives. The wax itself needs to be melted and poured a little onto the letter to fix its edges and seal it. After this, dip the seal in sunflower oil. This is necessary so that the workpiece does not stick to the wax base and spoil the entire image.
During this time, the wax will harden a little. But we must not allow it to completely seize. After this, just press the seal for a few seconds. When the wax hardens, it will leave a beautiful engraving, like in historical films.
All these arts
There are other ways to make fakes. Among them is drawing an image of a print on paper. But such fakes, again, are not difficult to recognize - by the discrepancy between the size and configuration of the characters and the typographic font, the presence of capital letters, the tortuosity, angularity of the applied characters, different widths of strokes and the way they are completed, errors and other signs.
In addition to a magnifying glass, if in doubt, you can also use a compass or ruler. This is necessary in order to measure the size of the print. You can do this - compare the doubtful print with the size of your company's seal.
I will not say that you need to “maniacally” study all the seals on documents. If a company has been working with its business partner for many years, then there should already be trust between them, and in this case there is no question of any verification. But with new counterparties, and even those that arouse suspicion, you need to keep your eyes open.
Marina Skoudutis
, for the magazine "Calculation"
Help your business grow
Invaluable experience in solving current problems, answers to complex questions, specially selected latest information in the press for accountants and managers. Choose from our catalog >>