How to weld a pipe in a hard-to-reach place
The work of a welder is difficult - sometimes you have to weld “on your knees” and in the most inaccessible places. Water and the crackling of hot metal, acrid, almost suffocating smoke, all this is associated with welding pipelines.
And if welding a fence or gate is one thing, then welding a pipe, and even in a hard-to-reach place, is a completely different story. Here welders have to be as sophisticated as they can, and they have their own secrets, which you can learn about below.
Technology of electric arc welding of metal pipes
Electric arc welding has technological standards and specific features depending on the material, wall thickness and intended purpose of the pipes.
Welding of fixed pipe joints
The connection of fixed joints is carried out in three ways, which depend on the location:
- vertically;
- horizontally;
- at an angle of 45 degrees.
The vertical method includes 4 stages:
- Welding a pipe to create a root bead. The most important stage is the formation of the joint, which will be the basis for all work. The inclination of the electrode relative to the surface: “backward angle.” The length of the arc should be adjusted: if penetration is insufficient, set it to short; if it is normal, set it to medium. Keeping the weld bead in a liquid state for a long time leads to the occurrence of defects. Therefore, with a large volume of the weld pool, the welding speed is reduced.
- Welding three beads and sealing. The rollers are performed at high speed. Depending on the direction of the slag, rectangular or “backward angle” welding is used. The top edge of the last roller must have a minimum value up to the top edge. Usually equal to the diameter of the electrode.
- Forming a lock at the beginning and end of the rollers. The formed lock is the beginning of the roller with a 5 mm offset from the previous one. When making a joint, the roller must be continuous along its entire length.
- Welding on the front side. It is performed at high speed and aims to form a flat surface. Welding ends when it goes beyond the beginning of the seam.
The horizontal method requires professional skills. It is produced at different welding current values and at different angles to the part. This technique involves three stages:
Within one stage, welding takes place continuously, starting from the “backward angle” position and ending with the “forward angle” position.
Welding at a pipe angle of 45 degrees begins with creating the first bead at an electrode angle of 90 degrees. The seam is made by continuously melting the second roller. After filling the base, the first roller is melted. This creates connections horizontally and vertically.
Welding pipes “under clearance”
The technology provides the following conditions:
- dullness size: 2-2.5 mm;
- gap between edges: no more than 3 mm;
- opening angle: in the range from 60 to 70 degrees;
- additional processing of edges by chamfering to give them the required shape and eliminate irregularities;
- the difference in the thickness of the welded walls should not exceed 3 mm or 10%.
Welding of high pressure pipelines
A feature of welding high-pressure pipelines is the need for preheating of the joined elements to 300 degrees C, which is maintained throughout the entire tack and welding process.
When cooking gas pipelines, take into account:
- That thick-walled pipes are used for gas mains, which increases the overall labor intensity of the work.
- There are increased demands on the quality and reliability of the weld, so professionals with extensive experience are involved in the work.
- The entire system as a whole (pipe, as well as joints, welds) must be resistant to corrosion. After the end of cooking, to relieve thermal stress, a section of 10 cm in each direction from the seam is heated to 500-600 degrees C. For this, thermal ovens, induction heaters, and gas burners are used.
When heated, the ends of the pipes are closed to prevent cooling and air movement in the pipe.
Automatic welding
The so-called submerged arc welding involves feeding an electrode wire into the combustion zone of an electric arc using an automatic welding head. In the molten state, the wire metal enters the weld pool and mixes with the base metal.
Automatic welding allows:
- speed up and stabilize the process;
- make the arc invisible;
- expand the range of parts in thickness;
- make the seams more resistant to the formation of cracks and pores.
Flux has a positive effect on the stability of the arc and the chemical composition of the weld. To carry out automatic welding, the ability to rotate the joint is necessary.
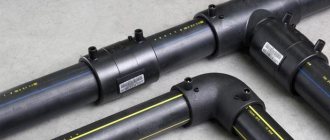
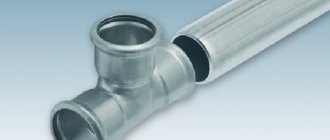
Welding large diameter pipes
In more than half of the cases, the connection of steel main pipelines is carried out using pipe welding machines. When it is impossible to use the mechanical method, for example, due to localization features or limitations in manipulating the pipe, manual welding is used, carried out by a team of welders.
For main pipes with a wall less than 6 mm, two layers of welding seam are used, and more than 6 mm - three. The reverse roller of the root seam can have a height of up to 3 mm. In those places of the root weld that are welded poorly, additional welding is carried out from the inside of the pipe. This requirement also applies to that part of the root that was made in the ceiling position: the lower quarter of the joint perimeter is welded from the inside. Rotary joints require welding along the entire perimeter of the joint. Welding is carried out with 3-4 mm electrodes.
Large diameter pipes require the use of special centering equipment.
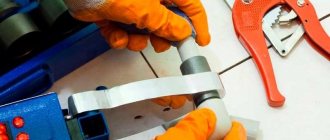
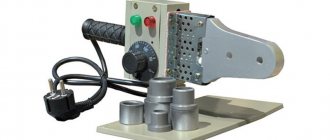
Sequence and important rules for soldering polypropylene
Although the equipment for soldering polypropylene is not too difficult to operate, the following rules should be observed when working with it:
- It is advisable to install the soldering iron on a flat surface and securely fix it in case of installation of individual sections of the pipeline.
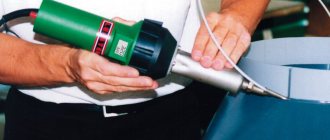
- The standard soldering temperature for polypropylene is 260º C, in budget models this temperature is reached within 10 - 15 seconds, modern expensive models heat up the nozzles in 5 seconds.
- During operation, the pipe and fitting heat up simultaneously; for each device, the instructions indicate its own heating, contact and cooling time for the joint, depending on the material and outer diameter of the pipeline line.
The PPR soldering technology consists of the following sequence of preparatory and installation operations:
- First, individual sections of the line are joined, so the welding machine is placed in a spacious place where surrounding walls or objects will not interfere with the installation of pipeline sections of the required length. Also, the soldering iron should be placed on a hard and level surface away from flammable objects.
- When soldering, it is very important that the ambient temperature does not drop by less than 10º C, otherwise the surface of the parts will quickly cool down and welding will not occur. If the work will be done in a cold room, it is necessary to warm it up.
- When installing complex lines, it is better to make an accurate drawing indicating dimensions - in this case, you can distribute the work of welding long chains in convenient conditions away from the walls. Next, the segments will be soldered in weight near the walls directly at the final location points.
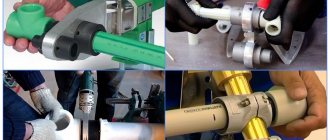
Fig.6 Technology for proper soldering of polypropylene
- The percentage of defects can be reduced by a significant amount by purchasing all materials from one manufacturer - the parts will not only have the same dimensions, but also the same chemical composition, which promotes the best diffusion.
- In some cases, an unscrupulous manufacturer produces soldering iron tips with different sizes of forward and reverse parts - they should also be checked by inserting them into each other. Similarly, the material is pre-checked for compliance with the diameters of the nozzles.
- The pipe is cut using pruning shears strictly at an angle of 90 degrees; reinforced materials are best cut with a grinder with any disc.
- When carrying out welding work, after cutting to the required length, the surface of the parts is cleaned of dirt and degreased; if a previously installed line is connected, the water is drained from it, and the joints are wiped with a dry cloth.
- First, you should put the required nozzle on the device in accordance with the diameter of the PPR and turn it on to warm it up to a temperature of 260 C. In expensive devices, this temperature value can be visually seen on the indicator board; in cheap models, it is set by a regulator of the corresponding diameter and is maintained for a certain time, after which A signal light indicates that the soldering iron is ready for use.
- After the device is ready for operation, we simultaneously press two fittings onto the nozzle, having previously marked the immersion depth on the part of a smaller diameter with a pencil. Simultaneous pressure on the workpieces from both sides allows you to securely fix the soldering iron in one place.
- The parts are held on the attachments for the time specified in the instructions; the report can be carried out by saying to yourself the numbers 1001, 1002, and so on.
- After heating, the workpieces are removed and immediately inserted into each other to the mark indicated in pencil, avoiding turning, they are also kept motionless for a certain time.
- After maintaining a certain cooling period, proceed to welding the next joint.
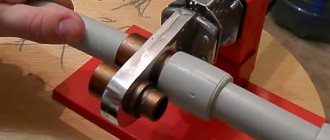
When welding on walls, it is inconvenient to hold the parts suspended, so the pipe is fixed in clips or couplings, moving it to the required distance.
Rice. 7 Soldering polypropylene pipes in hard-to-reach places with tap insertion
A situation often arises when it is necessary to insert a tap into a pipeline to insert a fitting valve or coupling when repairing a damaged area. When installing a crane, it is better to weld several sections in the following sequence:
READ ALSO: What Could Be Swollen Cones on Polypropylene Pipes
- First, cut the pipeline, cutting out a segment of the required length from it with scissors according to pre-calculated marks, drain the water and clean the dry-welded surfaces from grease, dirt and moisture.
- Pull the right section of the pipe away from the wall, insert it into the nozzle of a soldering iron previously prepared for use, and on the other side connect the fitting of an open tap (this is necessary to bleed air).
- Welding is carried out according to the above technology, then move to the other side. Before work, it is necessary to prepare a support for the soldering device (scissors, adjustable wrench), since soldering will take place by weight.
- Bend the left pipe to the side and warm up the bell of the faucet for a few seconds more, after which they quickly insert the pipe end into the nozzle, warming it up a few seconds less.
- Then the elements are joined, pressing them tightly against each other in compliance with standard time intervals.
Related article:
How to weld a pipe with water - several proven options . If you are faced with the problem of a leaking steel pipe, but there is no way to turn off the water, then on our website there is a separate article that talks about options for welding a pipe under pressure with water.
How to weld pipes using electric welding using an inverter?
The presence of grease, dirt, and dust prevents the high-quality connection of metal molecules.
Centering and joining of pipes
- Centering and joining of small-diameter products is carried out by fixing them using improvised means or using assistants.
- Center large pipes (from 60 mm) with special equipment - a centralizer: internal or external. Both have an electro-hydraulic drive. Internal ones are more preferable due to the fact that when they are used, the joint remains uncovered. This allows the use of automatic welding machines, and also does not limit manipulations during manual connection.
- Do not allow deviations when using the manual alignment method. It is impossible to dock perfectly without a centralizer, but try to minimize the deviation.
- Having connected the pipes exactly, proceed to welding the root seam.
Root welding
- Cook the seam under the following conditions:
- minimum current;
- reverse polarity;
- short electric arc;
- dry electrodes;
- lack of wind in the pipe.
- Cook vertically, the electrode is perpendicular to the plane.
- Use an electrode to melt the edges - a bridge will appear between them, which is called a weld pool. In front of the jumper there is a so-called technological window.
- Carefully monitor the size of the technological window: throughout the entire process it should remain the same diameter.
- Make a root seam no more than 1 mm high. The return roller should also not exceed this value.>
- Clean the beginning and end of the seam and the transition area between the electrodes to avoid the formation of pores in the metal, the presence of which will sooner or later lead to loss of the pipe’s tightness.
Filling and capping of the weld
- After welding the root, fill the entire seam section.
- Depending on the wall thickness and material, use a single-layer or multi-layer penetration method.
- The movement of the electrode during filling is a triangle: edge 1 - edge 2 - technological window.
- Pay attention to the heating of the edges and root seam. The greater the heating, the wider the filling step.
- After each layer, clean the surface of slag.
- If you have the skill, and if the wall diameter allows, fill and cover in one pass.
Video lesson on welding pipes under clearance
Advantages and disadvantages of electric welding
It is possible to highlight the following advantages of welded joints:
- Possibility of obtaining connections of enormous sizes.
- No transformation of external and internal dimensions due to the connecting seam.
- Use for welding of a material similar to the pipe material, due to which all the properties of the pipeline are preserved.
- simplicity and low cost of the method.
Defects in welded joints are mostly caused by the low qualifications of the welder due to his inexperience, technology requirements and non-compliance with the rules, which caused incomplete welding, the formation of cracks, residual stresses and displacements in the weld area as a result of underheating or overheating. Another drawback is the difficulty in adjusting the arc to ensure uniform conditions for the formation of a seam joint, since the electrode in the arc invariably melts and moves unevenly along the surface of the pipe. In addition, it is possible to determine the level of quality of the connection without the use of special devices, and to evaluate the structure of the replaced metal only by external indicators.
Welding gas pipes under pressure
Welding special gas pipes for transporting high-pressure contents places increased demands on the process.
Gas pipe welding technology
Features of welding pipes for transporting high-pressure trains are determined by two characteristics:
- Thick walls and small diameter.
- Aggressive effects of transported gases.
Pipes up to 10 cm in diameter are welded manually, above - using semi- or automatic welding with manual welding of the root of the seam. For diameters greater than 6 cm, special rings are used. The weld is made multi-layered - from 4 layers and above, depending on the load on the pipeline and the characteristics of the material. After completing the work, a mandatory inspection is carried out - flaw detection inside and outside the welding site.
Yulia Petrichenko, expert
Video lesson on welding gas pipes
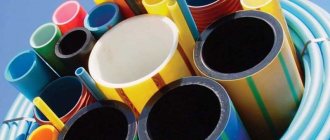
What are the tools for stripping polypropylene pipes?
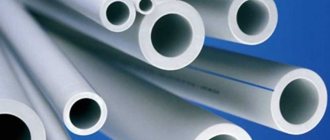
Proper pipe stripping begins with tool selection. Its type and design depend on the type of reinforcement (external, internal) and diameter. For end brazing, special edge removal machines must be used. But polypropylene products are rarely made with a diameter of more than 60 mm. For this purpose, polyethylene pipelines are used.
Drill attachments
To install a pipeline with your own hands, you can buy several manual strippers for standard diameters - 16, 20, 25 and 32 mm. An example of a tool for external processing is the MasterProf or Newton series of models. Each is designed for two diameters, for example - 20x25 or 16x20. The knives are arranged vertically, they can be replaced and position adjusted.
Manual removal is convenient for small jobs. If this needs to be done en masse, it is recommended to purchase special drill attachments. They also differ in size, but all are designed to fit in a standard drill chuck. These are the optimal stripping tools for 20-25 mm polypropylene pipes.
How to choose manual or drill type cleaning:
- made of tool steel;
- corrugated surface for easy fixation;
- for manual models, the length of the knob is from 15 cm, it is possible to replace it;
- Drill attachments (shaver) can be of different diameters. This is achieved by adjusting the position of the blades.
An additional tool is a vice or clamp for fixing the pipe. This will make it more convenient to treat the surface; removal will not require much effort.
Working with a trimmer
A trimmer is necessary for cleaning the ends. It differs from attachments and shavers in the arrangement of the knives. Their plane is in a horizontal position at a slight angle. The aluminum layer is chamfered up to 1 mm. The advantage of this tool is its versatility. It is used to level the plane of the pipes, which affects the soldering accuracy.
Features of end trimmers:
- the ability to adjust the location of the knives, which will allow you to use one nozzle for pipes of several diameters;
- There are models for manual processing or installed in a drill;
- standard diameters are 20/25, 32/40 and 50/63.
The depth of chamfering depends on the evenness of the cut of the pipe. Often a trimmer is used first to level the plane of the end and then to clean the surface. Only a small part of the foil layer is removed, which eliminates its appearance at the soldering site.
Tip: according to reviews from craftsmen, plastic end caps have proven themselves well. They are suitable for arranging central and autonomous water supply and heating.
Possible errors and defects in the weld
- A large current when cooking the root leads to the formation of a hole instead of a technological window through which the metal will drip down. Provide a current of such strength that the metal has time to cool literally immediately after the movement of the electrode.
- If the process window is not visible, most likely the current strength is too low, and it must be increased.
- A small bluntness leads to an increase in the technological window and to sagging of the metal inside the pipe.
- A gap of more than 2 mm guarantees the appearance of pores in the seam - the work will be unsatisfactory.
- When welding with an electrode, you cannot make jump movements of more than 5 mm in length.
Welding steel pipes is not an easy task for a beginner. With practice will come experience and an intuitive feeling of what should be done and at what moment in order for the weld to come out perfect.
Perhaps you are a professional welder and have something to share with your readers. Leave your opinions in the comments.
Yulia Petrichenko
Welding a pipe through transmission: video tutorials on how to weld pipelines of any diameter - printable version
THE MOST INTERESTING IN THE RUBRIC “Pipe Welding”
When installing heating pipes, you often have to connect them by welding. Of course, in some cases a threaded connection may be suitable, but the percentage of this method is much smaller.
As for welding steel pipes, this method has several varieties. For example: manual electric arc, gas welding (semi-automatic, automatic). To connect steel heating elements, the first type of welding is often used.
To weld steel pipes using manual arc welding, you need to use special electrodes that perform the function of an additive. They perform two functions: they conduct current to the arc and fill the seam. Their composition, dimensions and other characteristics are established by GOST. Today on the Internet you can find quite a few videos showing how this or that type of welding is performed.
The manual arc technology is quite simple, so you can do it yourself. It all starts with preparation.
Material properties
The weld metal must have similar toughness and strength as the base metal. Therefore, it is necessary to study the brand of electrodes for pipe welding, which must comply with the DIN EN 499 standard. This document regulates the tensile strength, yield strength and toughness of the weld metal.
For example, electrodes with the designation E 46 3 B 4 2 H5 have the following parameters:
- The letter E denotes electrodes intended for manual welding. You can use such electrodes for welding water pipes.
- Next comes the yield strength indicator, 460 N/mm2 is considered the minimum limit.
- The next designation is the temperature conducive to crack development, -300C.
- B - means the type of coating, in this case - the main one.
- The next number is the applied current. 4 – welding using direct current.
- Next comes the designation of the direction of the seam. 2 – any, excluding vertical.
- The last designation is the amount of hydrogen that the deposited metal may contain. H5 means 5 ml/100 g.
Preparation
First you need to start preparing the pipes. Surfaces that are planned to be welded must be cleaned and degreased. This is the only way to avoid defects in the seams.
Products must have an appropriate opening angle of the edge; perpendicularity to the plane of the end of the product axis must be maintained. The preparation of large-diameter heating pipes is carried out using milling machines or gas-acid cutting.
Dimensions, compliance with the thickness of products, chemical composition, mechanical properties - everything must be combined with the requirements of GOST.
It should be noted that often the amount of blunting is about 2 mm, and the opening angle is about 65 degrees.
An important stage of preparation is the choice of materials.
Electrodes
You can weld steel heating pipes correctly if you choose the right electrodes. There are two types of them: non-melting and with a melting base. The gradation is based on the type of electrode core. For the non-consumable type, electrical coal, graphite or tungsten is used. As for the melting one, it is made from welding wire, which can have different composition and size. In our case, electrodes with a diameter of 2 to 5 mm are often used. Larger products can be cooked with a larger electrode diameter.
How to make a connection?
Let's figure out how to connect two parts of a pipeline without using welding and threaded fittings. Most often, the following methods are used:
- installation of Gebo coupling;
- installation of a clip or clamp;
- flange connection.
Gebo coupling
This is the name given to a special fitting; it can be used to manually combine two pipes into a single line. The coupling contains:
- frame;
- three rings - sealing, clamping, clamping;
- screw.
To install the coupling, put the nut and all other parts on the pipe in order, the coupling is put on last, it needs to be put on halfway, tightening the nut. Then the part that they want to connect to the pipe is joined to the fitting in the same sequence.
The reliability of the connection when using a Hebe coupling depends on how correctly the work was done. If everything is done correctly, the joint will be absolutely airtight and will last a long time.
Installing a repair coupling or clamp
The pipeline can be repaired or modified using a mounting clip. This part consists of two halves, which are bolted together, tightly gripping the pipe.
Carrying out work:
- If repairs or joining of previously used pipes are carried out, then the joint must be cleaned of scale, paint and any other contaminants. The surface must be completely clean and smooth;
- then a rubber seal is installed at the connection point, detachable parts are placed on top on both sides;
- the parts are tightened with bolts.
This method is very simple, but it does not provide a sufficient degree of reliability, so it should be used on non-pressure pipelines or as a temporary measure. Installation of the clamp is carried out in the same way. The difference between this part and the repair clip is that the clamp is tightened on one side, and the clip on both sides.
Flanges
Another simple way to connect pipeline parts is to install flanges. Flanges are parts in the form of a ring into the center of which a pipe or pipe is inserted.
Identical flanges are put on the ends of the parts to be connected, which are then connected to each other and tightened with bolts. A gasket is installed between the flanges. Making a connection:
- The parts to be joined are prepared; the ends must be cut exactly at an angle of 90 degrees, cleaned of paint and dirt. Chamfering is optional;
- flanges are put on the prepared parts;
- rubber or paronite gaskets are installed;
- two parts with flanges installed on them are connected;
- The bolts holding both flanges together are gradually tightened. The bolts should be tightened gradually and crosswise, not in a circle.
Welding process
Potholders
You should start welding heating pipes with tacks. This is the technology of butt connection.
They are part of the seam. To perform them, electrodes of the same type are used that will be used for main welding.
If the diameter of the products is up to 30 cm, you can make four tacks, evenly spaced. Length – 5 cm, height – about 3 mm.
You can butt weld a large diameter product by making tacks every 25-30 cm. Welding is performed in three layers if the wall thickness is up to 1.2 cm. You should strive to ensure that most of the joints are made in a rotary position.
Rotary method
First, a seam with a height of about 3 mm is made, using electrodes with a diameter of 2-4 mm. Then electrodes with a larger diameter are selected to create subsequent layers.
Welding large diameter heating pipes
The joint should be divided into four sectors. They are performed in two sectors in the upper hemisphere of the pipe, gradually rotating the product. And only the third layer is performed in one direction, rotating the pipe.
Nuances
If you are connecting products that operate under pressure, they are usually located near the walls of the room, so welding such pipes is not very convenient. The process begins at the lower section of the heating system, from the center.
To come in
Already registered? Sign in here.
There are currently 0 users on the page
There are no users viewing this page.
In autonomous heating systems, where a boiler with a high-temperature coolant is used to connect pipes, electric welding is most often used. This method of connecting pipe joints is airtight and reliable, which is especially important under severe thermal loads.
Selecting a welding machine
Without stopping at specific brands and models, when choosing a welder, you need to pay attention to the main characteristics and parameters. What does it mean?
To perform the specified work, transformer and inverter type devices are offered. The difference is in price, dimensions, weight.
A distinctive and positive feature of inverter equipment is the nuance that when the voltage is not constant, below 220 V or during fluctuations, it does not “sag” in power. In addition, you should pay attention to the following parameters:
- Welding current. The higher the maximum current, the larger the diameter of the electrode that can be used, and this affects the size and depth of the seam.
- Duty cycle. In order for an inverter model to function for a long time and efficiently, it needs a short break (downtime) after a certain period of work. The ratio of these intervals constitutes the work cycle.
The percentages in the passports for the device can be of two standards: 5 minutes and 10 minutes.
How to decipher this?
Example 1. In a 10-minute cycle, 50% - you need to understand that we are talking about 5 minutes of work and 5 minutes of downtime.
Example 2. In a 5-minute cycle, 60% means 3 minutes of work and 5 minutes of rest.
The cycle may be different at different currents, this must also be taken into account, that is, the lower the current, the longer you can work and the less rest.
After a little practice, you will be able to independently adjust the cycle based on the technical characteristics of the purchased device.
- Another aspect that will indirectly indicate the reliability of the equipment. If the warranty period is more than a year, say 3, then naturally the device will last longer than one that is ready to be serviced only for 6 months.
Checking the reliability of connections
Often you will have to control the quality of the weld seam and the tightness of the system yourself by visual inspection.
To do this, first the seam must be cleaned of slag and tapped with a light hammer. Next, visually inspect the seam itself for chips, cuts or cracks, poorly cooked pieces or burns through, as well as other defects.
The last step will be to measure the thickness of the seam. To do this, you can use standard instruments, as well as probes, templates and other devices.
Please note that the gas transmission or water supply system must also be checked for leaks. To do this, perform a test run of the liquid under pressure.
Welding, step by step steps
The thermal process that occurs during electric welding connects the parts with a strong seam, which will have better mechanical properties in contrast to gas welding.
So, how to learn to cook? When we are talking about a pipe in an accessible place and with the possibility of rotation, then two sections of the pipeline are connected end-to-end by one or three electric welding points. Then:
- continuously (if you can rotate);
- with a tear, starting from the bottom, if the position of the pipe is inconvenient and it is impossible to rotate it, a seam is made.
Welding in hard-to-reach places
Soldering hard-to-reach areas of polypropylene products is much more difficult than straight runs. To create favorable working conditions in such places, a sufficient amount of effort is required.
“Inconvenient” places include:
- Space under the ceiling.
- Corners of the room.
- Cramped conditions for placing a soldering iron.
When welding polypropylene pipes in hard-to-reach places under the ceiling, you need to prepare a place where the welding machine will be placed when manually forming the connection. For this purpose, you can invite an assistant or hang the device on a special hook prepared in advance.
Water supply
Before proceeding directly to electric welding, you must prepare a diagram of the future water supply, with the location of all communications. Such a layout will allow you to make the wiring optimal and be well prepared for a high-quality connection of pipes using a welding machine.
What must be observed.
- The hot water riser goes to the right, the cold water riser goes to the left (if vertical). In a horizontal position, the pipes run parallel - the hot water pipe runs above the cold one.
- There must be a slight slope, which, if necessary, will allow water to be removed from the pipes. The slope is directed towards the riser or water intake point.
- The distance between risers, pipes and the wall must be maintained.
Welding protection
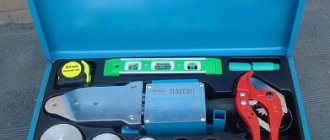
Tools for work
A special soldering iron for polypropylene pipes and a set of Teflon nozzles help to make a high-quality connection of pipe elements. Using a soldering iron, you can easily make a welded connection on any section of the pipe. Using nozzles, you can connect pipe elements of different diameters.
In addition, soldering polypropylene pipes in hard-to-reach places requires the following tools:
- A device for cutting polypropylene pipes (most often the cutter comes complete with a soldering iron).
- A solution that allows you to degrease the soldering area.
- Set of connecting elements.
You also need to prepare a tape measure, ruler and pencil, as well as a corner and a knife. In some cases, a rag may be needed.
How to weld water pipes using electric welding?
Start from the bottom center point of the pipe. To ensure that the ceiling welding stitch is smooth and of high quality, the electrode is drawn perpendicular to the welding site. From the bottom to the center to the top and symmetrically, on the other side, the same.
A vertical seam can be made pointwise, with the electrode positioned upward at an angle.
The horizontal section of the water pipeline is the most convenient and simplest for welding work. But, as with everything else, you need to be careful not to burn through the metal.
There are situations when welding needs to be done on a pipe close to the wall. In this case, a hole is cut in the pipe in order to make a seam along the inner wall, and then the rest of the joint is processed and a seam is made. Also, in difficult-to-see areas, so that the process is not done blindly, an ordinary mirror is used, which “shows” an invisible piece of pipe and electric welding is carried out based on the reflection.
Features of welding a pipeline with an inverter
The electric arc welding method is suitable for creating a vertical seam, provided that it is located at the end of the pipe. If a horizontal seam is created, the latter should be on its circumference. If you have to make ceiling and bottom seams, then they should be at the top and bottom. Among all those mentioned, it is the last one that creates fewer problems in implementation.
If you have to deal with steel pipes, then the butt welding method is most often used, which involves welding each edge along the height of the walls. To minimize sagging inside the pipe, the electrode should be positioned at an angle of no more than 45 degrees relative to the horizontal. Such a seam should reach a height of 2–3 mm and a width of 6–8 mm. If the products are overlapped, then the seam will have a height of 3 mm and a width of 6–8 mm.
Preparation
Before you begin electric welding of metal products, you need to complete the following preparatory measures:
- It is necessary to remove the top layer from the welded aliment.
- If there are any irregularities at the ends of the pipe, they need to be cut off or straightened.
- Next we begin to process the edges. Here it is necessary to smooth out at least 10 millimeters of the surface adjacent to the edges of the pipe outside and inside until a metallic sheen appears.
Main stages
If the walls are 6–12 mm wide
Particular attention should be paid to creating the first seam, since a lot depends on it. It must be performed in such a way that it melts every edge and dull areas
It is very important to examine it very carefully, as there may be cracks on it. If they are found, they must be melted down or cut down, after which the area is welded again
When creating the remaining layers, you need to slowly turn the pipe. It must be remembered that the beginning and end of each layer should be located with an offset relative to the previous layer at a distance of 15–30 mm.
Warmth in the house
Also, in addition to water, electric welding is used when installing a heating system, both in a private home and when installing individual heating in a high-rise apartment building. However, most often in the private sector. This is what we will proceed from.
Any global process, and heating is serious and difficult, must begin with preparation. The entire layout of the heating pipeline, the location of the boiler, bends, joints, bends, leading the pipe through the rooms through the walls, etc. are planned.
How to weld heating pipes using electric welding? The step-by-step process of electric welding is described above. But when connecting heating pipes, not only high-quality seams are important, but also correctly done wiring.
Pipe welding process
In order for the welding process not to turn into hell, but, on the contrary, to be simplified thanks to the thoughtfulness of all the nuances of the wiring (availability of connecting joints for welding work, convenience, minimum number of different bends and additional bends, etc.), it is necessary to consider the following points.
- You can choose a single-circuit or double-circuit heating system, depending on what you ultimately want to get - only heating or also the presence of hot water.
- Run the line in the attic or downstairs, along the walls.
- If the communication is located at the bottom (and it is the most economical in terms of spending money), prepare holes in the wall for laying heating pipes through the rooms.
If all the above points are taken into account, you can proceed directly to the process of connecting pipes by welding.
- First, all pipes are laid according to the chosen layout.
- Then you can start welding, observing the slope (controlled using a building level) required for the slope.
- First of all, the joints of the main line are made.
- At the final stage, the boiler is “piped” with the installation of an expansion tank and pump.
Weld joint quality control
Having completed the electric welding, an external inspection determines the presence of burns, pores, fistulas and other visible defects. To detect microcracks that are invisible to the naked eye, the mounted area is usually connected to the heating system. If water droplets do not appear on the seams, the work has been done efficiently. This method of checking is acceptable in a private home, where the system can be filled at any time.
In apartments with central heating, the quality of welded joints is checked in the summer using a compressor. Plugs are placed at the ends of the pipes, the joints are coated with soap foam, and air is pumped in under pressure. Places where there are flaws are identified by bubbles on their surface.
It is better to replace or install new heating pipes in the summer, so that most of the welding operations can be performed outside. There should be no flammable materials in the room near the place of work. If you still don’t have enough experience in welding pipes, you can first weld a few unnecessary scraps, so as not to spoil the new workpieces later.
Safety first!
Safety rules for welding work are described in the relevant GOSTs, but who will read these long provisions, written in compliance with all legal formalities. And yet. The process of electric welding is very responsible and dangerous, and therefore it is necessary to know those norms and rules that will preserve health and life! Here are the basic TB regulations.
- ”
- The technology of the electric welding process should provide for maximum mechanization.
- Necessarily! The presence of exhaust ventilation in a closed room or at home open windows or vents.
- Necessarily! Availability of grounding (the welding machine comes with two wires, one of them with a tip that is used as a “ground”).
- Good lighting of the room and areas where the pipeline will be welded.
- Consumables (electrodes) must match the type of work to be performed. It would be good to purchase quickly cooling and filling electrodes (for home use).
- Important! Use of personal protective equipment.
>
Indications
The instructions for using the product indicate the following ailments:
- the occurrence and accumulation of a large volume of gases in the esophagus, called flatulence, as well as Roemheld syndrome;
- intestinal colic in infants;
- symptoms of increased gas formation, which are formed due to functional dyspepsia;
- preparatory process for ultrasound examinations, x-rays, computed tomography;
- severe intoxication with cleaning solutions that include foaming ingredients such as detergents.