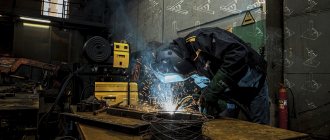
Welding work sometimes requires less effort and time compared to preparation for it. Their main part is the assembly of a welded structure, during which it is necessary to fix the elements in the required position. This work requires attention from the master, because the quality of the products depends on it.
If, after careful alignment and installation of the workpieces, the structure falls apart from the touch of the electrode, it will be a shame; you will have to assemble everything all over again. It also happens that an element is welded, but not in the required position. This can occur when there is subtle movement or deformation after the metal has cooled. That is why before starting welding work it is necessary to stock up on all the necessary equipment.
Solution
In order to avoid such mistakes, special welding devices are used. They allow you to save energy and time, ensuring high quality output products. Today there are many known mechanisms and devices that can be used for welding work. If people work in an industrial environment where mass and serial production is established, they use automated and mechanized equipment, this should include stacking mechanisms, transport devices, technological assembly devices, etc. If the master has to work at home, then he can use welding devices, which it is quite possible to make on his own. They will reduce the deformation of parts.
Installation mechanisms
Special welding fixtures are required in order to set the correct location in space of the elements to be welded. The most widespread are:
Stop devices are designed to fix the workpiece on the main surface. Most are used constantly, since the weld provides only a high degree of sealing. In addition, there are also folding versions that can be dismantled if necessary.
Often it is necessary to maintain a certain angle of pipe placement. For this purpose, special corners can be used, which are made from a variety of materials.
Prisms are designed for fixing a cylindrical profile workpiece. As a rule, such structures are made of metal corners. If necessary, the required elements for fixation can be made independently using welding equipment.
Making a clamp
Without a clamp, which you can make yourself, no welder will be able to cope with the job. In addition, this tool helps solve problems during plumbing and carpentry work. This device can have different options - specialized and universal. Recently, another modification has appeared, which is a quick-release clamp. With its help, you can provide a compression force of up to 450 kg. However, the main task of such tools is to fix the workpieces for interconnection.
Mechanisms with magnets
Devices with magnets are produced for welding work. An example is various angles. The main purpose is the correct arrangement of sheet material when connecting them.
Mechanisms with a permanent or electric magnet are produced in the form of a square and some other common shapes. Due to the influence of the magnet, reliable fixation of the workpieces relative to each other is ensured. In this case, after completing the work, you can quickly remove the structure.
Today, when creating clamps, various magnets, both permanent and electric, can be used. The latter are less practical, but provide greater force on the workpiece.
Working on an angle clamp: preparation
Welding devices are offered for sale today in a wide range, but you can make an angle clamp yourself. The tools and materials for carrying out the work are:
- steel corner;
- threaded studs;
- nuts;
- drill;
- steel plates;
- rods for gates;
- welding machine;
- tap.
Prefabricated welding devices for profile pipes and their types
Common welding fixtures are created in order to provide the most favorable working conditions, thereby increasing the quality of the resulting seam. All of them are divided into several types:
Similar mechanisms for installing and fastening profile pipes can be made from a variety of materials. It is recommended to pay more attention to the choice of welding fixtures, since they largely determine the quality of the result obtained.
Carrying out work
At right angles, the corners must be attached to the steel plates. A worm-type structure is fixed on each side by welding. This is a corner with a welded nut or thickening, in which a thread should be cut taking into account the knob stud. In this case, it is also important to pay attention to the potential workpiece, because it determines the width of the working gap. If the range of part sizes is wide, then it is best to prepare several clamps.
The collar pin is screwed into the working nut, and a stop is then assembled at the end. This design consists of two metal washers of different sizes. It is important to ensure that the stop rotates on the stud. The driver on the reverse side must be equipped with a hole into which a steel rod is installed. It will act as a lever. Such welding fixtures are assembled correctly if they can be used to securely fix steel parts. The design is very simple, and it can be made from scrap materials.
End welding of pipes is a rather difficult task. In this case, the workpieces will need to be precisely oriented in space. If a piece of pipe is welded to the finished system, the task will be simplified. But loose workpieces need to be welded with outside help or using a special device. It is necessary to use steel plates and a metal corner during the work. The clamp halves are attached traditionally; for this you need to use threaded rods. As a result, it will be possible to obtain an effective and simple design.
Material
Any owner of a country house or owner of a summer cottage will probably have metal waste on their farm. These may be the remains of pipes after the installation of a gas pipeline, water supply or heating systems. A real owner usually does not throw away the remains of a steel angle, channel, or pieces of reinforcement. You can also find used nails, bolts and nuts.
Such scrap metal very often becomes a material for new repairs or improvements to old ones. There will probably be outdated garden tools, chains, old dishes, as well as spare parts from a car, motorcycle or bicycle in the garage or shed that have not yet been handed over to collection points.
From all this you can make useful and practical metal crafts. With your own hands, using welding and available handy tools, you can repair old garden tools or make new ones from waste, taking into account personal experience, your preferences and business conditions.
Making pliers
Homemade welding devices also include pliers. You can collect them, but you need to be patient. To carry out the work, you should prepare a copper dart, the length of which is 2 m. Its diameter should be 30 mm. This workpiece may turn out to be slightly longer, in which case it will be possible to bend it. The element is bent to form a horseshoe-shaped blank. 18mm holes are made at the ends, then you need to turn them around and make a cut.
The result will be clamps for the electrodes. Two transformers are connected in parallel, in which the secondary and primary windings must be connected directly. The current supply can be adjusted independently. Such homemade welding devices must be cooled, and water should be used for this. By using the foot pedal you can remove the electrodes.
Making a magnetic holder
If you are interested in assembly and welding fixtures, you can make them yourself, rather than purchasing factory-made options. This also applies to the magnetic holder, for which you need to prepare the following materials:
- sheet metal;
- dry board;
- magnetic fastener.
When preparing metal, it is necessary to be guided by certain parameters; the thickness of the sheet can vary from 1 to 3 mm. When creating a template for a future design, it is better to make a monolithic version, the dimensions of which will correspond to the needs of the master. The template must be attached to the sheet metal and identical blanks must be cut out in the amount of 2 pieces. It is important to preserve their geometry.
It is best to draw up drawings of welding fixtures yourself; you can find some of them in the article. The next step towards making magnetic devices is to prepare the central part of the magnet. To do this, you need to cut a piece of wood according to the shape of the metal plates, but its size should not completely repeat the template. You should retreat 2 mm from the edges. The thickness of this element should be 2 mm greater than the width of the magnets.
The outer part of the product is ready at this stage, now you need to create the internal filling. In this case, you should push away from the magnets. They will be located between the plates, and the thickness can vary from 10 to 50 mm. When making such a device for welding at an angle, it is better to use round magnets, each of which will have holes in the central part. However, other workpieces can be used for work, which are pre-prepared by cutting holes for installing fasteners. The final stage will be drilling holes and assembly. Steel plates are fastened on both sides with a wooden blank, and magnets are fixed in the grooves. At this point, we can assume that the product is ready; it should be tested in practice.
Where do you get ideas?
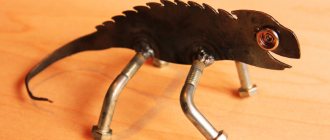
This question cannot be answered unequivocally. Someone, seeing random details in one place, imagines how they will fit together if they are combined into a common composition. Another purposefully goes to a scrap metal collection point and wanders around mountains of this trash in search of a suitable part for the chosen sculpture.
You can get ideas or simply take someone’s already realized idea as a basis from specialized book publications that are dedicated to metal crafts. There is nothing wrong with creating something you like from scrap materials available around the house.
In any case, DIY metal crafts created according to an existing drawing or sketch will be original. Welding is not copying, but a kind of creativity. Any weld that is made with a decorative intent and repeats a pattern or composition is perceived as a kind of masterpiece.
Making a welding jig
If you need hand tools for welding, you can start making a jig. It is used when making frames and complex patterns. The design has cone-shaped supports that must be placed on the sides. A rotating plane is attached between them. It should have adjustable longitudinal beams with several screw clamps.
There will be holes in the beams, which is why clamps can be installed along the entire length, which will depend on the size of the product. The width of the assembled structure can be adjusted by introducing beams and spreading them apart. The sliding mechanisms of the described device can be used as a universal means for welding small and large products. If you decide to use stainless steel, then when working it is important to avoid scratches that may occur from screw clamps. That is why the latter should be supplemented with felt stickers that are installed on the lips. Such a device can be assembled from a profile pipe; you will need long bolts and bearings, the penultimate of which are needed for fastening the moving parts.
Installation mechanisms
These devices allow you to install profile pipes in the required position.
Exactly how they will be located in the end. According to their functional and design solutions they are divided into:
Persistent. They fix the workpieces on the main surface, and can be used constantly, removed, and there are also folding ones (used for retraction and rotation).
Permanent fixtures are plates that are welded to the base.
And removable devices are used in situations where a permanently installed device cannot be used.
Angular. With their help, profile pipes are installed at a given angle.
Prisms. They fix cylindrical profile blanks in the required position. This device uses very simple designs that are made from corners.
This mechanism helps to install profile pipes in the required position in relation to existing parts of the future structure.
90 degree welding fixture
Some devices for welding metal structures allow you to avoid problems when it is necessary to connect parts at right angles. To carry out manipulations to assemble the structure, it is necessary to prepare a metal square, bolts, nuts, a piece of square pipe, a bolt, a small metal cylinder, a drill, a drill bit, a holder, and a welding machine.
When preparing a square, you must take into account that its side will be 20 cm. When choosing a thick bolt, you should prefer one that has 4 cm in diameter. When choosing a metal cylinder, you should prepare one that is the size of a ballpoint pen.
Work methodology
When making the above-described welding device with your own hands, you must weld pipes 15 and 20 cm long onto the square. They must be installed in the corners so that the ends of the pipes are on different sides of the square. Now you can start making auxiliary parts. To do this, a figure in the shape of the letter P is prepared from a pipe; its length should be 10 cm. The second part is made from the same pipes, but the elements are welded together in the form of an isosceles trapezoid.
An isosceles triangle is made on the sides of a square. A U-shaped figure is welded to it, in which a hole is first made in the center for a small bolt. A 4cm bolt should fit into the gap between the figure and the square. A handle is attached to the latter; a nut with a hole can act as it. The small cylinder needs to be threaded for small bolts. It is done along the end of a large bolt. At the point of intersection of the trapezoid's diagonals, holes must be made in both parts. A cylindrical element will be installed between them, in which the thread is first made.
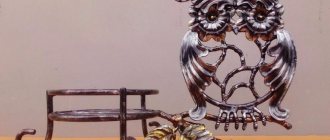
Metal crafts for the garden
You can make your backyard cozy without purchasing new equipment. From used, but still strong metal, you can build a base for a country table or bench. Finding the right sheet of particleboard for the table top and boards for the bench won't be a problem. Racks can be made even from substandard inch pipes.
If you have a supply of material, you can swing on a swing. It is better to make the structure permanent, with the base concreted. You need two sidewalls made of pipes welded at an angle, with jumpers for rigidity. The more massive the swing seat is, the larger this angle should be. The jumpers can be welded at ground level or even below so that they are not visible.
It is better to make suspensions from chains, but you can also use a reliable rope. The beam for fastening must be massive. A thick-walled pipe, a piece of rail or channel will do. It is best to fasten frame parts and suspension brackets by welding.