1 / 1
The availability of inexpensive, lightweight and high-quality welding machines on sale has become the reason that welding work is now carried out independently by many home craftsmen. Unlike factory conditions, home craftsmen cannot afford a lot of complex universal equipment. And there is often nowhere to find extra hands (in the sense of an assistant).
Why do you need a magnetic angle for welding?
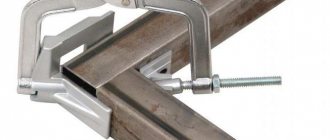
A good, proven clamp cannot be considered a universal equipment, and it requires a lot of time and effort to use. There was an urgent need to create something very convenient, universal and not expensive. It would be even better if you could do it yourself. The solution to the problem was a magnetic corner (square) for welding.
The vast majority of welded structures require strict adherence to angles between the elements being connected. Previously, this was achieved by using simple devices in the form of a vice, clamps and even special equipment. The emergence of a large number of holders based on permanent magnets has greatly simplified this process. Having a set of such equipment in your arsenal, you can assemble structures of any complexity yourself without resorting to outside help.
Of course, there are many similar products made industrially, but welders know how to handle metal and try to make homemade devices. Which option is preferable? You will find the answer to this question in this article.
Signs of a quality square:
- High strength.
- Powerful magnets that can hold a lot of weight.
- Ability to rigidly fix parts. Parts fixed with a square should not move even after force is applied to them.
- The presence of switches that turn off the magnets. The switch can be located on one side, but it is much more convenient if they are on both sides.
Another important advantage of a switchable magnetic corner is the ability to adjust its magnetic properties. A magnetic field can affect an electric arc. Therefore, when approaching the place of fastening, the corner will have to be removed. And at a switchable corner, you can simply turn off the magnetic field for a while, and then turn it on again when moving to the next section. Almost the only drawback of a switchable angle is its high price.
Of course, when choosing a square, the issue of cost will be important. A household fixative of acceptable quality can cost about 350 rubles, although even for household work it is better to take a set of several squares (800 - 900 rubles). And professional clamps with the ability to widely adjust angles and fixation in three planes can cost about 3 – 5 thousand rubles.
Types of magnetic corners
To fully understand the issue, it is necessary to distinguish between two fundamental types of magnetic corners used in welding: corner (permanent) and switchable.
Corner magnetic holders are the most widely used. Their main advantages are ease of use and low cost. They are produced by industry to hold metal structural elements of various sizes and at various angles. Of course, it is necessary to understand that the corner cannot support a beam weighing 1000 kg. Basically, we are talking about kilograms and tens of kilograms, which is more than enough. The number of angles offered is six, which is also more than enough.
Switchable corners are several times more expensive, but they are also the most versatile and convenient to use. The essence of this product is that the magnetic field can be turned off at the user's request. Physically, this is done with one movement of the hand, moving the rotary lever from one position to another. The work becomes faster and more comfortable; no effort is required to remove the corner from the structure. Prices and the full range of magnetic angles can be viewed in the catalog of the KEDR manufacturer’s website.
To decide which type to give preference, one should proceed from the following considerations:
- how often do you weld metal structures;
- How critical is labor productivity to you?
- Are you willing to pay for comfort or are you willing to endure inconvenience?
Main selection criteria
For professional work, you should choose a high quality tool. Devices are exposed to high temperatures, which reduce the magnetization coefficient of low-quality specimens. The fixture must be free of chips, gouges and other defects where it touches the clamped product. Irregularities do not allow objects to be firmly fixed at a given angle.
- Important! The advantage of switchable corners is the ability to turn off the magnetic field both on the entire device and on its individual faces. These devices are suitable for craftsmen who often weld parts of complex configurations
Chinese angles have a budget price, but they cannot withstand temperature changes, so they quickly break. To weld products at different angles, it is recommended to choose a customizable mechanism or purchase a kit containing several types of tools for clamping at certain angles.
Required materials and tools
List of tools for making a magnetic square:
- Bulgarian;
- drilling machine;
- drill;
- clamps, vices;
- calipers;
- ruler, square.
This is the maximum list of tools. If necessary, you can get by with a much smaller set. If you don’t have a grinder, you can cut out blanks from a two-millimeter sheet with a chisel. Drill all the holes with a drill, and the accuracy of a caliper may be excessive. In general, each master himself can choose a tool from among the available ones.
We offer a set of materials necessary for the manufacture of a magnetic square. It is not difficult to guess that this list is very arbitrary, and, in the absence of specific material, it can be replaced with a similar one.
Materials:
- ring magnet;
- steel rod Ф24 mm;
- steel sheet 2 mm thick;
- steel tube Ф15 mm;
- bolts, nuts, washers M6.
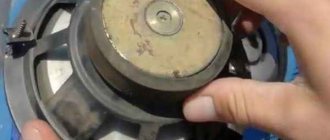
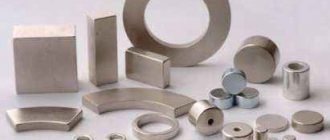
Ring magnets are most often obtained from powerful Soviet speakers. Although they are keeping silent about where to get these speakers. This can become a problem, especially if you need not one square, but two or three. In this case, powerful neodymium magnets, which can be found on the market, can help out.
Welding jig with magnet from speaker
To fix one of the parts to be welded, you can use a homemade welding jig.
This device allows you to firmly fix one part perpendicular to another.
For example, you need to weld a section of profile perpendicular to the metal frame post. In order not to use both hands at the same time, it is much more convenient to use a jig.
To make a homemade product you will need a minimum of materials:
- steel corner;
- magnet;
- metal washer;
- bolts with nuts.
We also advise you to read the article: how to make a 90 degree angle on a profile pipe without welding and bolts.
Main stages of work
First of all, the author cuts off a piece of steel angle. Makes markings and drills two holes. Cuts threads.
After this, you will need to weld a metal washer to one of the corner shelves.
We clean the weld seams with a grinder, after which we prime and paint the base of the jig. A round magnet is attached to the washer (can be removed from the old speaker).
At the last stage, all that remains is to screw the long bolts into the holes, and our homemade product is ready.
Manufacturing process and order
In accordance with the drawing, we mark the parts. We cut out the triangles with a grinder, and cut off three bushings from a steel tube with a hacksaw. For precision drilling, we drill two workpieces at the same time, having previously tightened them with clamps. We got a magnet with a hole in the center, so we attach it using a cylinder of the appropriate diameter, cut from a round piece of wood. We clean the resulting parts, paint them and begin assembling them.
Assembly
Assembling the finished product is not particularly difficult and does not require a detailed description. Briefly, the process goes like this:
- We insert bolts into three corner and one central holes.
- We put bushings on the bolts coming out of the corners of the triangle, and put a cylinder on the bolt in the center (if you didn’t forget to drill a hole in it).
- We put the magnet on the cylinder.
- We place the second triangle on the four bolts and secure the structure with nuts, having previously placed washers under them.
Assembly is complete, the product is ready for use.
Magnet for welding with angle adjustment
To make a homemade device you will need the following materials:
- rectangular profile pipe;
- pieces of round pipe of different diameters;
- two round metal blanks (for a hinge joint);
- dial with circular degree scale;
- Neodymium magnets.
We also recommend reading the review article: how to make mini yews for fixing round pipes.
First of all, the author cuts two pieces of profile pipe (they must be the same in length). The author welds a plug from a piece of metal to one end of each workpiece.
Next, we make markings and, using a crown, drill two large holes in the profile pipes.
Main stages of work
In the next step, you need to cut four bushings from a piece of round pipe. We insert them into the holes in the profile pipes and scald them.
Next, we cut off four more pieces of thick-walled pipe and press them inside the bushings. If there is no press, this operation can be done using a bench vice.
We cut off two round steel blanks and drill holes in them in the center. We cut the edges of the profile pipes at an angle, bend one of the walls, and then scald it.
Welds profile pipes to round timber. Thus, we get a hinged connection. We cut threads in the holes and connect the two halves of the welding magnet using a wing bolt.
After that, we clean the parts with a grinder and paint. On the front side we attach a dial with a circular degree scale and install neodymium magnets.
You can watch the video for details on how to make a homemade magnet for welding with tilt angle adjustment.
The author of the YouTube channel Made in Garage shared this idea with us, for which we thank him very much. How do you like this homemade product? Write about it in the comments.
Welding magnet with angle adjustment - homemade
Do-it-yourself switchable magnet - Metalworker's Handbook
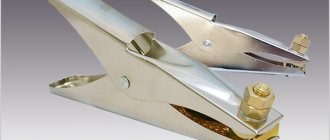
Often, skill alone is not enough to carry out high-quality welding work, which is why various auxiliary devices are used, such as a magnetic corner. It is designed for fixing metal parts during welding, soldering or assembling structures, and a good owner will find a dozen more uses for this design.
What are the benefits of magnetic squares?
- Allows you to work with round pipes, rectangular cross-section, sheet metal and products of complex shapes;
- A good fixture has a number of standard angles - 45, 90, 135, 30 and 60 degrees; there are also universal models that can hold parts at any angle;
- Quick fastening, unlike clamps, just lean the corner against the parts and it will fix itself;
- Simplification of the welding process occurs due to the absence of the need to use an assistant for the welder, plus the ability to adjust the location of the parts to be welded after they are secured;
- The device can work in any planes, at any angle and on any surfaces;
- Preset template angles make it easier to work with in-line products.
It is also worth noting that for most welding work, such a part is not just a recommendation, but an integral part of the work process.
How to choose the right model
The first step is to decide how you will use the holder. If you need it for one-time use, then the cheapest option is suitable, which will be useful in the future, but will not hurt your pocket.
For those who regularly work with welding equipment, models with a large number of preset angles and inexpensive universal models that allow you to independently set and fix the angle are suitable.
For professional use or to complete a small workshop, it is worth purchasing a set of magnets with a high degree of retention.
Very often, one magnet is not enough to work with, so having a whole, even minimal, set will greatly facilitate the welder’s work.
The next parameter is the holding force. The stronger the magnet, the heavier the parts can be used in the work, the longer it will retain its holding properties and the better it will fix the parts.
When buying magnetic welding devices with a high-quality magnet, make sure that you can remove it yourself, or better yet, that it has the ability to “unstick” on its own, that is, it is switchable.
Magnet quality is a parameter that most young welders forget about.
Here it is important for us that the magnet can retain its properties for a long time and, more importantly, does not deteriorate when heated.
The operation of a welding magnet occurs in close proximity to the welding site, so the entire product is subject to heating, which deteriorates the quality of the magnets.
Types of magnetic corners for welding. How to make a holder with your own hands
When welding small metal parts, it can be difficult to keep them stationary. To fix the elements in this case, the welder most often has to resort to the use of additional mechanisms and devices so that the parts do not move during welding.
The use of vices and clamps allows them to cope with this task perfectly, but the main disadvantage of such products is the need to carry out a large number of additional movements to install the part in a static position. And also the inability to fix parts at a certain angle.
A magnetic holder for welding does not have such disadvantages, so if you often have to weld parts in this way, it is recommended to purchase or make this device yourself.