The time of metal bumpers seems to be gone forever. Today, car manufacturers prefer to make this part from plastic. This solution makes the vehicle lighter, but it has disadvantages: the plastic bumper is quite easy to damage, this is not a rare occurrence in road accidents (the front bumper is especially often affected).
It is not always advisable to replace a damaged part; in many cases it is quite possible to repair it by soldering. With certain skills and desire, this can be done with your own hands at home.
Work order
The sequence of work to restore and solder the bumper can be represented as follows:
- first of all, the plastic bumper, which needs repair, is carefully removed from the car;
- Next, you need to wash it, degrease it and get rid of dirt and debris, remove the paint and varnish mixture from the damaged area;
- if the bumper splits into several pieces, then they are combined into the original integral structure, joining the edges;
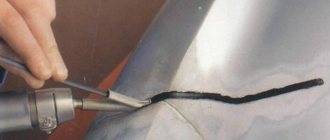
- Now you can begin the soldering process, which boils down to progressive movement of the soldering iron tip from one edge of the crack to the other with a slight recess of the tip into the body of the bumper;
- then the plastic that was squeezed out during soldering is leveled over the surface with a soldering iron;
- After this, you don’t need to do anything on the inside of the part; the soldering area will still not be visible. And on the outside, you will need to treat the surface at the crack site - sanding, puttying, painting.
Sometimes bumper soldering is carried out using reinforcing mesh. This mesh should be used correctly for large and serious cracks. The peculiarity of this method is that after removal and cleaning, the master must “sink” the mesh into the plastic. That is, the mesh for soldering bumpers is carefully applied to the inside of the part and heated with a soldering iron. And when the temperature of the mesh becomes sufficient, you just need to press it into the plastic with a screwdriver.
In some cases, craftsmen first, in addition to the mesh, install brackets or fasteners on the bumper to tighten the crack. The features of this procedure will be discussed in the corresponding section.
Note
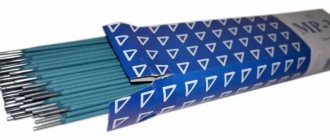
Rods for plastic can be supplied in small reels.
Work on welding plastic begins at the preparation level. The surface of the part is cleaned from dirt, roughness and irregularities. For different types of polymers, different cleaning methods are used - from sandpaper to grinding machines.
The principle of leveling the surface works in the same way as with metal parts - this ensures a reliable, high-quality seam.
Rods for welding plastic with a round cross-section have their outer edge sharpened. The rest depends on the type of soldering iron used. When working with an extruder that has a connector for filler wire, you need to insert the rod there and turn on the device.
Next, wait for the working element to heat up, and turn on the feed by touching the soldering area with the nozzle. When working with a hand-held hair dryer, it is enough to apply a plastic welding rod to the place where the parts are welded and heat it from a short distance.
The formation of the seam occurs gradually. The working part should not melt too quickly, and unevenness of the seam should not be allowed. When using the polypropylene type, pressing onto the surface of the part is required to uniformly fill the joint.
If not all of the rod was used during soldering, the excess can be removed. The surface of the seam is heated, the excess part is cut off. However, the seam should not be overheated, as this may lead to deformation.
Removing the bumper
On most cars, bumpers are secured using pins and screws. The difficulty here is that some fasteners are not visible at first glance, you will have to look for them.
Next, you will need to disconnect the fender liners from the bumper; often there are screws hidden under them that secure the sidewalls. Then you should look at the part from below: there are screws for attaching it to the body, and sometimes there is a special plastic splash guard.
The upper mounting bolts of the front bumper are located under the decorative radiator grille, so remove it first. Additional screws may be located behind the lower grille, as well as behind the registration plate.
After unscrewing all the fasteners, the bumper, starting from the end parts, is carefully detached from the body. If necessary, the wires from the fog lights and washer hoses are also disconnected.
Preparation of materials
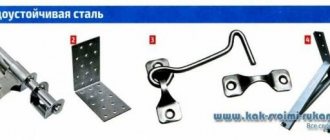
The minimum set of materials may include metal mesh, plastic rods as solder, primer, putty, paint and an old bumper.
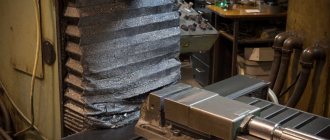
Metal mesh can be purchased at offline and online construction stores. Its cells had to be small (from 1 millimeter). Traditionally, steel mesh was used for the described purposes. However, recently many have begun to opt for a material such as brass.
The choice of primer has its own nuances. It is sold in different types and formats, but for working on a car it is best to buy primer in cans.
Putty should also not be neglected. No matter how carefully you seal the cracks, they still need to be additionally puttied - this is the only way to achieve an acceptable effect.
It is worth mentioning separately about solders. Each package of store-bought welding rods (solders) must be marked indicating a particular type of plastic.
The markings are as follows:
- ABS (acrylonitrile butadiene styrene);
- PA (nylon);
- PC (polycarbonate);
- PVC (polyvinyl chloride);
- PE (polyethylene).
If you don't know the type of plastic you have, pick up a rod that is similar in appearance and work with it on the back of the part.
The optimal thickness of the rods is determined by the seam. Thick elements should be used for deep cavities. And to embed reinforced mesh or to solder stitches on the outer surface of the bumper, thinner elements are used.
As for the old bumper, the need for it may be due, for example, to a shortage of plastic. In other words, this is only relevant for very serious damage.
Using a hair dryer
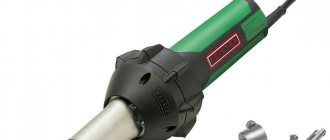
Soldering automotive plastic is done a little differently if a heat gun (hair dryer) is used. Here you will need special welding rods (essentially, this is solder for soldering plastic).
You can purchase them in specialized stores or even make them yourself. The main thing is that they are similar to the material being welded. One of the ends of the rod is sharpened and then inserted into the corresponding hole in the nozzle of the heat gun.
The hair dryer should be moved slowly along the crack being repaired; the filler rod should be inclined towards the workpiece at an angle of approximately 45°. If a plastic part has shattered into separate pieces, then soldering it with a hairdryer is carried out in two passes.
First, the pieces or fragments are fastened together with short stitches (seams). And only after this the final reliable soldering is made. When the material has cooled, the surface of the part is puttied and sanded, preparing for painting.
To repair the plastic of a motorcycle, all kinds of elements of its external design, you can use soldering using approximately the same technology as in the case of repairing a car bumper. Moreover, motorcycle panels are usually made of the same ABS plastic.
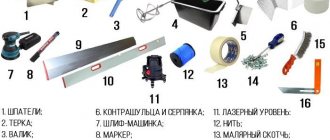
Tool Requirements
The most important tool in this case is, obviously, a soldering iron. Here it is quite possible to use a regular electric soldering iron or a gas torch with a power of 100 watts or more. In general, the following principle works: the greater the power of the soldering equipment, the better.
You can also use a tool such as a soldering hair dryer (or, as it is also called, a soldering gun). Actually, it is similar in principle to the hair dryer that women use after a shower. But the power and temperatures that a hair dryer can generate for soldering plastic bumpers are much higher - with its help it is quite possible to melt and solder plastic.
In addition, there are soldering stations that contain both a hair dryer, an ordinary soldering iron, and many attachments. If you have such a station, soldering any bumper will not be difficult.
Another important tool that will be useful here is a grinding machine with abrasive wheels. It is needed to remove paint and varnish from a damaged bumper. The best option is machines with a P240 wheel.
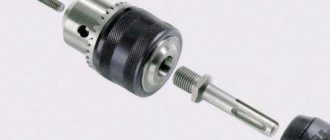
Sandpaper will also be needed during the repair process - for rubbing the putty. Finally, it is worth mentioning the additional tools that almost every craftsman has - drills with a set of drills, clamps, pliers, screwdrivers, and so on.
Preparing the bumper for painting.
- We clean off the excess deposited plastic with an orbital sander at low speed. Use coarse sandpaper no finer than P120. It is not advisable to clean petal circles on an angle grinder. It is better not to use high speeds as the top layer of plastic heats up and spreads over the surface. Subsequently, this smeared plastic may peel off in places.
If the plastic still melts and smears, then it is necessary to reduce the speed or replace the sandpaper with coarser one.
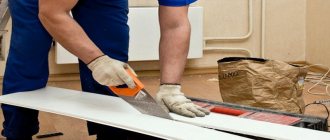
If you don’t have a sander, the excess layer of plastic can be removed with a utility knife blade. You need to place the blade across the seam and, pressing on it, rip off excess material.
- We degrease all surfaces to be painted with an anti-silicone degreaser for cars. Everything is simple here, apply and wipe off with a rag.
- Apply the adhesion enhancer Body plasto fix spray 340 in a thin layer and let it dry for 10 minutes. This adhesion enhancer slightly dissolves the top layer of plastic, as a result of which putty and primer adhere well to it.
- We putty with special putty for bumpers. For example, bumper fix putty from Novol. This putty is very elastic due to the various plasticizers it contains and therefore does not fall off even when the bumper is bent.
- We rub the putty with sandpaper. P80 sandpaper produces lint on the plastic, which is very difficult to remove later with finer sandpaper. Therefore, it is better to use sandpaper no larger than P180. We sand with decreasing sandpaper grain: P180, P240, P320.
- We prime. We take regular acrylic soil, but we must add a plasticizing additive to it in a proportion of 5-10% of the volume of the soil. For example, the additive Elast-o-Actif from Sikkens.
Plastic has a high coefficient of thermal expansion, so putty, primer and paint must be well plastic, otherwise they will peel off. The plasticizing additive gives the soil plasticity and therefore, when the temperature changes, it will not crack or peel off the putty and plastic.
A plasticizer is also added to the paint so that it, together with the primer and putty, expands and contracts with temperature changes.
- We do painting.
Features of contraction
As already mentioned, tightening may be necessary for soldering large cracks and in case of serious damage to the structure of the structure.
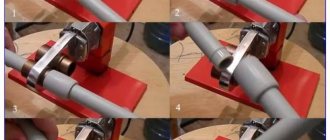
How exactly is this procedure done? First of all, you should purchase metal fasteners for attaching guides of the required size - they are available in almost any building materials supermarket. Then you need to cut this fastener into plates of the required sizes.
Holes are made on both sides of the cracks in the bumper, after which suitable plates are installed on the back side (this allows you to maintain an aesthetic appearance). At the next stage, screws are inserted into the holes, and the entire structure is secured with nuts.
The holes in the bumper must be drilled with a drill with a diameter of 3.6 to 3.8 millimeters. In this case, the drill must be located closer to the outer edge of the plate hole.
Each drilled hole in the bumper must also be countersinked so that the screw head “sinks” into the bumper. If a countersink is not at hand, you can alternatively use a drill whose diameter is slightly larger than the diameter of the screw head. The main thing is to achieve the desired angle for this hat.
Features of plastic soldering
A craftsman can use a cheap soldering iron, a hair dryer, or an expensive soldering station to repair plastic bumpers. However, in any case, those who decide to take on such work should know a few key points.
Soldering begins by placing rods (solders) along the seam on the inside of the bumper. Then one of the ends of the part is fixed.
The principle here is as follows: the thermal energy of the heating apparatus is directed to the solder, and not to the seam. If a soldering iron is chosen as a working tool, then it must be pressed against the solder, but the hair dryer must be kept at some distance.
At high temperatures, the rod melts and fills the crack cavity. The heat flow created by a hair dryer or soldering tip is moved from the edge to the middle of the stitch perpendicular to the seam. As a result, the free end of the electrode melts and gradually becomes smaller. The next time you pass the tool, you need to solder the side zones well. Then, over the entire area, the cooling material is smoothed with some blunt object.
Reinforcing mesh
Also, home craftsmen can use in their work such a device as a reinforcing mesh for soldering hard plastic.
It is needed to ensure that the final result is stronger and more durable. This mesh is placed on the inside of the structures.
Then, using a soldering iron or hair dryer, it is heated and, in this state, pressed into the plastic using a screwdriver. The mesh should become a kind of frame that holds and strengthens the part.
Excess plastic resulting from reinforcement can be removed using a grinding machine or an ordinary knife. If you work carefully on the outside, traces of cracks and breaks will not be visible even close up.
Sanding, puttying and painting
After the bumper has cooled, you need to apply a layer of special plastic putty to problem areas - this can be done with a spatula or any other handy tool.
Once the putty has hardened, you can begin sanding the entire bumper. Grinding should be done as carefully as possible so as not to damage the bumper itself. Particular care should be taken to clean and smooth corners, chips, and the seam itself. Where it is not possible to go through with a machine, you can work manually (with sandpaper).
It will be necessary to apply another layer of putty to the bumper after treating the part with a primer. Moreover, nitro putty should be used for this purpose. And after applying this composition, the surface must be degreased and dried.
Painting the sealed bumper occurs at the very end - this is the final stage. Now there is a large assortment of paints specifically for plastic - choosing the right color and texture is not difficult. It is only important to remember that oil paints and acrylic paints are not suitable for painting plastic.
To apply layers of paint evenly, it is best to use a spray bottle or spray can. And if you are painting a bumper that has already been installed back in place, then other parts of the car located nearby should be covered with film or other protective material. And one more tip: painting should be done in a dry and warm room at a temperature not lower than +12 degrees.
Polyethylene rod
Polyethylene welding rod is used where the temperature of use of the finished product will be below average. Products made from polyethylene can be used in harsher environments than products made from polypropylene. This is because the operating temperature of polyethylene plastic sheets is lower than that of polypropylene sheets. Accordingly, products obtained by welding with polyethylene rods are more frost-resistant. They retain their molecular structure at -30 Celsius.