Every motorist may encounter sudden damage to a fuel tank, so it is important to know how to seal a car’s iron gas tank. Fuel leakage is very dangerous; it makes the car unable to move, poses a threat to internal components, and reduces fire safety. The causes of holes and cracks in the gas tank can be natural aging of the metal, mechanical stress, or the influence of corrosion. Determining the presence of a leak is easy. Its signs are the smell of gasoline in the cabin, puddles under the car, and low fuel indicator readings. Serious damage can be repaired at a service station, and a small hole or crack in the gas tank can be easily dealt with by the driver himself if he has a good adhesive.
Choosing the right glue will help you quickly fix the leak.
Preparation for gluing
Having discovered a gasoline leak, the motorist must stop and assess the extent of the damage to the gas tank. The best access for diagnostics is possible in an inspection hole or on an overpass. It is necessary to mark the location of the damage, drain the remaining fuel and prepare the tank for repair. If you plan to use cold welding or other adhesive, the surface must be treated to ensure reliable attachment of the patch:
- Clean the damaged area from the outside and inside down to the base material. You can use warm soapy water, brushes, and rags.
- Remove thinned areas, edges of cracks and holes.
- Give the surface the roughness necessary for good adhesion. For this purpose, you can use sandpaper or a stiff brush.
- Degrease the surface with acetone, solvent, alcohol.
You can use a drill or other power tools to clean out the gas tank. But this is allowed to be done only after draining the gasoline, making sure that there are no explosive gasoline vapors.
General repair rules
Regardless of the material of manufacture and type of fuel, when carrying out repair work the following rules must be observed:
- Before repairing damage, the fuel must be completely drained.
- For cleaning, use special detergents to remove petroleum products. Gasoline vapor is an explosive substance.
- After washing, the tank should be rinsed with running water and dried.
- Carry out a thorough inspection - there may be several leaks.
The repair method depends on the size of the hole and the type of material.
How to seal a metal fuel tank
There is a gas-resistant sealant for the gas tank that allows you to fix a leak without welding. There are many of them, but one of them should definitely be in the trunk of an experienced driver. The glue will not provide a guarantee for several years, but it will allow you to get to a car service center if leaks are found far from a populated area. Using glue, you can seal a metal gas tank, an aluminum truck tank, a plastic trimmer gas tank, and tanks for other purposes.
"Cold welding"
To restore automobile parts, manufacturers offer a special adhesive based on epoxy resin - cold welding. The product can be purchased at any auto store. Cold welding for a gas tank is available in two versions - one-component and two-component (for example, Epoxylin moment).
When choosing an adhesive composition, you need to pay attention to its resistance to aggressive chemical environments, since gasoline, diesel fuel, and fuel additives can quickly destroy the structure of the adhesive. When determining whether a gas tank can be sealed with cold welding, look for the “Gasoline Resistant” or “Resistant to Aggressive Environment” marking on the packaging.
The advantages of the product are its simplicity and speed of use. Repairing a gas tank by cold welding takes a few minutes, after which you need to wait for the composition to polymerize. Disadvantages include poor adhesion and cracking of the patch when the car moves. If the tank on a car is leaking, then cold welding is used mainly to repair minor damage.
From a practical point of view, it is more convenient to use welding in the form of a plastic bar, for example, Diamond. It is enough to knead it in your hands and cover the damaged area. The liquid product must first be mixed with a hardener, but its use will be more effective.
Cold welding can quickly eliminate a leak.
Glue "Moment"
For a temporary patch, “Moment” glue or its equivalent is excellent. Using superglue, you can repair minor damage, cracks, and holes, quickly preventing fuel leakage.
For gluing you will need a piece of thick fabric or rubber. The glue must be applied liberally to the fabric and pressed firmly against the tank until it hardens. The advantage of this method is the speed of the process, safety, and availability of glue.
The downside is that the effect is short-term, so after sealing the crack with Moment, you should immediately go to a car service center.
Two-component epoxy adhesive + fiberglass
Sealing a fuel tank with epoxy resin is considered a universal method. Poxypol or other two-component epoxy adhesive can be used to glue a wide variety of materials.
A mixture is prepared with the correct ratio of components and the addition of filler - aluminum powder. Fiberglass laid in several layers is used as a patch. Using two-part epoxy adhesive with fiberglass will be successful if you follow the manufacturer's instructions.
Features of eliminating leaks
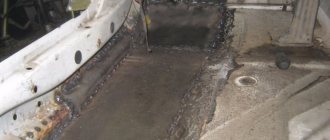
Experts recommend repairing damage to the gas tank at a car service center, where there are good conditions for dismantling and assessing the situation. The craftsmen will be able to weld the gas tank efficiently, and in case of large cracks and breakdowns, replace the part. If you need to repair a hole in the gas tank quickly and with your own hands, it is important to do it in the optimal way:
- It is necessary to correctly decide the question of what is better to seal the hole in a particular case. In this case, focus on the size of the hole and the material from which the tank is made. There are two options - metal and composite material. Despite the similar causes of damage, the glue must be chosen so that it is safe for the tank.
- High-quality repairs involve dismantling the tank. But minor damage that is accessible can be repaired without removing the gas tank from the car or disconnecting the hoses.
- With any repair option, it is important to prepare the internal and external surfaces of the gas tank. To do this, drain the gasoline and pour solutions with detergents into the tank. Clean the outer surface thoroughly.
- After applying the adhesive, you need to remove any remaining product and cover the patch with a protective layer.
- After eliminating the malfunction, be sure to check the tank for complete leaks.
When choosing an adhesive, you should give preference to trusted manufacturers who guarantee the quality and safety of the products.
Causes of gas tank damage
Manufacturers usually place the gas tank in the rear of the car, and depending on the car model, it can be located on the right, left or in the middle. This solution allows you to maximize the safety of people in the cabin. In addition, placing the fuel tank at the rear of the car improves its handling. At the same time, this arrangement of the gas tank exposes it to external influences (mechanical, chemical, natural), which can lead to the appearance of cracks and holes.
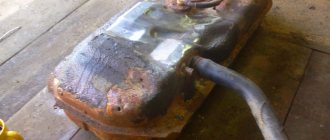
This element of the fuel system can be made of metal or composite material, conventionally called plastic. Regardless of the type of material used, holes, cracks or microcracks may appear on the tank body through which fuel will leak. If the damage is significant, fuel spills out copiously and a stain forms under the car.
The fuel tank can be made of metal or composite material
When microcracks form in the passenger compartment or trunk, a fuel smell appears, and a wet spot appears around the damage. Another sign of failure of this element of the power system is increased fuel consumption. In any case, you need to look for the location of the leak and determine the cause of its occurrence, and only then begin to eliminate it.
There are several reasons leading to fuel tank malfunctions:
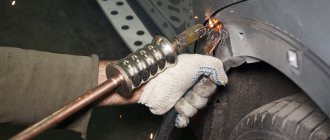
- Mechanical damage. Given the location of this element and the condition of our roads, there is a high probability of a gas tank being hit, resulting in a hole or crack.
The gas tank may be damaged mechanically
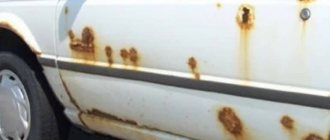
- Corrosion. Although high-quality metal is used to create the gas tank, it can become damaged by corrosion over time. Usually old cars are susceptible to this, but if the tank in a new car is made of low-quality metal, then it also quickly rusts. External corrosion of the tank occurs due to exposure to moisture, as well as aggressive substances that enter its walls. Low-quality fuel may contain water and this causes corrosion to develop from the inside.
The fuel tank may be damaged by corrosion due to low-quality fuel
- Power system malfunctions. As the amount of fuel in the tank decreases, a faulty power system creates a rarefied pressure in it. This leads to the appearance of microcracks on the walls, which can subsequently cause damage.
If a gas tank leak is detected, such a vehicle cannot be operated and the problem must be repaired immediately.
How to seal a plastic tank
Most motorists deal with metal gas tanks, but modern cars are often equipped with a plastic fuel tank. Plastic is less durable than metal, so it suffers more from mechanical damage.
Speaking of adhesives, repairing a plastic fuel tank can be done with epoxy resin or superglue for plastic items. But soldering is considered the most reliable way to repair plastic. For the patch, it is important to choose a compatible material; it is best to find a piece of plastic similar to the material of the gas tank. For repairs, you need a piece of plastic slightly larger in size than the damaged area, and the same piece of metal mesh. The repair process consists of the following operations:
- Processing the leaking tank, mesh, patch with sandpaper to a slight roughness.
- Degreasing with alcohol.
- Softening the tank with a blowtorch followed by fusing in a metal mesh.
- Applying the patch to the mesh and heating it with a soldering iron.
As a result, the plastic of the tank will be firmly connected to the plastic patch, and the junction will be secured with a metal mesh. Next, it remains to give time for polymerization and final hardening of the plastic.
A special feature of working with plastic is the need for careful use of the soldering iron. Excessive temperature increases can lead to overheating of the tank and new damage.
Conclusion
So, as you can see, there is nothing complicated in repairing a tank, and although this text presents only one of the methods that allows you to solder a tank, the other methods are also not particularly difficult. The main thing in this matter is to follow the precautionary rules prescribed above, otherwise the consequences can be severe for both man and machine.
A leak in the gas tank occurs as a result of physical wear or due to damage with collapse of the housing. Fuel vapor accumulates in an empty tank, so welding and heating can cause an explosion. Many motorists ask how to properly seal a gas tank. There are several repair methods: argon arc and cold welding, soldering. Let's look at each of them in more detail.
How to check the tightness of a repaired tank
To ensure the absolute tightness of the gas tank, a multi-step check is performed:
- The repaired gas tank is completely filled with water and left for a day. An indicator of a quality repair will be the absence of puddles under the tank.
- After this, the stability of the seam under pressure is checked. The gas tank filled with water is positioned so that the repaired area is at the bottom. If no drops or drips are observed, then the seam is sealed.
- For more thorough testing of the seam, an air pump is used. Only one hole is left open in the tank, to which a pump is connected, and air is pumped under a pressure of about 1.5 atmospheres. Next, cover the outside of the tank with soap film, checking for the appearance of air bubbles.
- To test for vibration, the gas tank is rolled on a wheelbarrow over an uneven surface, simulating the movement of a car off-road. After this, the quality of all connections is checked and, if everything is in order, the gas tank is ready for use. Now you can reassemble and install the tank in the car.
From the point of view of professionals, if a leak is detected, it is more advisable to replace the gas tank. But the motorist has the right to choose a more accessible, cheaper option. If a truck driver knows how to seal a hole in a plastic or aluminum gas tank and knows how to do it, he will be better protected from troubles on the highway.