The sinker is one of the consumable components of the tackle and often disappears along with the hook when biting large and strong prey. In stores, the cost of sinkers increases in direct proportion to their weight. Therefore, if catching large fish is carried out using several tackles, then purchasing sinkers becomes quite expensive.
At the same time, this element of equipment is quite simple to manufacture and practically does not require careful processing and complex preparation for use.
The material for the sinker is also quite common and accessible, so even complex sinkers can be made independently using appropriate blanks.
Lead smelting molds
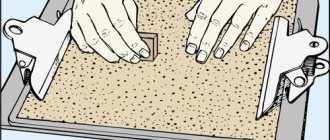
As noted earlier, lead is cast into molds to produce parts. Casting molds are made from different materials - steel, cast iron, graphite, and aluminum alloys are used in industry. At home, sand, gypsum, silicone and other materials are used. The lead casting mold can be made by hand, but mechanized equipment is most often used. Moreover, in many home workshops you can find hobby mechanical equipment.
Structurally, the mold for casting lead products consists of several parts: 1. The mold itself, as a rule, includes two parts. 2. Fusible or non-fusible rods, guides and locks. To make a plaster mold, you need to prepare two boxes made of wood. Then, gypsum, diluted to a creamy state, is poured into a wooden box. After some time, the plaster begins to harden, at which time the future product can be installed in it. In this case, it should be half immersed in plaster. This will form the first half of the mold. A similar operation must be performed to obtain the second form. After the plaster has dried, the form is ready. In order to be able to pour molten lead during the manufacture of the mold, it is necessary to form a casting hole.
Mold making
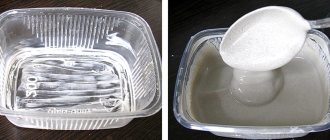
You need to prepare the gypsum mixture according to the “powder to water” rule, in a ratio of approximately 1:1, you need to focus on the consistency, it should be creamy.
Pre-lubricate our mold and samples with the prepared fatty cream.
Pour the mixed plaster into the container to fill exactly ½ of the container and tap it on the surface, expelling air bubbles. As soon as the gypsum begins to set, it is necessary to immerse our samples halfway in the hardening plaster. The setting time of the gypsum depends on the brand of the powder itself, the minimum time is 2 minutes, i.e. after 2 minutes we begin to carefully look at the surface of the plaster. As soon as it becomes matte, it’s time!
We insert guides along the edges of our form. It can be anything, I use pieces of wire, toothpicks, lollipop tubes.
Now we wait for complete hardening, 20-30 minutes is enough.
Simple options
The simplest thing is to make lead weights using a plaster or sand mold. This method has a number of undoubted advantages:
- accessibility and prevalence of material;
- lead melts at a relatively low temperature - 320°C;
- ease of manufacture.
The use of lead and gypsum when making sinkers yourself has several significant nuances:
- at a temperature of about 200°C, water begins to actively evaporate from gypsum , which leads to destruction of its structure and splitting of the product;
- Lead, when hardened, is pressed into plaster , which makes it almost impossible to remove the sinker without destroying the mold;
- a gypsum workpiece has a large number of micropores , which leads to the need to polish the finished product.
When using sand instead of gypsum, the process of preparing the mold is greatly simplified, however, the requirements for the material of the box in which the workpiece will be located when pouring lead are increased; it is advisable to use a metal support. The product itself will be somewhat less aesthetically pleasing and will require serious polishing.
Lead Die Casting
Injection molding technology is used when the task is to produce small castings with thin walls.
This technology has certain advantages: 1. High precision castings.2. High surface quality.3. There is no need for further mechanical processing of cast products.4. Possibility of manufacturing workpieces with complex configurations.5. High productivity of the injection molding complex.6. Low number of substandard products.7. Saving money and resources when producing large batches of castings.
Homemade feeders for feeders
For feeder fishing, you can use various types of feeder feeders, both industrial and self-made.
A group of fishermen revealed the name of the secret bait during interrogation.
Category: regional news.
This method allows you to obtain not very attractive products, but they are quite suitable for fishing. One should take into account the fact that the feeder is a consumable element of fishing, and appearance is not of fundamental importance. They can successfully compete with feeders made from curlers or plastic bottles.
The advantages of this method of making feeders
- simplicity - you need to spend minimal time making a mold for casting the load of the feeder;
- ease of giving the desired shape and weight of the feeder;
- The output is not expensive material.
To make your own feeder for feeder fishing, you need the following materials and tools:
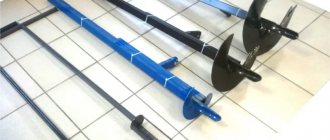
Tyrolka, or a lifesaver for fishing
A Tyrolean stick type setup in its classic form is a non-snacking weight made in the form of a flexible hollow polymer tube with a diameter of 5 to 12 mm (rarely more) with a hermetically inserted weight at one end and a sealed plastic plug with a fastening ring/swivel at the other.
This type of weights does not have clear parameters; there is a wide variety of weights, which differ in size, weight, shape, and types of loading.
It is clear that such a vertical position of the weight gives the angler two main bonuses. Firstly, this factor ensures less snagging of the equipment, this is especially noticeable among rocky ridges, shells, and small branches. Tyrolean makes it possible to qualitatively process the required water area, be it driftwood, silt, stones, fallen autumn leaves or loose sand.
It has excellent maneuverability between stones and snags, practically without getting stuck in them and is easily pulled out if this does happen, thanks to its flexibility and softness.
In this case, if the hook is still “dead”, only the stick itself is lost (often only the weight pops out), while the bait, going some distance from the bottom, remains intact.
Secondly, it is with the use of a Tyrolean that you can cast far and qualitatively/interestingly animate various spinning and fly fishing lures from the smallest flies, streamers, silicone worms, nymphs and other things, to fairly massive jig baits, floating wobblers and suspended wobblers. While keeping the bait in the near-bottom horizon, or slightly higher throughout the entire wiring. With all this, the angler himself can set the distance of the bait from the bottom by changing the length of the leash with the bait.
This montage shows its best qualities on the current, where the bait is animated by the river itself, and the fisherman only plays along by making timely pauses and stretches. On reservoirs without a current, the Tyrolean is not so effective, but if necessary, it can be used in combination with active animation - twitch, wave-like wiring, stepped, stretching, stop-and-go and other methods.
Watch this video on YouTube
Characteristics of the material and use in the manufacture of sinkers
For those who are just starting their career, experienced fishermen advise not to hesitate to stock up on a whole set of sinkers at once. Both very tiny and quite substantial ones are suitable here. But, this is for the first time, and then, when the fisherman gains experience and thoroughly studies all the nearby bodies of water, it becomes necessary not only to replenish the supply of weights, but also to make them as convenient as possible for fishing. This is where a soft, fusible and fairly heavy metal that does not react with water or air comes to the rescue - lead.
One of the reasons why lead and its alloys have become so popular for casting weights is the availability of the metal. First as the main metal for casting shot, and later as a metal widely used in the automotive industry, in railway transport, and in communication lines, lead, in fact, has never been a big problem. On the other hand, it was possible to melt the metal with a melting point of only 327.5 degrees using kerosene gas or a fire, and it could also be melted in an ordinary large tablespoon or tin can.
Lead products
In 2014, we had dry land on the Volga, the river moved 10 meters away from its previous bank. As usual, I took a metal detector and walked along the opened bottom. Well, of course, it’s rich: I found three “engagement rings,” a couple of signets, silver rings worth up to 20, and countless coins. But most of all (apart from beer and vodka caps) I came across lead sinkers (self-melting in a spoon). That year I handed over more than 100 kg of lead.
But here’s what can be made from lead, and, I suppose, in a garage:
1. Lead seals. 2. Bullets for pneumatics (4.5 mm).
So far I see only one drawback - lead is harmful to the body, but, as I think, stamping is used more than casting. As for fillings, the market is small, now there is more demand for numbered ones. But pneumatic bullets cost a decent amount, and there are several types of them (by weight, by shape).
From the invention of firearms until the introduction of the Minié bullet in 1849, soldiers made their own bullets. The Minie bullet was intended specifically for fittings and showed excellent results (but not for the Russian army) a few years later, in the Crimea.
Fittings were in use before Minié, but loading them was much slower than a smoothbore gun. The Minie bullet had a conical notch at the back, due to which the bullet expanded and was pressed against the walls of the barrel. Modern sports pneumatics have the same principle for bullets, that is, maintaining the caliber is not so critical.
The caliber can be formed during the stamping process, and the conical recess will fire when fired. That is, the main problem in the procurement process is to make pieces of lead no more than 4.5 mm in diameter and a certain weight. Next, make a mold in which there would be a recess (a blind hole with a diameter of 4.5 mm) into which you need to put the specified workpiece and squeeze out the desired shape. Lead plastic should be enough.
The ideal shape for a lead workpiece is a ball. It’s a pity that my father is no longer alive; he famously made such balls: he simply poured lead onto wet felt and got practically identical pellets. We need to experiment. I don't see any problems with the caliber.
You can easily make bullets for pneumatics and shot for a hunting rifle with your own hands. Take a tin can with a large diameter - in the center, make an even hole for the required diameter of the shot (now I don’t see such cans in the store) approximately the diameter of the can is the size of a galvanized bucket. Then take a bucket of water and pour diesel fuel on top. Lead is placed in a jar and placed on a bucket. As the diesel fuel burns, the lead melts and drops through the hole into the water - solidifying into a ball on the fly.
An air pistol or rifle operates on compressed air, so the charge (in our case, a lead ball) flies due to a powerful air flow.
If you are not interested in accuracy and shooting accuracy - and you don’t need good pneumatics - but just need an ordinary ball-splitter, then I agree that the accuracy of the ball is not important. Shooting at an aluminum can, you can see with your own eyes how the ball flies around the can, seemingly flying into it, but wobbling along the flight. But then I don’t see the point of buying a pneumatic gun - I’ll be more accurate with a wooden slingshot.
And if you need shooting accuracy, you cannot do without the ideal size of the ball for the barrel.
Perhaps in the south, on the beach. In our Central Russian region there are interesting finds, but few are worthwhile. So, the cost of the device, all the accessories, and travel can be recovered. Of course, many people lie, but it’s immediately obvious. I have only seen one person who actually made money from this business to buy a house and a car. But he’s been roaming around for 10 years now, and in his entire career, this is his first and only case. Of course, God grant him all the well-being, so that it rings and continues. Great guy, he helped me out a lot back then and I was not left in debt.
I had an idea how to turn this hobby into a business. The idea is this: a training ground for beginners with real artifacts. At the end of the season, any search engine will have regularly minted coins from Peter 1 to modern day coins. Well, not a bucket, but a three-liter jar will fill up. They cost pennies, but it’s a shame to throw them away.
We take a plot of about 50 by 50 meters, remove the grass, put these coins in the ground and let newcomers in there. For entrance there is a fixed fee + time allowance for every half hour, for example. Everything that was dug up was theirs. They will be happy at the very least. 2-3 times a day - a new bookmark.
I'm sure there will be people interested. Newbies are visible all the time. After work, go and browse for an hour or two. An eagle is coming towards you: all grimy and sad. It’s immediately obvious that he just picked some traffic jams.
In the forest the roots will get in the way, but in the park there are dogs. Strictly speaking, the worst meeting for a search engine is not a representative of the authorities or the owner of the site, but an inquisitive slacker who stands over his soul and follows on his heels. At first I thought about a garden plot close to the city. There are empty ones, not in the first line, of course.
In general, this topic is relevant when purchasing a metal detector. If you buy the first one, the seller does an “over the air” test (clamps a coin in a fist and moves it near the coil). If you buy a second one, or take a second reel, then you need to go over the same place, first with the old one, then with the new one. Moreover, the “over the air” test is not exactly what is needed.
I will also say that this is more of a test than a quest. Not entertainment, but getting the necessary information. A person does not immediately understand how to work with the detector. And since this is a test, you need to offer testing services in a specialized store that sells these devices. Business card, “testing metal detectors on real artifacts.” We are recruiting weekend groups. Percentage goes to intermediaries, we give finds to testers!
So here it is. My friend and I first wanted to try it at my uncle’s site - just next to the district, the entrance is normal, there are few buildings. You can run four people, there is somewhere to rest/sit. We mowed the grass, but there was a problem. I didn’t even think about how much garbage there was in the ground at the old site. So for now the matter stalled until spring.
Safety precautions
When casting sinkers over an open fire, fire safety requirements must be observed. Keep water nearby to extinguish potential fires. NEVER pour it into a container with lead.
The room should be well ventilated, ideally have a hood. The melting process should not be left unattended, but you need to choose thick clothing.
Long sleeves and gloves are required to protect your hands from burns if lead is splashed. Make sure that there are no flammable substances or flammable objects near the stove, fire or electric crucible. This especially applies to clothing. In addition, it is very difficult to remove the chemical smell of lead from it.
Making simple disposable molds
The fragility and destruction of the gypsum structure when water evaporates makes it difficult to use this material for reusable use. However, as a disposable and easy-to-make mold, gypsum is ideal.
Make it a rule, on every fishing trip, the first thing you do is start.
To make a shape for a simple sinker you need:
- Prepare a box for pouring the mold; it should consist of two parts, tightly mounted on top of each other; you can use small boards fastened with screws;
- Dilute the gypsum to a creamy state, while trying to ensure that there are no air bubbles in the resulting mixture, since voids then appear in their place;
- The first layer of gypsum is poured into the lower part of the box, which should harden a little;
- The required sinker is immersed halfway into the plaster and, using a drill, a hole is made in the plaster on the side of the workpiece for pouring lead (it is better to insert cylinders of suitable size into these holes);
- The surface of the frozen layer is greased with vegetable oil so that the halves of the mold can then be easily separated;
- The second part of the box is installed on top, into which gypsum is poured;
- After the entire structure has hardened, the box is disassembled, both parts of the mold are separated and the sinker and cylinders of the filling channels are removed;
- The mold is cleaned and covered from the inside with a layer of soot using soot from a burning candle;
- The ears and loops for the sinker are secured, the mold is assembled and secured with wire;
- The finished form should dry well; to do this, you need to place it in a dry place for 1-2 days or use the oven.
The easiest way to make a cone-shaped sinker is to use a paper cone in the sand:
- A paper blank (a piece of paper rolled into a cone) is inserted into any container tightly filled with sand; a metal loop for a sinker is inserted into the sharp end of the cone;
- Lead is melted and poured into a paper cone;
- Part of the cone burns, but during this time the lead has time to cool a little and begin to harden;
- The cooled workpiece is removed from the sand and processed with a file.
You can use aluminum foil instead of paper.
The material for the sinker is also quite common and accessible, so even complex sinkers can be made independently using appropriate blanks
Blitz tips
- The porosity of a plaster mold and the tendency of lead to stick when curing can be greatly reduced by using chalk or talc on the inside of the mold to fill voids and create a layer between the lead and the plaster.
- To increase the service life of a plaster mold, you can impregnate and treat it from the inside with a sealant to reduce water evaporation when pouring metal. It won't be durable, but it will probably last a few more uses.
- When making small sinkers, regular matches or nails can be used to create outlet channels by simply sticking them into the mold material before it hardens.
- Instead of soap solution and vegetable oil, you can use silicone grease.
Source: lakeking.ru
I offer my original and effective method of making molds for smelting products (sinkers, jig heads) from lead.
We take ordinary plastic bottle caps as a basis. Fortunately, there are now a lot of them and of different sizes. Then we take the original product for which we will make a mold (sinker, jig head, etc.).
We prepare the original: To do this, we make spacers in those places where you consider it necessary, so that during the filling nothing will wobble or spin (see photo). Then we put it on the cork and adjust everything. In order for the other half to fit tightly, we lower the hook (if it’s a jig head) or your spacers a little into the side of the lid. This can be done in different ways: cut out grooves or press a little with a hot iron.
When everything is adjusted, you can proceed to the main action: Take a beer can (we also have enough of them), cut off a third from the bottom. It turns out to be a very convenient jar to work with. In this jar, melt wax (paraffin or a regular candle) on the stove, and dip our original with spacers into the hot wax. When lowering it into the wax, you need to chat quietly so that the wax covers absolutely the entire surface.
We take it out. We try to do it carefully so that there are no drops or smudges, otherwise all this will be reflected in the form.
When the wax hardens, we place our original on the lid according to the grooves and fill it with ordinary epoxy (you can add fillers). When the epoxy hardens, you can consider half the job done. I'm sure many people will want to take the original out of the mold and see what happened. I answer: it is possible. But in this case, you will tear off the wax coating and have to re-coat it, then install it and adjust it into place. You can also remove it to make sure it’s not stuck. I assure you that if you covered the original with wax properly, the product will not stick.
Next, you should carefully scrape off the wax from the outside of our product. Because we will cover again, and the second layer is unnecessary. You don’t have to scrape it off, but then when dipping again, keep it in the hot wax longer, the first layer will melt). We take our half-mold and just as carefully dip it into the melted wax so that everything is covered. After this procedure, set the workpiece aside. We take the second plug and cut a hole in the bottom for filling. We place this plug on the first one from the top, with the hole facing up. It turns out to be a barrel. To keep the shape, I take this barrel and also dip both sides into wax. This is instead of glue. Holds up well. Pour epoxy into the hole. In principle - that's all! I think everyone understands.
After drying, cut off the plastic from the side and drill a hole for filling. I personally clamp it in a vise and work. The rest are quite capable.
Remember to take precautions. Tin sometimes shimmers, and this is not good. Be careful. Go for it. Hi all!
» />
» />» />» />» />» />» />
Source: fisherman2000.mirtesen.ru
Casting sinkers
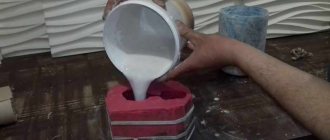
Now we can start casting the lead weights! To do this we need wire for the ears, lead, a torch or crucible and a clamp.
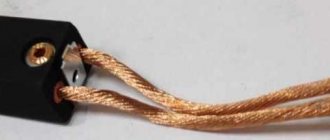
We bend the ears from the wire using pliers and put them into the mold.
We connect the two halves of the form and fix them with a clamp.
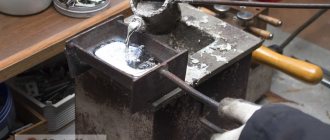
Melt the lead. I have old cheburakhs, tire weights and other lead scrap. I heat up the lead with a gas torch, it literally takes a few minutes, it’s very convenient! Next, pour the lead into the sprues and let it cool, that is, when you pour it into the last mold, the first one has already cooled down, everything is very fast!
Now we separate the mold and remove our weights.
Next we repeat in the same sequence.
Weights are cast very quickly, sometimes before fishing I remember that I have run out of a load of a certain weight, and then, in literally 20 minutes, I cast the dozen or one and a half weights I need. It takes less time than going to the store for the same goods)
In this way, you can experiment with the shapes and weights of sinkers, and invent some special shape of sinkers that are not available in stores. For example, last season I experimented with stick weights, making several versions of non-snagging weights with different lengths and diameters. The weight of such “stick” sinkers can be reduced directly while fishing, thanks to the small diameter of 6 and 8 mm (if you need to reduce the weight, you can simply bite off part of the sinker with pliers). Also, thanks to such diameters, the load passes 95% of hooks!
Another simplest version of the mold for casting weights is the “bullet” for Carolina. To make such a mold, you need to pour plaster into any sufficiently high mold, I took the cap from an aerosol can, and simply place the bullet samples coated with the same cream on top with the sharp side into the hardening plaster - that’s it, the mold is ready.
To cast such bullets, it is necessary to insert a “mortgage” made of steel wire, lubricated with ordinary toilet soap, into a mold, and pour lead on top. That's all.
The insert is removed from the bullet, leaving a hole for the fishing line.
Which ones are needed for a fishing rod?
To answer this question, you need to decide on the type of catch you expect and what kind of fishing rods you will use.
For float
This type of fishing does not require a lot of weight. You just need to immerse the fishing line to the desired depth in relatively calm water. This task is accomplished by one or more pellets attached to a fishing line.
Expert opinion
Knipovich Nikolai Mikhailovich
Zoologist, hydrobiologist. I am interested in fishing at a professional level.
Experienced fishermen advise attaching several pellets by cutting them and inserting the fishing line into the cut. In this case, the smallest one should be closer to the hook. The distance between the pellets should be from 5 to 7 cm.
There is no consensus on what the size of a single pellet should be. Typically, balls with a diameter of 3 to 7 mm are placed.
For spinning
The presence of a sinker is not necessary for this fishing method. If the bait is heavy, casting is carried out without it. If the weight of the bait is small, more advanced products are required. Shape and weight become categorically important, since casting distance depends on them.
- Spoon-shaped weight. You can easily make it yourself by pouring molten lead into a hole in the ground.
- Rhombus. Such products are produced in factories. The average weight of a lead diamond is 30 g, although some specimens reach up to 75 g. They are designed for casting at an average distance.
- Ball. A mathematically ideal shape is not ideal for fishing. Such sinkers are not recommended for use on fast rivers, since the current can roll them along the bottom.
- Spindle-shaped weights. Good for long casts.
For the donkey
Expert opinion
Knipovich Nikolai Mikhailovich
Zoologist, hydrobiologist. I am interested in fishing at a professional level.
For this kind of donk fishing, weights are cast from gart or lead.
There are several nuances:
- For fishing on a flat coastal area, you need a heavy weight.
- If you plan to fish on a pond, lake or calm river, you need to take a sinker that is not too heavy.
- For fishing on muddy or rocky bottoms, it is better to use a round, conical or pear-shaped weight.
- On a sandy bottom and in strong currents, a flat sinker will help out.
- If there is a lot of debris at the bottom, choose a weighting agent like a vanka-stand. It has a floating top, and the weight occupies a vertical position, supporting the hooks with bait above the bottom.
Form for sealant weights
You can make a mold for making sinkers or spinning baits yourself without much difficulty, using plaster or silicone sealant, as well as a ready-made sample. For example, it is easy and also very unusual to make a mold from a sealant like “Hermesil” and the like. The main factor when choosing a sealant is its ability not to change physical properties when exposed to high temperatures.
Content
- Materials
- Samples
- Mold making
- Casting sinkers
- Pros and cons of making your own sinkers
Hi all! Today I want to share my ideas, best practices and experience in making lead weights for spinning fishing.
I’ll say right away: this method is only suitable for small batches and simple shapes of sinkers. For example, I would recommend making collapsible Cheburashkas using aluminum molds, which I use myself)
Before the start of the season, I decided to add weights to my collection - “bullets”, for the increasingly popular jig-rig.
Making molds for plaster weights
- The melting point of lead, that is, the state from which lead changes from solid to liquid, is 320 degrees.
- At a temperature of 200 degrees, water begins to evaporate from the gypsum mold, the hardness of the gypsum is destroyed and it begins to crumble.
- When lead hardens in a mold, it tends to be pressed in, and it becomes impossible to pull out the sinker without destroying the inner edges of the mold, especially for heavy carp sinkers weighing over 100 grams with spikes and corners in shape.
- The product obtained by this method is subjected to polishing, since the plaster mold is impregnated with micro pores, they cannot be removed with Goya paste, the mold can only be smoked, coated with chalk or talcum powder. Soot, chalk, talc allow lead to slide freely along the inner surface of the mold and fill all voids. These components affect the smoothness, quality of the sinker and allow it to be easily removed from the mold.
- Even dental plaster is not able to withstand repeated tearing of a pressed sinker out of shape.
- A plaster mold can be impregnated and coated from the inside with various sealants and chemical compounds, but this does not solve the issue of water evaporation.
- The plaster weight mold needs to be closed and opened. Can this mold withstand repeated opening as the lead is pressed into the mold?
For bottom gear
Fishing through a donk is the most popular method due to the ease of making gear (you can do it yourself) and the efficiency of the catch.
Loads are:
- round and oval (“spoons”) - optimal for reservoirs without current;
- triangular and trapezoidal;
- rectangular and diamond-shaped (suitable for casting in currents);
- camouflage painted to match the surface color;
- three-blade with good aerodynamics;
- remote for long casts;
- with a swivel for unhindered sliding of the sinker;
- studded for better grip on the bottom.
In order not to delve into all these types, it is better for beginners to focus on the convenience of the gear. Experienced fishermen recommend tying a sinker to a fishing line on a drop-shaped bottom with an eye and a weight of 0.03-0.1 kg. Due to the streamlining, you can cast the bait far and silently. When the current is strong, use a heavy weight; when the current is weak, a light weight is enough - weighing 30 grams or more. If the bottom is muddy, the shape should be flat so that it does not sink and pull the leash along with it.
Sinker for a bottom fishing rod - what it should be
Before looking for an answer to the question of how to tie a sinker to a donka fishing rod, a fisherman must study the varieties of this fishing tackle.
When buying a bottom sinker in a store, pay attention to the following parameters:
- Product form. The most famous and popular options among buyers are sinkers in the form of an olive, a drop or a pellet.
- Donk mounting method. Usually the load is fixed on the fishing line in such a way that it either slides along it or remains motionless.
- The materials from which the element is created, their quality characteristics. On sale you can find sinkers made of metal alloys (including lead or tungsten). The first option has a significant drawback - a high level of toxicity. In England, for example, lead weights for fishing rods are generally prohibited because they are considered hazardous to health.
- Sinker weight. The product can have a mass of 3-75 g. (this parameter depends on its shape).
Drop-shaped weights are in great demand among fishermen. They are easily retrieved from the bottom of the reservoir and fly well. However, loads of this shape have some disadvantages. For example, they do not hold the float well in large currents. If you plan to fish in choppy waters, choose a flat sinker. It is not so pliable to a strong current and helps the hook sink to the very bottom. But it is worth considering that in this case the fishing line more often gets stuck between the stones at the bottom of the reservoir and breaks.
The weight of the sinker is selected based on the characteristics of the reservoir:
- if the river has a flat bank, then it is better to equip the bottom with a more powerful load (to cast the line as far as possible);
- to fish in reservoirs with stagnant water, it is better to equip the rod with a sinker with a small weight;
- round, pear-shaped or conical weights are suitable for fishing in rivers and lakes with a rocky, silty bottom;
- flat sinker models are an ideal choice for reservoirs with a sandy bottom and large currents;
- a sinker, which has a floating upper part, is useful for fishing in rivers where the bottom is strewn with a lot of debris.
When choosing a weight for a donkey, look at its quality and do not buy a homemade product. It is very easy to distinguish a product created in a handicraft way from one made in an industrial environment. In the first case, the cargo has an untidy appearance, an uneven surface and a too soft structure. In addition, its actual weight is always very different from that stated by the seller. Of course, an experienced fisherman will be able to fish with such a sinker on the line, but for a beginner this activity will be too difficult.
When choosing a sinker for the bottom, pay attention to how smooth its surface is. Smooth weights have minimal resistance when in the water at the moment of biting
To increase this parameter, some sinker manufacturers even coat their surface with varnish.
Forms for regular use
A plaster mold, even a very well made and dried one, will sooner or later collapse and you will have to make a new one or use a product suitable for frequent use.
Of course, for repeated use, molds made of heat-resistant steel or cast iron are best suited, but making these yourself is almost impossible. But cement is good for creating a melting mold, although this will require a little work.
Materials and tools for reusable uniforms:
- formwork material (wooden boards);
- liquid soap;
- cement;
- round file;
- fine sandpaper;
- clamp;
- cylinders for inserting into the filler hole;
- wire for making loops for the sinker.
For repeated use, molds made of heat-resistant steel or cast iron are best suited, but making these yourself is almost impossible
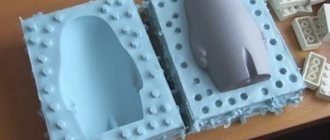
Making a mold for casting weights
Making a mold is not that difficult. First, we take a small box and completely fill it with high-quality sealant. When filling, be careful not to form bubbles.
Next, the original weight needs to be lubricated with a solution of wax or paraffin in gasoline. After drying, the sinker on a thin wire is completely lowered into the sealant, but it should not touch the walls of the box itself.
The weight sample should remain in this position until the sealant hardens. Due to the characteristics of the sealant, this process can last a couple of days or drag on for 5-6 days. Do not remove the weight until complete polymerization.
After the substance has hardened, we cut a small hole through which we extract a sample of the sinker. The elastic form is ready, which means you can try to make your own weight from lead or its alloy.
The metal is poured through the same hole that you made earlier to remove the original sample weight. Thanks to its unique physical properties, the silicone mold allows you to easily remove homemade sinkers or baits, after which it returns to its original form and is ready for use again.
Final processing
After the casting process is completed, the finished products will need to be processed. If the load is made in a spoon, then to fasten the scaffolding you need to drill a hole in the metal body. It is done in the narrowed part with a drill with a 2 mm drill bit. Just be sure to remove the chamfer with a drill so that the fishing line does not tear on a sharp metal edge in the future.
To ensure that the weights are not particularly noticeable in water, they should be treated with an aqueous solution of potassium permanganate. Immerse the parts in it for several hours. The sinkers also need to be sanded using emery or a velvety file.
This is what homemade weights look like after processing.
When working with lead, do not forget about safety precautions. It is unacceptable to cast sinkers in a closed room, so as not to inhale toxic fumes.
Also, it is unacceptable to use utensils for cooking.
Technology for making lead weights at home
Casting lead sinkers, despite the ease of technology and availability of materials, is still a mini metallurgical production, so before starting work it is necessary to at least superficially study the basics of metal melting. And although there is nothing special here, it is very important to listen to advice and instructions - both the result of the work and the safety of the work depend on it.
Materials
For the work you will need several types of materials - plaster, cardboard, tape, twine, wax or paraffin, and of course, lead.
Plaster or alabaster is usually used to make molds. Gypsum is more reliable than alabaster, but alabaster is more affordable. These two materials are required to make casting molds.
The auxiliary material for the work will be wax or paraffin. From them, models of future sinkers are made.
Clamps are used to secure the halves of the forms, but it is cheaper and easier to use twine or a clothesline, or, in a very modern way, adhesive tape.
Lead for melting can be found at any scrap metal collection point. Not only rechargeable battery scrap is scrapped; often lead-sheathed communication cables, lead alloys such as babbitt or typographical lead font are scrapped.
Mold making
The classic method of making a mold consists of sculpting a sinker model from wax or paraffin and then casting a reusable mold from plaster or alabaster.
Several models of sinkers are made from wax or paraffin. In principle, you can use plasticine, but then, in order for the model to separate from the plaster mold, it will be necessary to lubricate it with Vaseline or fat-based hand cream. After receiving the models, a gypsum solution is made and poured into a plastic or cardboard mold, so that the top surface is as smooth as possible. Until the plaster completely hardens, the model is pressed halfway into it at a distance of 1-1.5 cm from the top edge of the mold. After final hardening, the entire surface, including the model, is smeared with Vaseline, grease or fat-based cream and filled with plaster on top. When pouring, make sure that the height of both forms is the same.
Lead casting process
Lead alloys are multicomponent compositions that can contain up to 10% copper. Its presence significantly increases the melting point. The second most important component is antimony. The main advantage of lead alloys is that molds of almost any configuration can be used to work with them, at fairly low pressures. The melting point of lead is quite low - 325-350 degrees, and this allows you to cast lead parts at home.
For casting lead, injection molding technology is used. Melting furnaces use equipment that runs on various types of fuel - gas, fuel oil, coke and electrical energy. This equipment must meet the following requirements: 1.
minimum time spent on melting. 2. Minimal material loss. 3. Minimum fuel consumption. 4. Safe and comfortable work. To obtain molten lead and its alloy, the temperature provided in the furnaces is sufficient to melt the lead. Lead is processed in crucible furnaces. The main difference between this class of equipment is that the melt does not come into contact with fuel combustion products. Lead and its alloys are melted in furnaces with metal or graphite crucibles, which can operate on several types of fuel.
Crucible furnaces are produced in two versions: • stationary; • rotary. Furnaces with graphite crucibles for casting make it possible to melt various metals - lead, tin, and aluminum. Moreover, the transition from one metal to another occurs with minimal costs. But crucibles made of graphite have low durability and therefore crucibles made of cast iron are more often used.
The procedure for obtaining lead parts is as follows. Lead pigs or scrap are immersed, where the transition of lead from solid to liquid occurs. After this, the liquid material is poured into prepared models. The principle of castings in industry and households is the same, the key differences are only in scale.
Donkey installation
A spinning rod is a sensitive and reliable tackle, but to ensure this sensitivity you need to use a sliding sinker. The advantages of this installation are that when a fish takes the bait, it does not feel the weight of the load and is not frightened, as is the case with a bait donkey. This is especially true for trophy fish, which are very careful and attentive to unfamiliar objects.
On the one hand, she is attracted by the smell, color and taste of the nozzle, but, on the other hand, she needs to remain careful and attentive. A sliding sinker allows the fish to swallow the bait without fear and pull it to the side, and at this moment the movement of the sinker along the line stops and a hook occurs
At the same time, the load itself must be flat so as not to move along the bottom under the pressure of the current and the pulls of the fish.
To install a spinning rod you will need:
- a piece of fishing line 40 cm long, 0.25 mm in diameter;
- sliding sinker;
- triple swivel;
- float stops;
- two leashes 15 cm long, with hooks made of monofilament fishing line with a diameter of 0.2 mm.
Installation procedure:
- make a loop from one end of the fishing line for tying to the base;
- pull the float stopper onto the fishing line and guide it to the loop;
- pull the sinker along the fishing line;
- put on another float stopper;
- tie a triple swivel to the free end of the fishing line using the upper ring;
- lower the lower stopper to the swivel;
- tie leashes to the free rings of the swivel.
Installation is simple, but catchy, and for different fish. When fishing for crucian carp or bream, leashes are made from monofilament fishing line. If the catch is expected to include carp or catfish, the leashes are knitted from soft braid and their length is shortened to 5–7 cm. Short leashes are less tangled and do not create problems for the angler when fishing and casting.
The stoppers limit the movement of the weight along the line, and the lower stopper prevents the weight from hitting the swivel assembly during power casts. If the hook gets caught on a snag or grass, only the leash tied on a thin fishing line comes off, and the rest of the equipment remains intact. To restore the tackle, you only need to tie a new leash or leashes.