The desire to make a car with your own hands arises from inspiration and motivation.
This could be an expensive sports car that you cannot afford to buy, or a desire to create a car with your own design. There are several ways to realize your dream. In this article I will talk about how to make a car with your own hands. Let's look at how a model base for molding a body is created, methods for making a car body, and also how you can assemble a car with your own hands from a ready-made kit (kit-car). Content:
- What do you need to know to make a car with your own hands?
- How to make your own car from scratch?
- Making a full-scale base model for creating a body
- How to create a car body with your own hands
- Kit car
- Registration of a homemade car
What do you need to know to make a car with your own hands?
The process of creating a car with your own hands cannot be called simple. Even well-known automakers sometimes make mistakes in the calculations and assembly of cars. However, if you have a great desire and ability to work with your hands, then using available materials and tools, you can make a car yourself. Among other things, this requires strong will and perseverance, then you can get impressive results.
The basic knowledge and skills that are needed are: understanding of the structure of a car, the ability to work with metal, fiberglass and putty, the ability to use a welding machine, basic knowledge of car electrics.
Some things you don't know how to do, you will have to learn in the process of creating a car. A lot can be learned from guides and information on the Internet. This site contains articles about cars built by amateurs who have little experience and learned everything in the process of building a homemade car. Here are two examples: an article “about the creation of a dragster stylized as a Ferrari Enzo” and a second article “about the creation of a Scorpione car.” Sometimes it will be wise to seek the help of specialists. Think about what you can do yourself, and for which stage it is better to involve another master. Many people want to think that they are first-class jacks of all trades and can do everything on their own, without requiring help. This is sometimes the reason why a project drags on for too long. After all, what an experienced professional can do in a day, an amateur can take a week, or even longer. For example, if you don’t know how to paint, then you can prepare the body for painting yourself, and take the car to a painter for painting. Or, covering the interior with upholstery material can be entrusted to specialists in this matter. This way, the overall process of creating a car will not seem unrealistic.
Advantages of plastering machines over manual labor
The advantage of plastering machines in this case is very noticeable. The most important advantage of using the device is independence and freedom from routine manual labor in preparing the solution. The machine will greatly facilitate and speed up the work process for one person. Additional advantages of plastering machines are the following operating points.
- As a rule, preparing a solution for plaster requires a person to maintain exact proportions between water and dry mixtures when mixing. While people may make mistakes in their calculations, specialized plastering machines are designed to maintain precise dosages and prepare high-quality mixtures automatically.
- Dry mixtures are mixed mechanically using such devices. This is a tangible advantage, because it will be difficult and time-consuming for a person to mix large volumes of solutions. Plaster machines, on the contrary, mix quickly and efficiently, and the accelerated feed allows you to contain a large amount of air in the finished solution, which, in turn, allows you to save the dry mixture, because at the same cost the solution is produced by an order of magnitude more.
- One plastering device is a modern alternative to almost an entire construction team specializing in plastering work. The machine applies even, thin layers that dry faster, resulting in higher quality layers and significantly speeding up the work process.
Workshop and tools
You need to have a warm workshop with sufficient free space.
Making a car with your own hands requires the necessary tools. Special tools and machines make the job faster and easier, but you can do without them.
Here are the basic necessary tools that you need when creating a car with your own hands:
- It is necessary to have a good workbench with a large vice.
- Complete set of hand tools
- Drill, or better yet, a vertical drilling machine
- Bulgarian
- Welding machine (preferably semi-automatic)
- Compressor. For painting and for the operation of pneumatic tools.
- Spray gun
- Clamps of different sizes (for securing parts before welding)
- Mallets of various sizes and shapes, hammers and supports for forming metal (in the case of creating a body from sheet metal).
- English wheel machine and sheet metal bending machine (for easier sheet metal forming). As mentioned earlier, you can do without these machines, hammers and mallets, even if you make the body from sheet metal. We will look at different methods for creating a body in this article below.
Here is an example of a car whose body is made of aluminum on an “English wheel” machine. You can read more about the master and his cars in the article “Chris Runge and his cars made of polished aluminum.”
Batmobile
You don't have to be Bruce Wayne to own a Batmobile.
You can just work for two months at the city dump. You don't have to be Bruce Wayne to own a Batmobile. You can just work for two months at the city dump.
Another Chinese craftsman, Wang Jian from Jiangsu province, made his own “copy” of the Lamborghini Reventon from an old Nissan minivan and Volkswagen Santana sedan. And he also hauled metal from a landfill. I spent 60,000 yuan (9.5 thousand dollars) on this matter. The car has a carburetor engine, it smokes mercilessly, it does not have an interior or even glass, but the author himself likes the result, and the neighbors believe that Jian’s car is a fairly accurate copy of Lambo. The author claims that he is able to accelerate to 250 km/h in his supercar. No one risks dissuading him.
How to make your own car from scratch?
Making a car from scratch involves creating all of its components and arranging them correctly. This is a very difficult process and can take an indefinitely long time. For example, American Ken Imhoff, making a copy of the Lamborghini Countach car, as close as possible to the original, made almost everything from scratch, even the wheels. As a professional metal shaper, it took him 17 years to complete the project. In an interview, he admitted that it was not a profitable activity and was like an interesting game for him. Most often, when creating a car with your own hands, an existing production car is taken as a basis and remade. This is the most realistic way to make a car with your own hands - make the frame, body and interior yourself, and take all other components ready-made from another car or several cars. This is exactly what small car manufacturers around the world have been doing for the last 50 years or more.
You need to acquire the necessary manuals for the car that will be used as a donor in order to understand the structure of all its components (engine, steering, suspension, brake system, electrics).
Master class “Colored car”
Cut out car parts in advance from paper of different textures. Old wallpaper, foil, wrapping paper, as well as velvet and foam paper are suitable for these purposes. Let there be several identical parts so that the child has a choice.
Pour the glue into a flat plate so that it is convenient to dip the brush into the glue and spread the parts.
Show your child how to glue the pieces and let him finish the job.
Complete the application with drawings of a traffic light, road, etc.
At 2 years old, the baby goes to kindergarten, and the teachers demand crafts. Devote just an hour to this activity and the child will be happy that he was praised.
Exercising with parents strengthens the family, strengthens trusting relationships and is also a lot of fun.
Creating your own body design
Many car enthusiasts dream of owning one single car with an unusual design, the car of their dreams. You can design and make such a car yourself. The beginning of planning the design and construction of a car begins with an idea. The design can be individual, or combine existing shapes taken from other cars. For example, it could be the front that looks like one car and the rear that looks like another. When the image of your car is invented, you need to draw it. There are many graphics computer programs available to help you plan and design your car. Having decided what your car will look like, you need to understand what wheelbase will suit it. You need to choose a donor that is similar in parameters so that the wheelbase matches, or it will need to be changed.
Master class “Fun Truck”
Give your child paper or napkins of different colors and let them tear them into small pieces.
Print out the outline of the “Fun Truck” car on cardboard and cover it thickly with PVA glue. Together with your child, randomly scribble pieces of paper onto the outline.
Brush off excess parts. The work is ready
Making a full-scale base model for creating a body
To create a body, you need to make a base model. Using this base, it will be possible to customize sheet metal (formed with an English wheel machine or with hammers and mallets and applied to the model at each stage), or to mold fiberglass impregnated with polyester resin. After the body is molded, the base model does not participate in any way in the car's structure, and the finished panels are attached to the structural elements of the car's structure.
A computer (CAD or Alias program) can be used for design with further printing of full-scale drawings on a plotter. There are also ready-made templates for popular cars in electronic form, which can be purchased or found freely available on the Internet. There are also American companies that can make custom templates for the basic layout of any car.
A virtual layout diagram for creating a copy of the Mercedes-Benz SLR 300 body.
You can also use the old method of creating a base layout, without using a computer. It has its advantages. The old method of creating a mock-up base has been used by coachbuilders for many years. To do this, a drawing of all sides of the car must be drawn (see illustration) with a scale, which is drawn into squares.
In actual size, the distance between lines is 10 inches (25 cm). Using squares it will be easier to control the size and shape when making a layout. Next, to get a three-dimensional model of the drawings, you need to make a small model of the car. The model can be made from modeling clay or plasticine. As you work with clay, you will likely change a lot in your design as you get closer to the final form. This happens because the model appears to you from a different perspective. After changes in the design, you need to make changes to the drawing.
Next, the molded model is cut into transverse segments, which are outlined along the contour (see photo), and cardboard templates are made from them. Since both sides of the car are symmetrical, templates for the second side can only be made on one side. Each template should be numbered according to its location.
The next step is to enlarge these templates to full size. A projector is used to enlarge and transfer to paper. If you don’t have a projector, you can enlarge the templates by copying them onto large paper, maintaining the proportions (by squares). Then you need to make full-size templates. To create the final full-scale templates, 12mm birch plywood is best, but other materials can be used (discussed below). Now you need to put all the templates together to get a basic layout for molding the body.
Full-scale wooden base model for creating a replica of the Mercedes-Benz SLR 300 body.
Trying out molded sheet metal on a wooden mock-up of a sports car concept.
To make the base model, different materials can be used:
- Plywood
- MDF (cheaper version of plywood)
- Wire or fittings
- Polyurethane foam + cardboard (suitable for creating a fiberglass body)
- Plasticine or modeling clay
Full-scale mock-up for body molding, made from wire.
Different materials for creating a base layout have different features. Wood gives good visualization during the construction process, but burns when body panels are cooked on it. The open design (wire frame) bends well into different curves of the body, and provides easy access from the reverse side for hammering and supporting the sheet metal. Cardboard and polyurethane foam, which creates the main volume, are well suited for creating a fiberglass body (we will discuss this process below). Modeling clay is convenient in this process, but the most expensive thing. To create a full-scale model you will need more than 200 kg of clay. The cost of plasticine or clay will pay off if it is reused.
Once the 3D car model design is complete, it will serve as a mold to form the sheet metal for the car body or fiberglass body.
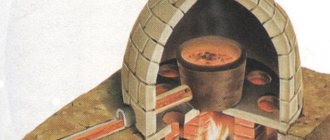
Historical facts
The beginning of automobile construction was preceded by certain historical conditions. During the existence of the union, mass production of cars was carried out. They could not satisfy individual consumer needs. That is why self-taught inventors began to look for ways out of this situation and did this by constructing homemade cars.
In order to make one car with your own hands, three non-working ones were required, from which all the necessary spare parts were removed. If we take into account people living in remote villages, they most often improved various bodies, thereby increasing their capacity. Cars began to appear that had high cross-country ability and could even overcome water. In a word, all efforts were devoted to simplifying life.
A separate category of people attached great importance to the appearance of the car, and not just its technical properties. In addition to beautiful passenger cars, sports cars were made that were not much inferior to factory copies. All these inventions not only surprised others, but also became full-fledged participants in traffic.
During the Soviet Union, there were no specific restrictions on homemade vehicles. Bans appeared in the 80s. They concerned only certain parameters and technical characteristics of the car. But most people could get around them by registering one vehicle with the relevant authorities under the guise of a completely different one.
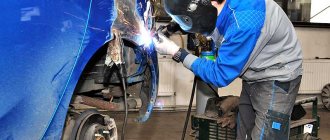
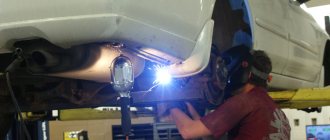
Frame and cladding (sheet metal panels)
Using a mallet and a solid wood die to shape the body panel.
This is a traditional method of making a body, used in the construction of carriages. The basic body frame is made of wood or metal. Next, the cladding sheets are attached to this frame. A body of this design is most often used by private automakers, since it is easy to design, build and repair if damaged (unlike the “monocoque” body, which is considered more advanced, but is used less frequently). The frame is the so-called space frame. A body with this frame uses many segments of profiled metal (usually steel) joined together to form a strong structure. Strength is achieved through crossbars. It is necessary to determine the loads that will act on the body and, in accordance with these loads, it is necessary to create the necessary reinforcements with profile pipes. Square pipes are easier to work with than round ones. They are easier to connect to each other. Round pipes are more difficult to connect, but are more durable. When forming sheet metal, mallets, hammers, supports, wooden stamps, and an English wheel machine are used.
The basic structure of a grinding machine
Without thorough knowledge of the design of grinding machines, it is impossible to assemble a high-quality device with your own hands. Before moving on to the structure, let's get acquainted with the most common types of grinders:
- Corner. Simply put, Bulgarian. Consumables are discs. Grinding wheels are designed for surface grinding. Pressure adjustment is carried out manually.
- Tape. Surface treatment is carried out with a sanding belt. Suitable for working on flat surfaces only.
- Delta sander. For processing products with a curved structure.
- Vibrating. Ideal for finishing smooth surfaces.
In addition to the above, there are several more devices that are less common:
- straight;
- polishing;
- eccentric.
Regardless of whether the device is factory-made or self-assembled, the main design elements are:
- Drive unit. The performance of the device depends on its power. Do-it-yourself devices use an electric drive, but there are pneumatic homemade ones powered by a compressor.
- Gearbox. Transmits torque from the drive to the working tool. The basic part of the gearbox is the spindle.
The gearbox is an integral part of tools such as an angle grinder or a drill. Some models, especially those assembled with your own hands, can do without it.
- Working platform. An abrasive material is attached to it. For this you can use circles, tapes, disks.
- Frame. Protects the structure from mechanical damage and dust, which is why many factory models are equipped with dust collection systems. The materials used to make a device with your own hands, as a rule, are not able to compete with high-quality polymers that are used in the production of professional tools.
- Control system. Includes turning off the power, as well as adjusting the abrasive speed.
Thick metal panels without space frame
This method does not use a load-bearing frame (space frame) onto which the sheets are welded. Instead, thicker sheets are used, which are stronger than regular sheet metal. The rigidity of the structure is provided by the mutual fastening of the panels to each other. Such bodies are mounted on a chassis and must have separate structural elements (not bearing a large load) onto which the sheets are attached. Hot rod bodies are often made this way. The disadvantage of this method is the difficulty of forming panels from thick metal and the heavy weight of the car.
Creating panels from individual segments welded together
Body panels can be created from multiple segments welded together. To do this, a wire frame is used as a basis (to control and maintain the shape), onto which all parts of the panel are welded. Depending on the size and shape, reinforcements may be added to the back of the panel. This method allows you to avoid molding complex panels using special molding machines.
Fiberglass body molding
Sports cars with fiberglass bodies appeared at the end of 1951.
The 1953 Chevrolet Corvette was the first production car to feature a fiberglass body.
The 1953 Chevrolet Corvette was the first production car with a fiberglass body.
The man demonstrates the light weight of the body. The fiberglass body can be molded entirely, in one solid piece.
The advantages of a fiberglass body are light weight, low cost when produced in small quantities, and non-corrosion. The disadvantages are the low visual quality of the resulting surface, which requires further leveling; fiberglass cannot play the role of a load-bearing structure capable of withstanding significant loads, so it must be installed on a frame.
To create a layout, today it is popular to use cardboard (as the main base layout, the creation of which is described above) with construction foam (to fill the gaps between cardboard templates) and further finishing the unevenness with putty.
The process of making a model of the basis of a car body using polyurethane foam.
There are two ways to form fiberglass panels. Both methods require creating a full-scale mockup (as described above).
- The body is molded directly on top of the layout. This forming will require further leveling with putty, as the surface will be rough.
- The surface of the layout is perfectly leveled and even painted. It is made into a mold using polyester resin and fiberglass. Next, the resulting form is enhanced. Its interior is very smooth and can be used to create copies of fiberglass panels with a much smoother surface than with the first method. If you need to create several copies of identical parts, then it is better to create such a shape. In other cases, fiberglass is molded directly over the full-size model.
Donor selection
The donor car must match the geometric parameters of your project. It is better to choose a reliable and easy-to-maintain car as a donor, the spare parts for which are not very expensive. To save money, you can, as a donor, buy a car with a damaged body.
Sometimes, when creating a car with your own hands, engines from powerful motorcycles are used. They combine light weight and decent power with a small volume.
The golden rule of plastering work
- Before applying a new plaster layer, the surface must be thoroughly cleaned of old plaster.
- Another requirement is the absence of damp and oil stains on the walls. Only a dry, clean and strong base is allowed.
- Mold and mildew will also interfere with further work.
- A person working with a homemade plastering machine must direct the unit’s hose to the wall, ensuring uniform coverage in relation to the beacons. If the solution is applied in excess, the strength of the plaster will noticeably decrease. If the solution is applied insufficiently, characteristic gaps will appear on the walls. The optimal thickness of plaster is a layer from 12 to 30 cm.
Kit car
This is another way to make a car with your own hands. A kit car (from the English kit-car) is a car kit that is sold by the manufacturer as a set of spare parts and contains detailed assembly instructions, and the buyer then assembles it himself. Typically, major mechanical systems such as the engine and transmission are taken from the donor vehicle or purchased new from individual manufacturers.
Kit cars have been around since the early years of the automobile industry. In 1896, Englishman Thomas Hyler-White developed a design for a car that could be assembled at home.
During the 1970s, kit cars had sports car-style bodies that were designed to attach to the frame of a VW Beetle. This was popular because the car's body could easily be separated from the chassis, leaving all mechanical components attached to the frame. For this reason, the VW Beetle has become one of the most popular donors of all time. Examples of such conversions include the Bradley GT, Sterling and Sebring, which were produced in the thousands and many still survive.
Modern kit cars are replicas of famous and expensive cars. Replicas have an identical appearance to the original, but the body is made of fiberglass and polyester resin, instead of sheet metal like the original body. The attachment points for the hood, doors and trunk lid are reinforced with metal inserts laminated to fiberglass and resin.
Infinity G35 coupe, prepared for installation of a new fiberglass body.
Part of the body was cut off, a power frame of the desired shape was added. Kit cars can come in different configurations. More common are kit cars that are designed only to replace the body of a specific donor (Re-body Fiberglass Kit). For example, Vaydor Body Kit produces fiberglass bodies for the 2003–2007 Infinity G35 coupe. Part of the body is cut off and a frame is installed that matches the shape of the fiberglass body. Such a conversion requires less technical knowledge, since all the technical parts remain from a working production car.
Veydor body based on the Infinity G35 coupe.
The advantage of making a car from a kit car is that it has already been done many times before and they can help you with advice. In addition, the manufacturer himself can always provide support in creating a car. If you are making an exclusive car from scratch yourself, then you can only rely on yourself.
Craft for kindergarten “Dad fixes the car”
Cover the base (a candy box or an old cutting board) with green paint, and draw a road in the middle with gray paint.
We make a car out of cardboard with our own hands. We need 2 identical side parts of a passenger car, and one rectangular part with teeth on both sides, with which we will glue all three parts.
Let's paint the rectangle and side parts with paint, and highlight the doors with a marker. Let's spread good glue on all the teeth, and placing the rectangle in the middle, bending it in the right places, glue it along the silhouette of the side parts.
We will also glue on four pre-painted wheels. We use white paint to mark the windows in the car.
You can make a dad out of plasticine or take a Lego man figurine.
Let's draw and cut out some trees. Using two squares bent in half, glue them to the base.
In the remaining empty spaces, crumble green threads, cut into small pieces, having previously coated the surface with PVA glue. The garden craft is ready!