The practicality of plastic bottles is actively used by craftsmen when arranging summer cottages. The presence and regular replenishment of plastic containers allows you to decorate not only small decorative items, but also take on fundamental structures, such as garden paths. There are several options for arranging a path made of plastic bottles; the choice of method depends entirely on the preferences of the owner of the site.
Characteristics of an extraordinary structure
Plastic bottles are a universal material that is actively involved in a budget option for landscape design. But, before you start arranging paths on the site, you should carefully study all the features of the future structure. The advantages of a path made of plastic bottles are as follows:
- financial costs at a minimum level;
- stability under the influence of external factors;
- simple installation, you can involve children to help;
- with small additions to the creative process, the path can take on a bright and extraordinary look.
But any method of arrangement also has negative features. Regarding the plastic garden path, these are the following negative points:
- The presence of containers of the same volume and color in large quantities makes it especially problematic to collect corks if the path is made from them.
- Strong temperature changes can cause deformation of the plastic bottles themselves or the entire structure as a whole.
- Over time, the material fades, and the path will become faded, despite the original bright decor.
Attention! The most dangerous thing is to use the paths after rain or in frosty weather. Excessively slippery surfaces can cause injury. Therefore, it is better to avoid traveling in unfavorable weather conditions.
Useful tips
Before starting work, make rough sketches on a piece of paper. The house, fence and other decor should be in harmony with each other. Decide whether the paths will be one color or not, with or without a pattern. If you plan to lay out a pattern, draw it on paper, calculating the required number of plugs for each row.
The width of the path depends on its purpose. For walking it must be at least fifty centimeters, for other household needs - eighty. If you want to get a durable coating, it is better to lay the corks on a concrete solution. When mixing the solution, you can add dyes to it. Then bright colors will be visible between the covers. Instead of sand, you can put foil, wrapping paper, candy wrappers, etc. in the bottle.
Any installation method is simple to implement, but the practicality and beauty of the path depends on the correctness of your actions. Knowing and following all the nuances will help you avoid troubles and achieve positive results. Therefore, if you have the opportunity, consult with a practitioner.
Preparatory stage
Regardless of the scope of the construction process, the work is preceded by a preparatory stage. A garden path, where plastic containers serve as the main element, comes in several types:
- directly from the entire bottle;
- only the bottoms of the container are involved in the construction process;
- A beautiful ornament is made from plastic corks.
First, select the appropriate type of path and collect the required amount of material. Everyone around us will be happy to join in the process, since everyone has an abundance of bottles in everyday use.
Then you need to mark the area and dig a trench. The depth varies depending on the material used as a basis:
- for whole plastic containers you will need a recess of one and a half shovels;
- if bottle bottoms are involved in the process, 15 cm is enough;
- the cork path needs even less deepening; about 10 cm of the top layer can be removed.
Formwork made of wooden elements is installed along the edges of the trench. It is recommended to fill the bottom with broken bricks or other household waste in order to subsequently prevent subsidence of the path, for the construction of which whole bottles were used.
In each of the three methods, a drainage cushion of sand is formed. After spreading the material, it is carefully compacted; if possible, it is recommended to use a roller.
Decor for the garden - photos of ready-made examples
Armed with imagination, in addition to interesting plastic garden paths, you can make a good fence for the site.
If you buy glue and fasten the lids together in the shape of a circle, you will get an unusual table for tea drinking.
Thematic material:
- Gazebo made from plastic bottles
- Gazebo made from scrap materials
Photo: table made of corks
Lovers of mosaics can be patient and try to create a whole picture that will delight the eyes of others for many years.
Photo: mosaic of lids
A simpler, but no less interesting option is to use whole bottles, turned upside down, as a fence for a flower bed.
Photo: flowerbed border
By choosing corks according to color and shape, you can create wall compositions. They will become an interesting decoration for a fence, walls of outbuildings, gazebos, bathhouses, and houses.
Photo: other crafts
This is how you get original decorative elements from unnecessary things, which are easy to make yourself. And if you invite children to help, landscaping the site will turn into an exciting creative process for the whole family.
Use of whole bottles
Let's move on to the main step of making a path from plastic bottles with your own hands.
Advice! Plastic containers for the walkway are selected the same according to four parameters: volume, shape, color and degree of hardness.
All containers are thoroughly washed, and any remaining adhesive solution and labels are removed. The containers are dried. The rigidity of the path will be given by sand, which is tightly filled with all the bottles. To speed up the action, younger family members are involved in the procedure. Children always enjoy playing with sand, and helping adults arrange the site is a double benefit.
Before filling begins, it is worth considering the design of the path. There are several decoration options:
- use a combination of plastic containers of two or three colors;
- coat the bottles with durable paint;
- during filling, add candy wrappers, foil or paper to create bright fragments;
- An original replacement for bright paper would be shellfish or sea pebbles.
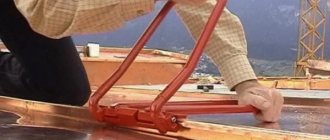
Well-dried plastic containers are filled with dry sand and tightly screwed with stoppers. Then the containers are sequentially placed in the trench in a horizontal position. To make the path as smooth as possible, place a wooden shield on top of the bottles and compact it. Here again the help of descendants will come in handy. Ask the children to jump on the board - they will have fun, and you can take a break before the next stage of arranging the path.
To make the track strong and reliable, plastic bottles need additional fixation. To do this, dilute a liquid cement solution and fill the cracks between the plastic containers, avoiding the very top of the bottles. When the solution has completely hardened, the remaining mixture is removed from the surface of the containers with a stiff brush to give it an aesthetic appearance.
There is another way to secure the track. High-quality dry cement is poured between plastic bottles, after which the path is carefully watered from a watering can. After the mixture has dried, at the final stage the elements of the wooden formwork are removed.
Preparing material for work
To use plastic bottles as a path, you first need:
- Wash well from any remaining drink;
- remove all labels so that they do not spoil the appearance in the future;
- Dry all material in the sun.
Further work proceeds depending on what you will do.
Also, before starting work, prepare all the necessary material:
- sand or ordinary soil;
- crushed stone;
- shovel;
- bucket;
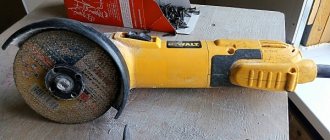
- garden shears (they are more convenient to use when cutting eggplants, but if you don’t have them, then perhaps use household scissors);
- leveling boards;
- formwork - box.
Having prepared all the tools, you can start working. Let's take a closer look at the main options.
Formation of paths from bottoms
Using exclusively the bottoms of plastic containers to arrange a garden path is characterized by lower labor costs. The initial steps are identical to creating a path from whole bottles:
- a trench is being dug;
- formwork is installed;
- plastic containers are washed and dried.
The bottoms for the path are cut to the same size, the approximate height is 7-10 cm. The trench is filled with a mixture of sand and cement and compacted tightly. Then the base is carefully watered in parts from a watering can so that the water does not wash out the litter. They begin to form a path. It is also appropriate to use a combination of colors here. The sketch of the ornament is drawn in advance. When the fixing composition hardens, the formwork is removed.
Comment! The resulting surface is more suitable for decorative purposes and will do an excellent job of massaging the feet. Therefore, it is better to create such a path from plastic containers in a small area of the garden away from areas of intense walking.
A decorative border for a flower bed made from the bottoms of plastic containers looks organic. The procedure for its arrangement is not much different from the construction of a path. A trench is formed the width of one bottle. To make the lines even, markings are first made with pegs, between which a thick thread is pulled, which later serves as a guide. DIY path made from plastic bottles in the photo below:
First way
You will need:
- rigid base made of plywood, chipboard or thick cardboard;
- glue;
- covers.
Everything is very simple. Lubricate the lids with glue and place them on the base. For reliability, press them with a heavy press, you can use books.
They are bright, colorful, retain color for a long time, durable and, most importantly, affordable.
To make the carpet brighter and more interesting, use the patterns offered on the Internet to create beautiful patterns or entire paintings.
They allow you to create any ornament, create exclusive pictures on benches and tables, etc.
Advice! Involve your friends in collecting caps, this will speed up the process. To make the search even more interesting, distribute the lids by color, let everyone collect lids of a certain color - arrange a competition.
Children will take up this with particular enthusiasm.
Crafts made from plastic lids for the garden
Lids of all sizes and colors are not sent to the trash today. They are given a second life. This does not require any special skills or knowledge. You need a supply of caps, wire, cardboard, old newspapers, and simple construction tools.
Fencing
Fencing for small flower beds or low shrubs requires a huge number of covers of the same size.
The color of the fence depends on the presence of traffic jams and can be plain or variegated. Craftsmen choose options: cover the fence with one color, build it in the shape of colored pencils. Less often, they lay out a multicolor pattern on the frame or place the lids like a painting or photograph.
When a sufficient number of caps accumulate, the stages of fence construction begin:
Garden paths
Since the front part of the raw material is smooth and slippery, it is recommended to safely place paths between trees and bushes. To decorate suburban areas you need: corks of different colors, sand, narrow boards for fencing the area, cement, industrial glue.
Construction stages:
Assembly steps:
Curtains
Openwork, bright curtains will decorate country windows or doors. The product does not require a lot of effort, time and money. But the end result pleases with intricate patterns and rainbow colors.
For the window curtain you need to take:
Sequence of work:
Panel
Post a simple picture or a complex panel in a geometric style. In each case, it is advisable to take a base - plywood or cardboard. Without experience, it is difficult to immediately place the panel in the chosen place.
Stages of the creative master class:
The panel looks interesting when lids of different diameters are inserted into one, like a “matryoshka doll”. The picture turns out voluminous and has a visual 3D effect. In this technique, a panel of a cockerel or a sun is chosen. The work is difficult for craftsmen who know how to create stained glass and mosaics. First, the plywood sheet is primed. Then the outline of the drawing is drawn. Fill it with lids.
Other options
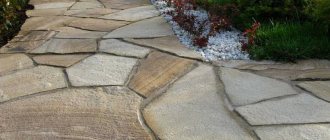
Coverings made from combinations of plastic lids with broken ceramic tiles look good. The small size of the elements allows you to lay out fancy and extraordinary patterns.
The result is a distinctive path of bright elements. Such garden patchwork will decorate the garden and place accents on the site.
The designs can be varied with metal lids. And adherents of eco-design will love the paths made from wine corks. Cork is a noble material with unique properties.
Health track made from different caps
Homemade massage paths in the garden have become quite popular. Children and adults love them. After all, walking barefoot on a textured surface is not only pleasant, but also useful. For such paths you will need a cement base on which various materials are laid.
Lids from juices, glass jars, corks, buttons, and sticks are suitable.
All this stuff is sorted by color and size. Then a sketch is developed. Here you can play not only with color and texture, but also with the styling method. Covers placed on the end will create a convex surface, while those glued with the recess down will give a smoother surface.
What kind of caps can I use?
Colored, white, large and small - almost all bottle caps are suitable for creating country crafts. The main thing is to give free rein to your imagination.
You can your loved ones and friends in collecting
This material can be used in a wide variety of ways, and for this you need quite a lot of it.
Coasters for glasses and hot dishes, children's toys and rattles, country rugs and seats, lampshades and curtains, garden furniture - and this is only a small part of what can be made from plastic bottle caps. Next we will look at several master classes that can become a source of inspiration for you.
Advantages
- This coating is very practical and aesthetically pleasing.
- Minimum material costs.
- Not afraid of temperature changes.
- Lasts a long time with proper paving.
- Easy to repair; if the cover bursts, it is enough to replace it without dismantling the entire covering.
- They do not lose color for a long time, as they contain a permanent dye.
So it is much more profitable to equip paths with this plastic than with paving slabs or other paving materials.
Instructions for creating a rug
Here we will talk about a massage mat that will be useful for all family members. One evening is enough for you to create an unusual decoration for your home that will also be good for your health. A little patience and attentiveness - and your unusual massager is ready.
You can make it in any shape, or you can think over the shape, size and even design of the product in advance.
Here's what you'll need:
- a large number of plastic covers;
- awl for making holes;
- strong fishing line.
make holes on the sides
Now imagine what your rug will look like.
Lay out a pattern on the floor and fix it in any way (sketch or photograph).
Place the lined corks in a snake pattern on the fishing line according to the pattern, row by row.
The result should be a long “snake”. Then select the covers of the first row and place them on the fishing line in the others - located oppositely.
So, having collected the first row, they move on to collecting the second, and then the third. All that remains is to tighten the ends and secure them securely. You can use the diagram provided, or you can try to create an original drawing yourself.
Home ideas
Having free time, desire, and a love of handicrafts are favorable conditions for making various things and souvenirs out of ordinary bottle caps. They will color the interior of the rooms. They will give your home uniqueness and comfort.
Decor options
Crafts made from plastic bottle caps are used as decorative options for various places and spaces.
Thanks to a variety of colors, shapes, sizes, lids are used literally everywhere:
Painting
The painting is a large-scale project made from plastic lids. Usually it is used to decorate the wall of a house or a solid fence. The main thing in this creativity is to choose the right color scheme of raw materials and design.
Work progress:
Experienced craftsmen advise not to use stencils. It is better to take a clear plan of the picture, divided into separate segments. Also, experienced craftsmen recommend choosing a simple, unpretentious drawing for the first painting.
Stages of work:
The design of the dial depends on the tastes and preferences of the master.
Massage Mat
Lids are used not only to decorate country houses and territories. They are used to create practical things to maintain tone and health - therapeutic mats for the feet or back. The use of such a coating relaxes and heals the human body. It prevents flat feet and osteochondrosis. You will need materials: corks, thick fishing line, an awl.
Assembly progress:
A rug with an ornament requires prior placement of the pattern on a flat surface. And fastening plastic parts according to the diagram.
Hanging decorations
Crafts made from plastic bottle caps are used in New Year's and holiday interiors. The children are inspired to collect Christmas trees from green corks and hang them on a large fir tree. Bright balls made from lids connected with strong glue look unusual.
Old pendant lamps will take on a modern look if they are decorated with transparent or colored covers. Craftsmen embody bold design ideas from waste material in the form of an original lampshade. You need to make a strong frame and decorate it with lids. In addition, monochromatic, boring pots for climbing flowers are covered with colored lids.
Hanging flowers look original in the interior of garden houses or country houses. To make a plastic flower you will need: large caps from 5-liter plastic bottles, double-sided tape, scissors.
Progress:
Stands
The peculiarity of this product is the reliable and durable fastening of rows of lids to each other.
To make the stand you need:
Making a stand for a coffee cup:
They also make stands for larger kitchen utensils: a kettle, a pot, a frying pan, by combining 4-6 small stands into 1 large one.