Basic requirements for tools
For a quality device there are a number of requirements:
the surface of the instruments is smooth, with anti-corrosion treatment, there are no cracks or kinks on it; parallel jaws without distortions;- working profile without chips, hardening, or other mechanical damage;
- combination and ring wrenches have uniform ring sizes and a strictly central location of the holes;
- the existing rotation toggle switch is firmly fixed in the ratchet;
- All markings are applied and readable.
The working profile of tools means a combination of planes that impart mechanical pressure from a locksmith tool to the element that needs to be unscrewed.
The body of the wrench is the body of the product that transmits the mechanical effect. Individual characteristics characterize a particular object.
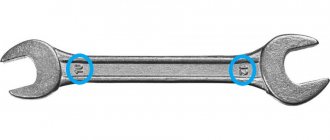
For open-end wrenches, GOST strictly regulates the standard size. It is determined by the gap cavity between the jaws - the mouth of the key. This parameter is measured in millimeters and is recorded in special reference tables. Markings are applied to the body. In the description of such wrenches, GOST requires an indication of the size, hardness, and surface coating material. There is a wide range of key sizes: the minimum is 2.5 millimeters, the largest is 75 mm. Number systems.
One of the characteristics also concerns the size of the tool. Some world manufacturers, on a German initiative, show data on indicators of working elements based on the European (metric) structure. Many others use US inch. The conflict between the systems manifested itself in the coincidence of only two dimensions - 15 mm (19/32′′) and 19 mm (¾′′).
Depending on the calculation system, accessories are divided into two categories:
- Those that support the metric system. The size is given in millimeters and varies between 2.5-230 mm for general kits, 6-41 mm for automotive ones.
- Inch tools work in a system with the main measure inch (1′′ = 25.4 mm). Dimensions range from 1/8 to 91/8′′. For car open-end wrenches, GOST sizes range from 1/8 to 15/8′′.
Tools
0 votes
+
Vote for!
—
Vote against!
To unscrew or tighten a nut, bolt, coupling, tap head, etc. a wrench is used. Any master who does men's work around the house or deals with technology has come across this tool at least once in his life.
- Wrench sizes
- Types of wrenches
- Choosing a wrench
- Making your own wrench
Wrench sizes
Any device has its own parameters and characteristics. There are generally accepted standard sizes of wrenches . To determine the size of the key, attention is paid to the gap created by the motionless jaws. This is the mouth of the instrument. The handle of any wrench contains a digital designation. This is the number of millimeters that determines the distance between the jaws. The standard sizes of wrenches range from the smallest (2.5x3.2) to the largest (75x80 mm). These are GOST indicators that cannot be violated under any circumstances. Other requirements for wrenches . Any manufactured tool must have specified hardness and strength. A special calculation of the maximum deviations of the nominal size of the pharynx was carried out; the protective and decorative coating of the key is taken into account; trademark markings are applied, etc.
Wrench sizes
Types of wrenches
Now let's figure out what types of wrenches there are . More applicable are keys that have two jaws. Its second name is a two-way wrench. If you need to unscrew parts with a distance of 19 or 22 mm between the polar edges, then you need to use keys with a handle, where there are designations 19 and 22. It happens that in a force majeure situation you do not always have the right size tool at hand. In this case, a key size larger will be suitable. When using an incorrectly sized tool, use a screwdriver or knife and insert it into the empty space.
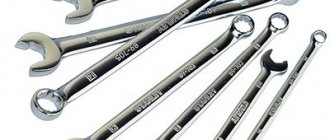
So, what types of wrenches are there? Firstly, divorces . These are open-end wrenches, the size of which may vary. Secondly, compound . They consist of a hollow socket, an end structure attachment and a handle, long or short. There are keys with a specific profile . These are no ordinary wrenches. There are hex, Bristol and star wrenches designed for working with computer and bicycle equipment, with tightening parts in hard-to-reach places, which borders on almost jewelry work.
Choosing a wrench
How to choose a wrench so that it meets all the requirements? The variety of wrenches demonstrates that there are different types of wrenches for every need. You need to proceed from the purpose of its acquisition and the complexity of the task that you set for it. The material for the manufacture of modern keys is special tool steel , which consists of chromium and vanadium. Therefore, when referring to the material, they usually say that chrome .
There is a unique thing that can solve all problems in one fell swoop and save you from having to rack your brains over which key to choose. There is a universal wrench that contains all the wrenches combined. It can handle nuts of any size with different head shapes. It does not slip on smooth surfaces thanks to its powerful teeth, which is its clear advantage.
There is also an electric wrench, the name of which speaks for itself. This tool runs on batteries and rechargeable batteries. So each master decides for himself which wrenches are best for him.
Electric wrench
The pricing policy for keys is very diverse. the price of wrenches ranges from 21 to 415 rubles, depending on the manufacturer and the versatility of the technical characteristics. The cheapest key will be a one-sided key, the open jaw of which ranges from 3.2 to 85 mm. When purchasing, it is also worth remembering the long handle, which limits the amplitude of movement of the key in turns. If one of the jaws is shortened, then, accordingly, the radius of the wrench will increase. In this case, it is possible to put the key on the side of the nut. If the handle is artificially increased, then the applied force will increase, and the jaw jaws will spread apart or even break. A sledgehammer can snap them back into place if they get loose, but the material won't be as strong as it was before. If you have a key made of 40X or 40HFA steel, then there is the option of hardening the sponge.
There is another way to repair a worn or broken throat. By welding the metal layer, the volume of the throat is adjusted using an abrasive tool. If the open gap is more than 24mm, then this key recovery option will be more effective. The service life of wrenches ranges from one to three years. When talking about durability of use, they always mention a ring wrench . It cannot be heard, but it will wear out. There are restrictions on the use of this type of key. It can be used if put on nuts, but it cannot be used to unscrew, for example, union nuts of flexible hoses. For plumbing work, ring wrenches are used to loosen or tighten valves, cast iron siphons, etc. The advantage of this wrench is a hexagonal or twelve-sided jaw, which allows you to perform the work more intensively.
Ring wrench
Making your own wrench
A natural question arises: how to make a wrench without the help of a specialist. For those who decide to personally make this instrument for themselves, there are some tips. You should start making a wrench with your own hands by making a single-sided or double-sided wrench. Use a sample of a similar finished product. Make a drawing of a wrench based on which you will make your tool.
To begin with, we make a blank from a sheet of steel with an overall dimension 2-3 mm larger than the outer size of the sides of the key. There are difficulties with thick workpieces. You can't cut it out with a hacksaw. It is contraindicated to use a gas burner. It is best to use blacksmithing. This is done by flattening the steel rod.
After we have the workpiece, we begin to apply markings. If the workpiece has uneven sides, it is better to file them and remove scale. Then you need to apply paint to the treated top. You can use quick-drying paint or varnish. The sample is applied after the paint has dried. It's best to use some kind of press to keep the sample from moving while outlining . The scriber will be a sharpened steel wire. After separating the sample and the workpiece, you need to make the final marks 1-2 mm from the ones already applied, then mark them. First, place the core at an angle at the mark, and straighten it when striking with a hammer. The distance between the pits in the throat should be 3-4 mm.
Next we drill out the throat . You can use a drill with 3-5 mm drills. The drill must not be allowed to overheat. You need to cool it in water. After you make the second shed, you need to remove the excess.
Well, at the end it is necessary to harden the production. This can be done at home using gas. If you use a forge or a special stove, it will be ideal. To remove the key, use pliers by dipping one side of the key into water. After this, you need to take it out and lower it until the sponges completely darken. Then we cool them in water. The opposite side of the key must be processed in the same way. This is the technology for making a wrench.
Making a wrench
Mass types of keys
Touching on the topic of wrenches, an unforgettable image of an open-end wrench appears before your eyes. The nuts are fixed using lips that look like horns. This is where the name comes from. The second name for such means is used by GOST - open-jaw wrench. The center lines of the handle and head most often intersect at an angle of 15-20 degrees. When manipulating in tight spaces, this configuration will make the work easier. The angles between the axes of the head and handle are made in different sizes; opposite heads have different slopes from each other. Horn models are typically divided into various modifications:
- Double-sided instruments have two jaws of different dimensions. Usually their size designations are adjacent (18−19 mm). The jaws can have different thicknesses: thin ones work in hard-to-reach places, while thick ones are used for loosening nuts made of soft materials.
- For one-sided ones, the body is lengthened in order to increase the moment of force when interacting with fasteners. It is used in assembly production for operations with the same type of nuts. Some models have a locking shank for tube extensions.
- High-speed with a modernized working profile and a shortened jaw for high-speed movement of the key from one element to another. The rotation changes when the tool is turned one hundred and eighty degrees.
- Profile cuts on the lips of open-end wrenches increase the number of contact points and shift the location of the boundaries of the fastening components relative to the jaw. The turning force does not damage the structure in the planes of the nut or in the heads of the bolts, and allows you to unscrew deformed elements.
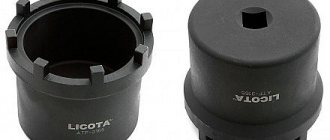
- A wrench with a working profile in the form of a ring, which is put on the mounting surface, is called a spanner. They can have rings at both ends of the working plane. There are edges along the inner diameter. There are six or twelve of them. The hex power tool unscrews tight, soured connections easily and without damage. Twelve-sided is used when working space is limited. The working profile can be made elongated for the use of attachments. The undoubted advantage of the attachment tool is the permissibility of exerting a large force on the unscrewing planes and working in cramped areas. The weak point is discomfort when working with threads of increased length.
- Devices that have a horn-type head on one end and a cap or end-type head on the other are classified as combined. Their heads are the same size on both sides. The dimensions of the body length are different: when space is limited - shortened standard increasing forces - elongated ones creating the maximum peak of pressure - extra long.
- A tool with a variable working profile is called an adjustable tool. The transformation occurs due to a screw mechanism or slider, which moves the moving part to the required width. The clamping of the fixing parts is not tight, which leads to the rolling of the edges. A plus is the possibility of using it with nuts of various diameters.
Materials for production
According to existing requirements, wrenches must be manufactured using tool steel, an alloy of chromium and vanadium or similar. It must be solid material. The information is reflected in the labeling.
Imported tools contain the following designations: Cr (chrome steel), CrV (chrome vanadium alloy), CrM (chrome molybdenum alloy), CrMoV (chrome molybdenum vanadium steel), etc. GOST recommends that domestic manufacturers prefer chromium-containing steel grade 40X with good strength for the manufacture of open-end wrenches . Usually this is enough for the majority of actions with keys. For high-strength products, chrome vanadium alloy 40 HFA is used. The best instruments are made from grade 45 metal.
Chinese and unidentified keys are sometimes labeled Drop Forget Steel. These accessories are made by forging from unalloyed steel, which means they are fragile and will fail at the wrong time.
The process of making a knife from a wrench with your own hands
The initial stage of making a knife from a wrench is to find a blank. The old tool may have succumbed to corrosion, then it should be cleaned of rust.
An angle grinder with a wire attachment will come in handy here; as an additional option, you need to use sandpaper with coarse grain.
Main profile cut
The cleaned tool must be marked in accordance with the future blade. A marker will help with this ideally:
Homemade knife from a wrench.
Immediately mark the rise of the blade and the tip. Don't forget about the handle. The workpiece will take on a template marked appearance.- For reliability, you should go over the marker with a tap, scratching the markings on the key.
- Having clamped the workpiece in a vice, using a grinder with a cutting wheel, we begin to cut off the unnecessary parts of the key.
- Use files or a grinder to remove burrs. It is acceptable to use an angle grinder with a grinding wheel. There are enough options.
Cutting and sanding the part in accordance with the markings. Let's move on to marking the cutting part.
Formation of the blade and bevels
A very important moment; mistakes and overheating of the metal are not allowed. Periodically it should be cooled in water . So:
- Use a marker to mark enough space for the handle.
- Using a grinding machine, we begin to remove the metal.
- Having reached the desired thickness of the butt, we mark the slopes symmetrically.
Blade hardening
After making sure that the slopes are even, the blade must first be sharpened. Now it is ready for hardening. Reference data is easily available on the Internet. 40HFA steel is hardened at a temperature of 880 ° C, dipped in engine oil.
Hardening a knife blade.
For this process you will need an oven. Heating to such temperatures is impossible in a simple fire. Stock up on fire-resistant gloves and a mask; when hardening, there is a possibility of the oil igniting.
After heating the oven to the set temperature, the blade is placed into it using pliers. Having brought the workpiece to 880 °C, remove it from the oven and lower it into oil for 4-5 seconds. Leave the wedge to cool in the air.
Cleaning the knife and preparing the holes for the handle
Upon completion of the hardening procedure, it is necessary to temper the steel. The blade is placed in an oven at a constant temperature of 220 °C for 2 hours. Once it has cooled down, remove the carbon deposits from it.
Using fine-grain sandpaper soaked in water, you need to go over the entire product. After wrapping the blade with masking tape, you should work on the holes:
- Having given the blade an aesthetically pleasing appearance, we begin drilling holes for the handle. Two or three is enough.
- Having marked with a marker and made notches with a tap, we begin to drill holes.
- We cut the prepared brass rod into pins, the number depends on the holes drilled.
- Metal drills must be hardened. The diameter of the holes should be made slightly smaller than the brass blanks.
Make sure the pins are securely fastened. This will affect the grip of the handle.
Making linings and assembling a knife
The wooden block must be “halved”. These are future handle linings, you need to act in this order:
- Drill holes in them in accordance with the handle, try them on and mark them to give them the required shapes. We bring them to a satisfactory appearance on a grinding machine.
- We glue the entire surface of the handle, apply pads, and drive the pins into the holes.
- Remove excess glue with a rag. Secure the structure with clamps and leave for a day until the glue dries.
Homemade knife pads.
Product refinement
At the end of the procedure you must:
- Cut off the excess length of the pins with a grinder and polish them on a grinding machine.
- Use sandpaper to sand the handle to a perfectly smooth surface.
- Sharpen the cutting edge to the required angle.
- Soak the handle with special oils. This will allow it to be water-repellent and last forever.