A good carpenter's ax is one of the most indispensable things in a home owner's arsenal. Choosing an ax in a store is not an easy task, but if you wish, you can find a tool there to perform any household task. This option is not always the most profitable for the following reasons:
- high cost of a quality product;
- limited selection in regular stores;
- lack of an element of exclusivity.
Making an ax with your own hands is a difficult, responsible task, but at the same time extremely exciting. You will need patience, perseverance, and strict adherence to the work plan. Don't forget to check that you have all the necessary tools. To work with a metal blade and butt you will need:
- grinder (with cutting, abrasive discs);
- grinding disc;
- welding machine;
- file;
When making a wooden handle, the following will be useful:
- chisel;
- jigsaw;
- mallet;
- sandpaper;
- clamp.
Don't forget about marking tools such as a marker, ruler, and plumb line. Even the slightest flaw can affect the quality of the final product.
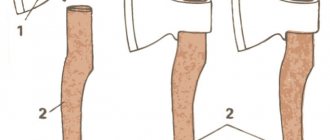
Try to find an old, rusty wooden ax in your garage, ask your neighbors. It will make an excellent base for your product. Pay attention to the condition of the butt and blade. If there is no noticeable damage or corrosion on them, then the metal part can be safely left.
The handle of an old ax does not have the necessary strength or appearance. Measure it carefully and enter this data into the table. They will be useful for developing a model of the future ax handle. If you want to make a homemade ax of a completely different shape, then it is better to change the dimensions of the handle in accordance with the type of the future product.
Classification of axes
In practice, many types of axes are used, which are designed for working with wood. Conventionally, they can be divided into three types:
- cleavers;
- for logging;
- construction or universal.
Accordingly, there are various designs designed to solve specific problems, for example, a firefighter is equipped with a pick, with which you can pull beams and other structures away from the source of fire.
Cleaver
Construction ax
In addition to this classification, we can offer another one - according to the size of the blade, or more precisely, according to the size of the butt:
- wide;
- average;
- narrow.
The first ones are used in logging, the second ones solve many problems in construction and in everyday life, and the third ones have found their application in carpentry. These tools are also distinguished by the length of the ax handle. That is, the larger it is, the stronger the swing and, accordingly, the blow. There is a difference between the width and shape of the blade. That is, if the tool has a direct sharpening, then it is intended for chopping blows. If the cutting part has a curved sharpening, then it can both chop and cut.
Steel, wood, and polymer materials are used to make ax handles. But as experience shows, nothing better than a wooden (birch) handle has yet been invented. Other materials do not always cope with vibration damping.
The list of existing and widely used tools can be listed for quite a long time, the following can be mentioned:
- Tourist, it has small overall and weight characteristics, its weight is just over half a kilogram, and its length is 350 mm. With its help, you can prepare dead wood and perform simple work, for example, put together a ladder or a raft.
- Hunting. It is used for cutting dead wood and butchering harvested carcasses.
- Scandinavian. This tool is intended for professional woodcutters. It weighs 1.2 kg, with a length of 640 mm.
- Cleaver-sledgehammer. Its use allows you to split any log.
Tourist ax
Hunting ax
GOST 18578-89 normalizes the main dimensions of the product, maximum tolerances, and roughness parameters of the cutting part. According to the requirements of this document, each product must be marked. This GOST defines the procedure for acceptance and shipment of finished products to the consumer.
Download GOST 18578-89
Wood: selection and preparation
For a tool to last a long time, be of high quality, strong and reliable, it must consist of the right parts. Therefore, to create a good and functional ax handle, it is important not to make a mistake in the wood material. It is up to the craftsman to decide which wood is best to make a strong ax handle from, but many years of experience suggests that the original material should be hard wood. Suitable oak, ash, maple, acacia and birch. It is from the lower part of the birch that templates are most often prepared. Before cutting down a tree, it is important to determine by eye or using a tape measure approximately 80 cm from the bottom. It is this length that is needed for further recessing of the handle.
The width of the tree should be approximately 40-60 cm in girth; if less, the fibers will be less strong, and the handle will break during the first felling. If you choose a thick and wide trunk, there is a risk of getting rotten wood. This is especially true for oak and maple.
The best time for harvesting is considered to be late frosty autumn. It is at this time that the wood is least wet due to the cessation of sap flow processes. Prepare logs with a reserve, because when making it yourself, there are cases of spoilage.
After selecting the wooden material, the drying period begins. If you leave the tree to dry under natural conditions, it will take several years, but oak dries out completely in 3-4 years. Therefore, experienced craftsmen prepare the wood at least 1 year in advance. They often dry in attics, near the stove or under radiators. The main condition is a well-ventilated room, there should be no musty air, otherwise this will lead to the formation of unnecessary mold and subsequent rotting.
After drying, they begin to apply the sketch to the workpiece itself or to a separate sheet of cardboard. Drawings for axes are prepared depending on the purpose of the future product. The tools are as follows:
- butcher's;
- sorcerers;
- lumberjacks;
- carpentry
The average length of an ax handle should be approximately or equal to the distance from the tip of the middle finger to the master's elbow. Although some axes may be smaller than standard sizes. For example, a tool for cutting branches should be light and maneuverable; it visually resembles a cleaver.
Work on cutting out an ax handle
This tool is used in almost any household. It is in demand for housework, construction and many other tasks. But, you need to understand that not all tools of this type that are in use have decent reliability. And therefore, some craftsmen make an ax handle with their own hands.
Making an ax is a very responsible task. The comfort of performing work, and most importantly the safety of the worker and the people around him, depends on the parameters of this part.
A stick with a section of a certain shape is far from the best option. When using such a handle, a person quickly gets tired, and work can become unsafe. Therefore, a curved handle with an oval cross-section is used for the tool. The tail part must be widened and bent down. Such an ax handle holds it securely in the hand, even when delivering a sharp blow.
Making an ax with your own hands
As stated above, a timber is required for the wooden part of the tool. Since this is only a blank, drawings with the derived parameters of the ax part are needed.
The labor intensity of the work here is lower than in the first case, when we were talking about metal, but it is very important that the part is done correctly. It is necessary that the ax handle has an attractive appearance and fits the eye of the metal part.
From what is needed to make an axe, specifically its wooden part, there is a set of carpentry and plumbing tools and additional items that help in measuring and drawing.
To avoid mistakes, you should step by step follow the instructions showing how to make an ax handle with your own hands. Information of this kind can easily be found on the Internet or in printed manuals on carpentry and carpentry.
The process of making an ax looks like this:
Material selection
The following grades of wood are used for the handle:
- oak;
- birch;
- maple and some others.
In order for this part to be of high quality, the wood must be harvested before frost. After the workpieces are ready, they need to be dried. They should lie in a ventilated area for about a year. But, some craftsmen claim that the drying period should be about 5 years. In fairness, it must be said that in an emergency, you can use an undried workpiece, but this is a temporary option, the handle will quickly wear out.
Cutting out the template
To obtain an ax of the required size, you must use a template made from cardboard. As a sample, to obtain it, you can use the tool that is convenient to work with. That is, you need to put it on a sheet of thick cardboard and outline it with a pencil.
Ax template
By the way, the size of the ax can be determined based on the height and physique of the person who will work with it.
Making a blank
A block is hewn out from a block that has been dried. Work must be carried out along the fibers. The size of the bar should be 100 mm larger than the size of the finished product. The size of the part where it will be installed, and the blade itself should be 2 - 3 mm larger than the size of the eye.
The template prepared in advance must be laid on the surface of the block. At the same time, leave allowances for processing. From the front its size is 10 mm, in the tail it is 90 mm. This allowance is necessary so that the handle does not crack when pulled onto the ax itself. Upon completion of work, this allowance is removed.
Hewing out an ax
To bring the part to the required dimensions, two cuts must be made in the upper and lower parts of the workpiece, but their depth should not reach the contour of 2 mm. Excess material can be removed using a chisel. After this, using a file with a large notch, the corners, transitions and other surfaces of the handle are leveled. Abrasive sandpaper is used to finish the surface.
Making an ax
Impregnation with waterproof compound
To increase the resistance of the handle to moisture, special compounds are used. But it is permissible to use drying oil or linseed oil. The handle is covered with this liquid until it stops being absorbed into it.
The handle of the tool should not slip in the hand and therefore, it is not recommended to cover it with any paints or use any pads.
By the way, it wouldn’t hurt to add a coloring pigment, for example, orange, to the waterproof coating. Then the tool with a bright handle will not disappear on the site.
Step by step process
Working with metal and wood requires perseverance from the master and strict adherence to the work plan. If you try to do everything by eye, the final product may only last you a couple of hours. Very often lazy owners don’t want to read how to repair a broken tool or how to make an ax with their own hands, which is why high-quality products are replaced with cheap goods from hardware stores.
This is the “grandfather” that unlucky tourists left in the forest.
Before starting restoration, clean the ax and inspect all its components. Try to establish the quality of the metal, the type of wood from which it is made. An old ax can turn into a truly worthy tool.
Ax design
A standard ax consists of two main parts:
- metal blade;
- wooden axe.
This is a standard design, for which it is not difficult to find a drawing on the Internet. Let's take the ax handle out of the butt of the old axe. If the tool has not been looked after, the butt can usually be easily removed from the ax handle without much effort. Pay attention to how it was secured, try to make mental drawings of the axe. The pattern for driving in the wedges may vary.
Head
The head is the most important part of any axe. It is almost impossible to make it at home. If you want an exclusive beautiful blade with a Scandinavian or Slavic ornament, order it from a blacksmith’s workshop. In our case, the rusty butt of an old ax will serve as a blank.
Choosing a blank for the head
On old axes, you can often notice cracks on the metal part (in the place where the butt meets the blade). During the impact, Newtonian forces tend to destroy the blade. Even the smallest cracks will increase with each blow, leading to complete destruction of the instrument.
To prevent this, existing flaws are removed using a welding machine. The only alternative way to deal with this is reforging. Do not spare money and effort; restoring a completely broken blade will be even more difficult.
In our case, the cutting edge became unusable. It was decided to get rid of it, then weld an additional piece of metal to make the shape of the blade more curved and beautiful.
Blade material
Before grinding, carefully inspect the surface of the metal for the presence of characteristic symbols of the alloy from which the part is made. You're lucky if the blade is marked:
- U7;
- 60G;
- 8HF;
- U7A;
- 9ХС;
- CHVG;
- 9HF.
Avoid the following labels:
- OST;
- MRTU;
- THAT.
These alloys are not suitable for making axes. They do not have sufficient strength, ductility, or corrosion resistance. To visually determine the quality of the material, you can cut the edge with a grinder.
Grinding
Start sanding the blade if you are happy with the material. The most comfortable way to do this is with a grinder with an abrasive disc or file. Make light circular movements. Any carelessness may result in damage to the metal. This procedure can take from a couple of hours to several days, depending on the condition of the part. Upon completion, the blade will become beautiful and shiny.
Hardening
You can harden the blade to give it extra strength. The metal is heated until reddened, then cooled in cold water or oil. This procedure is repeated several times. How to harden an ax determines its durability. If you do not have a forge at hand, it is better to contact a specialist. Improper hardening of an ax will only worsen its properties.
Drawing
A beautiful ax is the pride of its owner. Drawing will help give personality to this instrument. There are many different options for applying patterns to metal. In our case, we will use electrochemical etching. This method involves controlled exposure to the surface of the material. We will need:
- degreaser;
- nail polish;
- current source;
- solvent.
Sketch the image on paper. Degrease the part. Apply varnish to the surface so that a pattern is formed from the unpainted part. We connect “+” to the part. Wrap gauze or cotton wool around the negative electrode. Wet the “minus” in a saline solution, and begin to slowly move it over the surface of the part. After completing the procedure, remove the varnish with a solvent.
Making an ax
The manufacture of the handle must be approached thoroughly. It should have high strength, elasticity, look beautiful, pleasant. A wooden ax should sit comfortably in your hand and not slip out while chopping trees. Approach the choice of material for this part with all responsibility.
Entire books are written about how to properly make an ax handle for an ax with your own hands. Work on this detail can take several years. If the log house is fresh, then it needs to be dried for 2-4 years. During this time, the tree will get rid of excess moisture and become denser. Buy wood that has undergone a similar procedure. Old furniture is also suitable as a material for a future ax handle.
Material selection
Handles can be made of any wood. But hard wood is the best way to make an ax handle durable, strong, and beautiful. These include:
- birch;
- oak;
- ash;
- acacia;
- maple.
Select a tree from the root areas of the trunk. The growths can also serve as a good material for a wooden handle due to their special structure, but they are quite difficult to work with. The handle for a shovel is made from them.
Cutting out the template
There are many options on how to make an ax handle with your own hands. Select an ax template. The shape of this part determines the grip, swing technique, and impact force. Choose the length of the ax that matches your dimensions and the shape of the metal blade. The back should be wider than the rest of the part to ensure a comfortable grip.
A quick sketch and a complex, beautiful diagram will help in marking out a wooden blank. Cut it along the contour using a regular or electric jigsaw. If you used fresh wood, then the resulting part must be dried for several years in a dry, warm room.
The following handle was chosen for our ax.
Hewn out the workpiece
The most critical stage during the manufacture of the handle is cutting out the workpiece. This must be done slowly, carefully, constantly looking at the drawing. This procedure is carried out with a chisel or hammer. To remove large amounts of wood, use a plane. It is important to accurately observe the dimensions of the part.
Grinding the ax
Before the workpiece takes on a finished, beautiful appearance, you need to get rid of burrs and chisel marks. To do this, use an electric grinder and sandpaper with coarse and fine grains. Carry out this procedure carefully, there is a risk of damaging the ax handle.
Impregnation with a protective composition
Without additional protection, the handle will need to be replaced after a couple of months of use. Special impregnations provide additional resistance to water, pests, and cold. They are applied to the finished part in several layers. Each previous layer must dry completely before applying the next one.
Refrain from using varnishes and paints. The handle becomes slippery and slippery. This may result in serious injury. But no one forbids adding a little coloring pigment to the impregnation; this will make the ax more noticeable and beautiful.
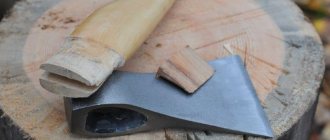
Placing the ax on the handle
The final part of the work is assembling the resulting parts. Mark with a pencil the depth to which the ax handle should enter the eye (hole in the butt). Next, secure it in a vice. Visually halve the distance from the top of the handle to the marks. Make a cross cut to this depth.
Take the ax in your hand. Place the ax head on the table. Using progressive movements, drive the handle into it a couple of millimeters. Turn the resulting structure over and tap the end of the handle on the table until the blade moves another couple of millimeters. Repeat the action until it reaches the level of the mark.
Secure the ax in a vice. Use a mallet to drive a wood or metal wedge into the cross-cut. Get rid of any protruding parts. Leave the ax for several days in a dry, warm room. After that, your beautiful new ax is ready to be used.
Sharpening
An ax needs to be maintained in working order to ensure it lasts for many years. Inspect the handle and blade for cracks. Sharpen your cutting edge regularly. It is convenient to use an electric sanding disc for this. A regular sharpener will do. Hold the blade at a 45 degree angle. Make smooth, arching movements. For cleavers, the sharpening angle is 30 degrees. A sharpened, shiny ax looks beautiful.
Piercing attachment for an ax
When choosing a piercing part, you must definitely find out what steel it is cast from. Our country has adopted GOST 18578-89. It defines the grades of steel from which it is permissible to make the blade parts of an ax. These are steels - 8ХФ, 9ХФ, 9ХС, ХВГ, У7А, У8, У8А, У8Га, У9, У9А and many others similar in properties to the named grades.
Piercing attachment for an ax
Choosing wood for an ax
When choosing materials, preference is given to hard rocks:
- oak;
- ash;
- maple;
- acacia;
- birch.
Most often, the templates are based on birch. 80 cm is the required length to carve the handle. The girth width of the tree varies from 40 to 60 cm. With a smaller value, the fibers will be unreliable and the handle will quickly break. If the trunk is too wide, you can get rotten material.
The wood is thoroughly dried so that the ax head does not become loose. The wood is harvested a year before the handle is produced. Oak takes 3 or 4 years to dry.
It is important that the room is ventilated. Otherwise, mold forms and the process of rotting begins.
Maple breed
Canadian maple looks beautiful. An ax handle made of this material is easy to polish and dry. The texture is different:
- hardness;
- strength;
- elasticity.
A maple ax handle is an excellent solution.
Jatoba tree
Increased impact resistance makes this breed indispensable in the manufacture of handles not only for axes, but also for knives. The wood is stronger than oak. Is different:
- hardness;
- viscosity.
Jatoba lends itself well to processing. The breed is considered one of the most expensive and beautiful. Suitable for those craftsmen for whom appearance is important.
hickory tree
Handles are made from it for:
- ax;
- knife;
- hammer.
The tree is resilient and durable.
Not particularly used in our country. This is due to the high cost.
Popular in countries such as:
- Canada;
- North America.
Oak and beech trees
These breeds have in common:
- easy processing;
- inexpensive cost.
The disadvantages of an oak ax include:
- heavy weight;
- severe drying of hands when working.
By increasing the length of the oak handle, the friction force is absorbed. A shorter handle is easier to cut from solid timber. Each ax handle shape has its own differences.
The porous texture of beech has a smooth and beautiful surface. It's easy to cut. However, this breed is not resistant to moisture absorption. The wood needs to be double impregnated with oil. Thus, hygroscopicity is reduced.
Birch
This is an ideal option for producing high-quality pens. The only drawback is the long drying time. The minimum period is 1 year, the maximum is 2 years. Birch is hygroscopic. At the same time, a pattern can be easily cut out of it. Cheap material is often used to make homemade handles.
Sharpening an ax blade
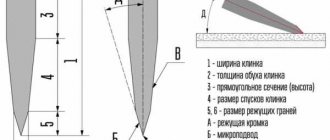
After choosing a tool, the owner is faced with a new task - how to sharpen it. Yes, the manufacturer supplies this tool in a ready-made condition. But sooner or later, the sharpening done in the factory workshops will become dull and the need for independent editing will arise. Practice shows that it is better to spend some time on editing it than to do the work with a blunt instrument. It is advisable to perform turning of a product using a template. It is made independently. To do this you will need a small piece of tin. After choosing the sharpening angle, you need to mark it on the sheet metal and cut out the angle. After this, attach the template to the blade. The angle of deviation from the required one will be immediately visible. Using a marker, mark the cutting edge accordingly.
Sharpening an ax blade
When sharpening, the master must consider the following factors:
Characteristics of the wood he will have to work with. What kind of work will have to be done, harvesting lumber is one thing, cutting out locks on logs installed in a log house is another. Of course, the material from which the blade is made must also be taken into account.
Features of the procedure
Knowing some of the nuances will help you do the job better and faster. Masters share features that need to be taken into account:
- During the forging process, you should not heat the metal above 1100 degrees. This may lead to the destruction of the structure. As you use the tool, the blade will become chipped.
- When forging blades, the metal acceleration technique is used. It makes it possible to have a longer beard.
- After forging, the product is annealed. It is placed in coals with a temperature of 750 to 900 degrees. As the metal cools slowly, it is freed from stress after forging and it acquires an even, fine-grained structure. This effect is difficult to achieve in industrial production.
- The ax is checked for defects in the working edge, and then sharpened and inspected again. Lack of penetration and burns are looked for. If they are absent, further processing is carried out to the final result.
- A sharpened ax with a treated eye is hardened in oil heated to no more than 830 degrees. At the hardening point, the metal has a hardness of 60 HRC. Next, it must be kept for 2 hours in a muffle furnace at a temperature of 220 degrees.
How to make a battle ax
Not all axes can be purchased in the store; for example, it is impossible to buy a battle axe. And therefore, if you want to get such a product, it’s easier to make an ax with your own hands.
You can take an ordinary construction tool as a basis, see Fig. 2, and use it to make a combat blade.
It has certain disadvantages:
- It has an irrational form.
- It has excess mass, which will interfere with manipulations during the battle.
Viking battle ax
It should also be noted that the upper ledge will create difficulties during chopping and striking. That is, it gives the ax an unnecessary torque directed counterclockwise, thus causing increased wear on the ax handle. It won't hurt to grind off the protrusion located below. In addition, straight sharpening is not entirely suitable for a battle axe.
Service life of the ax
The durability of a homemade ax is measured by the wood's resistance to changes in temperature or humidity, and compressive force. When heavy loads are placed on the upper part of the instrument, the wood bends, crumbles, or even gets wet over time. As a result, the ax begins to wobble, or even the metal chopper completely slips off the ax handle. The service life is affected by the type of wood, degree of drying, frequency of use and method of attachment. The more precise the hammer fit, the longer the tool's service life. If there is a certain gap in the shape of the handle and the metal chopper, then the error can be corrected independently by driving in a special wedge. If you make an ax handle correctly, the product can serve for years, decades without any repairs.
How to make an ax from wood
How to make an ax from wood? To do this, you need to prepare a wedge-shaped blank from which you will need to make a blade. On the surface of the workpiece, you need to draw the outline of the future toy with a marker. Excess material can be removed using an abrasive sharpener.
At the next stage, on the end surface of the workpiece it is necessary to mark the outline of the hole for the ax handle. The technology for obtaining the handle is described above, but it is necessary to correct the dimensions.
Children's wooden ax
Bringing the blade and handle to the required shape can be done using a sharpener or file. In a fairly short time, the children's ax will be ready.
Useful tips and tricks
Please note that the ax handle should be made so that its cross-section has a characteristic oval shape. Only by observing this condition will you be able to successfully hold it without straining your hand too much. In this case, blows with an ax will be more accurate and easier. It is recommended to make wood blanks for creating an ax handle in late autumn. It is during this period that the movement of sap is reduced to a minimum (almost stops), which means that the tree becomes, as it were, dehydrated.
Many inexperienced craftsmen neglect drying wood to build an axe. As a result, this ends up with the handle changing in size, and the metal part with the butt on it holds very poorly. It is permissible to use undried material only in special situations, when the handle needs to be built urgently, and this spare part is made as a temporary one.
When making a brand new ax handle yourself, you need to draw up a detailed drawing/template of the future tool.
If you have a very convenient old ax in your arsenal, then you can remove all parameters from it. This will make it much easier and more convenient. Do not rush to turn the cutting edge of the tool. First you need to make sure the metal is sufficiently hard. If it turns out to be too soft, then it will need to be additionally hardened under the influence of high temperatures.
It is permissible to begin sharpening the ax blade only after installing it on the ax handle.
- It is very important to use a ready-made ax (both homemade and store-bought) correctly. Experienced craftsmen strongly do not recommend trying to cut various metal parts with such a device. Even if you plan to cut wood, it is better to make sure that there are no solid particles inside that could harm the tool.
- It is strongly recommended not to throw the finished tool onto hard surfaces, especially from a great height. It is not recommended to leave the ax in the open air. Precipitation or aggressive sunlight can negatively affect the quality of the wooden part. Keep this tool in a dark and dry place. Only under this condition will the ax serve you for many years.
- If the ax handle fits into the eye too easily, this may indicate that during the work the master made a serious mistake somewhere (most likely in the calculations). An incorrectly prepared template often leads to this problem. In such a situation, even one more installed wedge will not change anything. That is why it is so important to take your time to do all the calculations and make the template correctly.
Do not forget to process the wooden ax handle at the end of all work. Please note that processing of this part must be carried out in several approaches. Each new protective layer should be applied only after the previous one has been completely absorbed. This is the only way to reliably protect wood from rotting and destruction. Stock up on enough wood to make an axe. You don’t need to make just one piece - it’s better to build several pieces.
This is necessary because during the work some of them may not work out and be rejected. There should always be at least one more blank in stock.
To make an ax handle, you cannot use a wooden block that has a large number of knots. Because of them, noticeable cracks may form on the material. Over time, the branches begin to dry out, and the entire material loses its strength. Making an ax handle yourself is not at all difficult. If you doubt your abilities, are afraid of making a mistake and translating natural material, then it is better to refuse experiments.
Buy a ready-made model or contact an experienced craftsman who will make a good tool for you.
Homemade ax for hunting
What product does a hunter who spends a lot of time in the wild need? How can it be made? Yes, no one argues, in specialized stores you can buy a product for every taste. But not all of them meet the needs of hunters.
In order to make the cutting part of a product for hunting, you need to use a solid piece of metal. But somehow it’s more common to hold an ax with a wooden handle. For the manufacture of the blade, grade 1040 steel is used, this is a structural alloy steel, the Russian equivalent is 40G.
Homemade ax for hunting
You can make the cutting part by ordering it from the village smithy. The master is able to forge the necessary blank for the blade. He is also able to make and install a steel handle. If such a handle does not suit you, then you can install a wooden one. When making it, you need to take into account some simple rules:
The handle cannot be varnished - the hand will slip.
When choosing its shape, it is necessary to take into account the width of the grip of the palm; it is necessary to make stops that will allow you to hold the ax in your hand.
Kitchen hatchet for chopping meat
Cooking utensils and cutlery play an important role among kitchen accessories. With their help, daily food preparation work is carried out, and the result of cooking depends on the quality and reliability of the products. An important role is also played by kitchen knives of various shapes and sizes.
They are designed for slicing meat and fish products, vegetables, bread, cheese, etc. Among the tools, you can often find a kitchen hatchet, which was popular back in the USSR. It is required for chopping small meat, as well as cutting it frozen, chopping bones and cartilage.
Unlike even the highest quality steel knife, a hatchet will be preferable for processing meat and fish with your own hands.
Knives can crumble or become dull when working with hard foods, especially bones. Using a kitchen hatchet it is easy to carry out such work without much effort.
This tool is highly durable, reliable, and almost impossible to dull.
In addition to the kitchen, such a hatchet can be bought for trips to nature, for example, on a hike, to a barbecue or to the country. In addition, not a single restaurant or cafe can do without this tool.
Varieties
A kitchen hatchet is somewhat different from a regular axe. Products intended for home use look less bulky and are more comfortable. A regular ax consists of a wooden handle and a metal blade. Its kitchen counterpart has a one-piece design, thanks to which the hatchet does not slip during operation, and the center of gravity is located exactly in the middle: between the butt and the tip.
In addition to the classic models of a kitchen hatchet, there are other varieties designed for processing meat, which can be bought in a specialized store.
Hammer-hatchet for processing meat
Almost no kitchen can do without this tool. Such products were often found on the farm during the USSR. In addition to chopping, you can also chop prepared pieces of meat with such a hatchet. To keep the room clean, it is recommended to wrap the meat in cling film.
Uzbek hatchet
Some dishes prepared from meat with your own hands require that it have the consistency not of minced meat, but of finely chopped pieces using a knife. This meat is used for chebureks, manti, samsa, lula kebab and other oriental dishes. In this case, a specially shaped hatchet comes in handy, which allows you not to cut by pressing, but to chop, and the juice does not leak out.
Kitchen hatchets can be washed in the dishwasher, but experts advise using predominantly hand washing so as not to quickly dull the blade. Like any kitchen knives, the hatchet will need periodic sharpening.
Criterias of choice
A hatchet in the kitchen can be very useful if you need to cut up meat or fish, chop bones, etc. Unlike a knife, a hatchet will cope with this process much faster and easier.
Before you buy a product, you should pay attention to its cost. More expensive models are made of high quality steel, which means they will not require too frequent sharpening.
It is not so easy to visually determine how high quality the metal is, but this can be done by clicking on the hatchet with your fingernail. The sound should not be dull.
It is also equally important to carefully inspect the blade and handle. It is best to buy a product with a thick and wide blade, so it will be much more convenient to use the hatchet. The handle can be made of plastic, wood or steel.
The first option is more durable, but to prevent the hatchet from slipping in your hands, the material should not be too smooth. Wooden handles are convenient to use and environmentally friendly, but wear out too quickly during use.
The steel handles are just as comfortable, but the downside is the heavy weight of the product.
The comfortable shape of the handle is the key to successful cooking. Before purchasing, you need to hold the kitchen hatchet in your hand and make sure that it will be comfortable to use in the future.
A handle that is too massive or long is unlikely to be comfortable; you will have to spend too much effort processing the meat with your own hands. The fasteners should not be very visible.
It is better if the handle and blade look monolithic.
Kitchen hatchets were used for chopping meat back in the USSR. Now manufacturers from different countries offer their own options, differing in price, material, shape and size of products.
Today, one of the best tools is considered to be a German-made hatchet. The models are distinguished by a stylish modern design, reliability, ease of use, propylene handles, etc.
Japanese products are also of high quality. Chinese samples are considered less durable and reliable.
Some products have a small hole in the design - an “eye”. It is intended for hanging a hatchet on a kitchen panel. There it is dried and stored along with knives and other accessories.
How to properly care
Like any kitchen item, knives and hatchets require careful care and storage conditions. Thus, the products will be able to last much longer without losing the original appearance and quality of the blade.
Many people probably still have kitchen hatchets from the times of the USSR, and they have not lost their quality.
Now, the most convenient way is to immediately purchase a set of knives, which will include several items of different shapes and purposes, including a hatchet.
- It is best to store knives separately from other cutlery. There is a special stand for this that comes with the set.
- Immediately after use, the hatchet or knife must be washed and wiped dry.
- Wooden or plastic cutting boards should be used to process meats and other foods. Ceramic or glass products will quickly dull the blade of a knife or hatchet.
- To sharpen products, it is better to contact a workshop.
A kitchen hatchet is one of the items that can become very useful when cooking. It is used for chopping meat and, unlike a knife, it does it much faster and better.
But, as with other kitchen utensils, you should inspect the product carefully before purchasing it.
Check the reliability of the handle, the quality of the material, the thickness and size of the blade, as well as other important nuances.
The importance of the handle
You can choose the optimal length of the ax based on the height of the master and the force of the blow. Strength, in turn, directly depends on the length, so when working with a large ax, it will be easier to chop logs of firewood.
Before making a choice, you should decide on the desired result:
- heavy version of the tool (total weight 1 kg - 1.4 kg, handle length from 55 to 65 cm);
- lightweight version (weight 0.8 kg-1 kg, with a length from 40 to 60 cm).
The quality of the wood from which the ax handle will be made is of great importance. Not every type of wood is suitable for manufacturing. Often, birch is used for these purposes (parts located near the roots or stem growths).
There are also handles made of oak, acacia, maple and other hardwoods. All selected workpieces require long-term drying.
After the wooden blank has dried well, the contours of the handle are drawn on it, according to a pre-made template. To avoid hand slipping during operation and to increase the convenience of the ax, it is necessary to provide a thickening at the end of the handle.
A knife, chisel, or electric jigsaw will help you cut out the outline.
After trying on the ax head and not finding any signs of a loose fit of the parts, you can safely continue improving the ax handle. Glass will help you scrape the tool, and sandpaper will be useful for grinding.
Main stage of work
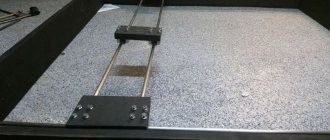
In order to make a cleaver, you will first need to arm yourself with a pencil and draw a sketch on paper. After this, you need to make a blank. In our case, the ideal source would be a large-diameter steel saw blade. The blade of the future cleaver should be drawn on it. You can cut the workpiece along the contour using a grinder. Now all that remains is to sand and clean our workpiece, giving it the required shape.
You will need to drill several holes in the tail of the cleaver. This is where the handle will be attached. Each should be carefully processed with a round file. When everything is ready, you can move on to creating the blade and cutting edge. We harden steel in the most accessible way - heat it and then dip it in oil. After this, we grind with sandpaper and polish the product.
Wood chopping
To prepare firewood, an ax is most often required in country houses and rural farmsteads, since even for frying barbecue, wood is the best fuel.
The blade of a wood ax is sharpened at an angle of about 40-60 degrees for better cutting.
The handle is most often made of wood, but can also be metal; the blade is made of hardened carbon steel
When asked which steel to choose, always pay attention to the manufacturer's seal mounted on the handle
The list of advantages of an ax can begin with the ease of working with it, since even a beginner can handle it. The second advantage is accessibility for the buyer in the sense that finding such an ax is as easy as shelling pears in any store.
There is also a wide price range for these axes, from which everyone will choose something for themselves.
The disadvantage of an ax of this format is that it is intended only for one type of work and cannot be used in other areas.
They cannot cut down a tree, and it is quite unsuitable for a butcher, since it is not so sharp. The disadvantages include the easy opportunity to get a low-quality fake, which the market is full of.
Preparing the template
When you have ready-made material, you can begin to create the ax itself. To do this, they think over and make a sketch of the handle, thanks to which the manufacturing process of the product in question is facilitated. The shape of the ax is determined by the type of tool. If a handle is required for a light ax weighing 0.8-1 kg, then its length is 0.4-0.6 m. The length of heavier ones can reach 0.6-0.9 m. Axes are classified according to their purpose:
- carpentry;
- lumberjacks;
- loppers;
- cleavers;
- butcher's
Based on the purpose of the tool, the length of the ax will depend. When making it, you should adhere to the following rules:
- to prevent the ax handle from slipping while working with an axe, the tail should be slightly wider than the handle itself;
- the cleaver's ax handle is made 0.75-0.95 m long, while for a carpenter's ax it is 0.5 m long;
- 10 cm is added to the length of the handle for allowance. This part is cut off after attaching the butt.
The future handle of the desired shape and size is drawn on cardboard, after which the image is transferred to wood and cut out with carpentry tools.