Types of accessories
Garment accessories include the following parts:
- Buttons.
- Hooks.
- Loops.
- Lightning.
- Blocks.
- Textile Velcro fasteners.
- Holniten are metal rivets. Most often used in denim clothing to secure stitching.
- Buckles.
- Eyelets. Durable metal or plastic fasteners are mainly used in leather goods.
- Rivets. There are utilitarian rivets - those that are used for clamping, fastening and fastening, and decorative ones. Very often, sewing accessories in clothing combine both roles.
The most popular materials for making fasteners and fasteners:
- Metal.
- Ceramics.
- Plastic.
If the part is not selected correctly, that is, without taking into account the characteristics of the fabric or leather, then the fittings simply will not cope with their functions. Then you will have to change the details on your clothes yourself so as not to throw expensive things into the far corners of your wardrobe.
Popular manufacturers
Among the popular manufacturers of rivets and other sewing accessories there are both foreign and domestic manufacturers.
NewStarButton
Turkish manufacturer and direct supplier of high-quality sewing accessories, fabrics and equipment. They work without intermediaries, which allows them to significantly reduce costs and, accordingly, prices for the final product. On sale there are both entire sets of ready-made rivets, as well as services for the production of decorative elements to individual orders.
Hemline
Australian sewing accessories company founded in 1950 by the Castley family. Their conspicuous packaging among customers was called “pink blister” and gained considerable popularity around the world. Products are manufactured in Hong Kong and sold through intermediaries not only in our country, but also in Japan, India and even the USA. In addition to regular and figured rivets, Hemline produces a huge variety of products for patchwork, quilting and scrapbooking.
Tierra Cast
The American manufacturer, which is on everyone's lips, is definitely familiar to many. The company focuses not only on quality, but also on the safety of its products for the buyer, carefully measuring the lead content in products.
Prum
One of the oldest family-owned companies in Germany producing sewing products - from sewing needles to electronic embroidery machines. The price of their products is high, but the quality deserves the highest praise.
S.A.B.
The brand is a leader in the production of sewing accessories and equipment in China, which in recent years has become increasingly popular in the domestic market. Compared to other Asian manufacturers, their quality is an order of magnitude higher, and the price is significantly lower than their European counterparts.
Buckle Expert
Russian company producing sewing accessories made of plastic. Their sew-on plastic rivets are eagerly purchased by many manufacturers of children's and teenage clothing.
"Omtex"
Omsk manufacturer working with small clothing factories and shops throughout Russia. They produce both standard fittings and work with individual orders.
Installing threaded rivets without a rivet gun
It is not always possible to have an expensive professional tool at your disposal. In addition, if it is necessary to perform one-time operations, its purchase is impractical. In such cases, work is performed without the use of special tools. There are several ways to rivet a threaded rivet without a riveter. The easiest way to install threaded rivets without a rivet gun is to use a screwdriver. For this purpose, a special nozzle is used, the body of which houses a bolt with a collapsible thrust bearing. The bolt, through a notched end nut, is screwed into the rivet, which is then installed in the mounting hole. After this, the screwdriver is turned on and, due to the rotation of the bolt, a force is created that forms the collar and fixes the rivet. A knurled nut and a thrust bearing prevent the rivet from turning. After installation, all that remains is to unscrew the bolt from the fastener, turning the screwdriver into reverse rotation mode. This method makes it possible to use a regular screwdriver as an electric riveter. In the absence of a special attachment, such a structure can be assembled manually.
In general, the listed methods make it possible to perform the installation of threaded rivets quite efficiently without a riveter. The speed and complexity of installation depends on whether a power tool is used.
Types of rivets
For each type of rivet tool, only the same types of rivet fasteners are suitable.
Exhaust
A fastener that consists of two main parts. The first part is a hollow cylinder (rivet body) with through holes on both sides, and a shoulder (rivet head) on one side.
The body of the rivet is made of easily deformable metal. The diameter of the cylinder is the size of the fastening material. The second part is the rod (rivet core), twice as long as the rivet body itself. Made from high strength steel. The core extends through the entire body of the rivet and has a seal at one end called the shank head. The diameter of the rod head is slightly larger than the diameter of the rivet body. In appearance, the rivet shank resembles a nail.
Depending on their purpose, blind rivet fasteners are of the following types:
- Countersunk - the junction has a flat surface;
- Regular with collar - standard and most commonly used;
- Conventional ones with a large collar are used when connecting two materials of different softness.
- The enlarged collar allows the clamping force to be more evenly distributed on the joint surface and does not cause deformation of the material;
- Sealed rivets with gas-watertight housing. The name speaks for itself - used for airtight and watertight connections.
Threaded
However, like an exhaust hood, it consists of a hollow cylinder made of soft metal. There is a metric thread inside the body. Some types have a corrugated surface on the outside and on the shoulder. According to the shape of the body, rivet fasteners are divided into: round, hexagonal, corrugated.
A threaded rivet connects very thin materials where a pull-out fastening material would not provide a strong connection and resistance to vibration. This type of riveting is also used in places that are difficult to reach - ventilation and air conditioning systems, medical furniture, automotive parts and shelving.
The body of pull-out and threaded rivet fasteners is made of soft metals - copper, aluminum, an alloy of aluminum and silicon. The rods of the exhaust fastening material are made only of steel. The rivets are coated with zinc as protection against corrosion. If the parts are intended to be used in an aggressive external environment, then the rivets are made of stainless steel
Varieties
Clothes buttons differ in the material they are made of:
- metal;
- plastic.
According to the method of fastening they can be:
- installation - secured using special tools;
- sewn - to attach them you need a thread and a needle.
Depending on their form, purpose and application, they are divided into:
- simple;
- s-shaped;
- shirts;
- magnetic;
- clasp;
- holsters;
- straps;
- tablet
O-shaped
The most common type of buttons is o-shaped. They are called simple, ring or flight, because the fastener first appeared on jackets and overalls of pilots. The design is not complicated and consists of two metal parts that fit tightly into one another. The upper component has a spring fastening.
Simple buttons are used both on different types of everyday clothing and on specialized textiles.
S-shaped
This type is of the spring type. One of the parts resembles the letter “S”, which is why they are called s-shaped. Depending on the size they are divided into several types:
- uniform - the size of the top ranges from 27 to 40 mm;
- article - half the size of the uniform;
- anorak - compact size;
- mini anorak - the upper part is less than 8 mm.
The shape of the top is varied - from flat and round to diamond-shaped, square, drop-shaped. They are fixed by sewing or fastening. The large spring allows it to withstand heavy loads.
Shirt
Shirt-type buttons differ from regular ones in the way they are fastened - not with a single pin, but thanks to 6-8 spikes. The design allows fastening fasteners on fabrics of light density. They are suitable for children's clothes, knitwear and knitted clothes, light summer jackets.
The devices are convenient to use, but quite expensive to manufacture. During installation, the material is pierced with spikes located on the ring. Their diameter varies from 9.5 mm to 40 mm. The largest ones are used on jackets.
Magnetic
Self-fastening magnetic fasteners are most often used in household products - bags, outerwear, wallets. They are convenient to use, but they are expensive to produce. The connection strength thanks to the magnet is high, and it is very easy to unfasten even with one hand. The magnetic button device includes four parts - two bases and the same number of mounting flanges. The magnet allows you to automatically select the position and close. The larger the fastener size, the greater the connection force.
Koburnaya
This type has another name - tablet. They have been produced since the times of the USSR, when they were necessary for fastening military haberdashery. The lower part of the structure is very similar to the part of the s-shaped device. The top of the lock is hollow inside, petal-shaped. Its size is 12 mm. When the button is fastened, it expands and contracts. Most often, the fasteners are nickel-plated, but they can have two more color variations - black and brown.
Principle of operation
The process of working as a riveter is very simple. It is necessary to drill through holes in the materials being fastened. Approximately one tenth of a millimeter larger than the diameter of the rivet used. The rivet mechanism grabs the shank of the rivet (wire) to the working part, after which it acts on the traction mechanism, which, through the wire, pulls the head of the rivet to the base and breaks the wire (when the rivet joint is ready).
Problems that may arise with the riveter
After the exhaust part is removed with the tool, it should fall out through the hole. However, after some time of constant use, you may encounter the fact that the exhaust part will get stuck inside the tool.
If blocking occurs, most likely the jaws inside the tool are misaligned. You will have to completely disassemble the tool and install the jaws in the correct position. After this procedure, the functionality of the equipment will be completely restored.
In the video, a home craftsman clearly demonstrates how to quickly and easily fix the problem of “biting” the rivet part:
We all know what a great thing threaded rivets are.
In some cases, there is no alternative to them. Until one certain time, I somehow managed without them. But one fine day a wonderful car came to me and needed window protection installed. Like this:
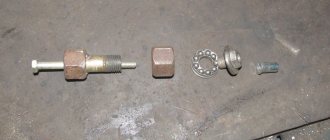
Then I started working on collective farms, and in the end I ended up with an unpresentable-looking device, but it was very functional, and with its help I installed more than a dozen rivets. The base is an M6 bolt, strength 8.8
This is what it looks like assembled, with the rivet installed
Main parts: M6 bolt. A piece of M12 bolt. More precisely, there was no bolt, no stud. A nut is welded on one side, turning it into a bolt. The stud is drilled through D=6.5mm. Then comes the nut from the UAZ stepladder. Strong. Next is the support bearing, the dimensions are not important. Next is a washer with a fitting from the brake pipe. It doesn't matter either. I installed what was there.
I think the principle of operation is clear. We drill a hole, under the M6 rivet it seems 9mm. We insert the device. Use one wrench to hold nut 1, and use the second wrench to unscrew nut 2.
As the effort increases, the riveting is completed. We twist everything back until it loosens, unscrew the M6 bolt, and install the next one.
A practical and easy-to-use semi-automatic manual riveter for working with blind rivets can be made with your own hands if desired. At the same time, most of the components for it can be easily found in a workshop or garage.
A distinctive feature of this design is that it does not have a power lever, as on factory models - here a screwdriver acts as a drive. An electric drill will also work.
To make a homemade rivet gun, you will need a working bushing with collet jaws, a conical bushing and a spring, which can be borrowed from an old rivet gun. You will also need a head into which the rivet shank is inserted.
How to assemble a tendril button for clothes?
In much the same way as a denim button, a button is installed on a tendril-type garment. The only difference is that all manipulations must be carried out only for the top part of the button.
The lower part of the part is much easier to assemble:
- To install it, you can buy a special tool with a recess inside in the store.
- If you do not have such a tool, then you can use a metal plate with a hole similar to the size of the “bump”. You need to insert the bottom part of the button into the hole of the metal plate, and “slam” the leg with a hammer on the back side of the clothing.
Adviсe:
If for some reason the buttons are not installed correctly, remove them and install new ones. Do not use damaged buttons, as they will not hold securely and will need to be replaced. To install a button on clothes at home, you can use the tools that are at hand: a Phillips screwdriver, a bolt, a thick nail, a dowel
To expand the cylindrical part of the button, you can use any cone-shaped device, and then use a bolt (cylindrical rod) of a suitable diameter to flare (attach) the button rod completely. Install the button on a smooth wooden surface, but be extremely careful not to break the button or destroy it. You can use a block of wood to install the bottom of the button if you don't have a suitable metal object with the right hole. Use a drill to make a hole in a wooden block (the diameter and depth should correspond to the male part)
Assemble the bottom of the button and place a block on top. Tap the part with a hammer.
What is riveting
The mechanical connection of parts using a series of rivets is called riveting, and the connection itself is called a riveted seam. It is used where it is inconvenient to weld parts or where non-weldable materials are joined. Not only metals are riveted, but also parts in clothing, accessories, etc. are connected in this way. But there it is more of a finishing touch than a loaded connection. So next we will talk about riveting in construction or home improvement. In principle, you can use a screw connection instead of riveting, but bolts and nuts are more expensive, and their installation takes longer.
This is what a rivet joint looks like
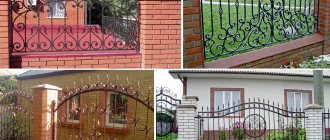
If we talk about installing fences made of corrugated sheets, rivets are more reliable, since they can only be removed by drilling out the fasteners. When installing screws or self-tapping screws, they can be unscrewed and both metal and hardware can be removed. In some cases, riveting is more convenient when installing a roof made of corrugated sheets or metal tiles. On the roof, installing screw connections is problematic and time consuming. But rivets, and with a good tool, can be done in an hour or even less.
Most common use in private households
How are parts connected using rivets? The rivet is installed in the prepared through hole. It has a head that rests on the material and the rod. During the riveting process, the end of the rod is flattened, changing shape under the influence of force. Therefore, ductile metals are used for these hardware.
Metal riveting
The process of riveting metals consists of two stages: preparatory and the actual installation of hardware. Preparation - drilling holes, countersinking for countersunk heads if necessary. Please note that countersunk heads can be on one (either) side or on both.
The riveting process itself is as follows:
- insert the rivet;
- tighten the parts to be connected;
- form a closing head using a tool;
- check and clean the connection.
This is how blind rivets are installed
With a good tool, work goes quickly. For private use and one-time work, manual riveters are usually used. And even with them, the process itself (without drilling holes) takes a matter of seconds. If we talk about installing corrugated sheets or metal tiles, it is recommended to coat each hole made with paint to prevent corrosion. It is these processes - drilling and painting - that take a lot of time.
In general, there are two ways to install rivets: cold and hot. When hot, the joint is preheated to a certain temperature (determined by the metal and the thickness of the parts). In practice, it is used when installing rivets of large diameter - 12 mm or more.
The rivets are placed in rows. The minimum distance between adjacent ones is 4 diameters; from the edge of the sheet to the center of the hardware is no less than 1.5 times the diameter of the rivet. When attaching a profiled sheet, place it in a recess, not in a wave.
What will you need?
In order to make the body of a future rivet, various materials are required. For the production of rods, only hard metal is used - steel.
When choosing rivets, people usually pay attention to their characteristics. You should be interested in strength and how one part affects another
For durability, it is recommended to select rivets so that their type and material match each other.
Experts additionally advise taking a closer look at the length of the rivet. If the part turns out to be smaller than the thickness of the elements being connected, there may simply not be enough material to create a closing head.
There are a number of varieties of rivets on the market. Each of them has its own advantages.
- Classic ones are usually used for most types of fastening.
- Using threaded ones, reliable connections are created. This is especially true for parts that have thin walls. Typically, such a part is characterized by a countersunk or wide flange. There is a thread on the inside. There is corrugation on the outside, which increases the strength of the fit.
- Piston rivets are distinguished by the fact that at the end of the rivet there is a stamped conical recess. For the manufacture of the part itself, it is recommended to use exclusively soft metals. When the elements are connected, two caps are obtained.
- The rod ones contain a solid rod. It helps withstand intense physical activity.
- If traction ones are used, then they will not need to be held when riveting.
- Tubular ones have a kind of cavity inside the part. This type is most often used at low loads.
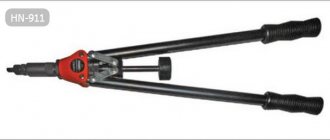
A riveter is a special tool, otherwise called “pincers”. It works similar to a pistol and is necessary in order to connect structural elements, as well as individual parts. The main condition is that the thickness of the product should not exceed 10 mm.
A mechanical gun helps to fix parts from their inside. The manual riveter has 2 parts. The first is the spring mechanism. Its main task is that it helps to pull such a rivet inside. The second is a lever system, which requires additional effort to use.
If you want to fix the rivet, you need to apply a pulling force. The most suitable option is a pull-out type of manual riveter. Retraction of the rivet rod occurs by applying force to the lever. The head of the rod seems to be bursting. In order for the parts to be firmly fixed, the elements on the outside must be flattened.
The work of a riveter with a threaded type is practically no different. It is necessary to remember the main rule - the ball is retracted in the working part, after which such a part is properly twisted. No extra effort is needed here. You should resort to twisting the handle only if there is a need to fix a part that is small in thickness.
Additionally, in specialized stores, you can find attachments complete with the gun. They differ mainly in diameter and tail length.
Connecting parts with a tool
As mentioned above, the most popular in everyday life is a manual type riveter. This device includes a sleeve and a rod. Now let’s figure out how a manual pull-type riveter works.
First, the sleeve is inserted into a pre-prepared hole, after which we take a rivet gun, which draws the rod into itself. All that remains is to press the handle of the tool and the sleeve will flatten, forming a strong and reliable fastener. All this will take very little time and effort.
This device has its advantages. Firstly, you can work with it even when only one side of the workpiece is free. Also, a manual riveter can be used even while suspended, without using other additional elements.
Of course, you should not forget about the quality of the rivet itself; the reliability of the fastening also depends on this.
Peculiarities
Riveting is one of the options for permanent installation of parts. The advantage of this method is its low cost. Consumables - rivets - are relatively inexpensive. You can purchase them at any store that sells fastening materials.
Modern materials are divided into two main types: threaded and exhaust. Both are essentially hollow tubes with a cap at one end. In the first case, a thread is cut inside the tube, and in the second, a rod with a thickening at the end is inserted into it.
Typically, installing a large number of standard rivets requires a special tool - a riveter. It can be electric, pneumatic or manual. The use of this equipment allows you to reduce the physical effort associated with crushing a metal rivet. These tools are not cheap at all, this is the main reason for refusing to use rivets in everyday life or for minor repairs. Indeed, purchasing an expensive tool for the sake of one or two rivets is hardly justified.
Below we will look at ways to install a rivet without special equipment.
What will you need?
So let's get started!
Given: parts that need to be connected, but cannot be welded, for example, so as not to spoil the paint.
Goal: install no more than 4 rivets.
Task: to rivet without a rivet gun, since it is not available, but it is quite expensive, and purchasing it for the sake of 4 rivets is completely unjustified.
Given: threaded rivets and... what you can find in the garage, plus the notorious ingenuity, without which in this case it’s absolutely impossible.
Having rummaged through deposits of all sorts of iron rubbish accumulated over centuries, you need to find a long bolt that matches the diameter and thread pitch of the existing rivets, or, conversely, purchase rivets of the appropriate parameters if such a bolt already exists.
Next, you need to build a simple rivet maker, with which you can roll the rivet. To do this you should select:
- a steel bushing, for example, from a nut with a slightly larger diameter than the already mentioned bolt;
- at least 2 washers with a hole diameter corresponding to the bolt diameter;
- a small bearing (some craftsmen consider the bearing to be superfluous);
- a nut that matches the thread size of the already specified bolt.
A homemade riveter is mounted as follows:
- screw a nut onto the bolt;
- install the washer;
- install the bearing;
- put the washer back on;
- put on the bushing, which can be covered with another washer.
To make a homemade device for installing blind rivets, you will need the following materials and tools:
- steel pipe with a diameter of 5 cm;
- long bolt with a diameter of 8 mm;
- nut for the previously mentioned bolt;
- welding machine;
- grinder, drilling machine, drills.
In addition to the need to install a threaded or blind rivet fastening metal or other parts and structural elements, there may be a need to install a rivet as an accessory on clothing or shoes. Tools for such an operation do not have to be made from scrap materials; they may come in handy:
- screwdrivers: Phillips and slotted;
- pliers;
- hammer;
- a bolt or piece of steel bar with a flat ground end;
- a piece of steel tubing similar in diameter to a rivet.
A variety of accessories used for clothing are made of relatively soft metal and have a small thickness; riveting them does not require much effort.
General procedure for installing threaded rivets
Before riveting the threaded rivet, preparatory work is performed. It is necessary to select a drill whose diameter should be 0.1 mm larger than the outer diameter of the rivet, which will allow it to be easily installed in the hole. After this, a hole is drilled at the location where the fastener is installed. In addition to threaded rivets with a round cross-section, similar hardware with a hexagon-shaped cross-section are also produced. This shape eliminates the possibility of the part turning during installation. To make holes for such rivets, special hexagonal punches are used. However, they are only suitable for working with sheet metal, which somewhat limits the scope of application of hardware of this shape. Manufacturers recommend using a special tool for installing fasteners - a riveter. Therefore, the installer must have the appropriate skills and understand how to install a threaded rivet with a riveter. Such tools can be mechanical (manual), electric and pneumatic. The design of a mechanical riveter consists of a working part and two handles. The working part contains a movable screw mechanism, the end of which has a thread. To make a threaded rivet using a riveter, perform the following sequence of actions:
- The rivet is screwed onto the threads of the screw mechanism of the tool.
- The working part of the rivet gun with the rivet installed is placed in the prepared hole in the metal base.
- The handles of the tool are compressed. This creates a force due to which a shoulder is formed in the inner part of the rivet. As a result, the fastener is tightly fixed to form a reliable and durable connection with the mounting hole for the screw or bolt.
- The working part is removed from the rivet by unscrewing.
The advantage of a mechanical riveter is its simple and reliable design, as well as its low price. However, to install threaded rivets with its help, it is necessary to apply quite a significant force. If it is necessary to perform a large volume of installation work, it is advisable to use riveters with an electric or pneumatic drive. These are professional tools that enable the installation of threaded rivets by tightening a set screw. This creates a force sufficient to form a collar, after which the screw is unscrewed from the hole. The tools are simple and easy to use, so there are no problems with understanding how to use a riveter for threaded rivets.
What is it used for?
A threaded rivet is similar to a blind rivet only with some nuances of fixation. Otherwise, its purpose is somewhat different. In some cases, it is necessary to install a product on metal. But its thickness is not enough to cut a thread or there is no way to crawl from the back side in order to substitute the nut. In this case, threaded rivets come to the rescue. Structurally, they are a small hollow cylinder, which already has a thread. The rivet is installed in such a way that it is securely fixed to a metal or other workpiece and provides the ability to install a bolt to fix any module.
Installation Features
To install the rivet, you need to follow simple instructions. Let's take a closer look at the steps.
- The parts must have pre-drilled holes. They are connected to each other, and the body of the rivet in the form of a cylinder is placed there.
- The rod is located throughout the body; it needs to be grabbed with jaws (sometimes the rivet head of a rivet tool is suitable for this purpose). It is worth considering that the capture occurs near the base of the cylinder head.
- Next, you need to apply a little effort and pull the rod through the body of the rivet. The process is accompanied by expansion of the cap or head. By changing the end of the cylinder, it is possible to form the reverse wide part of the rivet (it is located on the surface of the previously connected parts).
- After we have managed to install the parts, the remains of the elongated rod should be broken off exactly at the moment when the force of the riveter is at its limit. It is advisable to immediately check whether the connection is strong enough.
After the action is completed, on one side of the connection you can find the head from the body of the rivet, and on the other there will be a flattened end from the cylinder, which should resemble petals in appearance.
general description
Modern riveters appeared relatively recently; before that they were bulky and inconvenient for home use. But the constant work of engineers on this problem has yielded results: manual riveters have become compact, and most importantly, they reliably connect parts with each other with minimal physical effort. The device itself has become quite simple and easy to use.
It provides access to both sides for a more reliable connection. In this case, no outside help is required. The main thing you need when working with manual riveters is pre-drilled holes for rivets in the parts to be joined.
Almost anyone can cope with such work. At the same time, the price for manual riveters is low.
How to rivet?
Before using a manual riveter, it is recommended to understand the structure of fasteners. It is for this method of fastening that rivets are intended.
The cylinder has a hole; it runs along the entire body, while also capturing the head area. Externally, the metal rod is similar to a nail, which has a rounded head. To insert into a cylindrical hole, we need a clamp. Next, the head is retracted until it stops.
The rivet helps secure it. It consists of a metal rod and a cylindrical tube - these are 2 main elements. There is always a head at the end of the tube.
Threaded rivets are relevant for manual pull riveters
It is important to consider that the rod has its own thread. It scrolls exactly until the cylinder is inserted.
Next, we’ll figure out step by step how to properly fasten aluminum and tubular parts with your own hands and carry out their installation. In order to attach rivets at home, you need a special tool. It's called a riveter.
There are 2 types of riveters - amateur and professional. Each of the tools has replaceable heads. They are needed when working with elements of different sizes that are used during fastening. The main difference is the price and the force required to press.
To correctly rivet parts, you need to adhere to the following algorithm:
- we apply markings to the parts that we plan to connect;
- Drill the necessary holes using a drill;
- Next you need to insert a rivet;
- the handles of the riveter are moved apart and a rod is inserted into it;
- then the handles must be squeezed until the rod breaks off;
- loosen the handles and check whether the rod is completely inserted.
To make an exhaust product, you can take almost any metal. It is necessary to approach the choice of material in such a way that there is no subsequent corrosion process.
When creating a rod, it is customary to use a steel base. It is characterized by high strength. Various options are allowed in terms of the size and length of the cylinder, it all depends on what the final purpose of such a product is. Before making a purchase, it is recommended to consider exactly what specifications you will need.
How to install a rivet, see below.
Introduction
It should be noted that this mechanism is very easy to use, and the regular model is inexpensive. It can be used to fasten any type of metal, and the principle of operation remains the same.
Of course, you can make a rivet with a hammer, but with a large amount of work it will require much more time and effort. Manual riveters make the work process faster, and the effort required for all operations is minimal.
Today, there are different types of manual riveters, each working on its own principle and having its own pros and cons. Which type of riveter is better is determined by each master himself, but several points must be taken into account, which we will consider below.
Source
How to install a button on clothes at home?
Of course, if you have the opportunity, then entrust the installation of accessories to a master who has a special press, various devices, a set of tools, and most importantly, experience, thanks to which such work will not take him much time. If you don’t have this option, or you want to find out for yourself how to install a button on clothes, then prepare the following tools:
- Awl.
- Hammer.
- Forceps.
- Punch. You will have to purchase this tool. It is necessary to ensure that the hole is smooth and the edges of the fabric do not fray.
Adviсe:
- Do not cut a hole for the block with scissors, as over time the button or block will definitely “fall out” of it. The hole for the button should be minimal, it is advisable to even slightly stretch the fabric over the leg, since the tighter the fabric is pressed against the part, the more securely it will be fixed.
- Punch a hole in leather or fabric using a wooden anvil (not metal) to avoid damaging the tip of the punch. The wood should be very dense (not loose). An area with a knot will do. You can use other dense materials as an anvil that will not damage the punch.
- Areas on knitted and bulk materials where holes will be punched can be glued with adhesive fabric so that the edges of the hole do not fray. You can also treat the edges of the hole with silicone glue.
Rivet installation process
It is necessary to work with tools carefully, slowly and without making sudden movements. Otherwise, the fabric, accessories or tools may be damaged.
The most common type of installation of accessories is the installation of a block on clothing. In workshops and ateliers, forceps are used for this procedure. However, such a tool must be purchased of good quality so that the handles do not bend and the “cheeks” do not move.
Don’t despair if you don’t have special forceps at hand; you can do without them at home. Use the following step-by-step instructions:
- Use a punch to make a hole of the required diameter in textile material or leather.
- Thread the block leg and put a ring on it.
- Place the piece of clothing with the block on the anvil.
- Use a punch to split the stem of the block into petals. If all the steps are done correctly, the petals should bend on their own on the block ring.
- Lightly go over the block with a hammer to finally secure it to the fabric.
When working, place the ring with the convex side away from you so that it repeats the convex shape of the edge of the block.
How to attach buttons to clothes?
The most difficult process is installing rivets on the rough fabric that outerwear is often made from. Difficulties also accompany installing rivets on jeans. But if you use a good tool and follow all the technological steps, you will probably be able to attach the button to your clothes.
You will need the same tool as when installing the block. Sometimes, special punches are included for this type of button, but using them is ineffective. It is much more convenient to use a punch that splits the stem into petals.
To make a rivet on a jacket or other outerwear, proceed as follows:
- Unbend the leg of the four-part button at the top and bottom.
- Carry out the standard riveting process (described above).
Removing rivets from clothing
This is done in two ways. One - with the help of side cutters, the other - with a knife and a pair of pliers. The choice of methods depends on what type of rivet you have - alpha (internal) or beta (external). The corners and edges of the stitching are mostly riveted with alpha varieties, otherwise known as grommets. Beta is used in cases of buttons used to fasten clothing. One part there is alpha, and beta is riveted onto it. Despite the fact that such rivets hold the material perfectly, they are afraid of mechanical stress.
How to rivet alpha rivets using a knife and two pliers?
- Carefully, so as not to damage the fabric, insert a sharp knife blade under the edge of the wide part of the rivet on one side and bend it back so that the edge can be grabbed with pliers.
- Do the same with the opposite part of the rivet. Insert the knife blade and bend the edge.
- Grasp the outer folded part of the rivet with the edges of one pair of pliers, and the edge of the back folded part with the other.
- Pull in different directions and the inner part will come out of the outer one.
It is done.
How to rivet a beta rivet on clothes? Everything is even simpler here. The procedure is as follows:
- Grasp the garment with the widened (curved) part of the rivet protruding inside the pressure washer facing you.
- Take side cutters (it is advisable to use those with pliers), place them under the very bottom of the widened part and squeeze.
- Twist and squeeze again.
- At some point, the upper element will jump off the lower one on its own. Or when there is enough space between it and the lower element, the inner part that fits into the pressure washer can simply be cut through without harm to the material.
It is done.