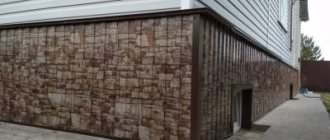
Corrugated sheeting, corrugated sheet or metal profile is almost the same thing, corrugated metal sheet. Currently widely used throughout the world in industrial and civil construction.
Metal roofing is very popular, especially in private housing construction. Because the material is light, strong, durable, cheap and available. When using it, it is important to know which brand is best suited for a particular roof, how to correctly lay corrugated sheets on the roof, and what tool to use.
All this and much more is presented in this article to help novice roofers, so that you know how to properly cover a roof with corrugated sheets with your own hands.
Profiled sheets and corrugated sheets, differences
At first glance, corrugated sheets are no different from corrugated sheets. They are made from sheet steel by cold rolling and coated with an anti-corrosion compound, but there are differences.
Corrugated sheeting is a roofing, profiled decking, material for constructing roofs. The profiled sheet is the rest: the construction of fences, walls, light ceilings.
Based on where the material is used, there are differences in physical and performance characteristics. Experts conditionally divide these materials according to three criteria.
- Profile rigidity. The profile of corrugated sheets is made with a height of at least 35 mm in the form of a trapezoid, which allows the sheet to withstand heavy loads. The profiled sheet has different configurations and a smaller height of the applied profile and can withstand less load.
- Noise absorption. In heavy rain, profiled decking absorbs noise better due to increased rigidity than profiled sheeting.
- Installation. The profiled sheet is easier to install during construction. Due to its low rigidity, it is easy to bend and adjust.
Roofing from profiled flooring: advantages and disadvantages
The main criteria when constructing a roof are the durability and strength of the material installed on the floors. The metal profile corresponds to these indicators, which is why more and more often builders are installing roofs from corrugated sheets.
A roof made of metal profiles has its pros and cons.
Advantages:
- durability - the service life of this material is more than 50 years due to its strength and anti-corrosion coating;
- low specific gravity ensures minimal weight of the structure and facilitates installation of corrugated sheeting on the roof;
- high strength makes it possible to cover roofs in regions with strong influence of atmospheric phenomena (snow load);
- low cost - average price category for roofing made of metal profiles;
- versatility - used both to create a roof and to construct other structures (partitions, fences, hangars, formwork, etc.);
- the ease of installation of metal profiles is due to the fact that there is no need to have special knowledge and equipment;
- appearance - the material has a wide color spectrum that is resistant to aggressive influences;
- ease of maintenance during operation.
Flaws:
- poor sound insulation - can be increased if corrugated sheeting is correctly placed on the roof and a soundproofing carpet is used (additional costs);
- heating the roof in the sun - you can reduce the penetration of heat through the roof by installing thermal insulation or a “layer cake” (additional costs).
How to organize roof ventilation
A metal sheet is the boundary between warm and cold air, where condensation occurs when the temperature changes. To prevent moisture from accumulating in the under-roof space, it is necessary to arrange effective ventilation. For this purpose, a gap of at least 40-50 mm is provided between the surface of the roofing material and the waterproofing.
For proper operation of ventilation, supply and exhaust openings must be organized. These are cornice and ridge vents, which can be slot-shaped or point-shaped. Their function is to ensure free circulation of air due to draft. Slots 25-50 mm wide are arranged in the ridge or between the roof and the wall. For point vents, small holes measuring 10-25 mm are made.
To prevent moisture from getting inside through the vents, they are covered with aerators on top. They are a pipe with a visor or an overlay for a ridge strip. Made from metal profiles with polymer coating.
Selection of corrugated sheets
When choosing the type of roofing elements from corrugated sheets, you should take into account the angle of inclination of the roof. At a larger angle, a material with a lower profile rigidity is used.
Sheets of corrugated sheets are marked according to their strength characteristics from C-8 to N-158. Using this marking, a profile is selected depending on the roof structure:
- profile grades from C-8 to C-25 are recommended for roofs with slopes of 15° or more;
- for roofs with a smaller slope angle (5–8°), it is recommended to use a higher grade of corrugated sheeting (H60–H75).
The distance between the sheathing elements depends on the brand of corrugated sheeting and external loads. The lower the grade, the shorter the distance (for S-8 the sheathing pitch is 500 mm, for more durable grades the pitch is up to 900 mm).
The size of the profiled sheet varies in length up to 12 m, width from 600 to 1250 mm and thickness from 0.3 to 1.5 mm. When selecting material, it is recommended to purchase sheets of a size that will maximally cover part of the roof area from the top point to the eaves. There will be fewer joints between the sheets, and this will increase the tightness of the roof.
In order to properly cover the roof with corrugated sheeting, it should be taken into account that there are types of corrugated sheeting that have drainage gaps and stiffeners in their design.
These options guarantee extended service life due to increased reliability and moisture removal. If you lay corrugated sheets correctly and follow the instructions, such a roof will last longer than usual.
Areas of application of corrugated sheets
Profiled sheets are widely used in the construction sector and perform basic and auxiliary functions:
- as permanent formwork for installing floors between floors made of reinforced concrete structures;
- as finishing of the external and internal parts of houses, administrative buildings, industrial buildings;
- as removable formwork when constructing a foundation in the form of a temporary structure;
- as roofing in the field of industrial and civil construction (roofs on workshops, administrative buildings, houses and cottages);
- for sandwich panels used in the construction of pavilions, kiosks, gas stations, hangars;
- for fences - temporary and permanent fences, gates, noise protection for populated areas along highways.
Types of coverage
In order to correctly lay corrugated sheets on the roof, it should be taken into account that the type of corrugated sheets is designated by letters that indicate the scope of its use on construction sites.
- N - “carrying”. This type of material is used for roofs and floors in areas where there are increased loads (hangars, low-slope roofs). It is made from a sheet 0.75–1 mm thick with a profile height of 57–114 mm.
- C - “wall”. This material is used in less loaded structures (fencing, decoration). It has a lower profile of 8–35 mm and a sheet thickness of 0.3–0.75 mm.
- NS - “universal”. The material lives up to its name. Due to the increase in profile height (up to 44 mm), quite high rigidity is achieved compared to type “C”, therefore this profiled sheet is used in horizontal and vertical structures.
Table 1. Markings and applications of metal profiles
| Profiled sheet | Metal thickness, mm | Corrugation height, mm | Application |
| C8 | 0,5 | 8 | Wall cladding, interior decoration |
| S21 | 0,4 – 0,8 | 21 | External cladding and protection of buildings, roofing material |
| NS35 | 0,8 | 35 | Formwork, fencing, roofing material |
| NS44 | 0,5 – 0,7 | 44 | Roofing material, production of boxes and hangars |
| H57 | 0,7 – 0,8 | 57 | Roofing material, formwork, floor construction |
| H60 | 0,9 | 60 | For roofing with spans up to 2 meters, floors, load-bearing structures of buildings |
| H75 | 0,7 – 0,9 | 75 | Roofing material, permanent formwork, interfloor permanent ceilings |
| H114 | 0,9 – 1,0 | 114 | Roofing with sheathing spans up to 6 meters, load-bearing structures of buildings |
A corrugated roof is usually mounted with a metal profile with a corrugation height of at least 20 mm.
To protect the corrugated sheet from external factors, the metal surface is coated with one of the anti-corrosion compounds:
- zinc - the most expensive and reliable coating that protects against corrosion, retains its properties for 65–120 years, taking into account the ecology of the area;
- aluminum-zinc - a more economical option, consists of a mixture of aluminum (up to 5%) and zinc, the protective properties of this coating are lower than zinc;
- aluminum-silicon - consists of an alloy of aluminum and silicon (1.6%), a metal profile with this protective layer is cheaper, and the service life of the protective property is equivalent to an aluminum-zinc coating.
A colored polymer coating is applied on top of the profiled sheet, which performs a decorative or decorative-protective function.
Color coating materials.
- Glossy polyester is one of the simple surface coatings for corrugated sheets. In addition to its decorative properties, it provides additional protection against corrosion. The disadvantage is that when the sheets are deformed, the coating is easily damaged, resulting in cracks and scratches.
- Matte polyester is the most resistant coating to various damages. The velvet-like structure prevents glare and diffuses light.
- Polyurethane (Pural) is a mixture with the addition of polyamide. A layer 50 micrometers thick is applied to the sheet. Reliable in operation, resistant to temperature changes, does not react to exposure to sunlight.
- Plastisol - the base consists of polyvinyl chloride. The most durable coating, the thickness of the applied layer is 200 micrometers. Resistant to mechanical damage and difficult climatic conditions.
Polymer coatings that imitate wood, stone, and leather have also found wide use; they have developed and implemented technology for applying a full-color photograph to a profiled sheet.
Requirements for fasteners
To fasten corrugated sheeting, special roofing screws with a length of 1.9 to 25 cm and a head diameter of 4.8 to 6.3 mm are used.
Unlike conventional hardware, they have a reinforced rod with an external triangular thread made of branded carbon steel, a head with a polymer coating that matches the color of the corrugated sheet, an elastic sealing gasket with a thickness of at least 2 mm and a special pointed tip shape, which allows the material to be attached without damaging its anti-corrosion properties. coating and without pre-drilling.
The head of roofing screws most often has a hexagonal shape , but sometimes there are hardware with a spherical, semicircular, cylindrical and even a hidden top. This point should be taken into account when purchasing - different tools are used to attach self-tapping screws with different head shapes.
Hexagonal hardware is easier to screw in using a drill with a special attachment, while semicircular ones are easier to screw in with a screwdriver. In addition, when purchasing fasteners for corrugated sheets, their exact purpose and the material of the sheathing are taken into account. In particular:
To attach sheets to wooden beams or porous bases, hardware with a large thread pitch (1-1.5 mm) and a pointed tip are purchased.- To screw the corrugated sheet to the metal, self-tapping screws with finer threads, made from high-strength alloy steel, are used.
Such hardware passes through metal up to 2.5 mm thick without preliminary preparation of holes. - To install additional elements, products with increased length are purchased.
The maximum length of products for fixing sheets to the sheathing is selected based on the thickness of the material and base and a 3 mm margin (also + wave height when selecting hardware for connecting sheets to each other). Moreover, the denser the base and the stiffer the grade of corrugated sheeting, the sharper and longer the fastening drill should be.
The quantity is calculated according to the sheet installation scheme, based on a minimum of 8-10 pieces/sheet (from 5 pieces/m²).
Material calculation
Having learned what corrugated sheeting is, what it is made of, which one to use in a particular design, let’s move on to the main part, how to correctly install a roof from corrugated sheeting with your own hands.
Before starting the main work, you should calculate the amount of material. It also includes additional elements for corrugated roofing.
The simpler the roof, the easier it is to calculate the amount of material needed to cover it. You can do it yourself by performing simple calculations. If the design is complex, with many slopes, with different angles of inclination, then it is better to ask for help from specialists or try to calculate it on a computer.
Another known method is to make patterns of stingrays on paper to scale and calculate each of them separately.
Overlap of corrugated sheets on the roof
If several horizontal rows are arranged in the roof of the slope, then to calculate the length of the sheet it is important to take into account the amount of horizontal overlap. The size of the overlap depends on the angle of inclination of the roof slope (more details in Table 2). It is also important not to forget to take into account the length of the eaves overhangs.
Table 2. Dependence of the size of the horizontal overlap on the angle of inclination of the slope
| Tilt angle | More than 30° | From 15 to 30°. | Less than 15° |
| Overlap size | 100–150 mm | 150–200 mm | 200–250 mm |
When completing the calculations, be sure to add 10% to the result obtained, which will be spent on unforeseen situations (defects, damage, etc.).
Examples of corrugated sheet calculations
Sheets of corrugated sheets of one type of profile have the same width, and the length ranges from 0.5 meters. The width is indicated by two numbers: the larger one corresponds to the full size, the smaller one corresponds to the working (useful) width. When calculating the number of sheets, in order to correctly lay corrugated sheeting on the roof, you need to take the usable width, which takes into account the size of the vertical overlap between the sheets.
Table 3. Dependence of vertical overlap on the grade of corrugated sheeting
| Brand of corrugated sheet | NS35 | C8 | C10 | S20 | S21 |
| Vertical overlap | In one wave | In two waves | In two waves | In one wave | In one wave |
Corrugated sheets, made from sheets of 0.5–0.6 mm, are available in lengths from half a meter to ten meters. Typically, manufacturers cut according to the size agreed with the customer.
Experienced roofers recommend using metal profile sheets no more than 5–6 meters long; it is better to make 2–3 rows. This will facilitate installation (lifting, laying) and protect the corrugated sheeting from damage.
Calculation of the amount of corrugated sheets for a rectangular slope
Simple roofs can be gable or single-pitch, based on a rectangle.
For the calculation, the width of the slope (W) and the length of the slope (H) are taken. If the roof is not symmetrical, then each plane is measured and the calculation is carried out separately.
Table 4. Dependence of the width of the eaves overhang on the type of corrugated board
| Type of corrugated sheet | NS35, C44, N60, N65 | S8, S10, S20, S21 |
| Cornice overhang width | 200–300 mm | 50–100 mm |
To determine the number of sheets in a horizontal row (Ng), divide the width of the slope by the useful width (Bl) of the metal profile sheet. If the length of the slope is more than 5–6 meters, it is covered with two or more sheets, which corresponds to the number of rows.
Example: W = 8m - width of the slope;
H = 6m - length of the slope;
Grade of corrugated sheet C21, usable width Vl = 1 m.
Ng = W/Bl = 8/1 = 8 pcs - sheets in a horizontal row;
because H = 6m, we will install 2 rows;
L = H + Lк + Lн = 6 + 0.1 + 0.1 = 6.2 m - the total length of the ceiling in a vertical row, where Lк is the length of the eaves overhang (Table 4), Lн is the length of the horizontal overlap (Table 2 ). We divide into equal parts, i.e. by 2;
Lл = L/2 = 6.2/2 = 3.1 m - the length of one sheet, we accept the standard length of 3.5 m:
The total number of sheets 3.5 meters long on one slope is:
N = Ng*2(rows) = 8*2 = 16 pcs.
An example of calculating the amount of corrugated sheets for a hip roof
For roofs with a complex shape, the calculation principle does not change; sheets are calculated for each slope separately. To determine the amount of material, large-scale patterns of each slope or a detailed drawing of the roof are made, and roofing elements are graphically placed on them.
Hip roofs have a pair of slopes in the shape of an isosceles trapezoid and an isosceles triangle, which facilitates graphical calculations (see figure).
On a trapezoid, the calculation is carried out as follows.
- Divide the trapezoid into a rectangle and two right triangles.
- The amount of corrugated sheets in a rectangle is calculated as for a rectangular roof.
- In a right triangle, the underlying leg is divided into segments equal to the working width of the profiled sheet, and perpendiculars are built from points on the leg to the hypotenuse. The length of the first sheet is equal to the ascending leg, the length of the next sheet is determined to the point of intersection of the perpendicular with the hypotenuse.
The calculation for an equilateral triangle is identical.
- From the vertex of the triangle, lower a perpendicular, from the intersection point on the base in both directions, set aside segments equal to half the working width of the profiled sheet. Place perpendiculars from the extreme points of the segment - this will be the first sheet of corrugated board.
- Next, on the base of the triangle, make marks to the right and left of the boundaries of the first strip, equal to the working width of the sheet.
- From these marks we construct lines parallel to the height of the triangle until they intersect with its sides. The distance to the intersection point determines the length of the next sheet.
Everything that has been calculated is summed up, the number of sheets and their length are determined.
Additional elements
Additional elements for corrugated roofing are easier to calculate than the base material. You should determine which extensions are needed, measure the length where they are installed, add 100–150 mm to each joint for overlap, add up all the data and divide by the length of the element. You will get the number of extras in pieces. If you get a fractional number, you need to round it up to the nearest whole number.
There are quite a few types of additional elements for corrugated roofing, but not all are installed at once. It depends on the configuration of the roof and its purpose. The figure clearly shows which accessories are installed and where.
Preparation and important information
The calculations are completed, the material has been calculated, now it is necessary to prepare the roof for laying corrugated sheets.
Any roof, regardless of covering, is a complex structure. Each individual roofing device made of corrugated sheets performs its intended functions, ensuring reliability in operation.
Laying corrugated sheeting on the roof is the final part. Before this, it is necessary to prepare the rafter system, “layer cake” (vapor barrier, waterproofing, thermal insulation, sound insulation) and ventilation.
To install corrugated sheets, you need to purchase a special tool.
Tools for work
During installation, you can get by with a small number of special power tools designed specifically for working with corrugated sheets - cutting (cutting).
It is not advisable to cut sheets with a grinder or a similar machine, since the disk becomes very hot during operation and burns the protective coating. Later, corrosion forms at the cut site, rapidly progressing throughout the entire sheet.
Electrical tools you should have:
- electric nibblers;
- drill or screwdriver.
Various drill attachments:
- for cutting metal;
- for screwing screws (“magnetic bit”).
You should purchase specialized hand tools:
- corrugated pliers;
- hand scissors for metal;
- manual cutting shears for metal.
The rest of the tools (hammers, mallets, measuring devices, markers, knife, stapler, rope, etc.) that are needed when performing roofing work should be prepared at your own discretion and need.
Lathing for corrugated sheets
Before attaching the corrugated sheet to the wooden sheathing and installing it, you need to calculate the step. It depends on the angle of inclination of the slope and the brand of corrugated sheeting. There are two types of sheathing for corrugated sheets.
- Continuous sheathing. It is made of boards, 50 mm thick, with a compensation gap between them of 5–10 mm. Installed on slopes with a slope of less than 15°.
- Sparse lathing. It can be made from boards with a certain pitch or from a bar with a section of 50x50 mm. Used on roofs with a slope angle of more than 15°.
Tables are used to determine the sheathing pitch. They indicate the type of sheathing, the dependence of the pitch on the angle of inclination of the roof and the brand of corrugated sheet.
They mainly use coniferous wood, smooth, well-dried, treated with antiseptic and fire-retardant compounds.
The installation of a roof made of corrugated sheets over a wooden sheathing is carried out on the rafters, on top of the “roofing cake”, if provided.
Start from the cornice, laying the first board. Next, bars are laid from the board up to the ridge at a certain pitch. With continuous sheathing, the boards are laid with a gap. The structure is attached to the rafters with self-tapping screws or nails, at least twice the thickness of the lumber. At the joints along the length, the bars are connected to each other with staples. The sheathing is secured to the concrete base with dowels.
Waterproofing and windproofing
If the roof is installed on a residential building or a heated room, it is necessary to install a roofing membrane before installing the sheathing. It doesn’t matter whether there is insulation or not, this will provide waterproofing and wind protection.
Installation is not difficult, but it is better not to rush and do it carefully:
- roll the membrane onto the rafters horizontally, starting from the bottom up with an overlap of 150 mm between the sheets;
- Do not stretch the canvas too much; there should be a slight sag between the rafters (temperature reserve);
- fasten the membrane to the rafters with staples;
- Glue the joints between the sheets with special adhesive tapes.
To provide a ventilation gap, a counter-lattice made of timber is mounted on top of the membrane to the rafters, and on it is a lathing for attaching the corrugated sheeting.
The difference between the installation of pitched and flat roofs
Please note that there are no completely flat roofs. There must be a slope of up to 5° so that rain or melt water can leave the roof through special storm drains. To do this, a slope is performed on the ceiling.
Correctly attaching corrugated sheeting to the roof should be directly on the floor beams or on a reinforced concrete base.
For flat roofs, high-strength profiled sheets with a profile height of at least 75 mm are used.
If the room is heated, a “roofing pie” with a vapor barrier is installed. When installing a “pie”, more attention is paid to the strength of the insulation material, its resistance to compression and fire safety.
Influence of roof slope on installation
The steeper the roof, the more difficult it is to cover it with corrugated sheets. The distance from the cornice to the ridge increases as the slope angle increases; it is more difficult to lift the sheets and lay them down. This not only affects the execution process, but also increases the amount of roofing material, which makes the structure heavier. In this case, the rafter system is strengthened.
Installing a roof with a minimum slope is easier and safer for workers, less material is wasted, but the sheathing must be made continuous and high-strength corrugated sheets must be used.
To properly fasten a profiled sheet, you need to know that the angle of inclination of the slopes affects the amount of longitudinal and transverse overlaps of the sheet. The dependence is shown in tables 2 and 3.
If the roof slope is less than 12°, the overlaps and joints of the corrugated sheets are additionally sealed.
There are recommendations with what slope to build a roof for a certain region. In central Russia, it is recommended to install a roof made of corrugated sheets at an angle of 25 to 40°. This will help to withstand aggressive weather conditions (wind, snow). In areas with strong winds, roofs should be installed lower, with an angle of less than 25°. In areas with heavy snowfall, it is recommended to construct the roof with a slope of up to 45°.
Safety precautions
When performing installation work, it is important to follow the safety rules:
- scaffolding and sites with a height of more than 1.2 m must have fencing and insurance;
- each worker must have personal protective equipment and insurance (overall clothing, shoes, mittens or gloves, safety glasses, mounting belt, etc.);
- the workplace must be equipped with additional safety equipment in accordance with the work performed;
- scaffolding, stairs, lifts must be in good working order and certified;
- There must be order in the construction area and at the work site.
How to choose the angle of inclination
If the roof area is small, the load allows the use of corrugated sheeting grades C18-C21. For large spans the load-bearing capacity of such materials is not enough, so more powerful types of flooring NS35-NS60 are used.
The minimum tilt angle for residential buildings should not be less than 10°, for industrial facilities or sheds - 8°. But with such a slope, the sheathing boards should be laid almost flush together. In addition, if the angle is too small, there is a high probability of leaks, which requires additional sealing of the seams and laying corrugated sheets with an overlap of 2 waves.
The angle of inclination of the roof is selected based on the loads and the architectural design. It should be taken into account that the more snow falls in the region, the steeper the slopes should be.
Wind load is a risk factor for roofs with a steep slope. In strong winds it needs to be made flatter.
The wind tore off the roof
The optimal angle for pitched roofs is 20-45°. It allows you to lay the lathing in increments of 500-1000 mm without the risk of deformation under load.
How to properly attach corrugated sheeting to the roof
The corrugated sheets are fastened using special self-tapping screws with a head or a head. A sealing gasket made of EPDM rubber is installed under the cap, ensuring the tightness of the fastening. Screws are available in different colors, which makes it possible to match them to the color of the roofing material.
Basically, the fastening is carried out in the lower flange of the profile, which is in contact with the sheathing, called “in the deflection”. Less often in the upper part of the profile, if necessary, to avoid excess moisture or to connect two sheets. It's called "into the wave."
The length of screws for fastening “in a deflection” ranges from 20 to 25 mm. It is important that when fastening the self-tapping screw does not come out from the back side of the sheathing, otherwise it will tear the waterproofing film with its sharp end. The length of the screw can be calculated using the formula shown in the picture.
When installing corrugated sheets, it is often necessary to trim the sheets (at junctions with communications, at junctions of slopes, etc.).
It is better to cut sheets with metal scissors or special devices. This is discussed in the “Tools for work” section.
Now about the installation. It consists of several stages, let's look at each of them.
Stage 1. Installation of starting accessories
Before you begin to cover the roof with corrugated sheets, you should install starting extensions. They are called starter because they are installed before the main work.
These include end or wind board.
It needs to be installed on the gable along the slope; the wind strip will be attached to it. The board should be higher than the sheathing by the size of the corrugated sheet wave.
Next, a cornice strip is installed on the cornice. It is attached to the first board of the lower edge of the sheathing.
If the roof has a complex shape, then at the junction of the two slopes an internal valley is laid from bottom to top with an overlap of 100–150 mm, depending on the angle of inclination.
Stage 2. Laying corrugated sheeting on the roof
There are differences in the sequence of laying corrugated sheets, depending on the type of roof.
- Single-pitched and double-pitched roofs. The coating starts from any end, either from left to right or from right to left.
- Hip roofs. Each hip slope is covered separately, starting from the center to the right and left.
To cover the roof, during installation you need to align the bottom row parallel to the eaves using a cord (do not forget about the eaves overhang).
There are three ways to lay corrugated sheets.
- Three-block. This method is used if the profiled sheets do not have drainage gaps (capillary grooves). The installation diagram is shown in the figure. First, we place two sheets (No. 1 and No. 2) in the first row, align them along the cornice and temporarily fix them. Next, we place the first sheet (No. 3) of the second row, align the structure of three sheets horizontally and vertically and finally attach it to the sheathing. We carry out further installation of profiled sheets by analogy: we lay and fasten sheet No. 4 in the first row, then sheet No. 5 in the second row, etc.
- Four-block. Used for profiled sheets with drainage gaps. The installation diagram is shown in the figure. We alternately lay the first sheet of corrugated board on the roof (No. 1) of the first row, the first sheet (No. 2) of the second row, the second sheet (No. 3) of the first row and the second sheet (No. 4) of the second row. We temporarily fix each sheet in the center of the canvas. Next, we align the four-block structure along the cornice, along the end board and finally fasten it. We lay the rest of the roof in exactly the same way, block by block.
- Decent. The easiest way. First, we install the bottom row, aligning it with a rope stretched along the cornice. Then the next row and further to the ridge. When laying, do not forget about overlaps and overlaps.
In case the sheet coating is damaged, stock up on paint of the same color as the roofing material in order to cover the scratch in time and prevent corrosion.
If the roof is very sloping, a vertical overlap is made into two waves, or a special roofing seal is installed along the wave between the sheets.
The corrugated sheets are secured with special self-tapping screws. The fastening screws must be screwed in at a right angle, pressing the gasket well, but do not overdo it, otherwise it will come out from under the cap, which will break the seal.
The number of screws is approximately calculated from 6 to 8 pieces per square meter of roofing.
Mounting diagram:
- on a vertical overlap, the sheets are fastened together along the top of the profile at a pitch of 500 mm;
- The sheet is attached to the beam at the bottom of the profile, horizontally through each profile, vertically into each row of the sheathing;
- the bottom of the corrugated sheeting in the first row of the roof is attached to the sheathing board in each profile;
- in a horizontal overlap, the corrugated sheet is attached to the block in each wave.
Stage 3. Installation of finishing materials
The roof is covered, all that remains is to install the finishing elements required by the roof structure. The most common: end, cornice and ridge strips. Available on all types of roofs.
All extensions are installed with an overlap of 100–150 mm on the corrugated sheet with a sealing gasket between them.
The end strip is attached to the end board so that the top flange overlaps the outermost deck profile.
Installation is carried out from the eaves to the top of the roof. Fastening is carried out with the same self-tapping screws in two planes at a distance of 1000 mm.
Cornice strips protect the under-roof space and serve as a decorative edging. They are installed along the eaves overhang and attached to the bottom of the sheathing with self-tapping screws in increments of 350–400 mm.
On a complex roof there are always internal corners of mating slopes. The additional elements of the valley consist of two parts, internal and external. They ensure a tight junction of the profiled sheets in these corners. The extension of the external valley is laid on top of the roofing sheets of both slopes from the bottom up with an overlap of at least 150 mm. It is necessary to seal the joints of the trim and seal between the sheets of corrugated sheets and the valley element.
The final step in this stage is installing the ridge.
The ridge strip protects the ventilation gap from dust, precipitation and other elements entering it, and also acts as a decorative component of the upper part of the roof.
Before installing the ridge, we line the places where it joins the roof with a sealant.
Next, we install the ridge elements one by one and fasten them on both sides in increments of 2-3 waves of the roof. The ridge is selected so that it covers the screws securing the sheet at the top of the roof. The ridge strips are overlapped and additionally attached to the top of the profile in increments of up to 3000 mm. The smaller the angle of inclination of the slope, the wider the ridge elements should be.
We select high-quality screws
Approximately 6 screws are required per square meter. For wood, a size of 4.8 by 30-35 mm is used, and for additional elements - 4.8 by 50-60 mm. You need to tighten the screws with a screwdriver or electric drill. Why is it important to buy special products for profiled sheets:
- Provide water resistance;
- Allows for reliable fastening;
- Do not damage the protective coating.
As a rule, you can buy screws for metal profiles in the same place where you can buy sheets for roofing. Preference should be given to products made of carbon or stainless steel with a zinc coating. You need to check the sealing washers - they sometimes have defects.
Corrugated roofing, components
Sometimes it happens that the corrugated roofing is adjacent to the wall. To ensure the sealing of this contact, use a corner strip. There are two options for installing protection.
- A corner strip with dimensions of at least 150x200 mm is installed and secured to the wall with a short shelf along the entire length of the contact. Fastened with dowels or other fasteners depending on the wall material. The joint between the plank and the wall must be coated with silicone sealant. The horizontal part of the strip is attached with a special screw to the sheathing through the upper part of the profile wave. If the plank is not enough for the entire length of contact, lay another one overlapping (100–150 mm), seal it and attach it to the wall.
- In this option, a groove is made in the wall, the distance from the ceiling is equal to the width of the corner strip shelf. The plank is taken with a size of at least 100x100 mm with the ends of the shelves bent at 45°. The fastening is similar to the first one, only the curved end of the shelf should fit into the groove.
These options are considered for the transverse connection of corrugated sheets to the wall, for the longitudinal connection - the same thing, only the plank has an angle equal to the angle between the roof and the wall.
Scheme of fixing corrugated sheets with self-tapping screws
The order of laying profiled sheets is selected taking into account the presence or absence of a drainage groove on them and the size of the slope (the less the worker moves along the fixed covering, the better).
If it is necessary to install coverings with drainage grooves, then a vertical scheme is considered optimal (the second sheet is attached on top of the first on the slope with partial tightening of the screws, after which they are both covered with the third and fourth sheets, the block is aligned with the eaves and finally screwed on).
In other cases, the material is laid in blocks of 3 pieces. (2 lower and 1 upper). Standard fastener diagram:
- In the bottom row, hardware is screwed into each bottom ridge.
- In the second row (with an indent to the next sheathing strip or from 30 to 50 cm when fixing the covering to a solid flooring), self-tapping screws are screwed into the second and every third lower ridge.
- In the third and subsequent ones - in the first and every third.
- When installing the top sheet, the pattern is repeated.
- When sealing and strengthening the joint, the hardware is screwed in at a distance of 10 cm from the bottom and in increments of 50 cm.
Additional items
The more complex the roof structure, the more additions and additional elements are included in the roof.
Chimney bypass
If the house is intended for habitation, then there are chimneys and ventilation pipes. Accordingly, it is necessary to seal the contact with the roof. Typically the pipes are round or rectangular, with a separate design for each type.
For round pipes passing through the roof, an apron made of metal or polymer in the form of a truncated cone is currently used. It is put on the pipe and lowered so that the “skirt” rests on the corrugated sheet. The profile is shaped with a hammer, sealed and pressed. The upper part of the cone is coated with sealant and pressed against the pipe with a clamp.
For rectangular pipes, the protective apron is made independently from stainless sheet metal or extensions. The profiled sheets are laid leaving a small distance from the pipe. Next, the gap is closed with an apron.
It is shown in more detail and clearly in the video:
Snow holder
This device is mounted on the roof slope above the exit from the building or above the balcony of the top floor, where there is a risk of unwanted snow rolling down.
It is attached with self-tapping screws to the sheathing through a corrugated sheet at a distance of 300–500 mm from the cornice.
Tubular snow holders with brackets are attached to the lower part of the sheet wave, corner snow holders made of slats are attached through the upper waves of the profile.
Finishing the overhang with corrugated sheets
The eaves overhang is included in the roof structure. It protrudes beyond the walls of the house, protecting them and the foundation from precipitation and melt water. The overhang from below must be closed so that wind, dust, insects, birds and other troubles do not enter the attic through it. If the roof is covered with corrugated sheeting, then it would be aesthetically correct to hem the overhang with the same material.
To do this, a special profile is attached to the cornice board. A corrugated sheet cut into strips with a length equal from the eaves to the end of the rafters is inserted there at one end. The other end is attached to the board at the end of the rafters. This unit is closed with droppers from below and from above. And so on around the entire perimeter.
Ventilation
Ventilation on roofs covered with corrugated sheets depends on the “roofing pie”. For an uninsulated attic, one waterproofing layer under the roofing sheets is suitable. If the attic is insulated, then the “pie” consists of thermal insulation, waterproofing, vapor barriers and counter-lattice, which provides special gaps for air circulation.
For this to work, the entire ventilation system must have the following elements:
- ventilated ridge;
- products;
- aerators and deflectors.
Vents are placed around the perimeter of the roof, their height is calculated using the formula:
H=Sc/300,
where Sc is the area of the slope.
With natural ventilation, air moves through vents into the attic, creating pressure, forcing warm air through the vented ridge.
Aerators and deflectors are installed for forced ventilation if natural ventilation does not cope with its task.
Training video:
Work order
When studying the question of how to properly cover a roof with corrugated sheeting, you should familiarize yourself with the order of performing all stages of the work.
Lathing
It is possible to make a lathing for laying profile sheets either continuous or with intervals. The step in this case is determined by the degree of inclination of the slope. With a slight slope, the planks are placed at a distance of 300-400 mm, and with a slope of more than 15 degrees, the step can be increased to 600 mm.
Installation
- In any case, laying of profile sheets is carried out from the bottom up. With this scheme, moisture will not get into the connecting seams.
- Experts recommend preparing preliminary drawings and diagrams taking into account the direction of the winds prevailing in the area.
- In a situation where the wind usually blows from right to left, installation is performed from left to right.
- If the length of the sheet corresponds to the size of the slope, then installation begins from the end of the roof, aligning the edge of the sheet along the eaves line (with a plumb line of 40 cm).
Step-by-step instructions will help you complete the task.
- The very first sheet must be carefully aligned and immediately fixed with one self-tapping screw approximately in the middle of the sheet.
- The second profile sheet is laid with the desired overlap, leveled and fixed again with one screw.
- Having secured the profile sheets in a similar order along the entire length of the roof, they are carefully aligned along the eaves line.
- The profile sheets are fixed at the ridge by screwing screws through one deflection.
- Then they begin high-quality fixation of the roofing material, securing the screws through the vertical pitch of the sheathing.
- In the horizontal direction, they are fixed with a frequency of every second step of the wave, and along the upper and lower edges the self-tapping screws are screwed into each deflection of the profile sheet.
In this case, the joints must be secured with additional elements. Excess metal is cut off. This is how you make a pitched roof from a profile with your own hands.
- If the roof has two slopes, the second side is covered with sheets in the same order.
- At the next stage, the end strip is attached towards the ridge. It is attached to the crest of the wave and extended with an overlap of at least 50 mm.
- The ridge is fixed to a seal with an adhesive base, placing screws at a distance of at least 300 mm.
It is easy to understand the entire roofing process in more detail if you watch the video.
Installation errors
Errors always come out “sideways” and they are noticed during operation. To avoid or minimize this phenomenon, it is important to clearly and accurately carry out the technological process of arranging the roof.
Common mistakes:
- incorrect calculation of the amount of material for complex roofs (some “masters” collect missing elements from scraps, thereby violating the technology);
- incorrect choice of material due to cost savings; You shouldn’t think that cheap means practical; you should take a close look at the recommendations in this article and pay attention to the fact that the choice of corrugated sheeting for roofing in most cases depends on the angle of inclination of the roof;
- When installing, they confuse the front and back sides, neglect horizontal overlaps and vertical overlaps (the dimensions are not maintained), the sheets are aligned along the edge of the end, and not along the rope, they begin to lay the corrugated sheet on the wrong edge (you need to lay it on the edge that has the lowest value).
Roof care
Corrugated roofing requires virtually no maintenance. Atmospheric precipitation will do this work itself. However, once a year, gutters and drainage systems should be cleaned of fallen leaves and other debris.
There are unforeseen situations, especially in industrial areas, where unauthorized or emergency emissions into the atmosphere occur, which settle on the roof. In this case, you can use water from a watering hose and a soft brush, using detergents for painted surfaces.