When purchasing any machine, there is a percentage of people who wonder about assembling it themselves. They are also thinking about assembling a CNC burner with their own hands.
But there are a number of nuances in which this idea can be more expensive than buying a ready-made machine. Let's figure out why this happens.
The important question is that if you decide to design a future machine yourself , then be prepared for additional costs.
Most often, when designing yourself, the process looks like this:
- You are doing a project (it doesn’t matter: in an engineering program or making a drawing) - it will take some time;
- After that, you order the components. Delivery time is usually 2-4 weeks depending on the components themselves. Most parts can be purchased individually, but some items are sold only in packs or several pieces;
- Once you have received the necessary parts, you begin assembly. There is a moment here. If you do not have experience in designing CNC machines, then during assembly it will turn out that some parts do not fit together or that you did not take into account some nuances at all. A simple example: the length of the closed strap is not suitable - instead of 120 mm you need 130 mm (or vice versa). It's a small thing, but because of it the transmission won't work. As a result, you have to order a new part and wait at least another 2 weeks.
- Also, during the assembly, it turns out that you need a certain tool for assembly, which you might not have at hand. These are additional costs that you are unlikely to be able to foresee in advance.
- After final assembly, you begin testing your machine. And in fact it turns out that it does not print as you expected. Various types of defects, stripes, offsets appear, light or midtones are poorly conveyed, etc. It will take additional personal time to study the reasons and make adjustments until you get something you are happy with.
The problem is that the full cycle of such production actually takes at least 1 month, but in fact about two. This takes into account design errors, replacement of unsuitable components, debugging, and so on. And there is no guarantee that you will get exactly the result you originally expected.
Do-it-yourself laser wood burner - Metalist's Guide
Making a powerful burning laser with your own hands is not a difficult task, however, in addition to the ability to use a soldering iron, you will need to be attentive and careful in your approach.
It’s worth noting right away that deep knowledge from the field of electrical engineering is not needed here, and you can make a device even at home.
The main thing when working is to take precautions, since exposure to a laser beam is harmful to the eyes and skin.
A laser is a dangerous toy that can cause harm to health if used carelessly. Do not point the laser at people or animals!
What will you need?
Any laser can be divided into several components:
- light flux emitter;
- optics;
- power supply;
- current supply stabilizer (driver).
To make a powerful homemade laser, you will need to consider all these components separately. The most practical and easiest to assemble is a laser based on a laser diode, which we will consider in this article.
Where can I get a diode for a laser?
The working element of any laser is a laser diode. You can buy it at almost any radio store, or get it from a non-working CD drive.
The fact is that drive inoperability is rarely associated with failure of the laser diode. Having a broken drive in stock, you can get the necessary element without extra costs.
But you need to take into account that its type and properties depend on the modification of the drive.
The weakest laser, operating in the infrared range, is installed in CD-ROM drives.
Its power is only enough to read CDs, and the beam is almost invisible and is not capable of burning objects.
The CD-RW has a built-in more powerful laser diode, suitable for burning and designed for the same wavelength. It is considered the most dangerous, as it emits a beam in a zone of the spectrum invisible to the eye.
The DVD-ROM drive is equipped with two weak laser diodes, the energy of which is only enough to read CDs and DVDs. The DVD-RW burner contains a high-power red laser. Its beam is visible in any light and can easily ignite certain objects.
The BD-ROM contains a violet or blue laser, which is similar in parameters to the analogue from the DVD-ROM. From BD-RE recorders you can get the most powerful laser diode with a beautiful violet or blue beam capable of burning. However, finding such a drive for disassembly is quite difficult, and a working device is expensive.
The most suitable one is a laser diode taken from a DVD-RW drive. The highest quality laser diodes are installed in LG, Sony and Samsung drives.
The higher the DVD drive's writing speed, the more powerful the laser diode installed in it.
Drive disassembly
Having the drive in front of you, first remove the top cover by unscrewing 4 screws. Then the movable mechanism, which is located in the center and connected to the printed circuit board with a flexible cable, is removed.
The next goal is a laser diode, securely pressed into a radiator made of aluminum or duralumin alloy. It is recommended to provide protection against static electricity before dismantling it.
To do this, the leads of the laser diode are soldered or wrapped with thin copper wire.
Next, there are two possible options. The first involves operating a finished laser in the form of a stationary installation together with a standard radiator.
The second option is to assemble the device in the body of a portable flashlight or laser pointer.
In this case, you will have to apply force to cut through or saw the radiator without damaging the radiating element.
Driver
Laser power supply must be handled responsibly. As with LEDs, it must be a stabilized current source. On the Internet there are many circuits powered by a battery or accumulator through a limiting resistor.
The sufficiency of this solution is questionable, since the voltage on the battery or battery changes depending on the charge level. Accordingly, the current flowing through the laser emitting diode will deviate greatly from the nominal value.
As a result, the device will not work efficiently at low currents, and at high currents it will lead to a rapid decrease in the intensity of its radiation.
The best option is to use a simple current stabilizer based on the LM317. This microcircuit belongs to the category of universal integrated stabilizers with the ability to independently set the output current and voltage. The microcircuit operates in a wide range of input voltages: from 3 to 40 volts.
An analogue of LM317 is the domestic chip KR142EN12.
For the first laboratory experiment, the diagram below is suitable. The only resistor in the circuit is calculated using the formula: R=I/1.25, where I is the rated laser current (reference value).
Sometimes a polar capacitor of 2200 μFx16 V and a non-polar capacitor of 0.1 μF are installed at the output of the stabilizer in parallel with the diode.
One of these circuits, powered by a Krona battery or a small battery, is presented below.
The diagram shows the approximate value of resistor R1. To accurately calculate it, you must use the above formula.
Having assembled the electrical circuit, you can make a preliminary connection and, as proof of the circuit’s functionality, observe the bright red scattered light of the emitting diode. Having measured its actual current and body temperature, it is worth thinking about the need to install a radiator.
If the laser will be used in a stationary installation at high currents for a long time, then passive cooling must be provided. Now there is very little left to achieve the goal: focus and get a narrow beam of high power.
Optics
In scientific terms, it's time to build a simple collimator, a device for producing beams of parallel light rays. The ideal option for this purpose would be a standard lens taken from the drive. With its help you can obtain a fairly thin laser beam with a diameter of about 1 mm.
The amount of energy of such a beam is enough to burn through paper, fabric and cardboard in a matter of seconds, melt plastic and burn through wood. If you focus a thinner beam, this laser can cut plywood and plexiglass.
But setting up and securely attaching the lens to the drive is quite difficult due to its small focal length.
It is much easier to build a collimator based on a laser pointer. In addition, its case can accommodate a driver and a small battery.
The output will be a beam with a diameter of about 1.5 mm and a smaller burning effect.
In foggy weather or heavy snowfall, you can observe incredible light effects by directing the light stream into the sky.
Through the online store you can purchase a ready-made collimator, specifically designed for mounting and tuning a laser. Its body will serve as a radiator. Knowing the dimensions of all the component parts of the device, you can buy a cheap LED flashlight and use its housing.
In conclusion, I would like to add a few phrases about the dangers of laser radiation. First, never point the laser beam into the eyes of people or animals. This leads to serious visual impairment. Secondly, wear green glasses when experimenting with the red laser.
They block most of the red portion of the spectrum from passing through. The amount of light transmitted through the glasses depends on the wavelength of the radiation. Looking from the side at the laser beam without protective equipment is allowed only for a short time.
Otherwise, eye pain may occur.
Do-it-yourself CNC burner production technology
What characteristics should a CNC burner have, how do the products differ, and is it possible to design them yourself? Experts warn that before you go to the store to buy a device or try to assemble it, you need to understand the mechanism of operation of the CNC machine and think about which control program will be optimal.
Recently, pyrography has been developing and gaining particular demand; people order wood-burned paintings and portraits from professionals as souvenirs and gifts. Therefore, experienced craftsmen and lovers of this activity had the idea of opening their own small business based on burning images.
The CNC laser burner is one of the latest developments.
CNC Laser Burner
The main distinguishing feature of the device is the ability to accurately cut and draw boundaries; high results are achieved due to the fact that the machine draws dots on the wood. Advantages of the laser machine:
- Thanks to its high precision, the machine is convenient for burning small inscriptions and signs - the image will be clear with bright contours.
- The laser burner is suitable for processing wood, leather, paper and film.
- The machine works properly in a room with low or high temperature; drafts and changes do not affect operation.
There are major disadvantages.
Since the machine draws with dots, it will not be possible to remove halftones and shadows with a laser. Even an experienced artist with an optimally configured program will not be able to achieve a three-dimensional image.
The CNC laser machine is slow. Experts assure that to draw a portrait measuring 25x25 centimeters, the master will have to spend about 13 hours. It is necessary to take into account that the picture will be light, and additional drawing may be required.
When you enlarge a photo before transferring it to the canvas, the burner will draw it in pixels. Externally, the image will resemble a mosaic.
Masters claim that a laser wood burner emits too bright a glow; over time, such brightness will negatively affect vision.
Burner with nichrome thread
The device is equipped with a different impact mechanism, which gives the burnt images significant volume, the drawings seem natural and rich. The image is applied to the wood using a nichrome thread; the brightness of the color depends on the heating temperature of the thread and the time of exposure to the surface.
When drawing shadows, the wire tip must be quickly passed over the surface, without stopping on the tree. But if the drawing requires bright and thick lines, the wire can be left for 3-4 seconds.
Experts include the following advantages of the machine:
- The saturation of the picture is adjusted on the device with a special button.
- The function helps to give the image any intensity depending on the client’s wishes.
- It's easy to burn pictures on wood and leather.
- To draw a picture measuring 25x25 centimeters, it will take an experienced specialist 3 hours.
- The drawing will not be pixelated when you stretch and enlarge the photo.
- During burning, the device does not emit harmful light.
Disadvantages of the unit
To perform the job efficiently, the master needs to maintain a constant temperature in the room. A small draft will cool the nichrome tip, white stripes and light areas will appear on the image, and the work will have to be redone.
What is Arduino
Arduino is a brand of hardware and software for building and prototyping simple systems, models and experiments in the fields of electronics, automation, process automation and robotics.
The software part consists of a free software shell (IDE) for writing programs, compiling them and programming hardware.
The hardware is a set of assembled printed circuit boards sold by both the official manufacturer and third-party manufacturers. The system's completely open architecture allows you to freely copy or expand the Arduino product line.
Most often, the term “Arduino” is used to refer to a controller with its own processor and memory. Arduino is very popular among novice engineers and experienced enthusiasts due to its low price and ease of setup.
The open architecture of Arduino boards allows people with minimal knowledge of electrical engineering to design microcontrollers. A significant advantage is the diagrams and codes available on the Internet, created for various types of machines.
The most popular Arduino controllers among engineers include UNI, R3, Mega 2560 and Nano.
Making a powerful burning laser from a DVD drive with your own hands
Making a powerful burning laser with your own hands is not a difficult task, however, in addition to the ability to use a soldering iron, you will need to be attentive and careful in your approach.
It’s worth noting right away that deep knowledge from the field of electrical engineering is not needed here, and you can make a device even at home.
The main thing when working is to take precautions, since exposure to a laser beam is harmful to the eyes and skin.
A laser is a dangerous toy that can cause harm to health if used carelessly. Do not point the laser at people or animals!
What are shields for?
Adding shields, such as CNC Sheild v3 or v4, to the circuit expands the capabilities of the CNC machine. You can simultaneously connect several shields to Arduino to perform different tasks. Main functions of the equipment:
- Ensuring work autonomous from a computer;
- Connecting and outputting information to peripheral devices;
- Parallel control of several motors;
- Connect to Wi-Fi or mobile networks.
Wood burner with hard and wire pen: how to use and make it yourself
There are various ways to decorate the surface of wood, one of the simplest and most effective is pyrography, or wood burning.
Any wood product can be made beautiful and unique by adding just a few contrasting touches.
It is not difficult to become a master of creating masterpieces using the burning technique. To do this, you don’t need to purchase expensive equipment, just buy or make a wood burner.
It's really simple - to create a beautiful and original thing, you don't even need artistic talent; you can download any images from the Internet or purchase an album of drawings in a store.
Methods for creating images
The principle of creating a pattern by burning is that part of the wood is charred and darkened, thereby standing out in contrast against the general light background. Working with a very thin tool, you can paint pictures on wood.
There are various pyrography technologies, many of them are complex and require special equipment. Among others:
- open flame treatment;
- firing using a clay stencil;
- burning with hot sand;
- friction burning on a lathe.
These are quite complex techniques, but an electric device is best suited for creating pyrography masterpieces at home. In the design of such a wood burner, the high temperature of the tip is created due to the flow of electric current through it.
The industry produces various models of burners, so it is not difficult for a novice master to choose the right tool. In addition, if you have the skills to work with a soldering iron, you can assemble such a device yourself.
Types of burners
Choosing a burner is a responsible matter. The quality of the resulting products largely depends on its characteristics. Both professional wood artists and beginning craftsmen use two main types of burning devices. These are devices with a wire tip and models with a solid tip.
With hard pen
This device is in many ways reminiscent of a regular soldering iron. Its working part is a sting, which is heated by a nichrome wire hidden under a metal casing. Unlike a soldering iron, a burner is equipped with removable attachments of various geometries. Depending on the price of the device, their number can reach 20 or more pieces.
The abundance of attachments allows you to make strokes of different widths and shapes, and by combining them, create unique images. Wood burners with a hard pen are characterized by low price, high durability, and ease of use. As disadvantages, it is worth mentioning the heating time (5 minutes or more), as well as the bulky design with a long handle, which complicates the performance of delicate work.
With wire pen
In burner devices with a wire pen, the heating wire itself is the working tool. The current is supplied directly to the pen, so the instrument is ready for use almost the moment it is turned on.
Devices of the middle and highest price categories have a power regulator, which allows you to select the optimal thermal mode for any type of work.
The small thickness of the wire used and its bend create a small contact patch with the material, which allows you to easily perform the most delicate work.
The disadvantages of this type of burner include the relatively high price and difficult repairs.
Separately, it is worth noting the string cutter-burner. This is a device that allows you to use heated nichrome thread to cut parts from a thin board or wood-based sheet material.
How to work correctly
It is easy to notice that the working tool of a wood burner resembles an ordinary pencil, and therefore the technique of working with it is not much different from ordinary drawing. It’s just important not to forget that the “pencil” is very hot.
The entire work process can be represented in a few simple steps.
Preparation
You need to choose a board on which the drawing will be applied. Its surface should be flat and smooth. To level the wood, the wood is scraped and treated with sandpaper.
A good material for burning, especially for a beginner, is plywood. It is cheaper, its surface is almost ready for work, you just need to smooth it with sandpaper.
Drawing
For those who have drawing skills, it is not difficult to cope with such work; moreover, craftsmen can do without a sketch, working straight away with a burner.
For beginners, we can advise you to select a suitable picture on the Internet, print it and transfer it to your work surface.
Here, old time-tested copy paper will come in handy; you can scale the image using the square transfer method.
For a novice master, it is worth choosing simple drawings that are not replete with small details. In addition, it is better to immediately make something concrete, not some abstract board, but, for example, a plywood stand for a microwave oven, which can be decorated with floral patterns.
Burnout
Using the heated tip of the burner, they begin to apply a pattern along pre-designated lines. The handle of the instrument is held like a regular pencil.
Drawing begins with the outer contours. Straight lines are performed with quick movements without pressure. It’s not difficult to make an accent or draw a thick line; you just need to slightly reduce the speed of the burner’s movement. In curved areas, you must hold the tool perpendicular to the surface of the board, avoiding excessive pressure.
Note! If there are several closely spaced lines, you should not try to draw them as quickly as possible; the wood must cool, otherwise the spaces between them may burn out.
The shade of the line can be changed within a fairly wide range. This is easy to achieve by changing the temperature of the tip, the shape of the working tool (in the case of replaceable attachments) and the angle of inclination.
Final processing
The completely finished image is processed with fine-grained sandpaper. Then they are coated with a layer of furniture varnish and, if desired, partially or completely painted.
The simplest homemade burner
To decorate a small board with pyrography or simply try your hand at something new, you don’t have to buy a professional machine.
From a soldering iron or radio components
You can make your own wood burner using a soldering iron. To do this, it is better to choose a model with a replaceable tip. Nozzles with the required profile can be easily made from a copper or brass rod.
A practically professional burning device can be made according to a circuit with current regulation in the primary winding. To work, you will need very few parts: a transformer, several resistors, capacitors and dinistors. The circuit is not particularly complicated, however, manufacturing the device will require knowledge and skills in working with a soldering iron.
Mini burner
If soldering radio components doesn’t appeal to you or you simply don’t have the time, you can make a device of the simplest configuration. To make a mini-burner you will need:
- unnecessary power supply (charger) from a mobile phone;
- syringe needle;
- sewing needle;
- material for the handle (wooden skewer or brush handle);
- soldering iron and solder;
- shoe thread;
- electrical tape or heat shrink tubing.
The process of making a burner is not particularly complicated. You should start by preparing a syringe needle. The plastic part is bitten off from it; it is not needed in this device.
Both needles are attached to a wooden handle diametrically opposite. The easiest way is to secure them with threads. The sewing needle is carefully bent to such an extent that its point barely touches the point of the hollow syringe needle.
The plug is cut off from the old power supply; it is also not needed. The ends of the wires are stripped. The wires are soldered to the needles. Polarity doesn't matter. At this point, the production of a homemade wood burner is almost complete.
As a final touch, it is necessary to give the product an attractive appearance and create conditions for convenient use. The wire is wound to the handle. This can be done using the same thick thread. This design will be convenient and reliable, however, it is worth strengthening the thread with glue, and after it hardens, put heat shrink on the handle or wrap electrical tape.
Note! Heating of the tip occurs almost instantly. The principle of operation of the device is extremely simple: resistance arises between the needles and the needle from the syringe (due to the fact that it is thin-walled) becomes hot.
Perhaps, such a burner will not be able to make a picture (insufficient power, not the most convenient tip), but you can practice and decorate, for example, a cutting board.
CNC burner
The burner will help add originality to the interior, diversify it with handmade products, but not only. You can make good money by making paintings created by fire. Landscapes, decorative panels, portraits, household items and kitchen utensils with elements of burning are in consistently high demand.
The use of modern technologies will significantly simplify the creation of masterpieces using the burning method. Computer-controlled machines have long become commonplace in wood and metalworking shops. There are similar solutions for pyrography. Such a burner can be connected to a personal computer, transfer the required image to it, and it will do the rest itself.
To make your own CNC wood burner, you will need significantly more knowledge and materials. Typically, such machines are purchased for production purposes. But for those who want to assemble the device themselves, you can use a laser for burning.
In general, there are two directions in the development of CNC burners. They differ in the main working tool.
Laser burner
As the name itself suggests, the main part of the machine is the laser. It is from this that its main advantages emerge:
- high accuracy of drawing due to a small contact patch;
- versatility, the machine can be used when working with wood, leather, films, paper;
- The burner is immune to changes in temperature and humidity.
Disadvantages include the low speed of the laser burner and difficulties in drawing halftones. In addition, the cost of such devices is high.
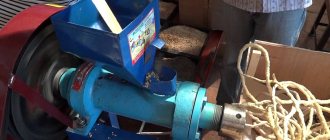
Nichrome CNC burner printed on a 3D printer
Subscribe to the author
Follow the author if you like his publications. Then you will receive notifications about his new posts.
You can always unsubscribe from notifications in the author's profile.
The principle of operation can be compared, or rather tested with a soldering iron at hand. Having heated it to the maximum temperature, begin to slowly pass over the wooden surface, the slower you move, the darker the burnt surface turns out, if you move it very quickly, the surface will not have time to burn out (too short contact with the surface) in the figure you can depict it like this: (for this algorithm and software was built)
At maximum speeds, the color remains virtually unchanged relative to the surface.
Design and build
Initially, the design should not be according to the classical scheme, but after thinking a little, I decided to stick with the classics, because it was necessary to test one structural element, namely the X axis with a carriage. Simply put, how will a carriage behave on two linear bearings? Although the machine bears absolutely no load during operation, still two is not enough, the Chinese backlash is merciless
In general, if you don’t count the “small things”, the design uses only 8 printed parts, with which the machine can already start, in total there are 11 parts at the moment (mount for the Arduino, cover with coolers, etc.). Due to the “simplicity” of the units, the size in theory can be any, in theory, because shafts of 8 mm over a meter, I think, are no longer very good. And initially the machine was planned to be of such size that it would easily fit an A3 sheet. But due to the fact that, as it turned out later, I did not have 500 mm guides for the X-axis, since I used them for the router, and there were 800 mm in the bins. It became a pity to cut, I left them as they were, which made the machine grow in size. As it turned out during operation, this is only a huge plus.
Homemade 5500mW laser wood burner
What characteristics should a CNC burner have, how do the products differ, and is it possible to design them yourself? Experts warn that before you go to the store to buy a device or try to assemble it, you need to understand the mechanism of operation of the CNC machine and think about which control program will be optimal.
Recently, pyrography has been developing and gaining particular demand; people order wood-burned paintings and portraits from professionals as souvenirs and gifts. Therefore, experienced craftsmen and lovers of this activity had the idea of opening their own small business based on burning images.
Processing of the finished product
The finished painting is either left uncoated or treated with one of the following options:
- Clear varnish;
- Furniture wax;
- Wood oil.
The plaque can also be framed in a beautiful frame. Wooden frames look better on a wooden background. You should not use thin plastic frames for diplomas and letters of gratitude. Plastic frames do not always look organic with natural wood.
During the low season (falls during vacations and vacations), to stimulate sales, you can announce a “free frame” or “larger size at a lower price” promotion. This way you can maintain the price of goods in the portrait burning business, without practically increasing your costs. This approach is preferable to deep discounts.
Remember: people don't know exactly how burning occurs. Especially if you make a portrait with the effect of a pencil drawing, it will be difficult to distinguish it from the artist’s work. A complex and labor-intensive (in the client’s understanding) task cannot be cheap, which completely devalues the work of the master.
Disassembling the DVD-RW drive
This process must be done with great care, since the internal parts are fragile and can be easily damaged. Having dismantled the case, you will immediately notice the necessary part; it looks like a small piece of glass located inside the mobile carriage. Its base needs to be removed; it is shown in Fig. 1. This element contains an optical lens and two diodes.
At this stage, you should immediately warn that the laser beam is extremely dangerous to human vision.
If it hits the lens directly, it damages the nerve endings and the person may remain blind.
The laser beam is blinding even at a distance of 100 m, so it is important to watch where you point it. Remember that you are responsible for the health of others while such a device is in your hands!
Figure 3. LM-317 chip.
Before you begin, you need to know that the laser diode can be damaged not only by careless handling, but also by voltage surges.
This can happen in a matter of seconds, which is why diodes operate based on a constant source of electricity. When the voltage increases, the LED in the device exceeds its brightness standard, as a result of which the resonator is destroyed.
Thus, the diode loses its ability to heat, it becomes an ordinary flashlight.
The crystal is also affected by the temperature around it; as it drops, the laser performance increases at a constant voltage. If it exceeds the standard norm, the resonator is destroyed according to a similar principle. Less commonly, the diode is damaged by sudden changes, which are caused by frequent switching on and off of the device over a short period.
After removing the crystal, you must immediately tie up its ends with exposed wires. This is necessary to create a connection between its voltage outputs.
To these outputs you need to solder a small capacitor of 0.1 µF with negative polarity and 100 µF with positive polarity. After this procedure, you can remove the wound wires.
This will help protect the laser diode from transients and static electricity.
Choose and use a laser engraver
And this is a homemade engraver, but more on that later.
Currently, there are many well-known brands that supply laser engravers. The device is almost the same everywhere, but many of them differ in their factory configuration and functionality. First of all, when choosing a laser engraver, you need to clearly define the purpose of its use, as well as what points you need to pay attention to when drawing up an estimate and not miss anything.
Electrical circuit design
When assembling a homemade burner, you must have knowledge in the field of radio electronics. This will allow you to develop an electrical circuit. If you do not have skills in this area, you can use the diagram presented below.
The circuit can be simple or quite complex, tailored to the developer’s requirements. The task is to select the most acceptable option and implement it in practice.
Our experience in assembling a machine in a single copy for our own needs
Disadvantage of self-assembly “Design errors” We wrote this in the first place for a reason. We encountered this problem ourselves when we wanted to save money and assemble a CO2 laser machine ourselves. In fact, taking into account design errors and various alterations, the amount paid for spare parts was equal to the cost of a finished similar machine. And we do not consider the wasted personal time and the fact that the machine could have functioned earlier and begun to pay for itself.
Such an assembly would be profitable if we planned to produce such machines constantly. But since our task was simply one laser machine for our needs, this turned out to be a completely unprofitable waste of time.
Electric wood burner: master class on creating a pyrograph with your own hands using improvised materials
Creative people who love to make crafts with their own hands will undoubtedly be interested in such a direction as wood burning.
Its second name, pyrography, refers to the process of transferring a design onto a wooden surface using a soldering iron. The result is extraordinary masterpieces, and the process itself helps relieve stress.
The finished works are suitable as gifts for loved ones, friends or to decorate a wall in your own home.
On sale you can find dozens of models of electric burners from different manufacturers. Each type has its own characteristics, but they are all divided into two large groups:
- with hard feathers. Burning devices with hard nibs can maintain a certain incandescent temperature of the pen. When choosing a burner, you need to take into account that the more power, the faster you can work. They are durable and easy to use. Most suitable for making large drawings. The set includes different attachments with which you can perform different types of work;
- with wire feathers. Burning devices with wire pens can be used for delicate and painstaking woodwork.
How to make a wood burner with your own hands
Not everyone has the opportunity to purchase a burning device. To save money, you can make it yourself.
To make a burner, you need to prepare a soldering iron, nichrome thread, pliers, 1 sewing needle, 1 syringe needle, barbecue sword, glue moment, heat-shrinkable tube and power supply.
- You need to take a syringe needle and bite off her nose with pliers.
- Attach two needles parallel to the barbecue sword and wind the thread on top.
- Next, bend until it touches the tip of the syringe needle.
- Solder the wires from the power supply to the needles.
- We tightly wrap the wires around the sword with a thread.
- The protruding wooden bottom of the sword can be cut off.
- We impregnate the wound thread with Moment glue.
- Place a heat shrink tube over the thread.
The burner is ready, now it needs to be tested. To do this, you need to connect the power supply to a 220 V outlet; if everything is done correctly, the needle threads should turn red within a couple of seconds. The device should only be tested on wooden surfaces.
- All necessary materials and tools are prepared in advance.
- A piece of wood of the required size is selected. It is better to do the drawing on the smoother side. Wood varies in hardness from 1 to 10. Accordingly, hardness 1 refers to the softest wooden surfaces, and hardness 10 refers to the hardest. For the first attempts, it is better to use soft wooden pieces.
- It is recommended to place the burner on a special stand, as it heats up instantly.
- Then you need to sand the piece of wood on which the design will be applied. You can use sandpaper for this.
- Instead of continuous lines, it is necessary to apply strokes. You can't press too hard on the wood, otherwise it will be difficult to control the pencil and then erase the extra lines.
- There is no need to rush to get the job done faster. Wood burning itself is a long, painstaking process. For beginners, it is recommended to try to use the same amount of force when applying the design. The design can be made darker by holding the burner handle on a specific area.
- The piece of wood must be positioned so that the grain is directed downward. This will help make drawing easier, since the device will move downwards all the time. Burning against the grain will significantly increase the resistance.
Workflow Recommendations
- It is important to choose a comfortable place for the wooden plank. You need to place it so that you can easily reach any part with a burning device.
- It is recommended to start burning the design from the bottom or along the outer edge.
- It is necessary to go through places several times. If you touch the wooden surface softer, it will be easier to move the device. You should try to keep your wrist on the board.
- First of all, you need to finish drawing the main lines, and then move on to the rest of the details.
- To make a regular 2D drawing, and for a 3D one, you need to purchase different attachments.
- Once the sketch of the drawing is ready, you can move on to adding colors. But you need to remember that an additional color will not always look beautiful. To do this, you can use watercolor paints.
- Each attachment requires regular cleaning. This can be done using a sanding block for quick cleaning. Remove the nozzle with pliers and, to be safe, immerse it in cold water for a few minutes.
- When the drawing is completed, you need to apply a special varnish coating to it and wait until the surface dries completely. It must be applied in a well-ventilated room or outdoors.