A DIY sandblasting attachment used for installation on a standard Karcher machine will allow you to turn such equipment into a full-fledged sandblasting unit, useful in many situations. Most Karcher washing machines operate under high pressure, so their technical capabilities are quite sufficient to supply sand through such a nozzle. The difference between such a homemade device and a classic sandblaster will be that sand will be supplied through its nozzle along with water, but this is not critical for many situations.
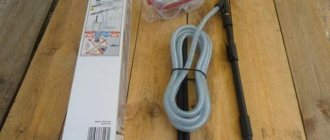
Kärcher wet sandblasting kit
How does a sandblasting nozzle work?
The operating principle of any sandblasting installation is that abrasive material from a special hopper enters the nozzle under the influence of an air flow supplied under high pressure. In serial installations, a separate compressor is used to create such pressure, due to which a significant amount of kinetic energy is imparted to the sand stream emerging from the nozzle. In the case of a Karcher washing machine, the pneumatic equipment built into it will be used for these purposes. As a nozzle for such equipment, you can use a serial gun, specially designed for equipping pneumatic treatment plants, but in order not to spend money on such a device, you can easily make it yourself.
In order for your homemade sandblasting nozzle, which you will use for installation on a Karcher device, to be effective and not malfunction, you must use high-quality materials for its manufacture.
Operating principle of wet sandblasting rust cleaning machine
Of course, equipment assembled in this way can, with great stretch, be considered as a full-fledged sandblaster, but it is quite suitable for cleaning various surfaces with a stream of water mixed with sand. When using such a sandblasting device, it is very important to adhere to two recommendations:
- It is better to use distilled water as the working fluid, which will avoid corrosion of the metal elements of the nozzle;
- the sand that will be used as an abrasive must be of a very fine fraction and carefully sifted.
Diagram of a sandblasting nozzle (click to enlarge)
A self-assembled sandblasting machine, the basic elements of which are a Karcher mini-washer and a homemade nozzle, will work according to the following scheme.
- When you press the start button on the nozzle gun, water under high pressure created by the compressor flows past the opening of the intake hose, the other end of which is placed in a hopper with sand. This creates a vacuum in the intake hose.
- Under the influence of vacuum, sand is sucked from the hopper into the main hose, where it is mixed with the water flow.
In order to minimize sand consumption and bring this parameter to a value of 30 kg of abrasive for processing a surface area with a diameter of 70–80 cm, the design of this equipment must be supplemented with taps and dispensers.
Homemade mixer from water taps and tees
DIY sandblasting for Karcher
It is quite possible to do sandblasting with your own hands, especially if you have at least the minimum necessary materials. For example, if you already have a Karcher sink, then the nozzle made for it can become a full-fledged sandblasting machine. Since most washers of this type operate under high pressure, it is relatively easy to convert it into a full-fledged sandblaster.
In this case, the abrasive material is supplied together with water. Although in general the principle of operation is practically no different from classic sandblasting.
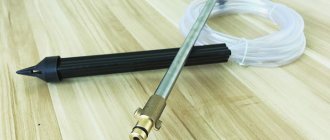
Nozzle for Karcher sandblasting
The main difference is that instead of a compressor, pneumatic washing equipment is used. Thus, the abrasive material (sand) is supplied under the influence of strong kinetic energy, due to which cleaning is carried out.
Sand for sandblasting comes in different types, so you should pay attention to the properties of each material. A gun for pneumatic cleaning equipment can play the role of a nozzle.
You can either purchase it ready-to-use or assemble it yourself.
Operating principle of the nozzle
Making such a nozzle with your own hands is not so difficult, the main thing is to choose high-quality materials for this. The operating principle here is the same as the nozzles in a full-fledged sandblasting machine.
Sandblasting operation diagram
It should be noted that such a product cannot be considered as complete. Rather, it is a lightweight option for treating surfaces with water.
Here you should pay attention to one very important point - it is better to use distilled water. This is due to the fact that the metal in this case will not corrode.
Please note that the sand when using such a nozzle on a Karcher must be of a very fine fraction and supplied together with water.
The operating procedure in this case is as follows:
- when you press the gun, water passes past the intake hose, thereby creating a vacuum;
- the vacuum sucks in the sand, mixing it with water, thereby starting the process.
Scheme of operation of the water-abrasive nozzle
It is worth noting that using only such a scheme (without additions in the form of dispensers and taps) is impractical. On average, cleaning a surface with a diameter of 70-80 cm can take up to 30 kg. Therefore, the principle of operation is good and does not require additions.
Sandblasting nozzle
In order to make an attachment for a Karcher sink with your own hands, you need to have the following elements:
- nozzle;
- trigger;
- reinforced hose;
- dispenser
Sandblasting nozzle for Karcher
You should also purchase a special ceramic nozzle if you plan to use it constantly. Due to frequent use of abrasive material, a metal analogue can quickly become unusable. The ceramic option will last much longer.
Now, regarding the nozzle. This is, in fact, the basis of the nozzle for any type of sandblasting, not only when using a Karcher washing unit. Making a nozzle with your own hands is quite difficult, but still possible.
To do this, you need to select a metal rod with a diameter of at least 15 mm and saw it from the middle. But since this is quite problematic, it is better to just buy a good nozzle.
The operation of the entire nozzle depends on the quality of this component.
The hose must be at least 2 meters long and must be reinforced. This is due to the fact that the abrasive material, in this case sand, will quickly render an ordinary hose unusable.
As for the dispenser, it is needed for economical use of abrasive material. It should be noted that some nozzle models are sold with a trigger.
You can assemble the nozzle by following this algorithm:
- a ceramic or metal nozzle is attached to the nozzle via a thread;
- on the other side of the nozzle, a hose is installed using a clamp and fitting;
- A dispenser is attached to the end of the ceramic nozzle.
Please note that all joints between parts must be sealed. You can seal them using a special fum tape.
Sandblasting nozzle diagram
To save sand, you can use a tank with a grate. To do this you will need a reinforced hose. Its beginning should be attached to a container with water and abrasive material. The end should go into a tray to collect waste sand. Thus, you can significantly save sand consumption.
The cleaning process is carried out using high water pressure. As a consequence of this, the sand is supplied under strong kinetic energy and simply “beats off” particles of dirt, paint, corrosion and other things.
With the help of such a simple device, you can thoroughly and quickly clean almost any surface, even after severe rust damage.
Nozzle for sandblasting machine
Safety precautions
Even despite the fact that sandblasting is done using a special nozzle, basic safety rules should be applied. Since the flow of abrasive material is supplied under fairly strong pressure, injury can occur if you are careless. To prevent this from happening, the following rules should be applied in practice:
- work only in closed protective clothing;
- shoes must be closed;
- It is better to clean outdoors.
As for face and respiratory protection, in this case they are optional. You can get by with overalls and closed shoes.
Safety precautions when working with sandblasting
Building a sandblasting machine with your own hands is not difficult if you approach this matter correctly. Moreover, this is easy to do if you already have special nozzles and a washer with good pressure. In this case, you can save on buying a compressor.
If you don’t want to make such a device with your own hands, or for some reason it’s not possible, you can simply purchase a ready-made sandblasting nozzle or the device itself. But it will be much more expensive than if you assemble it yourself.
Making a homemade nozzle
In order to turn a Karcher mini washer into an effective sandblasting unit using a homemade nozzle, you will need the following structural elements:
- a nozzle through which a mixture of water and sand will be supplied to the treatment zone;
- trigger;
- reinforced hose that will be able to withstand high pressure;
- dispenser necessary to make the consumption of abrasive material more economical.
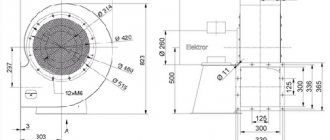
Nozzle diagram: 1 – thread; 2 – low pressure chamber; 3 – nozzle; 4 – fitting for sand supply; 5 – junction of two parts of the nozzle; 6 – smooth tapering transition
For the nozzle, if you intend to use your sandblaster regularly, it is best to purchase one that is made of ceramic. This type of attachment, which is constantly exposed to abrasive material, will last you much longer than its metal counterpart.
Read also: Hair dryer for desoldering microcircuits
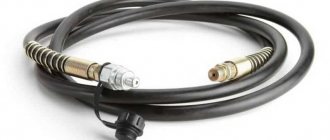
Homemade water sand blasting nozzle
Nozzle details: 1 – pistol; 2 – nozzle; 3 – nozzle holder; 4 – sandblasting nozzle
The efficiency of the sandblasting machine with a homemade nozzle, which you will equip your Karcher sink with, is greatly influenced by the quality of the nozzle. It’s worth starting to create such an element yourself only if you have the opportunity to drill an exact hole in a metal rod, the diameter of which is at least 15 mm. But if this is not possible, then it is better to purchase a factory nozzle, the quality of which will determine the operation of the entire device. The advisability of purchasing a serial nozzle also lies in the fact that some models of such products are already immediately equipped with triggers.
When choosing a hose, the length of which must be at least 2 meters, you should pay attention only to reinforced products. This is explained not only by the fact that such a hose will work under high pressure created by the compressor, but also by the fact that its internal walls will be constantly exposed to abrasive, which will quickly render the unreinforced product unusable.
When starting to assemble and attach the nozzle to equip the Karcher washing machine, you should adhere to the following algorithm of actions:
- a ceramic or metal tip must be fixed to the nozzle of your homemade nozzle using a threaded connection;
- the dispenser, with which you will regulate the flow of the water-sand mixture coming under high pressure from the nozzle, should be attached to the metal or ceramic tip of the nozzle;
- the hose through which sand will be supplied from the hopper must be secured to the back of the nozzle, for which a fitting and a clamp of the appropriate diameter are used.
Scheme of operation and example of manufacturing a nozzle for collecting sand
When assembling and installing a nozzle for Karcher, you should take into account the fact that all elements of such a device will operate under high pressure created by the compressor of the device. That is why all formed connections must be ensured with maximum tightness and reliability. It is not difficult to fulfill this requirement if you make such connections using a special fum tape.
There is one more trick that will allow you to save abrasive material. It consists of the following: cleaning must be performed over a special container with a grid into which the waste mixture of water and sand will be collected. This mixture can be reused by lowering the end of a reinforced hose into it, which is connected to the nozzle of the device. There must be a grate on the top of this container; it is necessary in order to hold processing waste and prevent it from getting into the water-sand mixture.
Karcher sink with sandblasting nozzle in use
How to make sandblasting with your own hands at home
Sandblasting allows you to quickly and efficiently clean surfaces from dirt and frost glass. The first type of operation is in great demand in small auto repair shops and even private garages.
The problem is that the equipment sets on the market are expensive. At the same time, let’s say a home craftsman has a fairly powerful compressor.
In this case, you can assemble a sandblasting machine with your own hands, using, literally, discarded items and parts that can be bought at any hardware store.
Design and operating principle of a sandblasting machine
Do-it-yourself sandblasting can be assembled based on two design schemes that differ in the physics of supplying abrasive material to the output path. However, they will have almost the same list of significant nodes.
- A compressor is the main device for pumping air.
- A receiver that can be made from a gas cylinder.
- The container for the abrasive material is of a fairly small volume, which is made from a freon cylinder or a fire extinguisher.
- The pistol is the main tool of the installation operator.
- Connecting hoses.
Important! To ensure long-term operation and stable parameters of the abrasive mixture, the sandblasting machine must include a moisture separator. If a piston compressor is used, it is recommended to install an oil filtration system in the air inlet path.
Any homemade sandblaster should produce a stream of air-abrasive mixture at the output.
In this case, the pressure diagram
uses pressurized abrasive into the outlet pipe, where it is mixed with the air flow from the compressor.
ejector type sandblasting machine
uses the Bernoulli effect to create a vacuum in the abrasive intake path. The latter enters the mixing zone under the influence of the atmosphere.
The drawings and diagram of a homemade sandblaster, according to which you can assemble the device at home, are extremely diverse. The reason is that artisans use what is at hand for their products. Therefore, it is reasonable to consider the general principles by which homemade sandblasting equipment is built.
What can sandblasting be made from?
To understand how easy it is to make sandblasting with your own hands, it is enough to dwell on the operating features of each structural unit. In this case, the selection of available parts or finished products becomes obvious.
Mixing unit. Sand for sandblasting and compressed air from the compressor come here from two hoses. The output is a ready-made air-abrasive mixture. In this case, no requirements, for example, the volume of the mixing chamber, are imposed on the unit. On this basis, you can use a regular plumbing tee to make it. Control devices.
A normal manual sandblaster should be able to adjust the air flow and the intensity of the abrasive material. In this case, no requirements are imposed on the control device. At home, this role is well performed by water ball valves made of steel. Connection points.
To connect the hoses, conventional fittings are installed on the portable sandblasting machine. They can be equipped with clamps for secure fastening. All these components are easy to buy in stores. Receiver. This part of the design is needed to facilitate the operation of the compressor and stabilize the pressure.
You will definitely need a receiver if you want to get a powerful sandblast with your own hands. This device can be made from a powder type fire extinguisher with a large housing capacity. Another option is to make a receiver from a gas cylinder. Abrasive chamber. The components for its manufacture may differ depending on the type of installation being created.
For example, an ejector-type mini sandblasting machine is assembled with a plastic bottle for abrasive. A pressure installation will require a durable container made from a fire extinguisher or a freon cylinder. Important! The connection diagram for moisture separation and oil collection devices depends on the specific product purchased for this purpose.
However, most of the models on the market will only require the manufacture of an outlet from a plumbing tee onto which the hose fittings are mounted.
Algorithm for making sandblasting from a gas cylinder or fire extinguisher
The simplest sandblasting design that you can do yourself is a pressure-type installation
. To make it you will need (the principles of selection and purpose of the components are described above):
- ball valves, 2 pcs;
- freon cylinder, gas or fire extinguisher;
- a piece of pipe to create a funnel for pouring abrasive into the chamber;
- tees, 2 pcs;
- hoses with internal diameters of 10 and 14 mm for releasing abrasive and supplying air from the compressor, respectively;
- fittings and clamps for fastening hoses;
- plumbing fum tape for connecting structural elements.
Sandblasting is produced according to the following algorithm.
- The camera is being prepared. To do this, gas is released from the fire extinguisher or powder is poured out, and the contents are removed from any cylinders under pressure.
Holes are made in the cylinder. From above - for pouring abrasive (corresponding to the diameter of the selected tube), from below - for welding the tap. The tap for adjusting the supply of abrasive can be tightly welded into the cylinder. Another option is to pre-install an adapter onto which the regulator is screwed.
- After the tap, using fum tape, a tee and mixing unit are installed.
- A tap is mounted on the cylinder valve, followed by a tee.
The assembly of the main structure is completed by welding wheels or carrying handles. Support legs won't hurt either.
so that sandblasting is not only mobile, but also stable.
Next, connections are made and the formation of supply and exit paths for the finished working mixture is carried out:
- fittings are installed on the cylinder valve, lower tee;
- an air supply hose with a diameter of 14 mm is located between the valve tee and the corresponding mixing unit at the bottom of the cylinder;
- a compressor is connected to the remaining supply of the valve tee with a fitting;
- The working mixture supply hose is attached to the free outlet of the lower tee.
At this point, the creation of the device can be considered complete.
Advice! To ensure a tight seal, it is recommended to select a screw-on cap for the abrasive sand filling tube.
What to make a nozzle and gun from
A homemade sandblasting gun is also not difficult. It can be made using a nozzle on a ball water valve
, installed at the end of the air-abrasive mixture supply hose. This output element is a clamping nut that secures the nozzle for ejecting the abrasive.
The last structural element - the nozzle - can be made of metal by turning the part on a lathe. However, it makes more sense to make a nozzle from a spark plug
. To do this, the old part is cut with a grinder, separating the durable ceramic pillar from the metal structural elements and forming a suitable length.
Important! The process of separating the desired part of the candle inevitably results in the formation of a huge amount of dust and an unpleasant odor. Therefore, if you do not have the skills to work with an angle grinder and a workshop, it is recommended to buy a ceramic nozzle in a store.
It is worth especially noting: homemade designs often show better results than a ready-made sandblasting gun, many models of which are presented in retail sales.
Therefore, it is wise to spend time creating your own solution, which does not require significant financial investments.
Alternative manufacturing methods
The many options for homemade sandblasting are determined by the needs of the owners and the different materials available.
You can make your own effective installation using products intended for other work.
For example, a high-pressure washer unit will help you assemble a dust-free sandblasting machine with your own hands. Below are several working and effective options for homemade installations.
From a pressure washer
You can assemble a sandblaster from Karcher. This car wash creates high water pressure with low water flow. To obtain an efficiently operating dust-free installation, you just need to assemble a special nozzle for the outlet tube
. Required:
- a self-made or store-bought ceramic nozzle;
- reinforced hose;
- mixing block, a tee with a suitable fit diameter is suitable;
- feed adjustment unit, cylindrical type dispenser;
- a tube for collecting abrasive, equipped with an air supply path into a closed container with sand or other material.
Water sandblasting from Karcher works on an ejector circuit
. High-pressure water passing through the mixing unit at high speed creates a vacuum in the abrasive supply path. Sand flows in and out with high pressure fluid.
The water sandblaster of this design has some features.
- The flow intensity is high with low water flow
. This allows the installation to be used for glass, frosting or other processing. - For stable feeding, an abrasive of uniform dispersion and small fraction must be used. For domestic use, fine, sifted river sand is suitable.
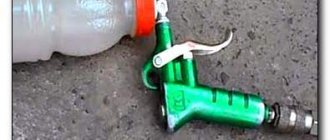
From a blow gun
Small and efficient - this is how sandblasting from a blow gun can be described. This device will allow you to carry out, for example, body work with fairly high efficiency.
However, the performance depends entirely on the compressor used. To assemble the device you will need:
- ready-made pneumatic blow gun;
- plumbing tee;
- ball valve for adjusting the abrasive supply;
- outlet nozzle with clamping nut.
The design is not complicated. How to assemble it can be seen in the next photo.
Either a lightweight powder fire extinguisher bottle or a plastic bottle can be used as a container for abrasive.
Using a spray gun
You can create a homemade sandblast using a spray gun. For this you will need:
- mixing valve from a conventional spray gun;
- handle with air supply mechanism for the spray gun;
- bottle for abrasive mixture:
- tee;
- ball valve regulator.
The operation diagram of the finished device is as follows:
To assemble the structure you will need:
- sharpen the spray gun to use a nozzle of the required dimensions;
- attach the mixing tee to the gun;
- install and secure the supply and circulation hoses.
Important! The supply of sand or other abrasive from the container is started by simply pressing the trigger. The volume of the bottle is enough to treat small parts or surfaces for 20-30 minutes.
As a conclusion
To prevent homemade sandblasting from becoming a problem and spoiling the owner’s health, do not neglect simple safety rules
. It is recommended to immediately remove dust from the treatment area.
A device for solving this problem can be made from a vacuum cleaner.
However, to achieve the maximum level of protection, you must work in a respirator and use an uninhabited sealed chamber for cleaning and polishing small parts.
What can you use a homemade sandblasting machine for?
The effectiveness of using a sandblasting unit with a homemade nozzle, assembled on the basis of a Karcher apparatus, is ensured by the fact that sand mixed with water is supplied from a nozzle under high pressure, which is created by the built-in compressor of the device. Possessing significant kinetic energy, such an abrasive jet is capable of effectively cleaning various surfaces.
It takes no more than 5 minutes to clean a propane tank from rust and paint.
A homemade sandblaster, assembled on the basis of a Karcher sink, can be successfully used to solve the following problems:
- cleaning surfaces from various types of contaminants;
- removing old coatings from surfaces: paint, glue, building mixtures, etc.;
- removing areas susceptible to corrosion from metal surfaces;
- cleaning metal surfaces before further processing.
Despite the simplicity of its design, a homemade nozzle for Karcher devices, designed for sandblasting, is highly effective in cleaning various surfaces.
The fact that such a nozzle is a convenient and effective device is well demonstrated by the video of its use. Such a video, as well as videos on the manufacture and assembly of such a device, can be found on the Internet without any problems.
Principle of operation
The operating principle of a sandblasting machine or device is to supply sand into a special nozzle. The abrasive comes from a special container using high-pressure air . To create such a powerful air flow, the sandblasting machine is equipped with a compressor, which imparts kinetic energy to the sand. For Karcher-type devices, equipment with pneumatics is typical.
At low cost you can make a nozzle for sandblasting; your original gun will work perfectly. The main thing is not to skimp on the quality of materials. The operating efficiency will be much higher, and the device will work without failures or complaints. Use decent and high-quality materials.
It is a mistake to believe that such a sandblasting nozzle can fully replace a professional device. But it is quite capable of cleaning different surfaces Some recommendations should be taken into account when working:
- use distilled water - this will protect metal parts of the structure from corrosion;
- The abrasive must be fine-grained and sifted.
A part made independently will function according to the following principle:
- Water under the influence of high pressure created by a compressor will flow along the intake hole of the hose, which at the other end is placed in a special container with sand. This circuit is necessary to create a vacuum in the intake hose.
- The vacuum helps the abrasive move into the main hose, where the sand is mixed with the water flow. Thus, sand is supplied along with water.
Read also: DIY file cutters
For better functionality and productivity of the unit, you need to improve the design by adding dispensers and taps. These additions will reduce sand consumption. The best values would be thirty kilograms of abrasive per surface area of 0.8 meters to be cleaned.
Sandblasting from Karcher: nozzle for Karcher high pressure washer
A DIY sandblasting attachment used for installation on a standard Karcher machine will allow you to turn such equipment into a full-fledged sandblasting unit, useful in many situations.
Most Karcher washing machines operate under high pressure, so their technical capabilities are quite sufficient to supply sand through such a nozzle.
The difference between such a homemade device and a classic sandblaster will be that sand will be supplied through its nozzle along with water, but this is not critical for many situations.
Kärcher wet sandblasting kit
Nozzle manufacturing process
A homemade nozzle for Karcher can turn a washing unit into a functional sandblasting unit for home use. You will need the following set of consumables:
- a hose that can withstand high water pressure;
- trigger hook;
- dispenser to save abrasive consumption;
- a nozzle into which a mixture of water and sand will come out.
Advice: if you plan to regularly use a sandblasting attachment for a Karcher, it is best to give preference to ceramics. This is due to the fact that the abrasive acts on the metal nozzle more aggressively and its service life is much shorter than that of its ceramic counterpart. The productivity of the device will depend on the quality of the nozzle.
Do not experiment with making a homemade nozzle if you are not a professional in this matter. It is necessary to accurately drill a hole with the required diameter . The market is saturated with ready-made parts and consumables of decent quality at reasonable prices, so it’s better to purchase them. In addition, the finished parts already have a trigger mechanism in the kit - a hook.
The hose you will use must be at least two meters long, durable and reinforced. A stream of high pressure water will pass through it , which will be created by the compressor. Strength is also important because the unit will work with abrasives, so a product of dubious quality will not last long.
Algorithm of actions
- Using a thread, the tip is fixed to the nozzle.
- A dispenser is also attached to the nozzle, which regulates the supply of sand-water mixture.
- The container with sand is connected via a hose; for this, a suitable clamp and fitting are used.
Please note: the Karcher compressor creates high pressure, which will affect all elements in your structure. Therefore, they must be secured and installed securely and correctly. All parts and connections must be ensured with maximum tightness. For any connections, it is best to use sealing tape.
To save the most sand, you should prepare a special container with a grate. Above it, you need to carry out the necessary cleaning of the surface using a sandblasting nozzle . The water-sand mixture will accumulate in this container. This mixture can be used again if a reinforced intake hose is lowered into it. The grate covering the container is needed to keep waste from being cleaned so that it does not contaminate the sand and water mixture.
Areas of use
The high pressure created by the Karcher compressor allows a jet of water mixed with sand to be thrown through the nozzle, thus effectively and quickly cleaning many surfaces.
The sandblasting nozzle will easily allow you to cope with some tasks in a very short time:
- cleaning various surfaces from complex contaminants;
- removal of building mixtures, glue, paint, varnish;
- cleaning metal from rust and corrosion;
- carrying out stripping of metal products for subsequent processing.
The simplicity of the design and the ease of self-production can significantly facilitate and increase the quality of the work you perform. This attachment will save your time and effort.
Precautionary measures
When working with a machine on which a sandblasting attachment is installed, certain precautions must be observed. A water-sand mixture can cause injury.
- When working with the device, wear special clothing, it will protect against injury;
- use closed and comfortable shoes;
- carry out cleaning work outdoors.
Since contaminated surfaces are processed and cleaned using sand and water, there is no need to use a respirator.
see also
Comments 48
why sandblast? when there is a sand blower!
Tell me what power the compressor needs to make everything work well. Thanks in advance
It’s best to have a three-phase unit with a 500-liter reservoir.
Can sand be reused after use?
Sift and re-sieve
Hello! How does sandblasting perform over time? Find out the order of the prices of the components - you also need one (discs, etc. to clean).
I took note of this device, I’ll make one for myself too
The grapevine turned out great!
I was thinking of welding the horse-size thread from the bottom and narrowing it to the tap by 1 inch with transitions. Now a pipe 3/4 tap 3/4 is welded, then an angle and a 25 mm hose for abrasive.
What a thought! Let me know how it goes
Today I assembled the sandblaster. I got the sifted sand. Zif compressor for 8 cubic meters. abrasive hoses. sand flows intermittently. you have to shake the tank constantly. was there such a problem?
There is such a problem, but not constantly shaking, but periodically. I think about it. Probably you need to cook a sharp cone from the bottom of the tank.
But the Injection principle won’t work here?
Today I assembled the sandblaster. I got the sifted sand. Zif compressor for 8 cubic meters. abrasive hoses. sand flows intermittently. you have to shake the tank constantly. was there such a problem?
Or buy a dispenser for 10 tr. it creates a vortex feed, or feeds the abrasive at an angle of 45 degrees.
I watched several videos and came across one option, it talks about different pressures in the tank and the supply to the outlet, the pressure in the tank is limited by the same regulator, although the bleeder is located in the same tee as the regulator, and even if the pressure exceeds the norm of 6 atmospheres of pressure as you indicated through the lower sand supply valve, it is activated and again equalizes the pressure in the tank to the specified value of 6 atmospheres, thus achieving a uniform supply of abrasive.
and there is an idea for a permanent installation, I heard that there is a problem that the whole thing does not pour out completely, so I’m sitting thinking about it, in addition to the funnel welded to the bottom.
Yes, there is such a problem. Stationary is good, but tied to one place. It's more convenient on wheels.