by Alexey | Cleaning Tools | Friday, December 03, 2021
| Follow Make-Self.net on Facebook and be the first to read our articles. |
Rust is completely preventable, but it is often unavoidable if you have a large number of metal tools. Those tools that you left outside in the rain and snow are now unusable, but that doesn't mean you have to throw them away! There are several different methods you can use to clean rusty tools so they are ready for use.
Why do tools rust?
You want to clean rusty tools, but it's also important to understand how it happened in the first place. Rusty tools are the result of water remaining on the steel for a long period of time. Rust forms when oxygen and water react with iron . If a tool is constantly exposed to water and oxygen, rust can form within four or five days. If by the time you realize that your tools are rusty, corrosion has not yet set in (that's when holes start to form in the metal), you can still fix the situation by cleaning the rust off.
When it comes to removing rust, you have several options. Find out the best tips for removing rust from tools!
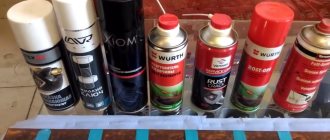
Special anti-corrosion agents
There are several special products that are produced to combat corrosive plaque.
Solvents
To remove rust from metal coatings, use Schnell-Rostloser. This cleaner has good qualities that allow you to get rid of traces of oxidation. You can also treat the iron product with Spirit-1 solvent. Its advantages include:
- displacement of moisture particles from iron;
- formation of a protective layer on the treated coating;
- cheapness.
Converters
Converters are means that convert corrosion particles into a durable film. Such compositions are available in the form of solutions, emulsions and suspensions.
Experts recommend using converters not only to remove rust stains, but also to protect the product from further corrosion.
Cleaning with sandpaper
When using sandpaper to remove rust, you will need a little bit of effort, as well as coarse and fine grit sandpaper. Start by cleaning the tool of dirt and grease, then dry it completely . Once it's dry, take some coarse sandpaper and sand off any rust from the surface , then switch to a finer grit so you can smooth out any grooves or marks left by the coarse sandpaper. If sandpaper doesn't help remove deeper rust, you'll have to double down on one of the other methods for removing rust from tools.
WD-40 and steel wool
WD-40 is a product specifically formulated to break the bonds between rust and the metal surface to which it is bonded. When you are trying to remove light surface rust from your tools, spray it directly onto the rusty area and let it sit for ten minutes . Once you've allowed the WD-40 to loosen the rust, take a piece of steel wool and scrape away the rust until the tool is clean. Wash the tool and dry it thoroughly before putting it back in the toolbox.
Sandblasting
An alternative mechanical way to remove corrosion is a sandblasting machine, which can easily remove even stubborn rust. The necessary equipment is quite expensive, so purchasing it only makes sense for processing a large number of damaged tools.
The main advantage of sandblasting compared to metal brushes is the ability to process even hard-to-reach areas. However, sandblasting is not recommended for use on sheet surfaces. The fact is that sand released under high pressure can leave a serious dent or even a hole in thin metal.
White vinegar
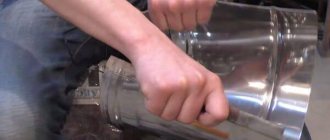
White vinegar is just what you need to remove those stubborn patches of rust that you can't seem to remove with other methods. Acetic acid will help break down rust. To get the most out of vinegar on your tools, you need to completely immerse them in water. For small items like wrenches, you can submerge them in a small bowl, but larger tools will require a bucket or large container. Leave the tools in the vinegar overnight. At a minimum, you should wait at least six hours.
Some unusual means and methods to remove rust from metal
The list of working anti-corrosion compounds is not complete. There is also Coca-Cola, beloved by many, tomatoes and the electrolysis process.
Coca Cola
Glory to the meticulous American housewives who were the first to notice how a tasty drink can corrode iron oxide. And not only the rust is eaten by the cola, but also the nail itself. There is nothing surprising in this; grapefruit acts in much the same way: both Coca-Cola and the fruit contain phosphoric acid.
How to remove rust from a bicycle? Or how to clean a rusty hammer? Buy a cola and give the item a good bath in it!
It is important not to miss the moment when the object has been cleaned and the drink has not begun to corrode the metal itself.
Salvaging metal from the garden or kitchen: tomato paste or ketchup
The chemical composition of tomato allows it to be used not only for food.
Homemade or store-bought tomato paste will do the job; it’s an excellent tool at hand.
Ketchup or paste is dripped onto the rusty metal, but not washed off immediately: let the substances interact. After 10-15 minutes, the dirt is removed mechanically, and the surface is wiped with a dry cloth.
Electrolysis
There is also a longer, but more effective way to clean metal products.
It is impossible to work properly with such tools.
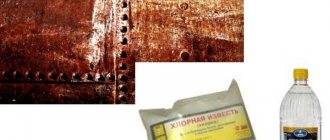
To clean, you need a container sized for the items, a steel plate for the anode, caustic soda or “Whiteness,” long stranded copper wires (insulated), a battery, a plastic plate (like a screen that protects from contact with the anode), a wire brush and rags.
Attention! The process is quite risky, since if the amperage exceeds the norm for the selected volume of water, the mixture will begin to boil. It is better to carry out work outdoors or in a well-ventilated area.
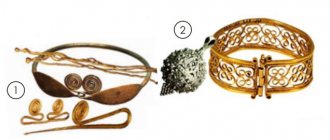
This method can also be used to clean antique metal finds.
- A solution is created: caustic soda (half a glass) per 15 liters of water.
- The anode is made from wire, installed in a container in such a way that it does not touch its walls.
- Place a round electrode (or steel plate) into the container. No aluminum is used! The length of the anode must be sufficient so that part of it is above the surface of the solution.
- Using an alligator clip, a wire directed to the positive red terminal (from the battery) is attached to the anode.
- A steel plate is lowered into the container, making sure that it protrudes a third from the solution.
- The end of the second wire is attached to the contaminated object. One end of the wire is cleared of insulation, the veins are stripped, and this end is attached to the object. At the point of contact, rust must be removed mechanically.
Important! There should be no free end of the protected wiring that could touch the anode.
All that remains is to attach the second wire to the black terminal. The process will take several hours and the solution will turn dirty brown. Cleaned parts may become dark - such deposits can be removed with a brush.
If you need to clean many parts, they are connected in series to each other with a wire
The more careful you treat metal products, the longer they will last. We invite you to watch a video of the electrolysis process at home:
Oxalic acid
Oxalic acid is a chemical-based solution that will attack areas of rust that you couldn't remove with sandpaper or vinegar. When working with oxalic acid, make sure you wear appropriate protective clothing and always read the label instructions carefully.
Degrease and clean the tools, dry them thoroughly, and then place them in large containers filled with 5 liters of water. For best results, store each tool in a separate container. Add three tablespoons of oxalic acid to the water , mix thoroughly and let the solution soak for up to 20 minutes. After soaking, you can wash off the softened rust and oxalic acid residues.
Materials
Before removing rust from a tool with your own hands, you should prepare:
- the instrument to be restored;
- screwdriver;
- sandpaper of different grain sizes;
- drill;
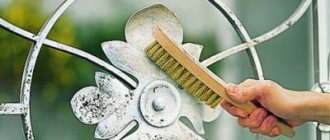
- wire brush;
- polish;
- polishing attachment.
Step 1
. The most difficult stage in this work of restoring an instrument is disassembling it. Due to rust, the threads and screws are thoroughly stuck, and it is not easy to unscrew them. It is not possible to do this manually, using just a screwdriver and pliers.
To disassemble the tool into its component parts, you need to place it in a vice. If in your case it’s still not possible to disassemble the instrument, you will have to resort to chemicals that corrode the rust. Be careful with any method of work; you may no longer find similar bolts and screws for old tools. Be careful not to break them, and don't throw away any of the parts.
Step 2
. You will first need to remove dirt, paint and old rust from all elements of the key with a wire brush. During this work, the main contaminants will disappear, and you will already see shiny steel. Don't touch the thread yet.
Step 3
. Continue to remove dirt from previously cleaned elements, trying to clean hard-to-reach places as well. Use 200-gauge sandpaper for this job.
Step 4
. Continue to work, but using paper of a different caliber each time: from 400 to 2000. When stripping, choose one direction of movement and move strictly along the given lines. During the work, some of the metal will also be removed along with dirt and rust. It is important that the material is also washed evenly, and you can clearly see the areas that have already been treated.
Step 5
. Clean the screw and thread using fine-grained sandpaper.
Step 6
. Take the materials prepared for polishing and the drill attachment. Proceed to finishing the metal.
Ready! Ideally, the surface of your old tool should look like new.
Homemade products from a washing machine engine:
1. How to connect a motor from an old washing machine through a capacitor or without it 2. Homemade emery from a washing machine engine 3. Homemade generator from a washing machine engine 4. Connecting and adjusting the speed of a commutator motor from an automatic washing machine 5. Potter's wheel from a washing machine machines 6. Lathe from an automatic washing machine 7. Wood splitter with an engine from a washing machine 8. Homemade concrete mixer
How to remove rust from tools, bolts and nuts with your own hands
- how to remove rust from a tool?
- how to clean rust from a coin?
- how to remove rust from a knife?
There's an answer!
Have you ever been cleaning out your garage and found a bucket of tools that might be wet and rusty?
DO NOT THROW THEM OUT!
There is a simple solution to restore their appearance for very little money, because buying new tools will cost you a decent amount.
So, have you found bags of nuts, bolts and tools corroded? If you do not know about the properties of vinegar, you will think that they are useless, nothing more. Wear gloves to avoid getting rust on your hands, because rust is very difficult to wash off. Gather all your corroded tools, nuts and bolts together. Depending on how many rusty things you find, select a container so that everything will fit. You can use a large basin.
Read also: What is iron oxide
Place your tools in a bucket and fill the bucket with vinegar until the vinegar covers the contents of the bucket. You won't believe the properties of the almighty vinegar. It will eat up the rust on tools, bolts and nuts!! This will all bubble up and you will watch as the rust starts to rise to the top.
If your tools are very corroded, you will need to leave them for several days, maybe even up to a week. Check them and when you see clean metal then it's time to take them out. Be sure to wear gloves when checking your tools! After taking them out, rinse them under running water and let them dry on a rag, or wipe them dry using the same rag. The vinegar cost practically pennies compared to what new tools would have cost!
- Potatoes remove rust
Fresh potatoes contain oxalic acid, which will help us in this matter. If the rusty spot is small, for example on a knife blade, then sprinkle salt on the cut potato and clean the knife with it. You can simply hold the potato with salt on the rusty spot for about 15 minutes, then rinse and dry.
- Vinegar and lemon juice
We mix these two components, which can be found in any kitchen in equal parts, and apply the mixture to the rust stain on metal, clothing or tiles. For metal, the mixture should be kept for two hours, for other materials, 15-20 minutes. After finishing the treatment, we also wash and dry the surface.
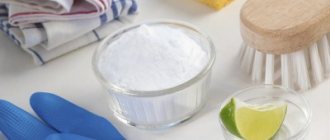
To prepare the composition, mix regular baking soda with water so that you get a not very thick paste. Apply this mixture to the rusty area of the metal surface for 15-20 minutes, then remove it with a steel wool. You may have to repeat this procedure a couple of times.
- Coca-Cola or other soda
Quite a modern rust remover. American housewives first started using Coca-Cola, who noticed that it copes well with rust stains. It's all about phosphoric acid, which dissolves rust. So think again about whether you should drink water that dissolves iron oxide.
Alka-Seltzer
Another miracle of modern chemistry that helps those suffering. It will help us remove rust stains from aluminum cookware. Place the dishes in a container, fill with water and add 4-6 Alka-Seltzer tablets. After 5-10 minutes, rinse with clean water and dry.
Yes, and it will come in handy in this matter. Place ketchup or tomato sauce on the rust stain, wait 5-10 minutes, then wipe dry
- Toilet bowl cleaner CILIT
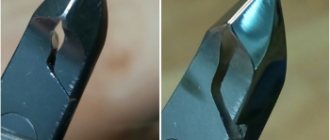
Take an old rusty scraper:
And immerse it in CILIT toilet bowl cleaner for several hours. Is there a difference before and after?
- As for professional methods,
then there are a large number of rust converters or removers on sale that operate on the same principle - the composition enters into a chemical reaction with rust, transforming it into a dense black or dark blue coating, which can then be painted. As they say, fast and reliable. I recommend using these products to remove rust on water pipes, metal rods of buildings and other solid metal objects. It makes no sense to cite specific means, since it is not worth advertising for any brand, since its products may not suit everyone. Converters and rust removers are sold in auto stores and auto departments of construction supermarkets. So that you do not have to use all these means to remove rust, first of all take care of its prevention - regularly paint metal surfaces, treat them with anti-corrosion impregnation and protect them from moisture.
- Testing the B-52 rust destroyer
The work with Audi has been sooo long... I've been fighting rust for days now. I fight using metal brushes on a drill and flap wheels on a grinder. Flap wheels and steel brushes remove rust well, but are very rough on living metal. Brass brushes are more kind to metal, but they are also less effective at removing rust.
There is, of course, also sandblasting - it removes rust with a bang (it does a good job of cleaning rust from sinks), and it is quite gentle on metal (more precisely, steel). But I don’t use it openly in the garage (maximum in a sandblasting chamber), and the weather doesn’t allow it outside.
In my search for a way to carefully and efficiently remove rust, I came across the B-52 Rust Destroyer.
There are tons of descriptions of his theoretical work on the Internet, but I almost never came across any practical tests. So I decided to test it on a rusty piece of metal from my car.
According to the instructions, the product must be applied to the surface with a layer of 1-2 mm, left for 15 minutes, then rinsed with water, wiped the surface with a dry cloth, and then wiped with solvent 646; if necessary, the procedure can be repeated. Here is my “lab mouse” - a cutout from the rear left fender (above the canopy).
Immediately applied the exterminator locally. The circumstances were such that I lasted not 15 minutes, but 30.
Wipe it off with a wet rag.
The result may not be phenomenal, but it is there! Apply remover to the entire surface.
Periodically rubbed it with a toothbrush.
About 30 minutes after application, I wiped the “mouse” with a wet and then a dry cloth.
Now, it's more fun!
Then I applied the remover again to the entire surface and replaced the toothbrush with a more “fierce” one.
After another half an hour I got this result.
The experiment could have been continued, but I decided that it was enough to transfer the product, because... its effectiveness is now known.
As for the 646th solvent, I will say that it is necessary in the work. They definitely need to wipe the surface at the end of each cycle (after wiping it dry), otherwise the steel begins to turn red right before your eyes!
Finally, a video of the process of destroying rust using Pepsi-Cola, which acts the same as Coca-Cola. Actually, any soda containing phosphoric acid will do.
What to do if the hinge is rusty
If your tool's hinge is rusty but the outside is not, you'll want to take a different approach. Instead of soaking your entire tool in vinegar or trying to scrub it off with steel wool, you'll need an all-purpose oil that serves to clean and lubricate your tools. Apply a small amount of oil to a rag and wipe the rusted hinge . You can also drop a small amount of oil directly onto the assembly while moving the tool back and forth. Once the oil has become a slurry, take a clean rag and wipe off the excess oil. Repeat the process until the tool's hinge works properly again.
How to prevent rust
Controlling humidity and keeping your tools away from water is key to preventing rust. To prevent tools from rusting over time, store them in a dry place. If any of your instruments get wet (rain, snow, etc.), dry them as thoroughly as possible and as soon as possible . It's also best to store all your tools (including power tools) off the ground, especially if they're stored in a workshop or garage, so there's no risk of moisture seeping through the floor.
Sealing the metal parts that are most susceptible to moisture is also a reliable rust protection tactic. Most manufacturers provide a layer of chrome or paint, but older tools often do not have a protective coating. Paint, rubber sealant or wax coating are cost-effective ways to prevent rust and extend the life of your tools.
Follow us on Pinterest for more interesting articles.
Useful short videos from Make-Self.net
Laser processing
As a more technologically advanced means of fighting rust, it is worth considering a laser, which can be used to remove corrosion quickly and effectively. Laser processing has only one disadvantage - the cost of the equipment, which starts from several hundred thousand rubles. Therefore, its purchase makes sense only for commercial use. However, nothing prevents you from contacting workshops that have the necessary equipment.