Cold welding for aluminum - varieties, tips for use
Cold welding for aluminum can be used in situations where it is not possible to use gas-shielded electric arc welding. This technique is also relevant for aluminum because workpieces made of this metal are very difficult to connect with bolts and nuts. The concept of “cold welding of aluminum” can mean both a method of joining parts made of this metal using deformation, and a technology that involves the use of special glue.
“Cold welding” most often means special glue, but there are also mechanical methods of cold welding - deformation welding
Cold welding of aluminum parts using special glue
Cold welding of aluminum parts, performed using a special adhesive composition, is a technology that allows you to obtain a permanent connection very quickly and without special surface preparation. Very often, this technique is used in cases where it is necessary to eliminate an emergency situation and quickly connect aluminum parts. Naturally, the simplicity of this technology allows it to be used most often at home.
Adhesive for fastening aluminum parts by cold welding
The special composition that is used to perform such welding is a two-component glue, produced in the form of mastic or a thick liquid. This glue (it can be purchased at almost any hardware store) consists of epoxy resin and steel powder, which serves to strengthen the joint being formed.
To improve the characteristics of the adhesive composition for cold welding (adhesion to the surfaces being joined, resistance to high temperatures and aggressive environments), special additives are added to its composition. Thanks to their use, the properties of the hardened adhesive composition often exceed the characteristics of the parts being connected in terms of strength and reliability.
Using two-component adhesive to fix the fitting in an aluminum alloy pipe
Any adhesive for cold welding - both liquid and in the form of mastic - consists of two components that must be mixed immediately before use. It should be borne in mind that it is necessary to apply the mixed composition within 20–30 minutes (after half an hour it begins to actively harden). After applying the adhesive composition to the surfaces of aluminum parts, they must be pressed together and kept in this state for 40–45 minutes. Complete hardening of the composition occurs within 2–2.5 hours.
In order to obtain a reliable connection in industrial or home conditions when using cold welding glue, it is necessary to first clean and degrease the surfaces to be joined. Using this method, you can not only join flat aluminum workpieces, but also weld small holes and cracks, spending a minimum of time and effort. The parts connected using cold welding adhesive withstand any mechanical stress well, except for tensile loads.
Cold welding repair of a broken car oil pan
So, it is not recommended to use glue:
- in places characterized by high temperatures;
- in those places that are subject to increased environmental safety requirements;
- for connecting parts whose operating conditions often change;
- for sealing vessels and containers under high pressure;
- for connecting parts operated in aggressive environments;
- for sealing pipes and vessels in contact with liquid food media and food products.
It should also be noted the advantages of using cold welding adhesive, which make it a very popular means of joining aluminum parts:
- elimination of oxidation processes at the junction of workpieces, which gives durability to such a connection;
- ease of use;
- minimum time required to form a permanent connection;
- low price of the composition and no need to use special equipment and energy resources.
A short review of cold welding compounds common on the domestic market, based on reviews of people who have used them in practice.
- PERMATEX Cold Weld An effective and highly versatile adhesive that can be used with a variety of materials. Excellent resistance to pull-out and shear loads during testing.
- "WURTH Liquid" Excellent for working with metal parts.
- “Abro Steel” is well suited for repairing liquid storage tanks due to its high ability to ensure tightness.
- "Titan" Affordable price, excellent resistance to mechanical loads.
- “Cold Weld PERMATEX” Quite a popular composition that has earned a lot of positive reviews.
Review of common sealants
Today, most automakers also produce related components and materials for repairing their car brands. Therefore, you can purchase an original sealant personalized for your car brand.
If this is not possible, then analogues with similar properties will do.
Motor heat-resistant repair compound GOETZE (gray) made in Germany, Liqui Moli, Hi Gear and anaerobic Loctite have proven themselves to be quite good. The main advantages of these sealing pastes are:
- high adhesion strength;
- heat resistance (from -55 °C to +230 °C);
- fast curing;
- application using an auto-dispenser;
- no finishing of parts required; permissible surface roughness 8–40 µm (Ra).
The price of these products for the oil pan is 750–900 rubles.
Elring and REINZ (Germany) for the engine cost 350–500 rubles. They are not inferior in many respects to the previous ones. The only difference is that it takes longer to cure.
- High seam strength.
- Immunity to chemicals.
- Operating temperature range from -50 to + 200 ⁰С.
- Resistant to sudden temperature changes.
Abro sealant 5 years ago was a favorite among auto mechanics. Has high quality indicators. But over the past 3-4 years, many fakes have appeared. Therefore, buying Abro can be compared to a lottery. Its cost is 150–250 rubles.
Deformation welding - technology features
Using this technology, aluminum parts are joined at room temperature, hence the name “cold welding.” In order to obtain a permanent connection, the workpieces are subjected to significant plastic deformation, as a result of which the oxide film on the aluminum surface is destroyed. In addition, the strong compression of aluminum parts against each other during the cold welding process helps to create intermolecular bonds between their crystal lattices.
An important condition for the formation of a reliable connection obtained using cold welding technology is thorough cleaning of the surfaces of the workpieces and their degreasing. The pressure that acts on the aluminum parts being connected can be static or with variable vibration.
Depending on the type of connection being formed, the following types of cold welding are distinguished:
Butt method
When using this cold welding method, aluminum parts are connected by their end parts, which are first thoroughly cleaned and degreased. In order to make a connection using this method, the workpieces are fixed in special jaws with a small release of the end parts, which will be subject to compression. After the parts are securely fixed, axial pressure is applied to the clamping jaws, which compresses the end parts of the workpieces being connected, which is accompanied by the formation of a reliable permanent connection.
Scheme of butt cold deformation welding
This cold welding method, despite its simplicity, has a number of significant disadvantages and limitations in application.
- The dimensions of the clamping devices used to perform such welding limit the length of the joint formed.
- When aluminum parts are compressed, not only the ends being connected are subjected to plastic deformation, but also the part that is clamped in the jaws.
- After obtaining a permanent connection, the workpieces are quite difficult to remove from the clamping jaws.
Point technology
This technology, which involves overlapping aluminum parts, is the most common method of cold welding of this metal. The workpieces to be joined are compressed at individual welding points, for which a special punch is used. According to this technology, parts are predominantly connected by several welding points located at a certain interval relative to each other.
Cold spot welding diagram
The quality of cold welding performed using spot technology directly depends on the degree of deformation of aluminum in the area of the weld spot. In numerical terms, this parameter characterizes the relationship between the thickness of the parts being connected and the depth to which the punch is pressed into the metal. There are standards according to which this parameter for aluminum should be 60–70%, and for alloys based on this metal – 75–90%.
Cold spot welding, which can be used to join fairly large sheets of aluminum and alloys based on this metal, has a number of advantages.
- The parts to be connected do not require preliminary fixation in special clamping devices.
- Aluminum is deformed in very small local areas - weld points.
Suture method
When using this cold welding method, the junction of aluminum workpieces takes the form of a continuous seam, which is formed using rotating rollers or a punch with a ring-shaped working part.
Scheme of the seam cold welding method
Pre-cleaned and degreased aluminum parts that need to be joined using cold seam welding are placed between one movable and one fixed roller (single-sided welding), or between two movable rollers (double-sided welding). After squeezing the rollers and the metal underneath them to the required depth, the movable rollers begin to rotate, which leads to the movement of the joined workpieces and the formation of a continuous seam.
The process of resistance seam welding on an industrial machine
The use of this technology makes it possible to weld even very large aluminum sheets, but the presence of a continuous seam pressed into the metal seriously weakens the structure. It is for this reason that when it is necessary to cold-weld flat aluminum sheet structures, spot-seam technology is used.
It involves obtaining a connection using a rotating roller on which working protrusions are located that exert pressure on the metal being welded. The seam in this case does not look like a solid line, but like an intermittent chain of welded points, which very slightly weaken the structure.
How to restore integrity and how to seal the engine pan
Author: premierautos · Published 01/22/2010 · Updated 07/29/2018
- device and purpose of the oil pan
- A brief description of their common consequences and underbody failures
- How to restore the integrity of the bottom
The engine oil pan is a removable part located under the bottom of the engine. The pallet is made by stamping from soft elastic steel or casting from aluminum is used.
In shape, this detail resembles a small deep bath, the upper edge of which is made in the form of a plane for a tight fit to the lower part of the engine crankcase. There are special holes in the edge to connect the engine sump to the crankcase.
device and purpose of the oil pan
This part is the reservoir of engine oil and lubricant. The bottom of the engine crankcase performs the following important functions:
- Accumulation of motor oil flowing from engine elements.
- Protection of internal parts and assemblies from external aggressive actions.
- Collection of small abrasive iron shavings formed during the friction of parts.
- Oil cooling.
- Preventing lubricant from splashing.
Depending on the design of the engine, the sump has a shape that protects the engine from contact with the transmission, front gearbox, and suspension elements. In the manufacture of these oil pans for cars with forced power units, aluminum alloys are used.
The design of aluminum parts includes special ribs designed for accelerated oil cooling.
The oil intake tube does not touch the bottom of the bath, so that small iron waste is not sucked into the lubricant system. Accumulated chips are removed when the lower crankcase is removed.
Quite often, the bottom is equipped with magnets that serve to fix abrasive accumulations.
To replace the lubricant, the bottom is equipped with a special drain hole with a plug.
A brief description of their common consequences and underbody failures
reliability and simplicity of this detail prevents frequent breakdowns. But, when hitting obstacles in the form of stones, reinforcing wire, snags and large stumps, wide dents or holes may appear in the lower part of the engine crankcase.
Damage to the protective element leads to malfunctions of the power unit. If deep deformations of the pan plane occur, the oil receiver tube breaks or is located above the lubrication level.
With “oil starvation,” the connecting rod may break, damage the cylinder block, and jam the engine.
Violation of the tightness of the bottom of the engine crankcase occurs due to the formation of cracks, breakdowns, and through holes in the details. An apparent oil leak leads to serious damage to the power unit, the consequences of which can be unpredictable, especially if the defect is not detected in a timely manner.
In order not to break through the bottom while driving, many car owners install engine crankcase protection.
How to restore the integrity of the bottom
When a difficult situation arises, car owners need an answer to the question: the engine sump has broken, what should I do? The first reaction should be to turn off and stop the engine.
If the engine is not turned off, a rapid decrease in the engine oil level will occur, which will lead to oil starvation with subsequent important breakdowns of the elements of the power unit.
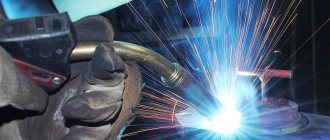
Repair of metal pallets is carried out by welding or gluing with a special sealant or cold welding. Aluminum parts are restored by welding in an argon environment.
How to seal an aluminum engine sump? In order to independently repair the underbody, eliminate oil leaks and repair cracks in the body without removing the part from the car, you need to perform the following operations:
- clean the surface from dirt using an iron brush;
- blot the leaking oil near the hole that appears;
- cut off a piece of cold welding and carefully knead it, like plasticine;
- remove any oil leaks again using a rag;
- apply the first layer of cold welding in the form of putty:
- After the applied layer has hardened, treat it with emery cloth;
- Apply a second layer of cold seal until the leaks are completely eliminated.
This description is given for emergency cases in order to quickly repair the engine oil pan for a short period of time.
To reliably eliminate the shortcomings of this unit, you need to contact a service center for qualified assistance. In a service station, the lubricant is completely drained, diagnostics are carried out, high-quality restoration and removal of the tightness of the part is carried out using welding operations with the installation of the bottom and subsequent checking for the previous place.
Repairing a hole in the engine oil pan without removal in 5 minutes.
Soldering engine oil pans
Repair of aluminum engine sump (crankcase)
Engine sump repair
The cost of work is from 80 Belarusian rubles.
We have a repair technology without removing the sump from the engine.
The engine oil pan is an oil collection reservoir located at the bottom of the engine. Its inconvenient location contributes to frequent mechanical damage due to accidents, careless parking, a car falling into a hatch, and so on. In these cases, it is necessary to immediately repair the engine sump, otherwise the engine will instantly fail.
Why shouldn't you hesitate to repair the engine crankcase?
Typically, the pallet is made of aluminum alloy. Manufacturers choose this material because of its low mass and high thermal conductivity. But at the same time, aluminum is more sensitive to impacts than, for example, steel. You don't even have to get into an accident. You can damage the pallet by running over a large sharp stone, curb or piece of rebar.
Even due to a small crack in the sump, oil will begin to leak out, and then the engine will definitely jam. This can happen instantly - just drive a few hundred meters. If you hear a blow or jolt while driving, proceed as follows:
• turn off the engine (under pressure, oil will begin to flow out quickly, which can lead to engine damage);
• turn on the hazard warning lights; • engage the parking brake; • check whether there is an oil puddle under the pan or whether it is deformed; • if there is no stain, but a dent is visible, crank the engine with the starter without starting it4 • if there are no extraneous sounds, go to a service station.
Engine crankcase repair is also necessary if signs of corrosion or rust appear. This can be identified during self-examination or preventive diagnostics at a service center.
Features of engine sump repair
Many people wonder what is more profitable - repairing the engine sump or replacing it. Of course, it is more rational to carry out repairs. You will spend a lot of time looking for a new component. In addition, you will have to raise the engine on a traverse and remove the subframe. But repairing the engine crankcase does not require this.
The only case when dismantling is necessary is if there is a crack in the threaded connection. In this case, the product is removed from the machine, cleaned of dirt, degreased and repaired by welding.
In other cases, dents are removed by straightening, and holes and cracks are removed using argon welding without dismantling.
Even if the pallet is broken into separate fragments, experienced specialists will restore it. To do this, all pieces of the product are folded along the fault lines like puzzles, and then welding is performed. If necessary, aluminum patches are made. Our specialists will repair pallets of any complexity, quickly and inexpensively.
The price of pallet repair is determined in each case individually and depends on the complexity of the work.
The engine oil pan is broken: what should the driver do?
It's no secret that the condition of roads in the CIS leaves much to be desired. We are talking about the asphalt surface itself, which has numerous deep potholes and holes, as well as open hatches, curbs, curbs with sharp edges, stones, protruding metal rods, etc.
Hundreds of motorists face such obstacles on the roads every day. In this case, as a rule, not only bumpers and decorative plastic elements in the lower part of the body are affected, but also the bottom of the car, as well as the engine. Next, we will talk about what can happen if the driver breaks the engine sump, what to do in such a situation and how to fix the problem.
Read in this article
Where does the name oil pan come from?
The sump is so called because it is located directly under the bottom of the engine. Many people call it that, but technically speaking, it correctly sounds like an oil pan. Not many people know what a crankcase is. A crankcase is a housing part, inside of which a mechanism is located. In the design of the car, the following types of crankcases are distinguished:
- engine;
- gearboxes;
- clutch;
- steering, etc.
The name karter appeared after an English engineer named Carter developed a protective casing for the drive chain of a motorcycle with an oil bath. This is where the name karter came from. On cars it can be wet - the engine, gearbox, and also dry - the clutch.
Crankcase sump - this phrase is not used by people, so drivers, mechanics and craftsmen simply say engine sump or crankcase. However, calling the pan a crankcase is not entirely correct, although when using such a phrase, this particular detail is implied. Another name for the pan is the crankcase cover.
How to avoid engine damage in the event of a sump failure
Let's start with the fact that the damage listed above threatens not only passenger cars, but also vehicles with increased ground clearance (city crossovers and SUVs).
At the same time, one of the most serious problems, along with dented sills or various problems with the chassis, can be considered a situation when, for one reason or another, the engine sump was broken.
First of all, you need to take into account that it is strictly prohibited to continue driving a car with a broken pan. The fact is that the pan itself on most cars is a kind of reservoir for engine oil (an exception is a dry sump system).
From the sump, the oil pump of the lubrication system constantly takes in lubricant, after which it supplies engine oil under pressure to the loaded rubbing elements and components inside the power unit.
It is quite obvious that the engine oil will simply leak out even through a minor crack in the sump, and without the proper amount of lubrication, the oil pressure will drop, oil starvation will begin, as a result of which the engine will be subject to severe wear. If the leak is strong, then the power unit can completely jam in just a few minutes.
In view of the above, the following recommendations must be adhered to:
- If, while driving, there was a collision with any obstacle or the driver felt an impact in the area of the front axle of the car, then the load should be removed from the internal combustion engine as quickly as possible (release the gas, reduce the speed, lower the engine speed to the minimum, stop car and turn off the engine).
- Then you should open the hood and carefully inspect the car engine from above and below. When inspecting the upper part, you should check the integrity of the engine mounts and their fastenings, inspect the internal combustion engine for fresh leaks at the gasket locations, etc. As for the lower part, it is highly advisable to find the place where the blow directly fell.
Oil pan repair: what you need to know
To begin with, many owners try to repair the hole themselves. Some also try to solve the problem on the spot so that they can get to the service station under their own power. For these purposes (depending on the degree of damage), sealants, liquid welding, conventional welding, metal rivets or even wooden plugs can be used.
In this case, you can try to use some suitable external sealant (do not pour “stop-leak” compounds directly into the engine oil), then you should add oil almost to the maximum on the dipstick and drive the car under your own power.
While driving, you should avoid even medium loads on the internal combustion engine and increasing the crankshaft speed by more than 25% of the total available number on the tachometer (the higher the speed, the greater the pressure in the lubrication system, which increases the likelihood of an existing leak becoming worse).
At the same time, during such a ride, you need to carefully monitor the oil pressure light, and also make stops at short intervals, check the oil level in the engine and re-inspect the damaged area of the sump. It should also be understood that this method of delivering a car to a service station under its own power involves traveling only over relatively short distances.
After the car has been delivered to the service, you can immediately replace the part, but you should prepare for certain financial expenses. Moreover, on some engines, the cost of the pan itself and the price of services for replacing it can be quite high, since replacing a part will require a fairly large amount of complex work.
It is for this reason that many take a different route and prefer to repair the oil pan using one of the available methods offered by specialists. Each method is selected individually, depending on the material from which the oil pan itself is made (steel or aluminum). The extent and nature of the damage, the risk of further enlargement of cracks, etc. are also taken into account.
It is quite obvious that one of the most reliable and proven methods is to weld the oil pan. In this case, the pan must be removed from the engine, since welding without removal directly on the internal combustion engine is strictly prohibited. The fact is that high temperatures can damage other elements and parts inside the unit.
Repairing small cracks in shower tray
Repair kit for cracked shower tray These appear most often. To repair a small crack in a shower tray, you need to do the following:
- Use a sharp knife to clear the edges of the crack . The acrylic is scraped off until the darkened part is removed.
A small crack that does not require removal of the pallet
- Vacuum the surface to get rid of any dust. Then you need to wipe the edges with ethyl alcohol.
- Wear rubber gloves, safety glasses and a respirator . Prepare the acrylic composition in accordance with the attached instructions. This must be done immediately before application, otherwise it will dry out quickly.
- Apply the compound in several layers depending on the depth of the crack. Its level should be slightly higher than the surrounding surface of the pallet. Then wait until it dries completely.
- Level the surface with sandpaper, first coarse grit, and then fine.
Video on using a repair kit for cracks in an acrylic tray: Upon completion of all work, the area to be repaired must be polished. To do this, you can either use a special product, or prepare the mixture yourself by mixing tooth powder and toothpaste. Polishing brings the surface to a perfectly smooth state.
Let's sum it up
As you can see, damage to the oil pan is a serious problem. Repairing such a breakdown also has certain difficulties and can be very expensive. For this reason, it is strongly recommended to immediately install additional engine crankcase protection.
At the same time, standard solutions that can be installed on a car are made of plastic and provide more protection from dirt and moisture than from impacts. This means that engine protection must be purchased separately, giving preference to the most durable metal products.
Let us also add that when choosing engine protection, you must also take into account that the engine compartment becomes more sealed and closed from outside air. This can cause problems with cooling the power unit, especially when the car sits for a long time in traffic jams with the engine running.
For this reason, it is advisable to buy only certified products that are specifically designed by the manufacturer for a specific car and its features (attachment points, oil drain hole, etc.), and not more affordable universal solutions.
In simple words, even a steel protection sheet can bend or break through from a serious blow (for example, from reinforcement). This means that if there is a collision with an obstacle, while protection is in place, the engine still needs to be immediately turned off and inspected. Only a timely detected problem allows you to avoid engine overheating, oil starvation or seizure as a result of oil leakage.
What should be understood by the definition of “knocked engine”. Why does the engine start knocking? In what cases does a knocking sound in the engine indicate a breakdown of the internal combustion engine.
Why the engine jams and the main symptoms of this malfunction. How to prevent the motor from jamming, what to pay attention to.
How to independently determine that the cylinder head gasket has burned out. Recommendations for pulling the cylinder head after replacement. Which gasket is better to choose?
The most common causes of engine knocking are: piston knock, connecting rod knock, crankshaft knock. What to do if the engine suddenly starts knocking while driving.
Basic methods for repairing a cracked engine block. Crack detection, repair by welding, riveting or applying an epoxy layer.
The appearance of knocking noises in different diesel operating modes. Fault diagnosis. The nature of the knocks of the crank mechanism, timing gear, and fuel equipment.
Design and purpose
The engine oil pan is a metal structure usually made of aluminum, but in older cars it could be made of steel. The shape of the oil pan resembles an elongated rectangular basin; it is attached to the cylinder block from the bottom side through a gasket on studs or bolts. There is a plug on the bottom or side surface designed to drain oil from the engine.
The pan is designed, firstly, to protect the oil receiver, crankshaft, and other parts of the engine crankcase from mechanical damage, dirt and dust. Secondly, it serves as a container for motor oil. It is from this that the oil pump delivers it upward through a filter - to the cylinder head, from where, having lubricated the parts of the gas distribution mechanism and connecting rod-piston group, it flows back.
Where is the oil pan located and what does it look like?
In passenger cars, this element is located under the engine. The part is attached to the cylinder block from the bottom side. Bolts or studs with a gasket are used as fasteners. There is a type of fastening where sealant is poured instead of a gasket. For Japanese engines, the part is usually bolted without seals and the joint is additionally filled with sealant.
External view of the oil pan
A pallet is a rectangular container, most often with ribs. These ribs give the structure rigidity; they are necessary if the structure is part of the hull. Usually in old cars the container is made of steel, in new and foreign cars it is made of aluminum, often black. For some foreign cars, models made of high-temperature plastic are produced.
There is a plug located at the bottom or side of the pan through which oil is drained from the engine. To prevent oil from freezing at subzero temperatures, a heater is often installed that heats the liquid. If necessary, the ten can be quickly dismantled.
Drain plug on the oil pan
While the engine is running, the oil from the sump is filtered and then rises to the cylinder head. When all elements of the internal mechanism are lubricated, the remaining oil returns inside the container. The reservoir is intended not only for storing lubricant. This element protects the crankshaft and other engine parts from mechanical damage. It prevents the ingress of road dust and soil, and serves as a container for chips formed as a result of friction of metal elements.
When to remove the engine sump
Usually the part is dismantled in case of breakdowns or severe corrosion. It happens that there is no damage on the pallet, but it leaks. The cause may be the sealing gasket; it is damaged in the following cases:
- Deformation of the seal due to temperature changes.
- Mechanical damage due to impact with the road surface.
- Increased pressure in the crankcase, which ruptured the seal.
- Damage due to exposure to caustic chemicals.
Oil pan gasket for Mitsubishi
It is not difficult to identify a gasket-related problem. In this case, oil streaks remain on the pallet or under the car. The oil level drops sharply, and the pressure in the oil system drops noticeably.
Possible faults
Malfunctions of this part do happen, and it is dangerous to ignore them, since loss of oil threatens serious and expensive repairs of the internal combustion engine. They can be easily diagnosed by oil leaks - a characteristic small puddle that remains on the asphalt after an overnight stay and a wet sump. The causes of leaks may be:
- loose oil pan bolt;
- gasket wear;
- loose drain plug;
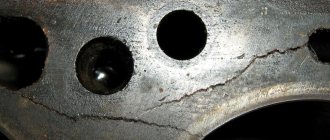
- cracks in the metal.
Cracks in metal are a much more serious problem than a poorly tightened bolt. They can appear as a result of impacts with large stones, curbs, etc. Even if protection is installed under the crankcase, it can crack due to non-compliance with the bolt tightening torques recommended by the manufacturer. A crack can also occur if the drain plug is overtightened after an oil change or repair. It has a slightly conical shape, is made of a harder metal, and can tear the pan. Such a crack is difficult to see, and some service workers, trying to eliminate the leak near the plug, tighten it even more, which subsequently aggravates the situation.
Engine sump: repair
You can often repair or restore the engine oil pan yourself.
When a leak occurs in the area of the gasket between the crater pan and the cylinder block, first of all it is worth checking the tightness of the mounting bolts/nuts. It is necessary to tighten the bolts according to the tightening torques recommended by the manufacturer, otherwise you can strip the threads or cause a crack to appear - then you will have to make more complex and expensive repairs, restoring the tightness of the engine crankcase.
If tightening the bolts does not eliminate the leak, the gasket must be replaced. In this case, you cannot do without removing the pallet. This is not difficult to do from a viewing hole, on an overpass or a lift. We will look at how to remove and install the engine sump yourself below.
The most easily corrected malfunction can be considered a poorly tightened drain plug; they could simply have forgotten to tighten it well after the next maintenance. It is tightened using the appropriate key, by hand, without using additional levers or pipes.
But if you have diagnosed a crack in the oil pan in your car, then the best way to repair it is to completely replace it. However, there are situations when a car of a rare model or a new part is quite expensive, there are several ways to restore its integrity. For example, using glue, dry welding or argon welding.
How to replace the oil pan gasket
Any driver knows that the reliable operation of a car often depends on the little things. The oil pan gasket seems to be a small thing, but the operation of the entire engine as a whole also depends on it.
The gasket is replaced when changing the oil so as not to drain it twice. But, if the leak is detected earlier, the gasket will have to be replaced unscheduled. You cannot delay this, as a damaged gasket will lead to loss of oil and, accordingly, to unexpected expenses. At best, this will be a constant top-up of engine oil; at worst, it will be a major overhaul of the entire engine.
How to remove and install the oil pan yourself
This is not a complicated procedure, and most car enthusiasts can do it, although it does require some repair skills and tools. Depending on the brand of the car, nuances are possible. For example, in VAZ cars of the classic family, with a longitudinal engine, you need to lift the engine. Therefore, before you start disassembling it yourself, read the repair manual for your car.
Procedure for removing the oil pan:
- Prepare a clean container - it can be a canister with a wide neck or a cut one. Its volume must correspond to the amount of oil in the engine of your car;
- Drive onto an inspection hole or overpass; it will be more convenient for you if it is deep enough so that you can stand under the car at full height;
- Warm up the engine to a temperature of 50-60 degrees, the engine oil will become thinner and more fluid;
- If the engine compartment protection is installed, remove it; it is usually secured with 3-4 bolts;
- Carefully unscrew the drain plug, placing a previously prepared container under it, be careful - the oil will definitely flow onto your hands and possibly somewhere else;
- Unscrew the oil filler plug. After unscrewing the filler plug, the flow of escaping oil will increase sharply, make sure that it flows into the canister and losses are minimal;
- Wait until all the oil has drained and begin unscrewing the fastening bolts/nuts;
- If all the bolts are unscrewed and the oil pan cannot be removed by hand, this means that the parts have been glued together. You need to tap it with a rubber hammer, carefully pry it with a screwdriver or other flat object, but so as not to damage the joints. Scratches may cause leaks in the future.
Now that the pan has been removed, you can carry out repairs and also see the crankcase structure.
Installation is carried out in reverse order. The drain plug must be screwed into the pan immediately, and oil must be poured through the filler hole last. It is recommended to combine pan repair with an oil change. It is important to ensure that the bolts and plug are properly tightened, as already mentioned.
It is the gasket that ensures a tight connection between engine parts. When purchasing, be sure to match the article number. It is not possible to repair a worn gasket. It is recommended to replace it after each removal of the oil pan during installation. In this case, you need to carefully and very carefully clean the surfaces that will be in contact from the remnants of the old gasket and sealant.
To improve the properties of the gasket, you can use graphite lubricant, a special sealant for the engine crankcase, or any heat-resistant silicone-based sealant.
Graphite lubricant is applied to both sides of the gasket in a thin layer; after assembly, it fills micro-cavities, and hardens under high temperatures.
It is preferable to use a special sealant; it is applied in a thin, uniform layer over the entire contact area, on the pan and on the cylinder block. After assembly, the sealant will dry and, as it were, glue the surfaces, ensuring a tight fit and sealing.
Some craftsmen use sealant instead of a gasket, in which case its layer should be thicker, but it is better to leave this method in case the car is so rare that it is difficult to find the right gasket for it.
homiak01 Apr 21, 2022
I took Dow Corning 7091 (11RTV70919A). Is this sealant suitable for the oil pan? Or still look for another one. Thank you.
From information found on the Internet:
Many world-famous manufacturers have long opted for polymer compounds for sealing elements of a car’s lubrication system, pushing the once traditional gaskets a step back.
In terms of their performance properties, liquid sealants are far ahead of classic gaskets. They harden easily if certain conditions are met, determined by the chemical formula of the product.
Engine sump sealants began to be produced not so long ago, but have already successfully conquered their niche, proving in practice their beneficial properties and effectiveness of use. The main purpose of such technical fluids is not only to replace failed gasket sets, but to prevent oil leakage through the valve cover of the oil pan housing.
Today, the market for automotive consumables and related materials offers a fairly large selection of sealants. They may differ from each other in color, temperature, constituent chemical elements, degree of elasticity, level of resistance and many other performance characteristics. Basic qualifications divide sealants into three main types.
Silicone
The most popular, both among professional craftsmen and novice car enthusiasts. It is very convenient to work with, as it contains natural ingredients. They quickly take on a solid form upon contact with moisture present in the air.
About ten minutes is enough for the required volume of liquid to accumulate. This time is enough to secure the necessary elements. But if you are working with large parts, then you should be more careful when working, because the liquid sealant can harden even before the two units are fixed.
If this does happen, it is recommended to remove any remaining hardened sealant from the surface before attempting to connect the parts a second time.
The main advantages of silicone-based sealant are:
- indicator of the maximum thickness of the gap that is planned to be filled with a sealed compound - up to 6 mm;
- withstands fairly high pressure, which is very important for modern power structures;
- the formation of an elastic seam with long-term performance characteristics, which means that oil will not flow through the cylinder head (cylinder head), crankcase gap and/or engine sections for a long period
When using silicone sealant, you must remember that it works effectively only on surfaces that have been previously cleaned of dirt and oil.
Anaerobic
It is more modern than the previous tool. While silicone-based sealants require moisture to harden, anaerobic sealants require the absence of oxygen. To fasten two parts, it is necessary to apply the composition to a previously cleaned surface. Then connect the surfaces as tightly as possible, thereby stopping the access of air so that the sealant begins to harden.
When working, extreme care is required, because if even a small gap is not eliminated in any place, thereby not closing the oxygen flow, the anaerobic sealant will remain in liquid form.
Despite the fact that only the absence of oxygen is necessary for the sealant to harden, you should not delay working with it. If the composition is applied in advance to the surfaces to be bonded, then dust or dirt may naturally get on them, which will significantly deteriorate the quality of fixation.
Therefore, it is recommended to apply liquid sealant immediately before gluing two surfaces. If everything is done efficiently, the resulting seam will have a high degree of elasticity, which is an undoubted advantage for further use.
However, anaerobic sealants also have a number of disadvantages. The main ones include:
- small thickness of the cavity, only 0.5 mm compared to 6 mm of silicone sealant;
- under conditions of high pressure, the composition may be disrupted;
- if the composition is applied unevenly, part of it may remain in its original liquid state
Heat resistant
When working with a car engine, it is more advisable to use sealants that have a high temperature index. They are able to withstand up to 375 0 C. In the case when it is planned to work with components and parts of the engine compartment, then it is possible to use a sealant with slightly low temperature indicators, for example, only 170 0 C.
When choosing a sealant from a particular manufacturer, it is recommended to carefully study the attached instructions. Some formulations are suitable for a certain make of car. To date, there are no serious problems in the availability of sealed compounds. You can buy them at a car store, service center, or order delivery from a catalog on various online resources that correspond to the topic.
You should give your preference to well-known brands that have been proven over the years. Of course, they are much more expensive than their Chinese counterpart. However, for the money spent you can be guaranteed to get a good quality sealant with high performance characteristics.
Cold welding
The cheapest way to repair a crack is by cold welding. It is no different in terms of reliability, because it is not brewing, but rather caulking/sealing. Cold welding, as a rule, consists of two components, which are mixed together, applied to the damaged area and allowed to harden. Before doing this, be sure to degrease and thoroughly clean the damaged area. In the case of a small crack, you can try to seal it without removing the pan. When choosing cold welding, pay attention to the temperature at which it retains its properties - it should be at least 200 degrees.
DIY shower cabin repair video
A cheap cabin must be carefully looked after so that restoration of both the cabin itself and its individual elements is not required. You need to keep the cabin tidy and clean at all times. Before installing the cabin, you first need to put a filter on the pipes so that the water enters the cabin already purified. Having done all this, you will be able to use the shower stall and enjoy it for a very long time.
Attention, TODAY only!
Add site to bookmarks
- Kinds
- Choice
- Installation
- Finishing
- Repair
- Installation
- Device
- Cleaning
Argon welding
Argon welding is the most effective way to remove damage. This type of welding can be used to weld both aluminum and any other non-ferrous metal alloys. A good welder can easily fix a crack or weld a small hole, and the seam will not affect the functionality in any way. The disadvantage of such repairs is the high price. You can, of course, save money if you remove the part yourself and contact welding specialists directly. But in the case of common brands of budget cars, it will cost less to replace the oil pan with a new one.
You can also use glue for repairs. There are many different types that allow you to seal metal, but epoxy remains wear-resistant, heat-resistant and water-resistant. It is based on resins, substances to accelerate curing, and other fillers. The application of epoxy adhesive is similar to dry welding, it is also two-component and comes in paste or liquid form.
What to do to make the crankcase last longer
The sump can be protected if high-quality engine sump protection is installed
Pay attention to what material it is made of
Steel is inexpensive, easy to repair and has good rigidity. But metal is susceptible to corrosion.
The aluminum part is considered more durable. The stainless steel body is not affected by moisture, is durable and retains its attractive appearance for a long time. Experts call plastic devices the best protection in terms of price-quality characteristics.
The crankcase protection acts as a barrier to physical impacts, dents and holes. Once you install it, you will forget about car repairs for a long time.