In this review, the author will share with us one of the working methods of how to transfer a design to metal.
For this we need a film photoresist.
Additionally, you will need to prepare a solution to develop the film. We will make the solution based on soda ash.
We also recommend reading: how to make an indelible design on a knife.
The author uses a piece of round metal pipe as a test sample.
Primer or bitumen varnish
Primer GF 021, XB 062 or bitumen varnish is used. First, the entire product to be etched is coated with the substance. Next, use a thin pen or marker to transfer the contours of the drawing. A needle should be made from thin wire or a rod of soft alloys, sharpening the end of the wire.
Etching using a primer
Those areas of the image that must be etched are scratched down to the metal. Care should be taken to ensure that the primer does not chip.
Coinage
This is one of the oldest methods of decorating metal, which craftsmen often combine with other technological processes. The embossing is attractive due to the volume of multi-level reliefs that create light and contrasting shadows in the composition. Blackening and patination give pieces a vintage look, while acids and dyes can produce interesting results for abstract images.
There is an alternative technique to embossing art - metal-plastic. Due to the accessibility and simplicity of the techniques, this type of decorative creativity can be mastered independently. During the Soviet period, even schoolchildren mastered it. Unlike coining, in which the metal is deformed by impact, metal-plastic is produced on very thin metal sheets by pressing with special tools. A metal painting created in this way will not only decorate your home, it will be unique.
Glossy paper
In addition to glossy paper (you can buy it at art supply stores, or you can simply cut a sheet out of a magazine), you will need a laser printer, an imaging application, and an iron. The image of the drawing should be mirrored and printed in full size. The image is applied to the surface and ironed several times. After the workpiece has cooled, the paper is washed off with warm water, and the toner remains on the surface of the part. The back and side surfaces that are not subject to etching must be protected with varnish or plasticine.
Glossy etching paper
The main advantage of the method is that the smallest details of the image can be accurately transferred.
The main disadvantage is that you can only work in this way with flat or cylindrical workpieces. The method is very popular in the manufacture of printed circuit boards.
Painting on metal
This type of art differs from printing in that the artist himself realizes his idea on the sheet, and each such painting becomes unique. Since metal surfaces without a primer have poor adhesion to most paints, each artist invents his own painting technique and selects the material by trial and error. The most common alloys for the base are aluminum and duralumin, since they are light and have good light reflection; brass is less often used. These sheet metals show through and shine through the paint, and with some finishing, their shine along with their reflective properties create the illusion of movement. Unfortunately, photos of metal paintings only remotely convey this effect. Among the dyes, craftsmen choose acrylic or automotive paints, less often oil paints; they also use patination, acid treatment, and other chemical methods.
Steel pickling
In addition to the artistic etching of metal, which allows one to obtain exquisite images on steel surfaces, steel etching is also used to remove scale and oxide films. In this case, you should especially carefully observe the requirements of the technological process in everything related to the concentration of etchant solutions and the time of exposure of the part in the mordant or in the electrolyte bath. Over-etching during such an operation is extremely undesirable.
When etching steel, both liquid and electrochemical methods are used. The mordant is prepared on the basis of strong acids, such as hydrochloric or sulfuric. Particular attention should be paid to thoroughly degreasing the surface. A missed oil or grease stain can render the workpiece unusable. To protect parts of the workpiece that are not subject to etching, I use varnishes based on rosin, turpentine, and tar.
These components are highly flammable, so you should be especially careful and careful when working with varnish. After etching is completed, the unetched areas of the workpiece are cleaned of the protective varnish with a solvent.
Nitric acid is very popular among home picklers. It is used as the only base for mordant, or in a mixture with tartar or salt. A metal etching solution based on a mixture of nitric and hydrochloric acid is very chemically reactive and should be handled with extreme care.
Nitric acid
For processing hard and special grades of steel, mixtures of nitric and acetic acid are used. The processing is carried out in two stages. First, a special preliminary mordant is prepared - glyphogen, which is a mixture of water, nitric acid and ethyl alcohol. The part is kept in it for several minutes. Next, the workpiece is washed with a solution of wine alcohol in distilled water and thoroughly dried. After this, the main etching is carried out.
For pickling cast iron, solutions of medium concentrations of sulfuric acid are used.
Based on their atomic weight and the physical and chemical properties of the substance determined by it, for each metal and alloy they select its own mordant that best affects it.
Pickling copper alloys
Both pure copper and copper alloys are etched using sulfuric, hydrochloric, phosphoric, and nitric acid. To increase the reaction rate, chromium or nitrogen compounds are added to solutions. At the first stage of etching, scale and oxide film are removed from the workpiece, then proceed to the actual etching of the metal. Be careful when etching copper at home.
Aluminum and alloys based on it stand out among other metals in that they are etched using alkaline rather than acidic solutions. For molybdenum, alkaline solutions based on sodium hydroxide and hydrogen peroxide are also used.
Titanium stands even more apart - at the first stage of preliminary etching, alkali is used, and at the main stage, acid is used. For titanium I use the strongest acids - hydrofluoric and concentrated sulfuric and nitric. Titanium blanks are etched to remove the surface layer of oxides immediately before electroplating.
To etch metals such as nickel or tungsten, an aqueous solution of hydrogen peroxide and formic acid is used.
A blank for a printed circuit board is a sheet of textolite, coated on one or both sides with a layer of copper foil. The purpose of etching printed circuit boards is to create conductive traces from copper foil in exact accordance with the drawing. The tracks are covered with a protective varnish, the rest of the foil is removed by etching.
At home he uses several methods:
- Ferric chloride. The reagent can be purchased at a chemical store or made independently. Iron filings should be dissolved in hydrochloric acid. Before use, the solution should be kept until the iron is completely dissolved and mixed thoroughly.
- Nitric acid.
- An aqueous solution of sulfuric acid mixed with tableted hydrogen peroxide.
- Copper sulfate with the addition of hot water and sodium chloride. This option is the safest, but also the longest. Throughout the entire process, the pickling temperature should be maintained at least 40°C, otherwise the pickling will take many hours.
- Electrolytic method. You should take a dielectric container (cuvettes are good for developing photographs), fill it with a solution of table salt, place a board and a piece of copper foil there, which will serve as a cathode.
After etching with the liquid method is completed, the board should be thoroughly washed with a soda solution to extinguish any remaining acid.
Stalegraphics
The new art direction was first demonstrated in 1984 by artists from Cape Town. Today, metal paintings made using the steelgraphy technique have gained great popularity not only in the design of residential and office interiors, but also for decorating the external walls of buildings, terraces, fences, and billboards. The contour, skilfully cut from sheet steel, reproduces the graphic design in detail against the background of a light wall. The impression of a three-dimensional composition is created as a result of the tonal contrast of the foreground and background with the penumbra between them.
Modern equipment - high-precision plasma cutters - allows you to make filigree cutting from a single steel sheet, practically not limited to geometric shapes. The role of a cutter is performed by a plasma jet, which can cope with any metal up to 200 mm thick. Therefore, despite the refined detailing, a painting made from a sheet of metal turns out to be very durable.
This type of decorative and applied art continues to develop, and artists find new, sometimes unconventional ideas to embody creative ideas. The pioneers of steelgraphy made paintings in black, where a light wall created a contrasting background on which the shadow was well defined. Now craftsmen use metals of different colors and combine several methods of processing the material.
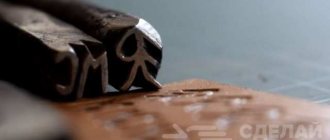
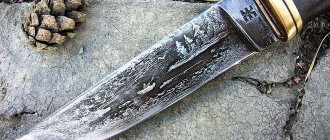
What will happen in the end: how high quality will the drawing be?
If everything was done correctly, the drawing will be no different from the one on paper. At the same time, the quality of the image does not depend on its complexity and the number of small details. If etching is not important, then you can leave the drawing as it turned out. Of course, such an image is not very resistant to aggressive cleaning agents and high temperatures, but in the absence of such factors it can last up to six months. I decided to leave this image of a tiger as a simple drawing.
Description of technologies
The rapid development of this craft has led to the fact that there are several different ways of applying an image to a metal surface. If initially only the hands of a master and simple improvised means were used to realize fantasies, today engraving machines and even lasers are used for this.
Manual
This type is often called artistic, since it is extremely difficult to engrave metal by hand. This is a labor-intensive and time-consuming process that requires the master to have special skills, knowledge and patience. To create the required design or inscription, only a cutting steel tool is used - a graver. This is a special cutter for drawing lines and points of various indentations, which are later turned into a picture. Such work is considered exclusive, and therefore is of particular value to people who want to get a unique thing of its kind or a creation by a famous master.
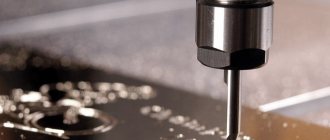
Mechanical
Mechanical engraving on metal is popular because it is particularly durable - it is almost impossible to remove or erase the design. It is realized with a sharply sharpened rotating cutter by cutting material that has an exclusively flat surface. The cutter is located inside the engraving machine, which allows you to obtain three-dimensional and relief designs. The result depends on the depth of penetration of the drill, the use of various cliches (taking into account the characteristics of the cutter) and the skill of the person. The main advantages of this type are:
- Guarantee of high accuracy and obtaining the desired result while achieving the desired realism.
- Long service life. The created drawings do not lose their original appearance even after several decades and under unfavorable external conditions.
- Ability to create three-dimensional images.
A subtype of the mechanical method is the diamond method, which has some differences. In it, the cutter performs striking movements on the surface, as a result of which a certain ornament is formed. After pressing the diamond needle, microscopic dots are formed, due to which the resulting product receives a specific shine. A diamond cutter can cope with even complex tasks, but a perfectly flat surface is a prerequisite.
Sandblasting
This type has another name - abrasive processing. Engraved inscriptions or other images on metal are applied by etching the top layer of the product with sand or other abrasive powdery substances. They are sprayed with a powerful air flow, resulting in a matting effect. The use of special stencils allows you to obtain not only patterns, drawings or inscriptions, but even photographs.
This type of image application requires sandblasting systems, a mask and an air compressor. Most professionals prefer medium-sized closed units because they filter dust. Also, implementing this technology will require a lot of free space, since engraving on metal using the sandblasting method is only possible with an air compressor, which takes up a lot of space and makes a lot of noise.
Laser sublimation
This type involves the use of a color printer, special cartridges, sublimation paper and a heat press for coloring metal materials. To get the desired image, first of all, you need to print it. The resulting transfer is placed on top of the product, after which the latter is exposed to high temperatures, which promote coloring and the transition of substances from a solid to a gaseous state.
Deep laser engraving on metal is characterized by productivity and practicality, which is especially important for business, for example, for souvenirs when applying photographs. It simultaneously combines high speed, mass production, accuracy, low cost and excellent quality. This technique involves the use of a focused laser beam. It allows you to adjust the laser power, which gives the image a different tonality and relief. In addition, the resulting pattern is preserved for many years and does not deform under the influence of water or moisture.
Different laser powers for metal engraving allow you to create sophisticated and complex patterns that have the required depth. Laser engraving involves removing the outer layer of the metal surface, which is important to consider during the work process. Laser contour engraving stands out separately, implying the drawing of exclusively contours. In most cases, this technique is used for processing coins, awards and other souvenirs. The main advantages of the laser are:
- Ability to work on finished products.
- Unlimited number of processed copies.
- Low price of service and excellent quality.
- There is no need to install supports and foundations.
- The ability to apply sketches even to hard-to-reach parts of the product.
- High precision, thanks to which the products are distinguished by realism and excellent reproduction of even small patterns.
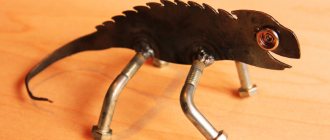
Collage and decoupage
If you collect all the unnecessary small metal parts in your house, you can use them to make an interesting painting in the steampunk style. Elements in decoupage are glued to a base, which is not necessarily a sheet of metal. It can be an abstract or narrative composition, which is easy to create thanks to the wide selection of modern adhesives, various primers, putties, and aerosol paints. Ideas for works and techniques for performing metal decoupage works are presented on the Internet. For example, the paintings of Lithuanian artist Arturas Tamasauskas will serve as an excellent source of inspiration. Since each work contains a different set of details, the paintings become unique. Well-thought-out author's works will be an excellent gift and an extraordinary interior decoration.
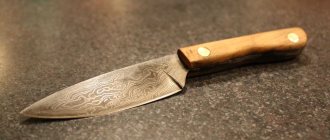
We begin to apply a pattern to the steel blade of a kitchen knife
First you need to find a drawing on the Internet that can be placed on the blade. In any graphic editor, it should be reduced to such a size that it fits on the blade and printed. Use scissors to cut out the image.
Next, a small amount of alcohol is poured into the saucer, sufficient for the printed image to be completely immersed in it. The drawing should lie in the alcohol until the paper is saturated. This will be noticeable in the image that appears on the back of the sheet. Don’t be afraid to keep it in alcohol - nothing bad will happen to the drawing, even if it sits in a saucer for a day, it won’t flow or blur.
The drawing must be thoroughly soaked in alcohol before transferring it to the blade.
Using an iron: this requires caution
The part of the blade to which you plan to transfer the image must be poured generously with alcohol. After this, carefully take the piece of paper with the image and place it on the knife blade with the printed pattern facing down. At this time, you can still correct it without fear of smearing it. What you should take into account here is that once you start working with the heating device, you won’t be able to correct anything.
We place the drawing in the right place on the blade, correct its position
When the pattern is laid out as needed, we begin to warm it up with an iron turned on at maximum temperature. When performing this work, you should be extremely careful not to move the sheet. The fact is that even slightly heated paper, if you move it, will smear the image, ruining it.
Warming up is carried out for 3-4 minutes until the sheet is completely dry. In this case, it is better to overdo it, warming up the blade longer than to stop working with the iron when the paper is still half-raw.
Heat the drawing with an iron until the alcohol dries completely
Cooling the blade and removing unnecessary paper
When the alcohol has completely evaporated and the blade has warmed up, it is necessary to cool it as quickly as possible. It was for this purpose that I had a basin of water, which was cooled with ice. The knife blade is lowered into ice water for 20-30 seconds. It is necessary to monitor the paper, waiting until it is completely saturated, now with ordinary water. After this has happened, we begin to slowly move our finger along it. The paper rolls and peels off.
In this case, there is no need to rush - there is a high probability that the blade has not cooled completely and the design will be damaged.
The blade is cooled in ice water, after which the paper is carefully removed from it
Bent wire paintings
Funny designs can be made from ordinary soft wire. Since 1997, the American artist CW Roelle, while still a student, laid the foundation for this type of fine art. He creates metal paintings from wire based on his own drawings. Sometimes these are simple plots, but there are also intricate, very dense illustrations that require several weeks to complete.
You can make such works yourself, for which tin wire is best suited, which is pinned together in certain places with a soldering iron. The finished product is coated with black acrylic paint and fixed on a light base. The process of making a painting from bent wire is very exciting. Gradually you can move from simple to more complex drawings, which will become real works of authorship.