How to make an impact stamp with your own hands
Making a striking stamp for blacksmithing is not difficult, the main thing is to approach this issue competently. As a workpiece, you need to use a round or square rod made of tool steel (for example, 9ХС, ХВГ, etc.).
Using homemade impact stamps, you can apply different patterns, letters and ornaments not only to the surface of metal, but also to leather products. Typically, electrochemical etching or CNC mechanical engraving is used to transfer the pattern to the impact stamp.
However, in this case, we will consider the manual method - using metal files. At first glance, this procedure may seem complicated and time-consuming, but, as the saying goes: “You can’t catch a fish out of a pond without labor.”
The process of making an impact stamp
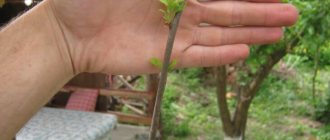
We clamp the workpiece that will be used to make the impact stamp in a vice and process it with a file, giving it the correct square shape. Then we mark the silhouette of the letters on thick paper, glue the stencil to the working surface of the stamp and “cut through” it with a file.
Transferring with film for decoupage
This method uses a board surface prepared with sandpaper, onto which white acrylic paint is applied. The paint is first slightly diluted with water, after which one layer is applied to the surface of the board in the longitudinal direction, and later a second layer in the transverse direction. After this, the paint is allowed to dry.
At the same time, decoupage film is used, on which a photograph or the desired image is printed. First, it is moistened in water at room temperature for about half a minute. After this, it is placed on the surface of the board, and then the base is removed.
By treating the film with a sponge, excess moisture is removed from it so as not to rub the pattern. After it dries, you can use a marker to correct image defects. The board takes on its final appearance after it is coated with varnish.
After creating a design on wood, it can be placed in any room of the house or used as a decorative element, multiplying it several times.
Some masters have turned this simple activity into a good business. But first of all, the main task of such a transfer is a beautiful drawing on wood, the creation of a beautiful object, gift or decor that will bring pleasure to its owner.
Examples of decals
You can find ready-made transfers on sale. They are also called applications, thermal transfers or thermal stickers. This is a color image glued face down to paper. The reverse side is impregnated with adhesive.
Transferring a design from a template to fabric is very simple. You need to attach the picture face down (paper side up) to the fabric and run a hot iron on top. It is advisable to set the temperature to maximum.
Advantages and disadvantages
the result is a colorful picture; You can use the applique as a patch.
synthetic thin materials may not withstand high temperatures; After washing, the picture may come off.
The transfer of drawing to matter is carried out in different ways. The easiest way is to transfer the outline of the image. To do this you will need a regular pencil and carbon paper. A drawing in color can also be depicted on matter. However, in this case you will need special paper (freezer or thermal paper).
How to transfer a drawing from paper to glass
To work, take an image with good contours and a roll of cling film. To transfer, you need to purchase a felt-tip pen - a marker for glass; it fits well and is easily washed off the surface.
Instructions:
We take the film. Its size should be slightly larger than the drawing itself. The film is attached to the surface, which prevents the picture from getting lost. The image is placed on film and outlined thinly and very carefully. Now the film is carefully transferred with the front side to the previously prepared surface. Preparation consists of degreasing its front side. Make sure that the film is completely adhered to the glass and get rid of wrinkles and bubbles. For a clearer transfer, we trace the image again along the contour with any sharp object. It's time to get rid of the polyethylene. We do this very carefully so as not to smudge the drawing. If there are inaccuracies somewhere, now is the time to correct them. Now we draw the outline
This can be done using acrylic paints and a brush. After everything has dried, carefully remove traces of the marker using cotton swabs dipped in liquid. Inside, the image is filled in any way. If the technique is stained glass, then everything is poured along the contour. After drying, for a longer service life of the product, the image can be baked or varnished
It all depends on where this item will be used.
Powdering
You can transfer the design onto the material in an original way, using tooth powder, crushed chalk or activated carbon, and also blue. First they make a matrix. It can be used several times. This is a blank in which the design along the contour is pierced with a sharp object (a needle). There are many holes on the surface of the matrix. The more there are, the higher the image accuracy. All holes are sprinkled with powder. The matrix is first attached to the material. For white surfaces, choose a dark powder; for black surfaces, on the contrary, light powder.
Advantages and disadvantages
minimal costs; clear contours.
a pattern is obtained on the fabric in one color; labor intensity of the process.
Stamp for burning on a soldering iron (for making an impression on wood, leather)
What cliche size should I choose?
The size of the cliche is determined primarily by needs. Needs should be divided into strictly regulated (GOST, technical specifications, drawing) and relatively free, i.e. allowing options.
In the first case, everything is adjusted to the regulations. Secondly, it will be useful to know that the larger the area of the cliche, the greater the vulnerability from unevenness of the working surface. Not everything that looks smooth actually is. We guarantee an absolutely flat surface of the cliche relief. A hard, uneven surface (wood, plastic) makes it difficult to make a high-quality impression. In such cases, the less cliché, the less this vulnerability. Consider the feasibility of making a large cliché. Choose smaller clichés if possible.
Which heater should I choose?
The speed at which the cliche is heated to operating temperature depends on the power of the heater. The larger the cliche area in the size range for a specific heater, the longer the cliche takes to heat up. The more powerful the heater, the faster it will heat the cliche.
We have selected a set of stamps and offer a heater designed so that it heats the largest cliche in its size range in no more than 30 minutes at room temperature without drafts.
In the order form you will be offered the opportunity to install a more powerful heater or two heaters per cliche.
When ordering a brand for burning, consider the following rules:
1. The larger the area, the more difficult it is to make a high-quality print.
2. The larger the cliche, the more powerful the heater should be.
3. The engraving depth must be selected depending on the degree of surface roughness. The standard relief depth is 2 mm. This depth was suitable in all cases known to us. We can go deeper, but this is not always advisable.
4. On black leather, the imprint will be almost invisible.
Transfer using decoupage film
Decoupage is becoming a very popular hobby, so many people know how to handle film from it. After printing the desired image on it, also prepare white acrylic paint.
It is necessary to perfectly clean the wood and also give it a smooth surface. Next, we apply pre-slightly diluted paint in two layers. Moreover, the application directions must be perpendicular to each other.
The paint must be allowed to dry. Once this has happened, the dampened decoupage paper (about 30 seconds soaking in room temperature water) is placed on the surface, removing the base and rubbing with a sponge to ensure a tight seal. After waiting for it to dry, you can treat the surface with varnish.
Very simple and quick transfer of drawings to any surface
This invention will eliminate the need for blue carbon paper forever! Now there is a completely new way to copy drawings that will no longer be erased by accidental contact with your elbow! In addition, you can also transfer color drawings and photographs; the quality of the transfer can even compete with printed products!
The methods described below will make it possible to qualitatively and permanently transfer drawings and photographs onto leather, rubber, plastic, ceramics, metal, wood, paper and film.
Chemical transfer
For chemical transfer you will need 646 or 647 solvent of the old (2004) sample with a high content of toluene (50%). where toluene plays a major role. But it is not recommended to use toluene in its pure form, as it is harmful if inhaled! Acetone ethyl acetate is also suitable, but much worse: butyl acetate xylene.
For transfer, take a high-quality (the amount of ink is checked for transmission) color or black and white photocopy or a printout from a laser printer; the copy must be printed on regular office paper (required!). When transferring a design, take a photocopy in one hand, and with the other hand, moisten this photocopy with a solvent on the back side, where there is no design, and only after that press it to the desired surface, using a brush with artificial fibers or a spray. The process itself should take no more than 30 seconds.
The easiest and fastest way to transfer drawings
To transfer (fresh) color magazines such as Natalie, Kull, Bravo, rest or silk-screen types of printing, as well as photocopies, you can use another method of transfer, moisten the very surface of the object and press a dry photocopy or magazine to it; before interrupting the drawing, it is advisable to make on the computer in mirror image. If there is no computer, then the photocopy is first transferred to a blank, unnecessary sheet of paper, and then transferred from it to where it is required. There is another way to get a DSLR. The photocopy is greased with vegetable oil. This is how TRANSPARENT PAPER is made!I! The excess oil is wiped off and the drawing is quickly photocopied on the other side.
However, there is also a non-mirror transfer method; for this, adhesive tape is placed on top of the photocopy on the drawing itself, and the other (back) side is generously moistened with solvent for at least 10 seconds, then the adhesive tape is carefully removed from the paper still wet from the solvent (the drawing is transferred to it) and pressed against the required surface. Then the tape is removed from the surface and a high-quality copy of the design is already visible on it! It will be interesting to know that the transferred drawing is no longer washed off, is not erased and is acid-resistant! By the way, black and white photocopies are interrupted from 2 to 4 times, and color photocopies and magazines only once. 646 solvent peels off tape and delaminated lamination! To do this, moisten the paper under the tape or lamination with a solvent.
Instructions
This method requires compliance with the following rules:
- The pattern is very tightly attached to the product. You can use a soap solution for this.
- Many craftsmen use a canter for this work. With it, the image turns out to be very accurate - almost jewelry work, which, however, takes a lot of time and requires some preliminary training.
- The instrument is taken with three fingers, resting on the ring finger, which serves as a kind of spring. The emboss is located 2-3 mm from the design, its light strokes form a dotted line - the main outline of the image is drawn. The smaller the detail of the picture, the more densely it breaks through.
- When all the lines have been transferred, you can wash off the paint.
- The image can be varnished.
Now you know how to transfer a design from paper to paper, to leather, to glass, to wood and to metal. Go ahead - get your tools, and good luck in your endeavors!
Review of the best samples
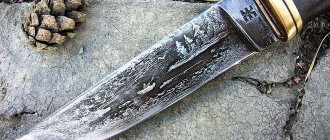
This sample is a classic tired saber, the blade of which is made of 65G spring steel. Due to the low level of chromium content, it is susceptible to corrosion. The blade is hardened by 20-24 units. according to Rockwell, which classifies the saber as a souvenir weapon, as a result of which it is allowed to be freely purchased. Of course, it is not recommended to chop anything with it; such actions can lead to damage to the blade.
The main difference of this model is the presence of a protective bow on the hilt, which protects the cavalryman’s hand from injury in battle. Similar checkers were in service with privates and non-commissioned officers, which led to minimalism in the design of the sheath device.
Cossack saber: history, traditions and modernity
It is believed that the history of the origin of the original Cossack checker dates back to the 7th-8th centuries. At first, it was in demand among the Kazakh people and had the name “sashkho”, which translated from the language of the Abkhaz-Adyghe group means “huge knife”.
For quite some time, the Cossack saber was not in great demand among soldiers. Everything changed when, after a certain number of years, inconvenient armor and sophisticated fencing began to be replaced as methods of self-defense. They were replaced by musket fire and a simple, cheap, but excellent weapon in battle - the saber.
Such weapons strike suddenly and only one is enough to completely defeat the enemy.
Types and main characteristics of Cossack checkers
Externally, a saber consists of two main components: a blade and a handle (hilt).
The first checker of the Asian type was called “Nizhny Novgorod”.
According to the standard, the primary characteristics of the checker were as follows: length - 890 mm, width - 33 mm, thickness 7 mm.
The handle of the Cossack saber was carved from wood, and its top was decorated with a knob whose shape resembles a double beak. The scabbard had four clips: two of them had suspension rings, the rest were intended to secure the bayonet in position when moving.
This weapon was used in the Nizhny Novgorod Dragunov Regiment in 1834. It was the first in which the saber was used not for the Cossack regiment.
The second version, which later became the final Cossack-style saber, was made in 1838, its name is Baklanovskaya.
The blade of the Cormorant saber is almost identical to the previous one, only shorter. The length of such a Cossack checker is 70-80 cm.
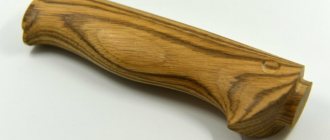
The handle is a crosshair that connects to a metal back, gradually turning into geese made of brass, and as if dividing into two parts towards the end. The part of the handle in front was wooden and had grooves for easy grip. The scabbard was made of brass and also had two clips with fastening rings.
In 1838, another model appeared - the Cossack officer’s saber. Its peculiarity was the difference in the handle: the handle was completely wooden and wrapped in copper wire. The scabbard was more beautifully decorated or equipped with transverse grooves. The scabbard differed little from the base model, but was better decorated.
Subsequently, in 1881, several more different checkers appeared, which were then recognized as official army weapons. And since 1968, this weapon began to be used during parades or to reward distinguished military personnel.
Differences between Cossack and Caucasian checkers
Cossack checkers have weapons similar to them, which are called Caucasian checkers. But they have several main differences:
- The weight of a Cossack saber is 1 kg, a Caucasian one is 300-400 g.
- The thickness of the Cossack blade is less than that of the Caucasian one.
- The Caucasian handle has bows, while the Cossack handle does not.
- The checkers of the peoples of the Caucasus had deep longitudinal pits, which were made in order to make the weapon lighter.
Based on this, it is believed that there are no particular critical differences, and the weapons are not inferior to each other in terms of convenience and functionality. Is it possible that based on how much a Cossack saber weighs, the Caucasian saber is lighter and because of this it may be somewhat more convenient.
Using checkers in the modern world
The production of Cossack sabers continues to this day. Most often this happens as a collection or gift, either for some competition or as part of a Cossack costume for a celebration or performance. You can build such a present according to the drawings of Cossack checkers yourself, but if you have certain skills, or order it from specialists. An original Cossack saber costs a lot and is difficult to find.
The most expensive among the checkers is the Cossack forged checker. Since this model is from 1881 and therefore difficult to obtain. The same can be said about the ordinary Cossack saber.
They are usually used as a reward for high-ranking officials or true connoisseurs of this type of weapon.
But forged Cossack military checkers are mainly given to the military and true connoisseurs of this weapon.
We use an iron
You can transfer the drawing using an ordinary iron. True, in this case it is necessary to buy paper with a special coating for inkjet printing, designed for thermal transfer of the image printed on the printer onto light cotton fabric. One such sheet costs 0.5-1 dollar.
On top of the textile you need to place a drawing printed in color, face down. The top of the picture must be ironed with a hot iron (the steaming mode must be turned off). While the paper has not cooled down, it must be quickly removed from the fabric. A bright, richly colored image will remain on the surface of the material.
Advantages and disadvantages
allows you to get a copy in color; ease of implementation.
You will need thermal transfer paper; fabric with a printed picture in color can be washed at a temperature of no more than 40 degrees; Do not use bleach when washing.
Real Cossack checkers
Willingness to defend the Fatherland and stand in the way of the enemy is a sign of masculinity. The combat saber is just that symbol of the Cossack love of freedom, devotion to Russia and his family.
History of origin
The first documentary mention of a military saber appeared at the turn of the sixteenth and seventeenth centuries. This edged weapon got its name from the Kabardian-Circassian word “sash-ho” (long knife).
Historians are sure that people invented such long-bladed cutting and piercing equipment much earlier. Archaeologists have come across parts of this type of weapon, which date back to the twelfth century. Cossack checkers of the Circassian type initially became the most popular. Later, the Don Cossacks created their own distinctive type of weapon and began to wear it constantly.
Triumphant spread
The nineteenth century brought changes in the position of edged weapons. Cossack sabers were officially put into service in the Russian army. According to the regulations, every soldier of a cavalry regiment had such a military weapon as part of his mandatory equipment. Policemen and gendarmes, by statutory order, were also obliged to carry checkers.
The Cossack combat saber was used in cavalry until the mid-twentieth century. But the twenty-first century has not abandoned the veneration of this symbol of masculinity. To this day, the ceremonial uniform of the Cossacks is unthinkable without the attribute of military pride.
The saber and the Cossack saber are very similar to each other. A distinctive feature of a checker is a wooden sheath, covered with leather, with one or two rings for sword belts on the convex side. This weapon was worn on a shoulder belt with the blade facing backwards. The saber was worn on the belt, with the blade forward.
Caucasian checkers had a two-edged, slightly curved blade with a combat end and a handle with a forked head. Such a hilt is considered a distinctive feature of a checker. Russian Cossack sabers differed from Caucasian ones in their scabbard and hilt. The first army samples looked more like sabers and were slightly more curved.
Types of weapons
1881 Lieutenant General A.P. Gorlov is unifying bladed weapons for all branches of the military. The model for the army blade was the Caucasian “top”, which has proven itself in cutting.
As a result of the reform, two types of checkers appeared: dragoon and Cossack. Each type had varieties for soldiers and officers. A shortened dragoon saber was offered for artillerymen.
Finally, Cossack checkers as distinctive signs of the lower ranks of the Cossack armaments were regulated in 1904.
There are not many differences between the 1881 and 1904 models. The earlier model is 6 millimeters longer (966 and 960 mm, respectively), the blade length is 20 mm longer (825 and 795), and the blade width, on the contrary, is 3 mm smaller (32 and 35). The total weight of the product remained unchanged - no more than 1.2 kilograms.
Mastering the skill of handling military weapons required time and perseverance. The boys trained from an early age, trying to replicate the skills of their fathers and older brothers.
At first they used sticks of similar sizes. From the age of ten they were given children's models of blades. Real Cossack teenagers could get hold of checkers at the age of sixteen or seventeen.
Such a saber was bought, made to order, or inherited from a grandfather.
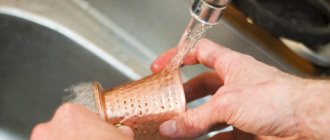
Methods of teaching mastery became more complex from training to training. For this purpose, improvised means were used. First I had to learn how to cut a stream of water without splashing. Then it was allowed to cut down grapevines and cabbage heads. Training was carried out gradually moving from hitting stationary targets to cutting down targets at full gallop.
A young Cossack dreamed of having three checkers in his life. The first - combat - he received when going to serve. Then he tried to get an officer's saber. And the ultimate dream was a personalized checker, which was a symbol of services to the Motherland and recognition by society.
There are frequent cases of creating “charmed” checkers. They brought good luck, victory in all life's troubles. The Cossacks firmly believed this. Such checkers were passed down from generation to generation. If there was no one to pass it on to, the weapon was broken over the coffin of the deceased last representative of the clan.
Award checkers
Rewarding military achievements with weapons became a tradition in Russia in the 18th century. Award weapons were divided into two types: edged weapons for generals and officers and granted weapons for the Cossacks. Such weapons were decorated with gold or diamonds, complementing the image with an engraved inscription. A place was allocated for the inscription on the hilt. The most common expression: “For courage.”
Before the First World War, golden weapons were abolished, equating them with the Order of St. George. The decorated Cossack saber began to be called the St. George weapon. The photo with the award received became a family heirloom. In addition to the St. George's weapon, they were awarded Annin's sabers. They were dedicated to Saint Anna, daughter of Peter the Great, and were considered lower in ranking.
Symbolism and meaning
An unusual weapon - a Cossack saber. It symbolizes fearlessness and strength, valor and fortitude. Firearms could not supplant the pride of the Cossack freemen.
Finding himself in a seemingly hopeless situation, the Cossack relied on his strength and ingenuity. Meeting the enemy face to face provided the opportunity to use real military weapons. With one finger, take your faithful friend out of the sheath and decide the outcome of the battle with one blow. A real Cossack was sure that with a sword, all the strength of his family, of the entire Russian Land, would come to his aid.
The checker demanded close attention and respect from its owner. Care and cleaning of weapons was mandatory. The Cossacks were allowed to attend the church service along with their integral friend. It was even allowed to remove the blade from its sheath a little so that the weapon could be cleaned along with the owner.
How to choose the right checker
In today's Russia, interest in the history of one's family is increasing. Traditions are being revived. The descendants of the Cossacks want to have their own military saber. If before you had to earn it, now you can buy it. You just need to take this matter seriously and choose a weapon that suits you.
The checker must be suitable for the person in size and weight. Fits like a glove in your hand. Withstand an enemy's blow and strike back. You need to hold the presented samples of Cossack checkers in your hand and hear the response.
Check for mutual attraction. The gunsmith will customize the selected model to suit the future owner of the item. Additionally, it is possible to age the blade and handle.
Carry out engraving in full accordance with the desired original.
It is important to understand: a weapon is not a toy. It should be used only for good purposes.
Laser printer
A laser printer and paper for freezing food products (freezer paper) will help to transfer the image to matter. It is better to print the design on thin white cotton or linen fabric. The freezing paper with the smooth shiny side must be glued to the material using an iron. For printing, cut out an A4 size rectangle.
You can print a picture on textiles in any color complexity. To do this, the glued blank (from freezer and fabric) is placed in the printer. First you need to make sure that the design will be printed on fabric and not on paper. Sometimes a printer not designed for printing on fabric may fail. In this case, the attempt must be repeated until the printing device accepts the workpiece.
Advantages and disadvantages
the ability to receive a copy in color; perfect picture.
labor-intensive process; a printer not designed for printing on fabric may not accept the workpiece; The pattern obtained on the fabric is erased during frequent washing.
With the help of light
You can transfer the outline of any image from paper to textile material using light. To complete the work, you need to have an ironed, clean fabric and the image itself. The paper is taped to the window. The material is spread over the image. It is also fixed with tape. Then, using a simple pencil, trace the contours of the image.
Advantages and disadvantages
minimum costs; ease of implementation; the ability to obtain a clear outline.
only the outlines of the picture are printed on the fabric; does not translate the color of the drawing.
You can use a rectangular piece of glass instead of a window. Then the transfer of the image from paper to textiles is performed in a horizontal position. The glass is placed on the seats of two chairs located opposite each other. A light source is placed below - a table lamp. The image and material are attached to the glass using tape. Having fixed the fabric, trace the contours of the design with a simple pencil.