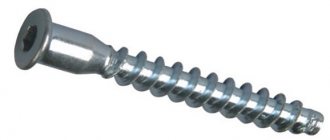
There are a large number of types of furniture hinges on the modern furniture fittings market. In modern furniture production, four-hinged modifications are most often used, which are improved hinges from the times of the USSR. Of course, today's hinges are much more reliable and better quality than their predecessors. Today, the choice of components for making furniture is quite extensive.
Let's figure out what types of hinges are used by furniture makers today in the manufacture of furniture.
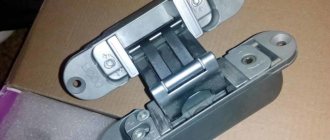
The most commonly used hinges are overhead hinges, which are used mainly for attaching facades (doors) to the furniture body. There are also semi-overlay hinges, internal, corner, with closers, spring, etc.
Today we will look at installing an overhead type furniture hinge. I would like to note that the installation of all other types of canopies will be similar.
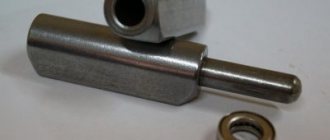
First, you need to figure out what parts the loop consists of. First of all, this is the mounting strip and the mechanism itself. The fastener bar should be mounted to the inside of the case, the loop should be mounted on the facade in a special hole, which must be made blind, twelve to thirteen millimeters deep.
The diameter of the hole depends on the type of loop, and can be twenty-six or thirty-five millimeters.
Canopies with a bowl of twenty-six millimeters are used extremely rarely.
Furniture makers use them only in cases where it is necessary to attach the facade to a module in which a washing machine is placed (non-built-in). This is explained by the fact that the gap for attaching the hinge in this case is very small, and it is not possible to attach a standard canopy.
Progress
Marking furniture hinges
First, you need to mark the centers of the future holes. Since all doors have different heights and intended installation locations, the figures for each option will vary from seventy to one hundred and twenty millimeters. One more point: depending on the weight of the door and its size, three or more canopies can be installed.
Marking holes for installing furniture hinges
When installing three or more hinges on one facade, pay attention to ensure that the hinge does not end up on the horizontal internal parts of the cabinet (for example, shelves, drawer ends, etc.). Make a mark for the hole at a distance of twenty-two millimeters from the end of the door.
Drilling a hole for the bowl
Armed with a screwdriver and a 35mm end mill, start drilling. Basically, the depth of the bowls is twelve to thirteen millimeters. You should not try to drill deeper, because chipboard, which is only 16 millimeters thick, does not always have high-quality outer laminate layers. If you drill a slightly larger hole, there is a risk of damaging these layers, which, unfortunately, will be impossible to mask or repair.
Drilling a hole for the bowl
It is recommended to use a well-sharpened cutter, with which it will be impossible to damage the surface or make chips. Also, to avoid chipping, the screwdriver should be held strictly vertically.
Installation of overhead hinges. Insert the loop into the resulting hole, align it with the end of the facade.
Use an awl to make marks for the screws. Then screw them into the holes.
Hanging the facade
Attach a pad for attaching a hinge to the inner side of the case. Connect the two parts of the canopy. Adjust the front to the body using a screwdriver.
It is very convenient to do this NOT in weight, but just on a flat surface in a horizontal position. Those. the sidewall on which you need to attach the hinge pad should be in a horizontal position, so you can easily try on and screw the facade to the sidewall.
Preparing for installation
In terms of popularity of use, four-hinge hinges for furniture facades, codenamed “frog,” are by far the leader. Durable, easy to install, they have a lot of varieties for all types of facades, and most importantly, they make it possible to adjust the installed door horizontally and vertically in order to achieve the ideal result.
The first step is to determine the number and size of hinges that will be used for each door. Depending on the height of the facade, the following calculation is recommended:
Furniture hinges have a so-called cup; for its installation, a blind recess is cut into the thickness of the door. The standard cup diameter is 35 mm (the most popular), 40 mm (for heavy structures), 26 mm (if there is not enough space for the standard). Therefore, when choosing fittings, it is important to take into account the exact dimensions of the furniture for which it is selected.
Adjusting furniture hinges
As for the adjustment of furniture hinges, it can be carried out in three planes: vertically, in depth and fixing the canopy, horizontally.
1. Adjusting the hinges in depth and fixing the canopy is, first of all, necessary in order to press the facade closer to the body, or, conversely, to weaken this pressing. Use a screwdriver to tighten the oval hole. Very often, in this way, hinges are adjusted in rooms with uneven floors.
2. Vertical adjustment allows you to move the door higher or lower. Since facades, like everything else, are subject to gravity, they can sag over time. It is necessary to make such adjustments to the canopies from time to time. It is performed by the same twisting of the oval holes.
3. Horizontal adjustment. In other words, it is a side adjustment. Due to it, you can avoid gaps between the facades and the body part. This method is also good if the room has uneven floors or walls.
Well, now you know everything about attaching furniture hinges to a furniture façade. We hope our instructions will help you avoid the most common mistakes when installing furniture hinges yourself.
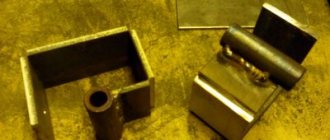
Installing hinges
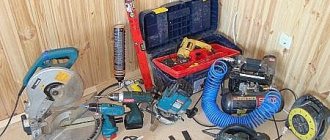
For work we will need:
A recess with a diameter of 26 mm is cut using a 25 mm nozzle; when drilling, it is enough to slightly play with the drill to obtain the required size. Before installing furniture hinges on the facades, you will need to carefully and slowly mark the surface.
Marking
The lower and upper canopies are installed 8-10 cm from the edge of the facade element, the interval between the hinges on the door is uniform, but taking into account the internal shelves and drawers of the cabinet. When they are located at the intended location of the loop, the latter moves higher or lower.
To get a recess for furniture hinges at the required distance, mark the center of the future circle:
If the design features of the box require separate markings, then the location of the fixing strip is marked at a distance of 37 mm deep into the box and 16 mm to the sides - the location of the fixing screws. If the hinge is internal, add the thickness of the facade to 37 millimeters.
Strategically important marks are supplemented with guide recesses using an awl or thin drill - this will make further work easier.
Inset
The required recess depth for inserting furniture hinges is 11-12 mm. Before cutting in a hinge, take a few minutes and practice on suitable scraps of material so as not to overdo it with pressure and spoil the furniture façade with a through hole. After that you can start.
Furniture hinges are inserted at a distance of 5 mm from the edge of the facade. With proper marking, the result will be exactly like this.
The bell of the turned on vacuum cleaner in the immediate vicinity of the drilling will help keep the room clean and reduce the time for subsequent cleaning.
Fastening to the facade
Canopies must be positioned strictly horizontally. You can give them the proper position using a simple technique - using a level, or a suitable level bar. To do this, the hinge cups are placed in the prepared recesses, aligned using a guide tool, and then fixed with self-tapping screws.
It is easier to install the fixing bar on the box in a horizontal position. If this is not possible, then you should attach the facade to the body in an open form, mark the location of the fixation points and screw in the guide bolts.
The fixing strips are placed under the guide bolts and then screwed to the box.
The final stage is debugging. The design of the hinges allows you to adjust the vertical and horizontal position of the door, as well as its depth. It is recommended to carry out these actions directly at the installation site in order to correct possible unevenness of the floor covering.
Video instruction:
Source
Adding loops
Author: Julie · Published 06/17/2013 · Updated 10/26/2016
Required tool:
— construction corner (square); - awl; - pencil; - electric drill; — Fostner drill with a diameter of 35 mm.
We place the façade on a flat, clean, non-slip surface. At home, this is usually a table or floor. I prefer to work on the floor. In the absence of clamps, it is very convenient to fix the facade with your knee. I always place unnecessary chipboard scraps under the façade so that when the drill goes right through, it doesn’t spoil the floor . Usually this doesn’t happen, it’s just a habit, since I make not only blind holes on the floor, but also through ones when I assemble cabinet furniture at home. Be sure to test drill in similar material of the same thickness. These can be scraps of laminated chipboard or a piece of board or furniture panel.
Pay attention to the shape of the drill, the central part of which protrudes above the cutting edge.
It is very important to make a hole of the required depth (about 12 mm) and not to push through the front side of the facade with the central sharp tip of the drill.
Hole marking
Marking holes is a critical operation on which the accuracy of the hinge installation and the correctness of its operation depend. possible to hide an incorrectly drilled hole of this diameter . The thickness of the facade must be at least 16 mm. The drawing below shows the dimensions for marking.
Marking is best done using a construction square .
We measure the size (80 mm...150 mm) from the lower or upper edge of the facade (the loops can be in the middle of the facade).
This size is not so important in terms of accuracy. It is important that the first and last hinges of the facade are located at a distance of 80 to 150 mm. from the bottom or top sides of the facade, and the fastening of the hinge plate did not get onto the shelves or drawers. Naturally, the shorter the façade, the closer to the top or bottom edge the loop is located.
We unfold the square and measure 22 mm. from the edge The accuracy of this size is very important . For greater accuracy, I prick it with a sharp awl. It is very comfortable. Then we insert the sharp tip of a Fostner drill into the punctured hole, and it does not move .
There can be more than two per facade. Their number depends on the height of the facade and its weight. To calculate the number of loops per facade, you can use the following table .
Drilling holes for the hinge
When drilling, align the sharp tip of the Fostner drill with the previously made hole. We install the drill vertically perpendicular to the surface of the facade.
Since the diameter of the drill is large, it is necessary to drill at low speeds (about 1000 rpm), otherwise the facade material burn may overheat . To effectively sample the material, by deepening the drill a little, you can use the drill to perform small circular movements of small amplitude, but keep in mind that when working with laminated chipboard, chips will form . Small chips are not so bad, since they will still be closed with a loop.
Stop from time to time and check the depth of the hole . We drill until the loop completely “sits” in the mounting hole. Typically the hole depth is 12 mm.
Attaching hinges to the facade
Attaching hinges to the facade is the simplest operation. Insert the loop into the drilled hole.
Level the hinge bowl area using a square.
You can align all the loops along a long ruler.
We use an awl to mark the attachment points in the center of the hole.
Please note that the length of the screws depends on the thickness of the facade; if the thickness of the facade is less than 18 mm, then use shorter screws so that they do not go through.
Having attached the required number of loops, we proceed to attach the striker plate.
Additive Tools
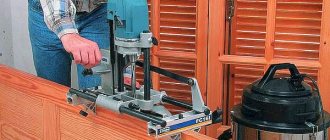
First you need to prepare the tools and materials for work. The additive does not require much technology. It is enough to have a machine for adding furniture hinges, which will allow you to perform installation quickly and efficiently.
Additive Tools:
For the additive, a Fostner machine is used. It allows you to make small indentations when working with soft materials. When choosing such a drill, several nuances need to be taken into account. It is important that the central needle is well centered, without noticeable runout. You also need to pay attention to the incisors. They must be made of hard alloys, otherwise they will soon become dull.
An important selection criterion is the length of the central needle. If this parameter exceeds the norm, the tool will make a through hole. A small needle will move the cutter to the side when working manually. The needle on a new machine, as a rule, has to be ground down by half a millimeter.
Professional Fostner machines are equipped with a needle that is already reduced in size. In such equipment, accuracy is controlled by other elements. Before drilling, it is recommended to practice separately on material of similar thickness.
Sequential stages and sizes for additive
The additive scheme consists of several successive stages. First you need to do some preparation. The working surface must be flat and free of dirt. You can place a rubber sheet, stretch film, or polyethylene foam under the door. To prevent the facade from changing position, you can use clamps. Before applying the additive, you should take care of safety precautions. It is important to wear protective gloves and goggles.
Marking
Next comes the marking. This is an important event that determines the accuracy of installation and functionality of the door. You can take a ready-made drawing of the door for the hinges or independently calculate the position of the fittings.
If you calculate the dimensions for the additive yourself, you need to rely on several rules. So you need to retreat 1.1-1.2 cm from the edge. This is an important accuracy criterion that must be observed. The first and last fasteners should be located at a distance of 7-15 cm from the sides of the doors. The number of hinges is determined by the dimensions of the facade.
Installation
After marking is completed, they proceed to drilling. It is prohibited to use high speeds when performing manipulations. The optimal amount is 1500 rpm. Otherwise, the material will begin to burn and the cutter will become dull. If a hand drill is used, the movements should be smooth and of small amplitude. This will help improve sampling efficiency.
The depth of the hole can only be controlled manually. For this reason, you need to periodically stop the drilling process to measure the depth. The optimal depth is on average 1.2 cm.
Then they move on to the simplest stage - fixing the loops. The fastener is inserted into the prepared hole. Then the bowl is leveled using a square. Places for fastening are marked with a marker. Fixation is carried out with two self-tapping screws. It is necessary to perform core punching first.
If there are minor inaccuracies, you should not pay attention to them. The permissible error is up to 1 mm.
If you have experience with additives, you can screw on the fasteners without preliminary marking. An experienced craftsman can use a square for work.
This primitive, simple additive can be done with your own hands in a quiet home environment. Mechanized work requires special equipment and skills to work with professional tools. You can make a special machine for additives yourself or purchase a cheap vertical type option. Working with such equipment will reduce time and labor costs. It will be possible to perform the additive faster and better.
Source
Characteristics of furniture additive
An additive for furniture hinges is the fastening of fittings to a cabinet door. The process consists of several successive stages. The additive necessarily involves drilling to secure the fasteners. This event determines the final appearance of the furniture.
The most common are hinges with 4 hinges. To secure the fittings, you need to make a small recess on the back of the doors. It will serve as a seat for the loop. You can make the additive yourself. This does not require a large set of tools. The main thing is to follow the sequence and rules for installing fasteners.