Door installation tool: 7 main tools
Before using tools for installing doors, you should read the instructions on their use. Choosing and purchasing the door you like is quite easy, but installing it correctly is a more complicated matter. To competently implement this process, you must have all the necessary tools and devices, and also possess certain construction abilities. From time to time, special equipment may come in handy - you also need to have it on hand just in case. So, what should be available for a high-quality installation of door panels?
Features of the device
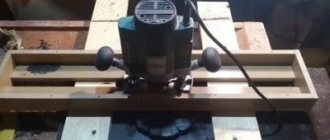
If you have never used a template for inserting door hinges and locks before, you should first become more familiar with the device. The part is a blank, one might say, a matrix, which has a cut-out window with a shape that matches the elements of the fittings. The tool is also called a jig. Fix it on the frame or sash in the place where the insertion is supposed to take place. The edges of the window define the contour of the future recess. The sampling can be done with a router, drill or chisel, without fear of damaging the wood outside the matrix.
The device helps to quickly insert fittings, but does not always bring benefits. Buying a template for one-time use is expensive. The tool is more suitable for craftsmen who often deal with inserting hinges and locks. If you wish and have the ability to work with wood, you can make a jig yourself. You just need to find the exact drawing, cut out the parts from it and assemble them into a single structure.
Fitting the box and accessories
The main problem when assembling a door frame is to make the joints correctly. Crossbars and jambs, as a rule, have a profiled structure, so the most difficult thing is to make cuts exactly at 45 degrees. In practice, novice door installers actively use hand miter boxes:
Useful to have:
- Protractor and miter box in one (max. plinth height 70 mm) for measuring and taking angles from 85 to 180 degrees Wolfcraft 6948000
- Angle/bevel copier TC133R VIRUTEX 3345634
And more experienced professionals work with miter saws: And undoubtedly the best choice here is the FESTOOL KAPEX 120 saw
Principle of use
The template is easy to use. Before starting work, check the size of the tool window and the dimensions of the hinges. If everything matches, proceed to marking. On the door frame and sash, draw the outline of the hinges with a pencil. A template is applied to the future insertion site and securely fixed with screws. The boundaries of the matrix window must coincide with the marking lines. Now all that remains is to use a router or chisel to select a groove of the required depth. At the end of the work, the conductor is removed, moved to the marking location of another loop, and all the steps are repeated.
The lock can also be installed using a template for installing hinges, if it is the right size. The device is attached to the end of the sash. If the size does not match, you will have to purchase or make a special jig for inserting locks. The steps are the same as when installing awnings. Using the template, a recess corresponding to the size of the lock is selected at the end of the sash. In addition to the router and chisel, you can use a drill for insertion. Another sample will be needed on the post of the box for the lock strike plate.
Cutting holes
You can use a straight mortise bit to cut holes in wood pieces. If the hole has a complex shape, then it is cut with a router according to a pre-prepared template using a copy ring. The latter is attached to the base of the milling cutter and, when the unit is operating, sets the movement of the tool in the desired direction.
So, to cut a hole in a wooden piece, you need to perform the following operations:
- secure a straight slot cutter in the collet of the machine;
- attach a copy sleeve to the router sole;
- place the workpiece in which you want to make a hole on the workbench;
- place small pieces of chipboard under the workpiece to slightly raise it above the table (this is required for the tool to come out when cutting through the part);
- place the template with the already prepared hole on the workpiece and press both parts to the table with clamps;
- set the minimum value of the cutter overhang (about 3 mm) relative to the base of the device;
- turn on the router and carefully lower it onto the template so that the cutter gently enters the material;
- mill along the entire perimeter of the template;
- lower the cutter another 3 mm and repeat the above operation;
- Continue adding 3mm depth at a time until the cutter goes right through the workpiece.
In the same way, you can cut a round hole according to the appropriate template. But in order to cut a circle in a workpiece, there is a much simpler way. Most models of routers already include a compass device. It consists of a rod with an adjustable (pointed) screw on one side.
The rod is attached to the sole of the unit, and a pointed screw is inserted into a hole that serves as the center of the future circle. Next, you need to set the desired radius taking into account the diameter of the cutter. The following figure shows how to correctly calculate the radius of a hole.
Milling is carried out in the usual way in several stages, each time deepening the tool by 3 mm.
You can also use a router to drill holes, for example, for installing furniture hinges. This is done as follows.
- Clamp a Forstner drill of the required diameter into the collet of the unit.
- Set the spindle speed to minimum.
- Place the router on a flat surface.
- Lower the cutter so that the spike in its center does not reach the table surface 2-3 mm, and fix the drive on the guides.
- Next, lower the depth stop onto any step of the turret stop and secure it with the locking screw. Thanks to the depth limiter, the cutter will not be able to drop below the required level.
- Remove the drive lock so that it can move freely up and down along the guides.
- The center of the future hole should be marked on the workpiece.
- Place the router pad on the workpiece and lower the cutter so that the tenon located in its center exactly hits the intended location on the part.
- Raise the cutter slightly above the workpiece, turn on the unit and, after reaching full speed, smoothly begin to plunge the tool into the material until the depth stop reaches the stop. At this point the drilling operation can be considered complete.
Before drilling on a workpiece, you should perform the same operation on some unnecessary piece of wood or chipboard of similar thickness.
If you need to make a through hole, then it is not necessary to install a depth stop. For a “clean” cutter exit on the back side of the workpiece, drilling must be carried out in 2 stages. At the first stage, the cup drill is immersed into the workpiece until a small hole from the tenon is formed on its reverse side. Next, the workpiece is turned over, the drill spike is installed in the resulting hole, and further drilling is carried out. This way, the edges of the hole on both sides of the workpiece will be smooth and without chips.
Making a template
If you decide to construct a device with your own hands, you will need a template diagram for inserting hinges and locks. You can find a drawing on the Internet or borrow a tool from familiar builders and draw every detail with a pencil on paper.
When the diagram is ready, production begins:
- The parts are cut out of MDF, plywood, thick plexiglass or sanded board. The first element is cut out a rectangle measuring 380*190 mm.
- 6 holes are drilled along the smaller edges of the part. There should be 3 of them on each side. The holes are maintained at an equal distance relative to each other, as well as to the center of the rectangle.
- A window measuring 135*70 mm is cut out in the middle of the rectangular blank.
- The limiter is made from a piece of slats, attaching a block to one end. The part is fixed to the rectangular blank with self-tapping screws.
- To change the size of the window, two rectangular blanks measuring 130*70 mm are cut out. On the larger side, two cuts are made, between which a distance of 70 mm is maintained. The overlays are applied to the smaller sides of the rectangular slab with a window.
- One overlay is cut out to a larger size - 375*70 mm. Two cuts are made on the larger side, with a distance of 300 mm between them. The workpiece is applied to the larger side of the rectangle with a window.
- All details are ready. All that remains is to assemble a template for inserting hinges and locks with your own hands using screws. Overhead plates adjust the size of the window.
Choosing good cutters
All cutters are divided into types according to geometry:
- End;
- Worm-shaped;
- Cylindrical;
- Conical.
They are also divided according to the material being processed:
- Aluminum;
- Ceramics;
- Steel;
- Plastic;
- Soft metals;
- Tree.
The significant difference is the size of the shank. Most often, cutters with 6 mm and 8 mm are used, less often with 12 mm shanks. There are their analogues, similar, but not identical. They are measured in 1/2 and 1/4 inches. In terms of millimeters, these are 6.35 and 12.7, but it is prohibited to use them in a collet chuck designed for shanks with sizes of 6 and 12 mm.
A collet chuck differs from a jaw chuck in that it does not tolerate errors. In this regard, the fixation is unreliable, and during operation the cutter can fly out and cause injury to the operator. To avoid such situations, you should use cutters for a router, which a sales consultant in the store will help you choose.
When buying cutters, you should choose only high-quality products. They will last for more than one day, and will not break during operation, as happens with cheap, non-certified products. It is better if the coating of the product is made of high-carbon stainless steel.
Installing hinges
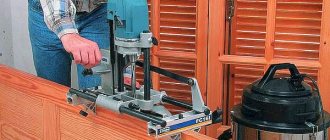
Installation of hinges begins with installing the template, but first prepare the tool. You will need a hand router, chisel, and screwdrivers. The sidebar consists of the following steps:
The sash is securely fixed to the floor, with its side facing up. Markings are applied in places where fittings are inserted. It is enough to simply outline the mounting plate of the canopy with a pencil.
- The conductor is clamped to the end of the door with screws. Overlay plates adjust the size of the window in accordance with the applied markings.
- Adhering to the boundaries of the matrix, chamfer is removed with a milling cutter or chisel. The recess must correspond to the thickness of the fittings mounting plate. If more wood is accidentally removed during insertion, the fittings will not work correctly. The door will warp. You can reduce the recess by placing a lining of hard cardboard under the hinge mounting plate.
- When all the grooves have been cut, begin installing the fittings. The hinges are screwed on with self-tapping screws.
How to install a lock using a template?
Installing a lock using a template follows a similar pattern, only the recess at the end of the door is made larger. The process consists of the following steps:
- The sash is securely fixed to the floor with its side facing up. Use a pencil to mark the future insert. The lock body is applied to the end of the door and outlined.
- A template is set according to the markings. Adjust the coincidence of the matrix boundaries with the drawn lines.
- The wood is sampled using a milling cutter. If there is no tool, holes are drilled with a drill, and the remaining jumpers are cut out with a chisel. The depth of the opening must correspond to the length of the lock body.
- The template is removed from the door. The lock is applied to the front part of the sash, the holes for the handle and the keyhole are marked. Holes are made with feather drills. The lock is inserted into the cut-out recess and secured with self-tapping screws.
- The sash is hung with hinges on the frame. When closed, mark the location of the strike plate. A template is fixed to the bowl, the window is adjusted according to the markings, and a recess is selected using a router or chisel.
- The insertion is completed by fastening the strike plate with self-tapping screws and checking the functionality of the lock.
A homemade device for inserting fittings can be assembled according to individual sizes, come up with your own convenient design, and improve the clamps.