DIY oscillating spindle grinding machine – Machine tools, welding, metalworking
The grinding machine is very common and in demand among the tooling available in the workshop, so its manufacture will be practical and justified. With its help, you can process not only wooden blanks, but also some types of other materials, such as plastics and some metal blanks, of course, without fanaticism (no grinder!). In this article we will describe the process of creating such a machine.
Introduction
There are a huge variety of different design options for grinding machines. And all these options have their application and purpose.
Using a grinder made from an angle grinder, you can grind and sharpen large workpieces and give them the desired shape - the master holds it in his hands.
The second option is a grinding machine, in which, like a grinder, the abrasive material is a sanding belt (sandpaper), but it is stationary and it is convenient to process small workpieces, while maintaining the feed angle, since there is a perpendicular table.
The version of the grinding machine that will be described in this article is much simpler than the two previous options; The abrasive element is a grinding wheel with sandpaper installed on it. The advantages of this option are obvious:
- Ease of manufacture;
- The sanding surface is much larger than that of belt options;
- The grinding plane is rigid, unlike belt grinding, where the sandpaper can bend under the pressure of the workpiece;
- This machine is universal, that is, it is one of three machines that are made on the basis of a drilling machine (in total, there are only 4 pieces with a drilling machine).
| Drilling | Turning | Thicknesser |
Here are three articles that describe their manufacture:
This design solution, which allows four variants of machines to be assembled on one base, is a universal and very practical solution, as it saves material, time and space in the workshop, and also has one power tool as a drive - a Drill.
The sanding machine is perhaps the simplest, since you only need to make a sanding table. Everything else is already ready.
Preparing for work
Preparation for work is important, since it is at this stage that the full composition of the required tools, mechanisms, materials, fittings and fasteners is determined. It is at this stage that you need to make sure that you have everything you need so as not to interrupt or stop the work. Therefore, before starting, we recommend that you review the material in full and make sure that everything is available.
Tools
During the work you will need some hand and power tools, let's check the list:
- Tool for straight sawing: Circular saw or sawing machine.
- Jigsaw.
- Screwdriver.
- Additional hand tools: hammer, clamps, square, screwdriver, marking pencil, etc.
Materials, fittings and fasteners
To make a drill-based grinding machine you will need:
- Plywood 15 mm thick. Chipboard can also be used.
- Wing nut – 2 pcs.;
- M6 bolt and self-tapping screws.
Main structural elements
The main structural elements of the grinding machine are:
- Base:
- Frame;
- Spindle box;
- Sanding table;
- Drill (or screwdriver);
Base (Frame and spindle box) of the machine
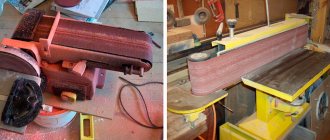
As noted earlier, this machine is made on the basis of an already existing (previously created) drilling machine, therefore, in order not to duplicate information, we suggest that you familiarize yourself with the technology and process in the corresponding article, everything is described in detail there. Thus, we consider that the frame and spindle box are already ready. Here is their appearance.
Sanding table
The sanding table has an inverted U-shaped design and is quite simple to manufacture. The following pieces need to be cut:
| Detail | Width x Length x (Height) | Material |
| Side wall | 120 x 120 | Plywood 10 mm |
| Bottom part | 120 x80 | Plywood 10 mm |
| Stiffeners | 120 x 25 x 20 | Array |
| Guide | 200 x 30x 40 | Array |
| Tabletop | 200 x 200 | Plywood 10 mm |
Do-it-yourself grinding machine from a drill: drawings, photos and videos
The grinding machine is very common and in demand among the tooling available in the workshop, so its manufacture will be practical and justified. With its help, you can process not only wooden blanks, but also some types of other materials, such as plastics and some metal blanks, of course, without fanaticism (no grinder!). In this article we will describe the process of creating such a machine.
We make an oscillator for a plasma cutter with our own hands
A voltage of 20,000 volts DC is sufficient to ignite the plasma in the torch. Therefore, a spark oscillator is suitable. In order not to create a complex step-up transformer, it is easier to use a banal voltage multiplier. The current doesn't matter. The circuit is compact, and is literally made from junk parts from the USSR era.
Oscillator for plasma cutter - video recommendations.
To prevent the winding turns from vibrating under load, the transformer is impregnated with epoxy resin.
The storage capacitor is a capricious part of the circuit. After going through several options, the Conder from a starter for fluorescent lamps showed itself to be the best.
Oscillation Spindle Machine: Main Functions
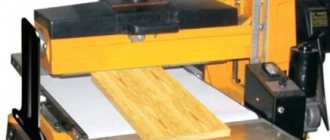
Some spindle machines have a small work table. And some have a large working surface with the ability to tilt up to 45 degrees. This allows you to work with boards with beveled edges. Such large work tables may also have a profile track guide. Thanks to it, the operator can continuously process boards with beveled edges.
Tabletop models usually have a 1/3-1/2 horsepower motor. Floor standing machines can have a motor up to 1 horsepower. This allows the use of shafts with larger diameters and lengths.
Oscillating spindle machines are available with grinding drums of various sizes. For desktop machines, the shaft height is usually about 10 cm. Their diameter varies between 12-50 mm. Floor-standing models usually have a shaft height of around 20 cm and a diameter of up to 10 cm.
Some models have a belt sanding function. As a rule, a special nozzle is used for this. It converts drum sanding into a belt sander. To use a spindle machine in belt sander mode, a standard width sanding belt is suitable. That is, the same as used for a belt sander.
How does an oscillating spindle machine work?
An oscillating spindle lathe is a tabletop (or in some variants, floor-mounted) woodworking tool. It is designed for sanding edges and edges. The machine has a small working surface and a grinding drum. Which goes through a hole in the desktop.
When rotating, the sanding drum moves up and down at the same time. As a result, the working surface of the drum completely interacts with the surface being sanded. Thanks to this upward and downward movement, grooves are not formed on the treated surface. In addition, the abrasive on the sanding drum lasts longer.
Selecting components for a spindle grinding machine
Spindle design
The selection of components for a grinding machine before preparing it yourself is carried out only after drawing up a diagram. You can take drawings of factory models as a basis. Adjustments to the documentation are made according to the parameters of the available components.
The main component of homemade equipment is the electric motor. The best option would be to use a single-phase model with a power of up to 2 kW. The next element is the transition structure for attaching the spindle. This may be a shaft connected to the engine rotor using a belt drive. If it is necessary to regulate the speed, it is recommended to install pulley systems.
Recommendations for choosing components for a self-made grinding machine:
- frame. It is advisable to make it in the form of a desktop. Most factory designs have a cast iron body, which provides adequate stability. A wide desktop will have similar properties;
- spindle. Since this is the most wearing part of the equipment, it is best to make it from wood. This will reduce production costs, as well as reduce the cost of components.
The shaft with the spindle should be located closer to the center of the table. But at the same time it must freely reach the treatment area.
Functional Features of Spindle Grinding Machine
Factory model of spindle grinding machine
During the end processing of wooden workpieces, special requirements are placed on the quality of grinding. Making them manually is problematic and often leads to defects. For these purposes, it is best to use a spindle grinding machine made by yourself.
Unlike other types of woodworking equipment, this machine is large in size. This is due to the specifics of its design. It consists of a power unit, a spindle and a support frame. The above-described components are mounted on the latter. The spindle is positioned vertically, and sandpaper is attached to its surface. An oscillating grinding machine is used for continuous production. The difference lies in the additional movement of the spindle along the vertical axis. This ensures maximum processing quality.
When making such equipment with your own hands, the presence of an oscillating spindle is not provided. This is due to possible problems and laboriousness of the work.
The main characteristics of a spindle grinding machine that you can make yourself:
- electric motor parameters. The optimal power is from 0.6 to 2 kW. Rotation speed - 2000 rpm;
- spindle diameter. It is recommended to make several removable models mounted on the motor shaft. The diameter can vary from 20 to 180 mm. The higher this indicator, the faster the processing will take place;
- weight of the desktop. During operation of a self-made encryption machine, vibrations will inevitably appear. To eliminate them, it is recommended to increase the weight of the work table or perform a rigid fastening to another work surface.
The size of the tabletop directly depends on the dimensions of the workpieces. When processing small parts, you will need a platform of 50*50 cm. If their size is large, you need to make a large tabletop.
Factory models with an oscillating unit cost about 20 thousand rubles. Therefore, you need to think in advance about the feasibility of making it yourself.
How to glue a sanding sleeve onto a sanding drum
Master class on making your own grinding bushings for a metal or rubberized spindle of grinding drums for an oscillating spindle grinding machine.
Sanding bushes are a popular consumable item. It’s great when you learn how to make them yourself and stop depending on the availability of bushings of the required diameter and grit in stores.
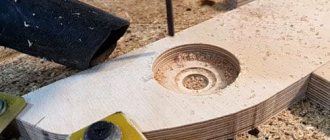
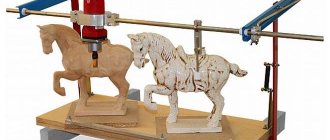
In a wooden toy workshop, sanding the pieces is a special part of the production process.
This is a very responsible and important stage in transforming the workpiece into a safe wooden toy.
You need to carefully get rid of all sharp edges, smooth out the corners of the parts so that the toy becomes safe for the child and pleasant to hold in his hands.
A video of the process can be seen here:
Step-by-step master class with photos.
Sanding drums come in various diameters, with rubber or metal spindles, clutched and clutchless.
How grinding drums differ is the topic of the next master class.
The process of manufacturing a grinding sleeve for a grinding drum with a metal spindle begins with gluing the spindle itself with soft plastic.
Typically, large and large diameter drums come with a rubberized spindle, while small diameter drums simply have a metal spindle.
Rubber coating contributes to a “softer” grinding, the part and the grinding material are better pressed.
Rubber coated surface is in process.
Therefore, you can independently “rubber-coat” the metal spindle for more comfortable grinding of workpieces.
To do this, we need soft plastic for children's creativity and double-sided tape:
1. Wrap the metal spindle with double-sided tape and trim off the excess with a utility knife.
2. Remove the protective yellow shell.
3. Roll onto soft plastic.
4. Trim off the excess.
5. Roll the spindle with plastic on a flat, hard surface.
6. Everything is ready. You can start making the grinding sleeve.
For drums with a rubberized spindle, we skip the step of gluing soft plastic.
1. We make a grinding sleeve.
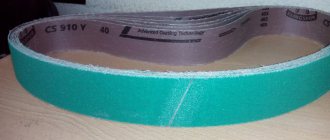
We will need wet sandpaper, a utility knife, super glue, meter-sized sanding belt and a template.
As a template, we use a magazine sleeve of any grain size, but of the drum diameter we need.
2. Take a sanding belt of the desired grain size, a template and tear off the blank strips.
You can make several bushings at once, as far as the width of the sanding belt allows.
3. Take sanding paper for WET sanding!
This is important, because such paper is strong and will not let glue onto the rubberized surface of the drum, which means that the sanding sleeve will be easy to change if necessary
Glue it to the back of the skin using super glue.
Trim off the excess, leaving a strip of about 1 cm.
4. We tentatively, without glue, wind the skin onto the drum and make control pencil marks.
5. Use super glue
It is important to try to apply super glue in the center of the glued skin, quickly and carefully. You can use the adjustment on the tube spout. The main thing is that the glue does not flow onto the front surface of the sandpaper and does not flow onto the rubberized part of the sanding drum
The main thing is that the glue does not flow onto the front surface of the sandpaper and does not flow onto the rubberized part of the sanding drum.
We wind with tension, aligning the pencil marks.
The convenience of this method is that super glue hardens very quickly and, after developing skills, in just 20 minutes you will have a batch of new grinding bushings.
It’s a pleasure to work with sandpaper of the required grain size!
The master class will be useful for craftsmen who make toys with curved shapes, such as rainbows.
Thanks for reading!
Please like if the information was interesting and you liked it.
DIY grinding machine
The desire to make wooden structures yourself is always faced with the need to equip your workshop with sawing and grinding machines. Modern manufacturers produce them in a wide range. Such machines have good performance and high reliability. The most important and quite significant drawback is their high cost.
Therefore, many craftsmen try to assemble a grinding machine from existing components. The most experienced ones try not to limit themselves to a machine capable of performing only one function; they immediately try to assemble a universal machine capable of performing several functions: cutting wooden blanks, grinding followed by polishing, removing old coatings and preparing surfaces for renovation.
Homemade grinding machine
This is possible because the basis of any home-made machine is a frame on which are mounted: an engine, drive and driven drums, a set of additional equipment (saws, cutters, grinding wheels, and so on).
Making your own grinding machine
If it is necessary to carry out wood processing operations, you can assemble a household machine with your own hands - a structure that must meet certain requirements:
- The electric motor must be attached to the front pillar and connected to the grinding wheel using a shaft.
- Circles can have different surfaces:
- made of abrasive material;
- felt;
- special fabric.
- The base for mounting the electric motor must be movable and rotatable in any direction.
- The electric motor must have sufficient power and shaft speed.
The use of oscillating spindle grinding machines allows us to achieve high quality processing of wood products, significantly increasing labor productivity and reducing the time required to complete operations.
If you find an error, please select a piece of text and press Ctrl+Enter.
Introduction
There are a huge variety of different design options for grinding machines. And all these options have their application and purpose. Using a grinder made from an angle grinder, you can grind and sharpen large workpieces and give them the desired shape - the master holds it in his hands. The second option is a grinding machine, in which, like a grinder, the abrasive material is a sanding belt (sandpaper), but it is stationary and it is convenient to process small workpieces, while maintaining the feed angle, since there is a perpendicular table.
The version of the grinding machine that will be described in this article is much simpler than the two previous options; The abrasive element is a grinding wheel with sandpaper installed on it. The advantages of this option are obvious:
- Ease of manufacture;
- The sanding surface is much larger than that of belt options;
- The grinding plane is rigid, unlike belt grinding, where the sandpaper can bend under the pressure of the workpiece;
- This machine is universal, that is, it is one of three machines that are made on the basis of a drilling machine (in total, there are only 4 pieces with a drilling machine).
Preparing for work and launching
Scheppash oscillating spindle machine
Working with an oscillating grinding machine begins with the selection of a grinding sleeve, which depends on the size and shape of the workpiece. After which the flange is selected. It should fit tightly, without gaps. We provide a table as an aid.
| Grinding sleeve diameter, mm | Spindle washer diameter | Flange, size in mm |
| 13 | Small | 13 |
| 20 | Average | 20 |
| 28 | Average | 28 |
| 38 | Large | 38 |
| 51 | Large | 51 |
| 76 | Large | 76 |
Table 1. Flange and washer dimensions for upper spindle
The washer is installed on the spindle from below, after which the sleeve and a suitable shaft for grinding are put on. The flange should fit as closely as possible to the bushing; it is placed on the spindle and installed in the provided working hole. A sleeve and shaft are put on the spindle. The upper spindle is covered with a washer and secured with a nut. Controlled by a single “ON-OFF” button.
Technical conditions for machine maintenance
The operation of oscillating machines requires certain regulations for carrying out preventive maintenance.
For the normal functioning of the grinding machine, it is necessary to periodically perform certain operations:
- once every 30 hours. the condition of the commutator brushes is checked and, if necessary, replacement is made (if the length of the brushes is less than 3.5 mm);
- Constantly clean the bottom flange and washer from dust;
- Constantly lubricate the working mechanisms of the machine.
Making your own grinding machine
After preparing the manufacturing diagram and blanks, you can begin assembling the structure of the grinding machine with your own hands. The support table is best made from square steel pipes with additional stiffeners. The upper part under the tabletop must have a frame base.
First, the tabletop is made. For this you can use a sheet of fiberboard. A hole for the spindle is cut in the middle part of the workpiece. Then an adapter block is installed that connects the shaft to the engine rotor. After this, the power plant is installed. There are no restrictive or fixing components on the surface of the tabletop. The degree of processing of workpieces depends on their pressure to the abrasive surface.
Some factory settings provide a mechanism for changing the angle of the spindle relative to the workpiece. The same can be done in homemade models. However, it should be remembered that the presence of this unit in the circuit will increase the complexity of manufacturing the structure.
The video shows an example of a homemade design:
Design of belt units
To have an idea about the manufacture of a sanding unit with an sanding belt, you need to familiarize yourself with its design, which includes:
- an abrasive belt stretched horizontally or vertically on the frame;
- a pair of drums (drive and tension cylinders). In this case, the kinematics provide for the launch of the driving element using an electric drive that transmits torque by means of a belt drive;
- a metal or wooden table, and the first option makes it possible to work with more complex parts;
- an electric motor with a power of at least 2.8 kW, due to which the sanding belt (emery) can move at a speed of 20 m/second;
- a hood that removes wood dust.
There is a close relationship between the length of the working tool and the bed, as well as similar parameters of the workpieces that are to be processed on this unit. Every experienced craftsman will confirm that working with equipment is more comfortable if the wooden element being processed is shorter in length than the working surface. A properly assembled homemade belt sanding machine will allow you to easily level the surface and remove all errors, making it even and smooth. Also, belt units will quickly and efficiently remove old paint and varnish coatings, cope with the processing of edges and ends, sand curved shapes and polish a flat wooden piece of furniture.
DIY wood sanding machine
The main function of wood sanding machines is to finish processing natural materials using abrasive elements. Machines and devices of various types can have a wide range of capabilities and allow sharpening knives, grinding decorative and furniture products, and also perform internal and external polishing of workpieces.
Modern units are capable of ultra-fine polishing, giving products a perfectly smooth surface . One of the advantages of such equipment is its excellent performance and high efficiency both when performing a rough roughing process and during high-speed grinding.
In production you can often find calibrating, disc and oscillating (spindle) types of grinding units. No less popular are the disc sander, belt grinder and drum polisher.
The kinematics of all grinding devices without exception, be it a calibration or polishing sample, is based on the rotation or movement of a wooden part along a straight or arc path and the simultaneous rotation of the working part of the unit, but this applies to stationary machines.
If we mean a hand tool, then we are not talking about the movement of the workpiece, but only the grinding machine moves. Returning to stationary grinding machines for wood, we note that it is better to perform high-quality surface treatment of large-sized products on belt samples .
Factory equipment is not cheap, so many owners of small home workshops are increasingly interested in how to make a belt sanding machine themselves.
Design of belt units
To have an idea about the manufacture of a sanding unit with an sanding belt, you need to familiarize yourself with its design, which includes:
- an abrasive belt stretched horizontally or vertically on the frame;
- a pair of drums (drive and tension cylinders). In this case, the kinematics provide for the launch of the driving element using an electric drive that transmits torque by means of a belt drive;
- a metal or wooden table, and the first option makes it possible to work with more complex parts;
- an electric motor with a power of at least 2.8 kW, due to which the sanding belt (emery) can move at a speed of 20 m/second;
- a hood that removes wood dust.
There is a close relationship between the length of the working tool and the bed, as well as similar parameters of the workpieces that are to be processed on this unit. Every experienced craftsman will confirm that working with equipment is more comfortable if the wooden element being processed is shorter in length than the working surface.
A properly assembled homemade belt sanding machine will allow you to easily level the surface and remove all errors, making it even and smooth..
Also, belt units will quickly and efficiently remove old paint and varnish coatings, cope with the processing of edges and ends, sand curved shapes and polish a flat wooden piece of furniture.
Materials for assembling the machine
Many novice carpenters make a grinding machine from a drill, but we propose to create an improved tool. Before assembling a belt sanding machine with your own hands, you need to decide on the material for the manufacture of its main components.
For example, it is better to make a desktop from thick metal, giving preference to the overall dimensions of the canvas within 500x180x20 mm. We draw your attention to the fact that the larger the bed, the more functional it is and the more varied the parts that are planned to be processed will be.
Table
Making a working surface looks like this:
- Cut off one side of the metal sheet.
- Carry out markings.
- Three holes are drilled at the end of the cut sheet, through which the working surface is bolted to the frame.
Engine selection
A homemade wood sanding unit is equipped with a motor, and in this case an electric drive from a washing machine is suitable, although you can choose any motor with a power of about 2.8 kW, capable of performing an average of 1200-1500 rpm. The drive is tightly fixed in a stationary state to the frame.
Now we have to make two drums for the surface grinding unit, for which we will need a sheet of chipboard, from which blanks of 200x200 mm are cut and a package with a diameter of 240 mm is assembled.
After assembly, the structure is machined to a diameter of 200 mm. The drive cylinder is installed on the drive shaft, and it is this that will drive the abrasive material.
The tension element is fixed around the axis of the frame on bearings.
Make sure that the belt can easily touch the tabletop, which is achieved by ensuring a bevel on the side of the drum.
When assembling drums, do not forget that their inner diameter should exceed the outer diameter by several millimeters. This is necessary so that the tape is placed in the middle of the cylinder and does not slip off. Now we need a sanding belt, for which abrasive sanding material, cut into strips and then glued together with a high-quality adhesive, is suitable.
Drum grinding unit
Just like industrial designs, household units can have different configurations, although, as noted earlier, their kinematic diagram and operating principle are similar. Above we told you how to assemble belt sanding equipment, and now we’ll find out what to use to make a homemade drum sander.
In this case, instead of a stretched abrasive belt, the homemade product is equipped with a disk shaped like a drum, which is used to polish wooden blanks. As in the previous case, this simple type of units is created quickly and without any particular difficulties; moreover, here we also do not need a complex diagram or sophisticated drawings.
Electric motor for machine
The performance of the machine depends on the engine installed in its design
When assembling homemade equipment, it is important to carefully consider the choice of electric motor:
- Simple machines can be made using an electric motor from a washing machine. These are cheap models that surprise with their reliability, performance and durability.
- The ideal option is considered to be engines that make 1000–1500 rpm. Powerful electric motors with a rotation speed of more than 3 thousand revolutions per minute are unsafe for homemade structures. Due to the heavy load, the parts may not be able to withstand it and the machine will break.
- The optimal power indicator for homemade equipment is 100–200 W. It is desirable that the power could be increased to 400 W. You don't need more power for homemade products.
- It is best to install a three-phase motor.
Electric motor for machine
Belt
To drive the grinding wheel, you need a high-quality belt. The optimal belt width is 12 mm. Thinner models overload the engine less, but they are less durable.
Creating a machine at home
As mentioned above, oscillating grinding machines for industrial production are expensive, so if you wish, you can make it yourself. Do-it-yourself machines do not have an oscillating spindle. This is due to the complexity of the work.
There are three main components of the grinding installation.
Electric motor. For a homemade machine, the optimal choice would be a single-phase motor with a power of no more than 2 kW.
Frame. In factory models it is made of cast iron; at home you can use plexiglass. Usually performed in the form of a desktop. To eliminate vibrations during operation, which often occur with homemade machines, it is recommended to increase the size or weight of the workbench.
Before selecting components, you need to create a drawing. You can take the diagrams of factory models as a sample.
The electric motor is fixed on the front pillar. The frame on which it is located must be movable and rotate in any direction. To attach the spindle, a shaft is used, which is connected to the motor rotor via a belt drive.
To adjust the speed, a pulley system is created. The shaft should be positioned as close to the center of the work table as possible, but so that it can easily reach the processing area. When working on a product, grinding wheels with a surface made of abrasive materials, special fabric or felt are used.
How to make a homemade sanding machine? Drawings and manuals
The belt grinding machine is widely used not only in production, but also in everyday life to perform a number of operations for finishing various surfaces. In most cases, using such equipment, finishing of parts made of one or another type of wood is carried out. However, the machine is also suitable for grinding products made of ferrous and non-ferrous metals and plastic - just use a special abrasive belt.
Among the main tasks that can be performed using belt sanding equipment are the following:
- reducing the degree of roughness of the treated surfaces of wood or other material;
- finishing to level the part;
- preparing a smooth base for painting or applying any coating.
In addition, such machines are often used for fine grinding using an abrasive belt of hard-to-reach internal and rounded parts of the workpiece, as well as for removing various defects on metal or wood products: burrs, varnish or primer deposits. These units are often used for sharpening knives, cleavers, chisels, and cutting parts of various power tools.
It is very convenient that with such equipment, using an abrasive belt, you can process parts of almost any shape: flat, polygonal or curved. These machines also perform grinding of pipe and round workpieces of various diameters.
Due to the wide range of applications of such units, many home craftsmen often have the desire to make a belt grinding machine with their own hands. This is explained by the fact that industrial machines are very bulky and the cost of the equipment is quite high.
If funds allow, and the unit with the sanding belt is planned to be used very often, then you can get a factory copy. It is worth considering that in the absence of the appropriate skills, making a machine yourself is quite problematic, even if you have all the necessary drawings and diagrams in front of you.
When purchasing industrial equipment, you need to take into account the difficulty of transportation and ensure that there is enough space in the workshop for its installation. In addition, servicing such a unit is much more difficult than one assembled independently, which is quite possible to do with the right approach.
Let's look at what belt sanding equipment is, and also provide step-by-step instructions for making a simple device at home.
As the name suggests, the working part of a belt sanding machine is a belt coated with a layer of abrasive substance. It is a closed ring fixed between a pair of rotating rollers, of which only one is driven.
Torque is transmitted to the drive drum via a belt drive from an electric motor. For various processing modes, manual adjustment of the belt speed is provided. Grinding can be done in only one plane or at any angle to the workpiece, depending on the type of equipment.
Different models of machines are designed to process parts of various sizes. On units with a short work table length and, accordingly, an abrasive belt, it is very inconvenient to grind large objects
It is important to take this factor into account before you decide to make a machine with your own hands or purchase a ready-made one.
An integral element of any belt sanding machine is the hood. With its help, a huge amount of dust generated during the process of sanding a part with a belt is removed from the working space. When processing wood, many tiny sawdust are released, which enter both the respiratory tract and the eyes, which can cause irritation.
The work table of different types of grinding units can be movable or stationary. The abrasive belt in such machines is located exclusively in the horizontal plane.
The design of some equipment that allows processing workpieces in all planes does not include a work table. In these cases, the tape can be freely rotated in any direction.
Features of the use of spindle machines
Products from foreign manufacturers of woodworking equipment are popular in Russia:
- Jet (Switzerland);
- Scheppach (Germany).
They produce the following machine models:
- Jbos-5;
- Jovs-10;
- Joss-S;
- Scheppach OSM 100;
- Scheppach 450 B.
Jbos-5 machines are manufactured at production facilities in China in accordance with a license from a Swiss company.
Machines of this type consist of several main units:
- Engine.
- Table tiltable up to 45°.
- A set of spindles with sleeves.
- A special mechanism placed in a bath of oil. This allows you to extend the service life.
- Protective housing with stand for spindles.
- A set of table inserts with round holes.
- A set of inserts with oval holes designed for inclined grinding.
- A special device for connecting waste exhaust.
- Control unit.
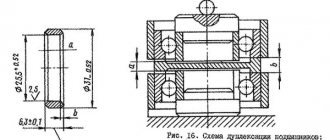
Structurally, the unit includes a spindle on which pulleys of different sizes are installed. When connected by a gear, the pulleys can be the same diameter, but the number of teeth can be different. The main working pulley is rigidly mounted on the shaft, and the other, with an eccentric, is installed on the end part
It is important to consider that the height of the motor pulley must match the range of vertical movement of the spindle. Due to the difference in speed, a reciprocating motion is created
The main parts of the unit are made of cast iron. They have high stability when processing workpieces. Using an oil bath to lubricate the oscillating mechanism extends its service life. Jbos-5 machines, which have a compact size, good performance, reliability and are inexpensive, are the most popular in the segment.
Before starting work, you need to select a grinding sleeve to remove burrs from the workpiece. Then the flange is selected. It should have a tight fit.
The washer is placed on the spindle from below. Then the bushing and shaft are selected. The flange fits tightly on the spindle in a special hole. After this, the bushing and shaft are installed on the spindle. The upper spindle is attached and secured using a washer and nut. When finishing, the workpiece is fed into the working area from right to left, while the sleeve rotates counterclockwise.
Machines of this type are used to work with curved edges of workpieces and wooden parts. They are easy to use, have excellent quality of product processing and do not require long setup and adjustment. With proper, gentle operation and regular maintenance, the machine will serve for a very long time.
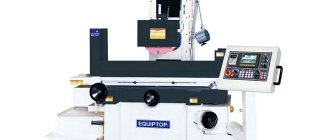
Oscillating spindle grinding machines
For wood processing, many models of professional machines used in technological operations are produced.
The list of woodworking equipment includes oscillating spindle grinding machines Jbos-5, Scheppach OSM-100 used in the processing of wood products.
If necessary, you can assemble a machine with your own hands to work at home, observing the necessary technical conditions and safety requirements.
Professional class oscillating spindle grinding machine Jbos-5
Features of the use of spindle machines
The products of world leaders in the production of woodworking equipment are well known in Russia:
- Jet (Switzerland);
- Scheppach (Germany),
producing oscillating spindle grinding machines:
- Jbos-5;
- Jovs-10;
- Joss-S;
- Scheppach OSM 100;
- Scheppach 450 B.
Oscillating spindle grinding machine Scheppach OSM 100
- Jbos-5 machines are also produced at production facilities in China under license from a Swiss company.
- Oscillating spindle machines consist of the main units:
- Electric motor.
- Desktop tiltable up to 45° on some models.
- A set of spindles with sleeves.
- A special oscillating mechanism placed in an oil bath, which can significantly extend the service life.
- Protective housing with stand for spindles.
- A set of table inserts with round holes.
- A set of table inserts with oval holes designed for inclined grinding operations.
- A special device for connecting the exhaust of generated waste.
- Control unit.
Structurally, the machine consists of a spindle on which pulleys of different sizes are installed. When connected using a gear, the pulleys may have the same diameter, but the number of teeth may be different.
The main working pulley is rigidly mounted on the shaft, and another equipped with an eccentric is installed on the end part. It must be taken into account that the height of the motor pulley must coincide with the range of vertical movement of the spindle.
Due to the difference in speed, a reciprocating motion is created.
The main parts of the machine are made of cast iron, due to which its stability is achieved when processing workpieces. And the use of an oil bath to lubricate the oscillating mechanism allows you to extend its service life. The most widely used machines are Jbos-5, which have a compact size, good performance, reliability and low price.
Before starting the work process, the grinding sleeve necessary to remove burrs from the workpiece is selected. Next, a flange is selected, which should have a tight fit.
Operating principle and technical parameters
Main components of spindle grinding machine:
- Disc sanding machine for wood,
- working surface,
- set of spindles and sleeves,
- protective housing on which the stand for spindles is located,
- oscillating mechanism located in a container with oil,
- Control block,
- chip suction,
- set of pulleys.
Factory models also include a spare spindle, tool stand, rubber roller and cleaning tool.
All machine components are mounted on a support frame. The spindle, covered with sandpaper, is placed vertically. There are pulleys on it. They have different diameters, although if the connection occurs through a gear drive, then pulleys of the same size can be used, but differing in the number of teeth.
The main working pulley is rigidly attached to the shaft. At the end of the machine there is a pulley equipped with an eccentric. The range of vertical movement of the spindle must correspond to the height of the motor pulley. Due to the difference between speeds, a reciprocating motion occurs.
The base of the machine is made of cast iron, which gives it the necessary stability. Thanks to the oil container in which the oscillating mechanism is located, the wear rate is reduced.
Spindle grinding machines have the following technical parameters:
- weight (from 10 to 140 kg),
- desktop settings,
- electric motor power (from 0.8 to 1.3 kW),
- angle of inclination of the working surface (up to 45⁰),
- maximum height of the workpiece (from 100 to 160 mm),
- number of spindle revolutions per minute (1300–1400),
- number of spindle oscillations per minute (from 30 to 60 times),
- size of the grinding tool (up to 250 mm).
Oscillating-spindle wood sanding machine | mk-soyuz.rf
An oscillating spindle sander is used when working on products made of wood or similar materials. The most productive is the use of professional machines. But using such models at home is impractical due to their high cost. Therefore, many create woodworking machines with their own hands.
Oscillating spindle wood grinding machines from such brands as:
- the German company Scheppach, which produces the Scheppach OSM 100m and Scheppach 450 B models,
- Swiss company Jet, which produces models Jbos-5, Jovs-10, Joss-S.
The most popular is the Jbos-5 model, which has a small size, moderate cost, high performance and good strength.
Operating principle and technical parameters
Main components of spindle grinding machine:
- Disc sanding machine for wood,
- working surface,
- set of spindles and sleeves,
- protective housing on which the stand for spindles is located,
- oscillating mechanism located in a container with oil,
- Control block,
- chip suction,
- set of pulleys.
Factory models also include a spare spindle, tool stand, rubber roller and cleaning tool.
All machine components are mounted on a support frame. The spindle, covered with sandpaper, is placed vertically. There are pulleys on it. They have different diameters, although if the connection occurs through a gear drive, then pulleys of the same size can be used, but differing in the number of teeth.
The main working pulley is rigidly attached to the shaft. At the end of the machine there is a pulley equipped with an eccentric. The range of vertical movement of the spindle must correspond to the height of the motor pulley. Due to the difference between speeds, a reciprocating motion occurs.
The base of the machine is made of cast iron, which gives it the necessary stability. Thanks to the oil container in which the oscillating mechanism is located, the wear rate is reduced.
Spindle grinding machines have the following technical parameters:
- weight (from 10 to 140 kg),
- desktop settings,
- electric motor power (from 0.8 to 1.3 kW),
- angle of inclination of the working surface (up to 45⁰),
- maximum height of the workpiece (from 100 to 160 mm),
- number of spindle revolutions per minute (1300–1400),
- number of spindle oscillations per minute (from 30 to 60 times),
- size of the grinding tool (up to 250 mm).
Working with the machine
Before starting work, the machine must be fixed on a stable surface using clamps.
First you need to decide on the grinding sleeve. Selection is carried out in accordance with the size and shape of the workpiece. Then you need to select the appropriate flange.
A washer is placed at the bottom of the spindle, then a bushing and the corresponding shaft are put on. Then a flange is placed on the spindle and installed in a special hole. It should fit as closely as possible to the sleeve. The sleeve and shaft are placed on the spindle. A washer is placed on the upper spindle and secured with a nut. Starting and shutting down is done using the same button.
The bushing rotates counterclockwise. The product can only be fed from the right, gradually shifting it to the left. If you do the opposite, the workpiece may be thrown off the work surface.
Commutator brushes deteriorate very quickly, as they are made of carbon. Their condition must be monitored every 30 hours. If the length of the brushes does not exceed 3.5 mm, then they need to be replaced.
From time to time the machine must be cleaned of dust and sawdust.
By default, mechanical parts do not require lubrication. They should only be lubricated if instructed to do so in the instruction manual.
Creating a machine at home
As mentioned above, oscillating grinding machines for industrial production are expensive, so if you wish, you can make it yourself. Do-it-yourself machines do not have an oscillating spindle. This is due to the complexity of the work.
There are three main components of the grinding installation.
Electric motor. For a homemade machine, the optimal choice would be a single-phase motor with a power of no more than 2 kW.
Spindle. This part deteriorates the fastest, so the most suitable material for it is wood. The spindle diameter should not be more than 180 mm.
Frame. In factory models it is made of cast iron; at home you can use plexiglass. Usually performed in the form of a desktop. To eliminate vibrations during operation, which often occur with homemade machines, it is recommended to increase the size or weight of the workbench.
Before selecting components, you need to create a drawing. You can take the diagrams of factory models as a sample.
The electric motor is fixed on the front pillar. The frame on which it is located must be movable and rotate in any direction. To attach the spindle, a shaft is used, which is connected to the motor rotor via a belt drive.
To adjust the speed, a pulley system is created. The shaft should be positioned as close to the center of the work table as possible, but so that it can easily reach the processing area. When working on a product, grinding wheels with a surface made of abrasive materials, special fabric or felt are used.
Selecting components for a spindle grinding machine
The selection of components for a grinding machine before preparing it yourself is carried out only after drawing up a diagram. You can take drawings of factory models as a basis. Adjustments to the documentation are made according to the parameters of the available components.
The main component of homemade equipment is the electric motor. The best option would be to use a single-phase model with a power of up to 2 kW. The next element is the transition structure for attaching the spindle. This may be a shaft connected to the engine rotor using a belt drive. If it is necessary to regulate the speed, it is recommended to install pulley systems.
Recommendations for choosing components for a self-made grinding machine:
- frame. It is advisable to make it in the form of a desktop. Most factory designs have a cast iron body, which provides adequate stability. A wide desktop will have similar properties;
- spindle. Since this is the most wearing part of the equipment, it is best to make it from wood. This will reduce production costs, as well as reduce the cost of components.
The shaft with the spindle should be located closer to the center of the table. But at the same time it must freely reach the treatment area.
To improve the quality of work, it is recommended to install a chip ejector. Its nozzle should be located below the table level under the spindle.
How to Make a Spindle Oscillating Wood Sander
A spindle sanding machine is used for uniform processing of wooden products. Factory models provide the greatest efficiency. But due to their high cost, purchasing is not always advisable. An alternative option is to make it yourself.
Functional Features of Spindle Grinding Machine
Factory model of spindle sanding machine
During the end processing of wooden workpieces, special requirements are placed on the quality of grinding. Making them manually is problematic and often leads to defects. For these purposes, it is best to use a spindle grinding machine made by yourself.
Unlike other types of woodworking equipment, this machine is large in size. This is due to the specifics of its design. It consists of a power unit, a spindle and a support frame. The above-described components are mounted on the latter.
The spindle is positioned vertically, and sandpaper is attached to its surface. An oscillating grinding machine is used for continuous production. The difference lies in the additional movement of the spindle along the vertical axis.
This ensures maximum processing quality.
When making such equipment with your own hands, the presence of an oscillating spindle is not provided. This is due to possible problems and laboriousness of the work.
The main characteristics of a spindle grinding machine that you can make yourself:
- electric motor parameters. The optimal power is from 0.6 to 2 kW. Rotation speed - 2000 rpm;
- spindle diameter. It is recommended to make several removable models mounted on the motor shaft. The diameter can vary from 20 to 180 mm. The higher this indicator, the faster the processing will take place;
- weight of the desktop. During operation of a self-made encryption machine, vibrations will inevitably appear. To eliminate them, it is recommended to increase the weight of the work table or perform a rigid fastening to another work surface.
The size of the tabletop directly depends on the dimensions of the workpieces. When processing small parts, you will need a platform of 50*50 cm. If their size is large, you need to make a large tabletop.
Factory models with an oscillating unit cost about 20 thousand rubles. Therefore, you need to think in advance about the feasibility of making it yourself.
Selecting components for a spindle grinding machine
The selection of components for a grinding machine before preparing it yourself is carried out only after drawing up a diagram. You can take drawings of factory models as a basis. Adjustments to the documentation are made according to the parameters of the available components.
The main component of homemade equipment is the electric motor. The best option would be to use a single-phase model with a power of up to 2 kW.
The next element is the transition structure for attaching the spindle. This may be a shaft connected to the engine rotor using a belt drive.
If it is necessary to regulate the speed, it is recommended to install pulley systems.
Recommendations for choosing components for a self-made grinding machine:
- frame. It is advisable to make it in the form of a desktop. Most factory designs have a cast iron body, which provides adequate stability. A wide desktop will have similar properties;
- spindle. Since this is the most wearing part of the equipment, it is best to make it from wood. This will reduce production costs, as well as reduce the cost of components.
The shaft with the spindle should be located closer to the center of the table. But at the same time it must freely reach the treatment area.
To improve the quality of work, it is recommended to install a chip ejector. Its nozzle should be located below the table level under the spindle.
Making your own grinding machine
Homemade grinding machine
After preparing the manufacturing diagram and workpieces, you can begin assembling the structure of the grinding machine with your own hands. The support table is best made from square steel pipes with additional stiffeners. The upper part under the tabletop must have a frame base.
First, the tabletop is made. For this you can use a sheet of fiberboard. A hole for the spindle is cut in the middle part of the workpiece.
Then an adapter block is installed that connects the shaft to the engine rotor. After this, the power plant is installed. There are no restrictive or fixing components on the surface of the tabletop.
The degree of processing of workpieces depends on their pressure to the abrasive surface.
Some factory settings provide a mechanism for changing the angle of the spindle relative to the workpiece. The same can be done in homemade models. However, it should be remembered that the presence of this unit in the circuit will increase the complexity of manufacturing the structure.
The video shows an example of a homemade design:
Source: https://StanokGid.ru/derevo/ostsillyatsionnyj-shpindelnyj-shlifovalnyj-stanok-svoimi-rukami.html
Main performance characteristics
Models of grinding machines manufactured by various companies have certain characteristics:
- Electric motors with a power of 0.8 - 1.3 kW.
- A certain desktop size.
- The permissible height of the workpiece for processing is 100-160 mm.
- The spindle speed is 1300-1400 rpm.
- Possible spindle oscillation frequency is 30-60 times per minute.
- The permissible spindle stroke is 25-40 mm.
- Possible tilt of the work table is from 15 to 45°.
- The permissible size of the processing tool is up to 250 mm.
- Certain weight characteristics - from 10 to 140 kg.
Grinding machine Jbos-5 with the table working position installed at an angle of 45°
The machines are also equipped with special devices that allow the removal of waste generated during the processing of parts.