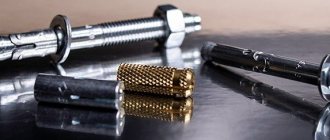
Confirmat is the most popular fastening element used in the production of cabinet furniture. Confirmations became widespread back in the 90s of the last century and since then have been actively used by specialists working in furniture production.
Confirmats are great for assembling homemade furniture
The correct name for this fastening element (along with the designations “Euroscrew”, “Euroscrew”, and sometimes simply “Euroscrew”, which are common among home craftsmen) is “single-element tie”. The word indicated in the title comes from the name of the Confirmat trademark, which the German company Hafele began to use when producing fasteners of this type.
Design features and advantages of use
Confirmats are screws equipped with a countersunk head, which has two types of slots. Thanks to the presence of these slots, Euroscrews can be tightened with either a four- or hexagonal screwdriver. The rod of such a screw has a blunt end, and its working part has a widely protruding thread. Bottom threads are designed to cut threads into a pre-prepared hole, so they are conical and serrated. Under the head, the Euroscrews have a smooth (no thread) surface.
Significant parts of the confirmation
All confirmats have a protective coating of zinc, brass or nickel, and are made from high-quality carbon steel. The use of such steel makes it possible to give Euroscrews high ductility, due to which they bend but do not break. The high plasticity of confirmats ensures their easy removal from furniture even if their installation is carried out incorrectly.
The use of confirmata allows you to connect furniture elements made not only from natural wood, but also from its processed products - MDF and chipboard. Based on the ratio of the outer diameter of the thread and the length of the screw, fasteners of this type are presented on the modern market in the following standard sizes: 5x40, 5x50, 6.3x40, 6.3x50, 7x40, 7x50, 7x60 and 7x70 mm. The most popular are Euroscrews, the length of which is 50 and 70 mm, and the thread diameter is 7 mm.
Sizes of common confirmations
There are varieties of confirmations produced with a regular cap. When using them, additional countersinking of the hole is required. Certain categories of confirmats are made with a special tooth located under the cap. The purpose of such a tooth is to form a chamfer in which its head will be located when installing the fastener.
If the confirmation cap is on the front side of the furniture product, it can be disguised using a decorative plug or sticker, which any hardware store offers in a large assortment today. When choosing such decorative elements, you should take into account not only the size of the Euroscrew head, but also the texture and color of the furniture structural elements that are connected with it.
The diameter of the securing decorative protrusion of the plug must match the size of the recess in the confirmation cap
How to fasten with Euroscrews
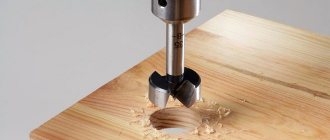
To use confirmations, certain skills in working with such fasteners are required, as well as knowledge of the characteristics of the material from which the products being connected are made. Drilling for confirmation is performed with a tool whose diameter is 4.5–5 mm. In this case, it is best to use drills that have a stepped cutter attached, which allows you to immediately chamfer the location of the screw head. Using such a tool, you can get a finished hole in one pass. In this case, the cutter forms an ideal surface for the screw head, which cannot be said about the drill, which, when removed, can leave chips on the edges of the hole (they, however, will subsequently be covered by the confirmat head).
Euroscrew installation sequence
Euroscrews, when compared with other types of fasteners, provide more reliable fixation of the parts being connected. This is explained by the wider arrangement of threaded elements, which reliably cut into the material. Install confirmations manually, as well as using an electric drill with appropriate attachments or a screwdriver. For those who do not have experience working with such fasteners, it is better to install them manually, so that in case of excessive resistance of the screw, they can be able to remove it from the furniture elements being connected at any time.
Read also: What you need for tig welding
What to drill with?
Often, home craftsmen have had to deal with a situation where they have to use what is available.
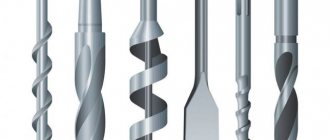
Use of 3 drills of different diameters
This method is suitable for small-scale work, since it requires a lot of time. The hole is prepared in 3 stages.
- Drilling the entire length of the confirmation through 2 parts. The diameter of the cutting tool must correspond to a similar parameter of the Euroscrew body, but without taking into account the thread (we have already talked about this). This is done so that the helical surface of the thread creates a counter thread in the material.
- Drilling an existing hole for an even part of the fastener, which should fit tightly, but not too tightly, so as not to tear the material. The expansion is carried out with a drill of the same thickness as the neck, and the depth must correspond to its length.
- Processing the hole for recessing the cap into the material. This is done using a larger diameter cutting tool. Experts advise doing this with a countersink to avoid chipping.
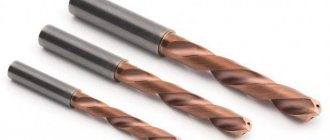
Specialized drill for Euro screed – 3 in 1
It is much easier to work with a specialized drill for Euro screed, since it has a special stepped design, and the entire procedure is completed in one pass.
Another advantage of its use is that it simultaneously chamfers the countersunk head of the fastener. In fact, it combines 2 drills of different diameters and a countersink.
In addition, the confirmatory drill has a lead with a pointed end, which ensures precise insertion of the cutting tool and does not allow it to move away from the center at the beginning of drilling.
How to drill a hole for placing a confirmat
The confirmat is screwed into a previously prepared hole, so the question of how to drill such a hole is quite relevant. To do this you will need the following tools and materials:
- screwdriver or electric drill;
- bit of the appropriate size;
- drill for confirmation;
- a measuring tool, which can be a ruler (or a construction tape);
- pencil;
- awl.
To facilitate marking and maintain a strictly perpendicular position of the drill, use a template for drilling holes for confirmat
Hole dimensions for Euroscrew
For furniture assembly, Euro screws are usually used, the dimensions of which are 6.4x50 mm. To make holes for such a confirmat, the outer thread diameter of which is 6.4 mm, and the cross-sectional size of the screw body is 4.4 mm, a drill with a diameter of 4.5–5 mm is used. Drilling holes for confirmation of this type should be performed to a depth of at least 50 mm. If the diameter of the hole is larger than the specified value, then the Euroscrew simply will not hold; if it is smaller, it can tear the furniture element into which it is screwed.
The step drill is selected based on the dimensions of the specific Euroscrew model
The drill used to make holes for the confirmation must be equipped with a special working head. On the one hand, she prepares an expanded hole for the neck of the screw, on the other hand, she countersinks the place where the screw head will be placed. To place the confirmat, you can also use a regular drill, but in this case it is necessary to prepare places for the neck of the fastener and its head.
Marking drilling locations
The reliability and quality of connections made using confirmats largely depend on the accuracy of marking future holes for them. On the element that will overlap the end of another element of the furniture structure, two types of markings are made:
- drilling depth (5–10 cm);
- the center of the future hole (if the thickness of the joining part is 16 mm, it should be at a distance of 8 mm from the edge of the slab).
Drilling diagram for Euro screws
On the element being joined, the drilling point is marked at its end, placing it strictly in the middle of the furniture board.
To mark the drilling locations as accurately as possible, you can use the following simple technique: after preliminary marking, a through hole is made in the applied part, through which, by attaching the first part to the second, a rotating drill is used to mark the location of the second hole for the European screw.
Making holes
In order to make the holes for placing confirmations as efficiently as possible, it is advisable to follow the recommendations below.
- Before drilling a part, you need to place a piece of unnecessary chipboard under it: this will prevent chips from appearing at the exit of the hole being created.
- The formation of places for the neck and cap of the confirmat in an already made hole can be done by holding the workpiece in weight.
- When drilling both in the layer of the part and at its end, the drill is positioned strictly perpendicularly. This will allow you to get a high-quality result and not damage the part.
- When drilling two parts simultaneously, they must be securely fixed in the required position, for which you can use clamps and other clamping devices. This is the most accurate and fastest way to create confirmation holes.
- When drilling holes for dowels, it is advisable to equip the tool used with a depth limiter, which will prevent damage to the workpiece by drilling through them.
The main fastening element in furniture assembly is the confirmat. It is screwed in with pre-drilled holes. It is the drilling of assembly holes in chipboard for confirmations that we will consider in this article.
Furniture euroscrew, advantages, fastening element dimensions
When purchasing furniture, people try to save money on its assembly. If this service is not included in the price, they often install the products themselves, using independently selected fittings.
In this important matter, a furniture euroscrew, which has universal properties, comes to the rescue. It differs from other screeding methods in its ease of installation and minimum tools required.
It has become popular among Russians since the 90s.
Features and advantages of the fastener
This screw has several names: furniture euro screw, euro screw, euro screw. It is also called confirmat by analogy with the German trademark of the same name. It would be more correct to use the term “single-element screed,” but it is inconvenient and rarely used.
Scope of application of furniture hinges with a closer, installation features
A confirmat is a screw that has a head with slots for a tetrahedron, hexagon or figured screwdriver . The conical shape of the rod and sharp serrations on the end make it possible to easily cut threads in prepared holes. A smooth surface is provided under the head.
Furniture euroscrews have a number of advantages:
- high speed of parts fastening;
- reliability of connection of various materials;
- low cost;
- the ability to disassemble assembled furniture without damaging the holes;
- ease of assembly without the use of special tools.
There are minor disadvantages:
- the need to hide the heads using plugs or overlays;
- impossibility of assembling and disassembling a piece of furniture more than 3-4 times.
Euroscrews are often compared to ordinary self-tapping screws. This is not entirely correct, since there are certain differences in working with them. Drilling preliminary holes for Euroscrews takes a lot of time, but this small drawback is more than compensated for by the durable clamping of the parts. Self-tapping screws tighten faster.
The design of the confirmat ensures reliable fastening even of porous materials.
Scope of application
The use of Euroscrew is directly related to the manufacture and assembly of furniture and carpentry. Simplicity, reliability and high speed when working using familiar tools made this confirmation a leader among analogues . It is necessary to distinguish several areas of work where this fastening element is widely used:
- production of furniture in production;
- repair;
- making cabinet interior items with your own hands;
- assembly of finished products.
The design features of the European furniture screw allow it to be used with materials of different compositions:
- wooden sheets and boards;
- chipboard;
- laminated chipboard;
- Fiberboard;
- plywood.
Before starting furniture manufacturing or assembly, the craftsman should take care of purchasing plugs. They completely cover the caps and give the product a finished look. There are two types of plugs: self-adhesive and plastic. Both can be matched to the color of the furniture. Due to convenience, self-adhesive options are more used. The cost of the plugs is almost the same.
Laminated chipboard Wood Fiberboard Repair Industrial furniture assembly Manufacturing of cabinet objects Do-it-yourself furniture making Wood-look plugs
Installation nuances
Euroscrews are quite simple and easy to use, but basic skills in furniture assembly are required. Inept actions when drilling can ruin the workpiece. Not everyone can choose the correct drill diameter or determine by eye the perpendicularity of the tool during operation. A slight deviation will cause the hole to come out.
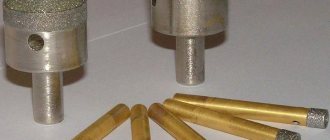
For drilling, nozzles of different diameters are usually used to make three holes: for thread, head and countersunk. The use of several tools is justified only when performing small-scale work.
Professional furniture makers use a special drill with a step cutter, which is capable of performing all three operations simultaneously.
When removing the tool, minor chips are possible, which are easily covered by the wide cap.
To speed up installation work, high-speed power tools are required. Drilling at high speeds is especially important to keep chips from getting into the holes.
Furniture parts are mainly attached at an angle of 90 degrees. First you need to make a hole in the plane of one part, and then in the end of the other.
After this, a screwdriver is used, although it is better for beginners to use hand tools at first.
When working, it is important to install the parts perfectly evenly, avoiding displacement.
Incorrectly combined parts spoil the aesthetic perception of a piece of furniture and disrupt the functions of moving elements. To avoid such troubles, you should pay attention to some nuances:
- Having prepared the hole for the euroscrew, you do not need to completely tighten it the first time. It is better to stop at the level of the head entering the part, adjust the workpiece, press firmly and tighten the tie.
- When working with loose or porous materials, it is recommended to apply glue to the threads.
- In pieces of furniture that have drawers, you should not completely tighten the sides without checking the operation of the moving parts.
For a more reliable screed, you need to use the marking method. In production conditions, special machines do this. For an amateur, it is enough to have a few simple things: a marker, a square, a tape measure, an awl. Make marks last so that the drill does not slip on a smooth surface. They are placed approximately 50 mm from the edge.
It is convenient to make markings using special templates (conductors) . These are blanks with ready-made holes that are superimposed on the parts so as not to have to measure the same distances again. Templates can be made with your own hands or purchased.
Step-by-step installation work can be shown using the example of assembling a drawer for a closet or bedside table. Four chipboard boards are taken as blanks. Installation proceeds as follows:
- First you need to carefully examine the details of the future box. The ends connecting to the plane of the board should not have a decorative layer. It would be a good idea to check for chips and scratches on the front sides of the workpieces so that the damaged parts do not end up on the outside. Having decided on the correct arrangement of the boards, you need to connect them.
- To achieve perfectly even joints, it is advisable to use special clamps. The fastening of this device should not be rigid, as this may damage the edges. Corners must be clamped and aligned separately.
- The hole for the euroscrew must be made using a drill. It should go through the middle of the end board strictly perpendicularly. The drill at the base is wider in diameter, to accommodate the thicker part of the screw without thread.
- Using a screwdriver with a hexagonal bit, install the confirmat. It is not advisable to tighten the hardware all the way with an electric tool; it is safer to do it manually. The hat should be recessed a little.
Using this fastening method, you can assemble and install furniture yourself. This will save money in the family budget. Russians have always been distinguished by their ingenuity and skill in making products with their own hands.
Now that people have the opportunity to use such universal fastening material in their work, there are even more people who like to make their own furniture. Moreover, many companies provide services for the production of blanks to specified sizes.
All that remains is to order and assemble the product to your liking.
Installation of the Euroscrew Marking using a template (jig) It is important to choose the correct diameter of the step drill Hole drilling pattern Connecting parts
Hole depth and width
When assembling furniture, confirmat size 6.4*50 is usually used. Because the thread diameter is 6.4 mm, and the diameter of the confirmation body is 4.4 mm, then for high-quality fastening of parts, the hole diameter must be in the range of 4.5-5 mm and a depth of at least 50 mm.
If the thickness of the hole is greater than the specified one, the confirmat will not hold the parts well; if it is less, its thickness can tear the chipboard.
For drilling, use a confirmat drill with a diameter of 4.5 mm, which is equipped with an additional head for drilling an enlarged hole for the neck of the confirmat, which also makes a countersink for its head.
Of course, you can use a regular drill with a diameter of 5 mm, but for high-quality fastening in the hole you will additionally need to make space for the neck of the confirmat and its head.
Read also: Machine for the production of gloves China price
Using three drills of different diameters
This method is suitable for small volumes of work, as it requires more time. Hole preparation is performed in three approaches:
First step
– drilling through two parts for the entire length of the Euroscrew. The diameter of the drill must be equal to the diameter of the screw body without taking into account the thread. This is done so that the threads can cut a counter thread in the material.
Second step
– expansion of the already obtained hole for the smooth part of the hardware, which should have a tight fit, but not too tight, so as not to split the material. Reaming is performed with a drill equal to the thickness of the neck and to a depth equal to its length.
Third step
– countersinking a hole to deepen the head into the material. This can be done with a drill of a larger diameter, but to obtain a high-quality result without chipping, it is better to perform this operation with a countersink.
Marking drilling locations
In order to perfectly fasten two parts, it is necessary to mark the places of their fastenings as accurately as possible.
On the part that will be applied to the end (the one on which there will be a through hole), you need to make two measurements - along the length (usually 5-10 cm) and from the edge - exactly 8 mm (this is if the thickness of the plate is 16 mm).
On a part that lies perpendicular, mark the drilling point at the end. Here you need to maintain the same distance in length (5-10 cm from the beginning), and in width - strictly in the center (8 mm from the edge).
Markings must be done as accurately as possible, especially along the length, because If the markings are incorrect, your parts may have extra gaps or protrusions when joined.
It is better to make a through hole in the first part, attach it to the second - and immediately use a drill to mark the drilling location at the end of the second part. And then, separately, calmly drill the hole.
The best manufacturers
The unsurpassed leader in production remains Hafele, the brand that was the first to supply these fasteners to the market. The company's products are made of high-quality steel and are excellent for installing hardware.
Products from the German company Hammer Werkzeug GmbH are also trusted. Among Russian manufacturers, one can note the Praktika company.
Drilling in two parts at the same time
This option is considered the most accurate and, moreover, the fastest. But in order to make a hole in two parts at the same time, you will need to fix them before drilling. To do this, you may need special clamps, clamps and other devices.
Hole Drilling Tools
In order not to mark 8 mm from the edge each time both into the layer and at the end, you can use a special device, which, by the way, is easy to make yourself.
It is a kind of wooden template with a metal sleeve for a drill inside.
It looks like this, see photo:
And this is a more professional thing:
Watch a short video on how to accurately drill holes in chipboard for confirmations and assemble furniture parts:
Drilling for dowels
The hole for the dowels is made with an 8 mm drill. Also, in order not to drill through the part, it is advisable to equip it with a depth limiter.
At the end we drill with the same drill to a depth of 20 mm. Do not forget that during any work the drill must be strictly perpendicular to the plane of the part.
Of course, if you picked up a drill for the first time in your life, you won’t do very well. But this activity can be learned quite quickly.
In construction, there are many fasteners, for example, screws, nails, self-tapping screws. Sometimes it is difficult to understand from their name what they are talking about. For example, let’s take a fastening element such as a confirmat.
The word is unusual, but the meaning is simple. This is a furniture screw. It got its name from a German company. In our country, this fastener has become popular since 1990. The confirmat has its own characteristics and varieties, which we will discuss below.
Features of the selection and use of confirmations
Concept and important characteristics
Confirmat (euroscrew, euroscrew, confirmat screw, furniture screw tie) is a tie-screw with which you can connect several wood parts. It is most often used for assembling furniture, carpentry and construction products.
- In appearance, the confirmat is a metal rod, the top of which is formed by a head, and the bottom by a blunt end.
- The confirmat's carving is massive; it protrudes widely above the main rod. At the very bottom, conical coils with jagged edges are cut.
- The confirmat also has a large threaded and rod surface. As a result of this feature, the load on the twisted material is minimal. The assembled compound acquires good resistance to attack.
- The diameter of the smooth and rod surface is the same. Thanks to this, the Euroscrew is in close contact with the material being fastened.
- These screws are made from high quality carbon steel. All Euroscrews have an anti-corrosion coating. The hardware is coated with a special compound: brass, nickel or zinc.
- Confirmat is European class hardware. It is manufactured and processed in factory conditions.
Read also: Date cable usb com rs232 pinout
This video will tell you what is better to choose, confirmation or self-tapping screw:
Advantages and disadvantages
Confirmat has its advantages and disadvantages. Let's look at the positives first:
- The Euroscrew is easy to install.
- It is possible to connect parts one after another.
- No special equipment is required to attach it.
- The confirmat tightly tightens the parts.
- Objects connected with this screw have a reliable and stable connection.
- Materials fastened with this euroscrew can withstand numerous and long-term loads. However, if we are talking about attaching a shelf for books, then it is better to use a confirmat and dowel connection.
The negative points include the following:
- Fastening with confirmation is not hidden. The confirmat has to be masked using a plastic plug in the color of the chipboard.
- Elements assembled in this way cannot be disassembled. The structure will not withstand repeated assembly.
Product parameters
Dimensions
The confirmat has the following size range (the first number is the thread diameter in millimeters, and the second is the length in millimeters):
- 5x40;
- 5x50;
- 6.3x40;
- 6.3x50;
- 7x40;
- 7x50;
- 7x60;
- 7x70.
Below is the weight of 1000 pieces of hardware:
- Confirm screw 5x40 mm – 4.4 kg.
- Confirm screw 5x50 mm – 5.49 kg
- Confirm screw 6.3x40 mm – 7.0 kg.
- Confirm screw 6.3x50 mm – 8.3 kg.
- Confirm screw 7x40 mm – 7.2 kg.
- Confirm screw 7x50 mm – 9.0 kg.
- Confirm screw 7x60 mm – 14.0 kg.
- Confirm screw 7x70 mm – 21.0 kg.
Confirmats are manufactured according to European standards 3E120 and 3E122.
This video will tell you about the process of installing confirmations:
Installation
Material calculation
The total number of euroscrews depends on the mounting area. You can count them yourself. The main thing to consider is the following information about fastening hardware.
When drilling holes, you must strictly maintain the edge and center distances.
- The minimum distance from the edge is equal to twice the depth of the fastened element. The fastening element cannot be installed very close to the edge.
- The maximum distance between the axes is equal to four times the depth of the material being fixed. You shouldn’t screw in Euroscrews further than this value.
Often buyers have difficulty, they cannot decide on the number of pieces. Since the manufacturer sells confirmations by weight.
- In this case, special calculators available on the Internet will help. If you enter the type of hardware, standard, diameter, length and weight into the program, it will calculate how many kilograms of hardware are in the specified quantity.
- There is another calculator in which you just need to indicate the size of the screws and the weight, and it will give you the number of pieces. There is also a reverse calculation (from pieces to kilograms).
Below we will tell you which drill is suitable for the confirmat and how to install them.
Jig for drilling holes for confirmation
Technology
Connecting parts with a confirmat requires little skill. You need to be familiar with the features of the European screw and the quality of the material being fastened. Confirmat is used mainly for fiberboard, chipboard, plywood, chipboard and wood.
The connection is formed as follows: the smooth part and the head are in the through hole, and the threaded part is in the blind hole. In this case, the first hole is a through hole, which is located on the front part of the first part. And the second hole is in the second part and it is blind.
The installation process looks simple. For confirmation you need to prepare 2 special holes: the first for the threaded part, the second for the smooth unthreaded part. If we take as an example the most common confirmation size of 7 mm, then in this case you will need a 5 mm drill for the threaded part, and a 7 mm drill for the non-threaded part.
- There is another positive point in editing the confirmat. There is a special drill for confirmat, which has a stepped thread. With its help, you can prepare a hole for a European screw in one step.
- To connect the parts even more securely, a dowel is added to the fastening.
So, to fasten the parts with a confirmant, you will need the following tools:
- Hexagon.
- Two drills of different diameters (5 and 7 mm) or a confirmation drill.
Recommendations
There are a number of important rules and recommendations that need to be taken into account.
- To prevent the drill from moving sideways from the very first minutes of the drilling process, it is necessary to make a notch in the middle of the planned hole. This is done with an awl, although other sharpened objects will also work: a self-tapping screw, a nail, and the like.
- Reduce speed. Drilling wood should be carried out at low speeds with an electric drill.
- You can reduce or minimize the formation of chips on the bottom surface of the product when drilling through it by performing the work using one of the following methods:
- we create a through-type hole with a small diameter, then drill through it to the center on both sides with a cutting tool of the required diameter;
- To the side where the drill should come out, use clamps to firmly press a flat backing made of wood or fiberboard, drill a hole, and remove the backing.
4. The verticality of the drill is ensured by using a guide for an electric drill; for workpieces that have a cylindrical shape, you can use a special jig, which ensures both centering of the drill and vertical drilling.
If the drilled hole is too large in diameter, you have the opportunity to restore it in the following way: drill the hole to a larger diameter, then insert a wooden dowel (wooden dowel) of a suitable diameter into it and place it on the adhesive. Allow the adhesive to harden and align the top edge of the chopstick flush with the plane using a chisel, then drill the hole again in the same place.
How to make a hole for confirmation, see below.