When choosing an electric motor cooling fan impeller, special attention should be paid to its design and application.
The design of the electric motor blowing impeller can be:
The amount of air that reaches the cooled surfaces depends on the diameter of the impeller, the angle of attack of the blades, and the type of impeller relative to the direction of rotation. The impellers are forward curved, straight radial and backward curved.
After manufacturing, each impeller is balanced. Thanks to balancing, network runouts are eliminated, destruction of bearings is prevented, and their wear is reduced. Under operating conditions, one should not forget that the integrity of the impeller protective casing should be constantly monitored. If the impeller is damaged, the electric motor will overheat and fail.
Thus, to prevent damage to the electric motor due to overheating (especially in the warm season), all devices are equipped with blowing and cooling impellers. The impeller should be selected in accordance with the technical characteristics of the motor and fan.
What is important to consider when choosing an impeller
Of course, you can make an electric motor cooling impeller with your own hands. But how long will it last and how long will it take... That is why we offer to buy an electric motor cooling impeller in Ukraine
When choosing polypropylene impellers for cooling electric motors, it is important to consider the conditions under which further operation will occur. All versions of impellers are made in Kharkov, taking into account modern requirements and technologies. Our products have a lot of advantages. But its most important advantage is an excellent combination of quality and price!
DIY centrifugal fan. Do-it-yourself centrifugal fan snail (photo, video) What types of snail hoods are there
The tools needed for this project are very easy to assemble and are all pictured above. The basics for this project are a set of 6.5" and 3.5" PVC pipes, a plastic container or bowl, and a 3mm fiberglass sheet.
Expert opinion
It-Technology, Electrical power and electronics specialist
Ask questions to the “Specialist for modernization of energy generation systems”
How to make a radial fan for a workshop exhaust from plywood and a washing machine motor with your own hands Before gluing the base to the main body, we drill a 3-inch diameter hole in a 6-inch PVC pipe, which will be the passage for air to enter the main body and then into the outlet hole. Ask, I'm in touch!
Further disassembly
Removing the top engine mount cover
It is simply put on top and crimped around the perimeter in four places.
Dents created at the factory can be carefully smoothed out using pliers.
Then the cover is simply pulled back by hand and removed from the engine housing.
Air pump wheel
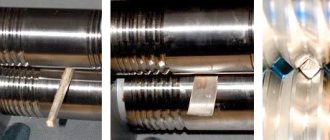
There is a fan under the cover. It shows slight damage to the plastic part of the case.
Inside the cover, the layers of dust remaining after purging the engine are clearly visible. They can also be seen in the photo of the fan near the inlet blades.
Dismantling the anchor
Screws securing the rotor to the motor stator
We gain access to them immediately after removing the plastic fan housing.
Let's unwind them. At the same time, we pay attention to the amount of construction dust inside the housing that remains even after it has been blown out from the outside.
Protrusions of the mounting plate that fit into the grooves of the stator housing
They are located next to the mounting screws and provide additional fastening to the rotor.
Using a flat screwdriver, carefully guide them toward the exit from the grooves.
Then we hold the mounting plate with our fingers through the internal holes or hang it on a support. The rotor is still held in place by attaching the outer race of the lower bearing. By the way, it turned out to be additionally glued.
The protruding end of the threaded shaft axis must be protected from damage with a piece of dry hardwood board and struck with a hammer. The rotor will be knocked out of the stator.
Visual inspection
On the rotor, traces of carbon deposits from graphite dust formed as a result of burning brushes and glue on the bearing race are clearly visible.
What kind of lighting do you prefer?
Built-in Chandelier
I tried to remove contamination from the plates in the traditional, careful way: wash with alcohol or its solution using a cotton swab.
The carbon deposits stuck quite strongly to the metal and dissolved very poorly. I had to work with steel bluen. The photo below shows the preliminary result of cleaning, which requires additional polishing of the surfaces.
But, for carrying out electrical measurements this is quite enough. Then comes the cleaning of the grooves between the collector plates from debris, dust and carbon deposits that can bypass the rotor winding chains. At first he worked as a bluer, and then as a scraper made of non-coniferous wood.
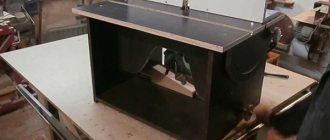
The process of making an exhaust fan from available materials
The motor shaft is freed from nuts, pulleys, plugs, flanges and other devices. A circle with a diameter of 250 mm is cut from plywood measuring 400x400 mm using a manual wood router using a universal milling table.
A hole is made inside with a diameter equal to the diameter of the engine impeller (50 mm).
A circle with a diameter 1-2 mm smaller than the hole is cut out of the scraps so that it fits freely into it.
Holes are drilled for mounting the electric motor, then drilled a couple of millimeters with a countersink or a thick drill to hide the bolt heads. The motor is screwed to the plywood.
A smaller cylinder of such a height is glued to the circle that they together cover the motor shaft.
A hole is drilled inside with a diameter equal to the thickness of the shaft. The structure is carefully pressed onto the shaft through a wooden spacer so as not to split or damage.
Two identical “guitars” are cut out from the remains of plywood and a second sheet - the future body of the air purifier.
Two circles are cut out of thin sheets of plywood with a diameter slightly smaller than before - about 230 mm.
On one of them, blind radial grooves are milled using a 6 mm milling cutter with a depth of 3-5 mm. In this case, 8 pieces.
The result is a turbine similar to that used in a vacuum cleaner.
Using a hand or stationary circular saw, rectangles are cut from thin plywood. Their length exceeds the length of the grooves by a couple of millimeters, their width is 58 mm.
The ribs between the side edges, with which the parts are inserted into the grooves, are ground at an angle. These slopes will make it easier to install the blades into the grooves. When sanding, you need to be careful not to get your fingers under the sandpaper. The grooves are lubricated with wood glue, and all the parts are pressed into them.
The second circle is placed coaxially with the lower one, and the structure is pressed down with a weight for gluing.
After drying, an air intake with a radius of 43 mm is drilled inside the turbine base. In the center of the second circle with a diameter of 230 mm, a hole is drilled with a crown with a diameter equal to the thickness of the smaller cylinder on the engine shaft.
The structure is put on the engine and screwed with screws through pre-drilled holes.
The motor starts and the plywood is leveled using sandpaper or a grinder with it as an attachment, taking precautions. The upper circle is glued to the blades. The structure is secured with clamps. An angle grinder with an emery wheel or a grinder adapts to it.
If the blades protrude strongly beyond the circles, they need to be carefully trimmed with a handsaw with a margin of a couple of millimeters.
The motor is run with a cypher tool to align the edges and center the turbine to minimize vibration.
The same is done to level the top surface. A hole is made in the upper “guitar” equal to the diameter of the circle with the electric motor, so that it fits tightly. An air intake with a radius of 43 mm is cut out in the lower “guitar”.
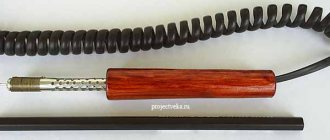
Compact water pump with brushless motor and remote control
We cut the workpiece along the markings almost to the neck. We bend the blades of the future propeller and cut off every second of them. We are left with a blank with three blades equidistant from each other. The edges of each blade must be rounded. We do this carefully.
Expert opinion
It-Technology, Electrical power and electronics specialist
Ask questions to the “Specialist for modernization of energy generation systems”
Do-it-yourself impeller for exhaust hood The 12 V DC electric motor, on the shaft of which the propeller will be attached, can be taken from old toys or a hairdryer that is unnecessary in the household. Ask, I'm in touch!
A simple homemade product from CDs
The simplest fan can be made from CD discs. It can be used, for example, for local impact on a user who spends a long time at the computer.
Let's prepare the raw materials to complete the work:
- CD discs – 2 pcs.;
- low-power motor;
- wine bottle cork;
- cable with USB plug;
- a tube or rectangle made of thick cardboard;
- soldering iron;
- candle or lighter, hot glue;
- pencil, ruler, squared paper.
For our purposes, you can use a motor from an old toy, for example, from a toy car. A toilet paper roll slightly decorated with decorative finishing paper can be used as a cardboard tube.
The main advantage of this model is that almost any do-it-yourselfer will have all the materials needed for its manufacture.
The assembly process of the mini fan is quite simple.
Let's take one of the CDs and use a marker to divide its surface into eight equal sections. The easiest way to do this is to use a sheet of checkered paper.
Draw a cross on it from a horizontal and vertical line. We divide each of the four resulting right angles in half. Using cells, this is not difficult to do.
Using a very simple method using a checkered piece of paper, we can achieve the ideal layout of the disk into eight equal sectors
We place a disk on our drawing so that the intersecting lines are in the very center of its hole. Alternately applying a ruler to the lines diverging from the center, we make markings on the disk. This way the sections will be the same.
To divide the disk into blades, follow the marking lines with a soldering iron from the transparent part to the edge.
You can also use scissors for cutting, but there is a danger that the workpiece will crack during the process. If you don’t have a soldering iron, you need to use a knife preheated on the stove. When working with a soldering iron, deposited plastic is formed along the edges of the cut, which can be easily removed with a knife.
Cutting a disk with a soldering iron is the most effective method in which the workpiece will not crack or deform, and the remnants of the deposited plastic can be easily removed with a knife
We heat the surface of the disk over the flame of a burning candle so that the blades can be slightly expanded. If you don't have a candle, a lighter or a soldering iron will do.
The central part of the disk should be heated, and all blades should be turned in the same direction. A wine cork is placed in the hole of the disc. To fix it better, you need to pre-treat the edges of the hole with hot glue.
The USB cable must be connected to the motor. If we don’t guess the direction of rotation of the propeller, we can swap the reins, that is, change the polarity.
The motor needs to be glued to a cardboard tube, and the tube itself to a second CD, which will act as the base of the stand.
When the plug is installed in the hole, the stand from the second CD and cardboard tube, as well as the connecting device are already assembled, it is very important to correctly fit the propeller onto the motor shaft
Now the propeller needs to be “planted” on the rod of the future fan. We will try to make sure that it is installed strictly in the center. You can secure it in this position using hot glue.
After all work is completed, the fan is ready for use.
Although the construction of this device will not take you much time, the result of the work performed will undoubtedly please you
How to make a similar, but slightly more complex design by including a regulator in the circuit, look at the video posted at the end of this article.
Do you find these homemade instructions complicated? Then you may be interested in information about the types of fans and the rules for choosing them in order to purchase a ready-made device offered by manufacturers of household appliances.
DIY fan - 130 photos and videos made from improvised means and materials
- electric motor from a washing machine: power – 600 W with a capacitor, with shaft rotation speed – 1600 rpm;
- four sheets of plywood with dimensions 400×400 mm, thickness 19 mm;
- a pair of plywood sheets with dimensions 300×300 mm, thickness ~16 mm;
- plywood 6 mm thick;
- rolled steel 0.35 mm thick with dimensions 120×1100 mm;
- several dozen metal screws;
- narrow masking tape;
- M5 or M6 bolts with wings and washers.
- grinder (angle grinder) with an emery grinding wheel with a grain size of 80-100 grit;
- pencil, ruler and compass;
- shears for cutting sheet metal;
- drill or screwdriver with metal drills and a bit for self-tapping screws;
- manual wood milling machine, preferably built into the table;
- straight groove cutter;
- sanding paper;
- wooden or rubber mallet (mallet);
- wood glue and clamps;
- a circular saw.
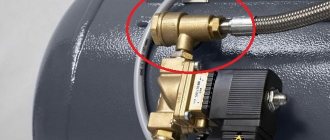
Direct connection between impeller and motor
The impeller is fixed without the use of couplings or other gears directly at the end of the electric motor shaft, located horizontally. This design ensures maximum reliability, minimal noise level and high efficiency (no transmission power losses). The disadvantage of the design is the restrictions on the weight and dimensions of the device. This method of connecting the motor to the impeller is possible only in small-sized, lightweight fans. If the engine speed matches the impeller speed, this type of connection is unacceptable.
Types of equipment
First of all, snail hoods differ in pressure indicators. Ventilation can be carried out under the following conditions:
The first type of hoods is suitable for use in both industrial and domestic environments. As a rule, such equipment is quite compact, so it can be installed without additional help.
Medium pressure fans are used for industrial purposes. Such equipment can more easily withstand difficult operating conditions; it is equipped in accordance with basic fire safety and technical requirements in production.
The third option is used not only in workshops, but also in laboratories, warehouses, areas where painting is carried out, etc. They can be installed for blowing air conditioning systems or working machines, as well as for pumping air in boiler systems.
Depending on the quality and degree of wear of the structure, there are general volute hoods, heat-resistant, corrosion-resistant systems, as well as heavy-duty equipment that can withstand even explosive reactions.
In most cases, snail-shaped air ventilation systems are used to remove pebbles, wood and metal shavings, wood chips and other production residues from the premises. Their installation must be carried out taking into account safety and labor protection requirements.
Expert opinion
It-Technology, Electrical power and electronics specialist
Ask questions to the “Specialist for modernization of energy generation systems”
How to make a fan with your own hands - diagram, photo, video The sticker with the model marking is located on the back side of the fan, it can be seen that this Globefan 220mm Blue LED model has an impeller rotation speed of 650 rpm, consumes 7. Ask, I’m in touch!
Belt drive pulley between bearings
The impeller is connected to the engine via a belt drive with a pulley fixed between the bearings. The engine is located horizontally, the spiral housing is located vertically. The disadvantage of this design is the difficulty in replacing the belt. When using flat belts, they have to be embroidered. For V-belt transmission, remove the bearing located on the edge. Therefore, fans of this design are rare.
Read also: How to cut car glass
How to make it yourself
One of the features of such snails is their different price range. The minimum price for a snail hood will be about 3 thousand, but such devices, as a rule, are not very powerful and are very limited in size. The average price of a high-quality unit will exceed 20 thousand rubles.
Therefore, for domestic needs, it is more advisable to make a homemade snail for extractor hood. The standard design of such a housing will consist of two parts: the engine will be located in one zone, and the blowing blades in the other .
The casing for the snail can be purchased at hardware stores. If you are going to make it yourself, purchase the motor and other parts in advance, since the dimensions will have to be adjusted. It is better to make the case from metals (for example, aluminum and steel). Plastic will be less resistant to mechanical damage, and wood will quickly catch fire in the event of a malfunction.
The fan in such a system will operate at high speed. Therefore, incorrect design of the hood can have bad consequences. Check the quality and reliability of not only the base itself and fastening mechanisms, but also the motor, impeller and fan.
The fan dimensions are selected taking into account the area and degree of contamination of the room. Industrial designs are large.
Pay special attention to the choice of internal materials. Fan operation can be affected not only by temperature, but also by the power of air flow, the amount of debris and dust.
When air with large impurities is sucked in, the blades of the rotating wheel may be damaged. And in order to thoroughly clean the air, the unit must operate at high speed and under high pressure - this creates additional stress on the entire internal structure. Therefore, it is better to choose parts made of durable materials, such as steel or aluminum .
Compliance with the following recommendations will allow you to create a high-quality and safe hood with a long service life:
- choose the right size and power of the motor : take into account the maximum load on the structure, as well as the required operating speed of the hood;
- When mounting such a system vertically, carefully check the reliability of the fan and wheel fastening : with rapid air flows, they can jump off or change their location;
- materials adjacent to such a hood must be fireproof , as are all parts used in its assembly;
- observe the proportions between the individual hood zones : in the standard models offered in stores, the optimal ratio of the length and width of the structure is taken into account;
- If you are not sure that the assembled hood is safe, contact specialists who will check its serviceability .
Please note that hoods are rarely used in living rooms . Firstly, they take up a lot of space, and secondly, in rooms like a kitchen, the flow of polluted air can have different directions, so it is best to install such a hood in a ventilation shaft, where all the air coming from the apartment is concentrated.
Snail design
A standard volute (umbrella) consists of an impeller and a power unit. Your fan, depending on its assigned functions, may have protective properties against corrosion or be characterized by increased heat resistance.
The structure of the snail is selected directly for the room in which an additional cleaning system should be installed. When choosing a device, it is recommended to take into account the strength of the air flow, namely:
- low pressure flows;
- average pressure;
- high pressure flows.
When choosing a “Snail” fan, you should take into account the strength of the air flow
Professionals warn that the more powerful the ventilation unit, the more effort should be put into installing it. A homemade box or base will facilitate quick connection and correct operation of the entire device for a long time.
What to do if the household fan does not work?
So, we already know how to make a fan ourselves. But you probably have a faulty factory-made fan in your household. The design of such products is simple (you can use the instructions), so for those who are especially curious, the final topic of the article will be repairing a floor fan at home.
Design of an electric motor cooling fan impeller and its application
The amount of air that reaches the cooled surfaces depends on the diameter of the impeller, the angle of attack of the blades, and the type of impeller relative to the direction of rotation. The impellers are forward curved, straight radial and backward curved.
Expert opinion
It-Technology, Electrical power and electronics specialist
Ask questions to the “Specialist for modernization of energy generation systems”
How to make an air intake in a fan with your own hands? When choosing an electric motor cooling fan impeller, special attention should be paid to its design and application. Ask, I'm in touch!
Several suitable materials
- Calculation of overall dimensions. If the device will be installed in a confined space, special damper pads are provided to compensate for vibration.
- Manufacturing of the body. If there is no ready-made structure, you can use plastic sheets, steel or plywood. In the latter case, special attention is paid to sealing the joints.
- Installation diagram of the power unit. It rotates the blades, so you need to choose the type of drive. For small structures, a shaft is used to connect the motor gearbox to the rotor. In powerful installations, a belt type drive is used.
- Fastening elements. If the fan is installed on the outer casing of, for example, a boiler, mounting U-shaped plates are made. With significant power, it will be necessary to make a reliable and massive base.
Popular models
In principle, there is no model division of snails. There are certain brands that are produced by all manufacturers. And they are divided mainly according to their intended purpose. For example, a VRP fan, where the letter “P” means that this is a dust model, which is used in ventilation and aspiration systems to remove air with a high concentration of dust. That is, this is a specific model that must be used for its intended purpose. Of course, this device can easily handle ordinary air, but it is more expensive than standard VR or VC, because its design uses thick metal to make the body and blades, hence the higher power of the electric motor.
The same applies to VR DU brand fans, that is, for smoke removal. They are made from higher quality materials with the installation of an explosion-proof motor. Hence their high price. As for other positions, VR is divided into types that have already been mentioned, and each group has its own models with its own technical characteristics.
Created Threads
Low pressure fans - no higher than one hundred kg/cm2. Temperature no more than 80 °C. They are used in equipping production workshops and building houses. “Snails” are installed on roofs.
Models with medium pressure - from one hundred to three hundred kilograms per square centimeter.
High pressure equipment - three hundred to two thousand kg/centimeter squared. High-pressure air flows of exhaust "scrolls" are usually located in combustion zones of fuel of different brands in boiler rooms, fuel warehouses, and air duct systems of paint shops.
The centrifugal fan "snail" requires reliable mounting and a solid base. In order to avoid vibration, the housing is properly fixed. Ignoring this phenomenon will cause the device to fail.
Electric motors used
The industrial snail hood is equipped with explosion-proof electric motors, durable housings and covers. Most often, asynchronous mechanisms with a fixed rotation speed are used as a drive. This unit quickly reaches maximum performance and is reliable and durable. The disadvantages of asynchronous electric motors include the inability to adjust the speed of rotation of the working shaft, which somewhat limits the possibilities of using such equipment.
The presence of dimming in the electric motor and an automatic control unit allows you to regulate the rotation speed, significantly expanding the functionality of the use of volute fans. The disadvantage of using such motors with variable speed control is their high cost, as well as reduced reliability of units in which the electronics that control the operation of the drive often fail.
Source
How to make a centrifugal fan
From what has been said, the obvious way to achieve this is to remove the tangential fan from the hood, for example. Advantage: Silent operation is ensured. The manufacturer complies with the norms prescribed by the standards, so factory-made devices of the hood class are relatively quiet. We believe that for most readers this is not the best solution to the problem, let’s continue our consideration.
Vacuum cleaner
Inside the vacuum cleaner there is a ready-made centrifugal fan. A big plus is that there is already a ready-made housing that needs to be mounted in the channel on site. Additional benefits include:
- The vacuum cleaner engine is designed for long-term operation. Spins the blade for days on end. The windings are often protected from overheating; in addition, air passes through the channels, cooling the stator.
- The vacuum cleaner engine is designed to overcome significant pneumatic loads. When you disassemble this housewife's assistant yourself, you will see a safety valve inside. Try removing it and blowing it out with your lungs. Does not work? And the engine does this in jest! Pinch the inlet or bend the hose in half. A click coming from the inside of the case indicates activation. We believe that such a force will be more than enough to ventilate the facility.
- Plus - the suction power (in aerowatts) is indicated in the technical specifications, similar to the pressure created. Thus, it is easy to calculate in advance using formulas whether the engine power is sufficient for the selected task. Sometimes manufacturers are so kind that they indicate the flow rate, for example, 3 cubic meters per minute. Anyone can do the math: 180 cubic meters per hour. Thanks to the high power, the flow rate will be maintained despite the turns and bends of the air duct.
Expert opinion
It-Technology, Electrical power and electronics specialist
Ask questions to the “Specialist for modernization of energy generation systems”
Using Factory Parts Sometimes there are more than two wires in the cooler and USB cord, remember, we need the black and red color of the two wires in one and the other element. Ask, I'm in touch!
Windmill from a cooler: instructions for converting a computer fan into a wind generator
Mini wind generator from an old computer cooler
Important! You should not expect to create a device that can charge a cell phone battery or power a laptop. The energy obtained in this way is only enough to power the LED flashlight
The whole idea is useful from an educational or cognitive point of view.
Manufacturing technology
To convert a computer fan into a wind generator, you will need to perform the following steps:
Upgrading the motor
In order to rebuild the engine, you will need to disassemble the cooler. This is done as follows:
- remove the sticker from the engine compartment cover in the central part of the cooler;
- carefully remove the compartment cover;
- the retaining ring securing the impeller axis is removed;
- the impeller is removed.
After this, free access to the motor windings appears. They must be removed as they are not suitable for our purpose. The easiest way is to carefully cut them and pull them out of their nests.
Then the windings are wound with thinner wire. The number of turns should be the maximum that the stator can accommodate. The windings are wound at random - the first clockwise, the second counterclockwise, then clockwise again and counterclockwise again. This will provide AC power.
It would be a good idea to change the magnets to more powerful ones, for example, neodymium. This will significantly increase the generator power and stabilize the output voltage.
After this, wires are soldered to the terminals of the windings, to which the rectifier will subsequently be connected.
After completing these steps, the entire structure is assembled in the reverse order. A rectifier is assembled from 4 diodes, and this completes the engine modernization.
Impeller manufacturing
The blades on the cooler are good size for cooling the inside of the computer, but they are too small to work as a wind wheel. In order to ensure the highest possible efficiency of interaction with wind flows, it is recommended to manufacture new blades. You will need to do the following:
Useful tips Connection diagrams Principles of operation of devices Main concepts Meters from Energomer Precautions Incandescent lamps Video instructions for the master Testing with a multimeter
Stylish product without blades
We are accustomed to the fact that the main part of the fan is the propeller. This design part rotates, creating the necessary air flow.
But there are also bladeless models. They have become fashionable, primarily due to their safety for younger family members and pets. In addition, these products look stylish: they can fit into any interior and decorate it.
The finished bladeless fan is completely different from the device we are used to seeing, however, it works great
Like most other things that serve a person, a bladeless fan can also be made with your own hands.
The principle of its operation is simple: at the base of the device there is a small turbine, which allows you to create air flows passing through the side openings.
For work we will need:
- computer cooler;
- power supply unit and connector;
- small switch;
- hot glue gun;
- cardboard or thick paper;
- scissors, pencil, ruler, compass and caliper.
In principle, we need a caliper solely in order not to make a mistake in the dimensions of the product. If it is not available, then you can get by with a regular ruler, tape measure or measuring tape.
Let's get to work.
First, let's make the body - the base of the product. To do this, cut out four rectangular pieces of cardboard. To determine the parameters of the base, measure the width of the cooler. The resulting size will match the width of the rectangles.
For convenience, we will operate with specific sizes. The width of our cooler is 120 mm. This means that the width of the rectangle is also 120 mm.
A small switch and power connector will be built into the body of our product. In order for them to stay tight enough in the future, you need to take measurements from them.
The holes in the housing must correspond to the obtained values. You need to make holes until the rectangles become part of the body: cutting them out in flat objects is always easier.
We need a twelve-volt power supply and a corresponding cooler that consumes only 0.25A. Taking into account the fact that we have a 2A unit, we can assume that we are quite well prepared for the further operation of the future device.
Now we take sheets of cardboard from which we have to cut out the elements of the main part of the fan. First, let's draw two circles. The radius of each of them is 15 cm. Cut out both circles.
In one of them, let's call it A, we will draw an inner circle with a radius of 11 cm. In the second, which we will call B, the radius of the inner circle will be 12 cm. Carefully cut out the inner circles. We received rings A and B.
The resulting rings will be attached to the body of the product. In order for them to better adhere to the surface of the body, we will apply one of the rectangular blanks to each of the rings and cut off a segment, the flat side of which corresponds to the width of the rectangle.
In order to reliably glue the rings to the base on which they will be installed, it is necessary to ensure the maximum contact area: for this purpose, a sector is cut off at the bottom of the product
The main part of a bladeless fan is cylindrical in shape. To make it, we need strips of cardboard with the following parameters: the first - 12x74cm, the second - 12x82cm, the third -15x86cm. During the assembly process it will become clear what to do with each of these three strips.
Before assembling the body, cut a notch in the bottom of each rectangle. This way we not only make legs for the future fan, but also create channels for incoming air.
The recesses in the lower part of the base can be made in a rectangular shape, but it is better to add an arc to the original rectangle, drawing it using a CD disk
We will assemble the body using hot melt glue. The cooler should be located approximately in the central part of the case, surrounded by four rectangles that form the walls of the structure. Lubricate the cooler around the perimeter with glue and surround it with walls.
Don't forget that the notches in the walls that we just cut should be at the bottom of the case.
The wires from the cooler can be tucked into a corner of the structure, securing them in this position with glue.
At this stage it is best to mount and connect. Since we are using a switch, we need to split one of the wires and form a circuit.
The wires should be connected to the power connector (red - positive, black - negative). If we get the polarity wrong, we just need to swap the wires. Using hot glue, we secure the connector and switch in the places intended for them.
We connect the power and check if the turbine is working. If everything is in order, we continue assembling our bladeless model.
We take ring A, which will be located in the front of the device, and the first strip (12x74cm). We close the strip into a circle and glue it into the inner circumference of ring A. The result is something like a cylinder hat without a top, but with a brim. The same must be done with ring B and the second strip (12x82cm).
This kind of hat came out of ring A and the first strip that we glued along the inner circumference of the ring
We glue the first “cylinder” to the front side of the body in the place where we cut off the segment. We also glue the second “cylinder” to the back side of the body with a cut surface. In this case, the smaller “cylinder” ends up inside the larger one.
The stability of the structure can be imparted using five strength partitions, fixed between the rings using the same glue. They need to be cut out of cardboard. The length of the partitions should be slightly less than 12cm.
Now the side surface of the main structure should be covered with the remaining third strip of cardboard (15x86cm).
This photo shows the internal structure of the fan quite clearly, which will be hidden from us by the last (third) strip
In principle, the fan is ready. All that remains is to give it an external gloss. To do this, remove excess glue and cover its outer surfaces with paint or decorative paper.
You may also find the information on fan speed controls contained in our other article useful.
So that you can see how correctly you understood and did everything, watch the video on how to create a bladeless fan yourself, which we placed at the end of this article.
If you are interested in assembling interesting and useful devices, then you may be interested in the information about making an air conditioner at home, discussed in our other article.
And in the cold season, you can assemble a heater or a homemade fan heater using a minimum of materials.