Manual finishing of wood will always be relevant, even in the era of absolute automation of all production processes, because in the vast majority of cases a unique thing can only be done manually.
The basics of turning wood on a machine can be useful not only to a professional carpenter, but also to novice designers, builders, and those simply wanting to learn this ancient skill.
Working on a wood lathe, or, as they sometimes say, lathe, in general, is not particularly difficult, but you need to learn to understand how to feel the product being processed. It is then that work becomes a true art in which a person gains self-expression, realizes creativity and develops imagination.
General design and structure of a homemade unit
When designing a homemade lathe for turning, you can consider two design options: with an electric drive and without an electric motor.
Despite the antiquity of the method of processing wood using human muscles, this option has the right to exist in conditions where it is necessary to process wood, but there is no possibility of using electricity. The main structural elements of a lathe are listed below.
bed
The bed is the frame of the entire mechanism. The safety of the craftsman and the quality of the future product depend on the reliability of the frame.
Drive: motor rotor or pedal for foot drive.
Headstock
The headstock is a chuck for clamping the product and its subsequent rotation. Rotation from the engine is transmitted to it through a gear transmission, pulleys or a belt. At the end of the headstock there is a spindle with a faceplate for fixing the product.
Tailstock
The tailstock is needed for additional fixation of the workpiece, which will help improve the accuracy of the rotation axis and avoid unnecessary vibrations. It is a freely rotating blade that can be moved along the axis of rotation of the product to adjust the distance between the headstocks.
Podruchnik
A tool rest is necessary to support the chisel while processing wood. Without a stand for a hand tool, it is impossible to maintain high accuracy of the blade tip hitting the sketch lines and it is extremely difficult to regulate the pressing force of the cutter.
Candlestick made from roots
When creating wooden candlesticks with your own hands, you can use old wood that has lain under water and roots. In this case, it is possible to create truly masterpiece crafts.
Such material must be carefully processed. It is varnished or painted. If the pieces are very small, they also make interesting compositions. After processing, several roots are collected into a single system. It must be sustainable. The candlestick seems to be stretching upward. In this case, the roots should be turned upside down. You can also create a horizontal composition.
Stands for candles are installed at the tips of the roots. All elements of the system are fixed using colorless glue. Such a composition must be stable. This needs to be checked after the glue has completely dried. If necessary, the base of such a candlestick is further leveled.
Such candlesticks look harmonious in many interior styles. Its color should be in complete harmony with the selected color scheme in the room. White candlesticks made from roots look very elegant. You can also leave the natural color of the material. It will also look interesting.
DIY wooden toys, wooden dolls, master classes
A long time ago, when there was no plastic yet, and instead of glass, bull bubbles were pulled into window openings, little girls, just as now, played at being daughters and mothers, and boys at warriors and hunters. Each clan always had its own Lefty, who made not only ralos and cart wheels, but also funny toys for his children in moments of leisure. The most accessible materials at that time were clay and wood, so most often children's clay whistles and wooden nesting dolls came from the hands of a craftsman.
Wooden dolls did not always have legs and arms. Often the making of crafts ended with the designation of eyes and mouth, the rest was added by children's imagination. But sometimes a loving dad made crafts or mechanical masterpieces that were passed down from generation to generation. For example, almost every child had a wooden rocking chair in the shape of Sivka-burka.
Rocking horse
In order to start making this toy, you will need:
- board approximately 20-30 mm thick or furniture board;
- rake handle;
- wooden pins;
- wood screws;
- jigsaw;
- drill;
- glue.
Work order
- Transfer the drawing from paper to the board.
- Using a jigsaw, cut out all the parts along the contours and drill holes for the cuttings and pins.
- Insert pins into the holes, covering them with glue. Assemble the seat and rear legs.
- Once dry, continue assembly.
- Sand all sharp edges and rough spots. Draw a muzzle. The horse for the little rider is ready.
Weapon
If he wants to play as a knight or an epic hero, such wooden armor, a sword and an ax will probably come in handy. They are cut from a single piece of wood, polished and coated with metallic paint. With such a weapon you can even organize children's New Year's performances.
Cubes
The very first toy after the rattle is, of course, cubes. In a world dominated by synthetics and plastic, it’s so nice to touch natural materials. To make wooden blocks for your baby, you don’t need to have carving skills. The only indispensable condition is careful processing of surfaces, cutting off sharp corners and edges. Such cubes do not need to be coated with varnish or paint, because the baby will definitely taste them. Place a gift under the tree, and your child will be busy with an exciting game all New Year's weekend.
Virgin Mary toy
Home-grown Kulibins were not limited to whistles and horses. Movable “living” crafts, which are several hundred years old, can be seen today in the “Virgin Toy” museum. Without knowing the laws of mechanics, the masters created these grain-pecking hens, accordion-playing hares and blacksmith bears solely on inspiration and thanks to their own ingenuity.
Wooden figurines were carved from linden, cut down 3-5 years earlier. Special knives were made for work in the village of Bogoroditsky. Today's development of technology allows anyone to make original New Year's gifts for their children under the Christmas tree.
Start making crafts with drawings. You can significantly simplify the design, depriving it of volume, and use plywood instead of linden. The most difficult thing in assembly is to determine the place where the legs and paws are attached so that when moving the slats, the bear and the blacksmith accurately hit the anvil with hammers. This is done experimentally. But if our ancestors could make wooden mechanical structures, then, probably, modern dads can do it too.
New Year's snowflakes on the Christmas tree
For any child, the most memorable moments of the holiday are making toys for the Christmas tree with your own hands. It's very easy to make wooden Christmas snowflakes for your Christmas tree from old clothespins. For this:
- remove the two halves from the spring. Unfold the reverse side and glue 8 pairs with even “backs”.
- Fold the 4 glued halves into a cross and glue it in the center.
- attach 4 more turned out clothespins, gluing them at the base.
- New Year's snowflakes on the Christmas tree should be beautiful. Glue circles of colored paper or cardboard on both sides, sprinkle with tinsel;
- Don’t forget to tie a string to the New Year’s toys to make it easier to hang them on the tree.
www.toysew.ru
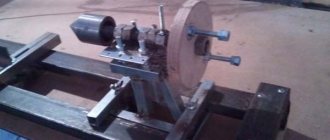
How to quickly make a wood lathe yourself
It is impossible to turn a drill into a full-fledged turning unit, since this will require a powerful electric drive. Making a mini lathe from a drill is easy and doesn’t require a lot of effort or expense. A workbench is used as a bed, on which an electric drill is installed. The woodworking machine is almost ready, and all that remains is to make the tailstock to secure the workpieces, and complete the process by arranging the support. The tailstock must be movable, so it is necessary to provide guides in the frame.
You need to start making a lathe by preparing drawings. The drawings will help you accurately calculate the dimensions of the device, as well as select the necessary materials. There is no need to make a headstock, since its role will be played by an electric drill chuck with a fixed trident. To secure the drill stationary, you will need to use clamps and clamps. The cylindrical part is secured with a clamp, and the handle must be secured with a clamp, which will prevent the tool from turning.
The principle of making homemade products involves performing the following actions:
- Before attaching the drill to the workbench, you need to install spacers that will adjust the distance of the chuck from the table top. This distance characterizes the size of the workpieces being processed. Boards of appropriate width and length installed under the power tool are used as spacers.
- To make the tailstock, wooden beams are used, into the structure of which an adjustable screw with a conical tip is attached.
- To make a caliper, you will need to use a block of wood to which the rail is attached. The length of the rack is equal to the distance between the front and rear supports
- Provide a power button. To do this, you can display the contacts on a separate button or block the standard button in power-on mode, and start the tool by inserting the plug into the socket
When creating a homemade machine, you need to pay due attention to fixing the wooden workpiece. On the headstock, a trident acts as such a fastening
It can be made from an old drill. Two cylindrical ends must be welded to the drill, which will be located at the same distance from each other. In addition, the protrusions should be located in one row. In order not to make a trident yourself, you can use a pike for a hammer drill, cutting off the shank from it. The protrusions on the nozzle are needed so that the rotating chuck of the electric drill sets the workpiece in motion.
Attention is also paid to the tailstock, because the safety of the installation depends on the quality of the second latch. A drill or screwdriver chuck is suitable as a tailstock, into which a conical attachment should be secured.
There is no need to use a trident in the tailstock design, since it is intended solely for fixing the workpiece.
This is interesting! The tailstock must be movable, so this point should be taken into account at the design stage and preparation of drawings. The mobility of the tailstock is needed in order to regulate the clamping force of the workpiece, as well as the ability to install workpieces of different sizes.
Carpentry workshop equipment
A few more interesting suggestions on how to make equipment for home carpentry using a regular screwdriver.
Wood lathe
When making wood products, it is difficult to do without a lathe. You can build it yourself. A flat wooden workbench is ideal for the bed. A screwdriver can be used as a headstock and rotation drive. You need to place the tool in a wooden bed made from a block in the shape of a screwdriver and secure it with a clamp. The block can be secured with a clamp, and if the machine is constantly used, screwed with self-tapping screws. A tooth mandrel must be inserted into the chuck. The tailstock is made of two bars with an adjusting screw, which is sharpened to a cone. It is installed opposite the fixed screwdriver so that the axis of the tool coincides with the axis of the tailstock adjusting screw. The back support structure is secured with a clamp. If you plan to process large parts, then the fastening should be more reliable. The tool rest can also be made from a block, securing it to the workbench with a clamp. A primitive lathe for the home workshop is ready.
Bench Drilling Machine
Another equally important piece of equipment is a drill. It can also be made from a screwdriver. To do this you will need a used screwdriver. From it you need to take a motor with a gearbox and a cartridge. Now you need to make two clamps from textolite, which will perform the function of fixing the drilling head of the machine. To achieve maximum alignment of all holes on the clamps, it is better to process them together, in one installation. Then you will be able to avoid distortions.
Bushings with internal threads are used as limiting posts. They must be the same size, corresponding to the distance between the clamps. After this, another clamp is made from textolite and two bosses from caprolon. They are drilled off-center, resulting in two eccentric bushings. The clamp is installed on the rod and the backlash is selected using eccentrics. After this, install a wooden lever on a spring so that the drilling head returns to its original position. To supply power, you must use a transformer with a power of more than 150 watts and an output voltage similar to the screwdriver you are using. After this, you need to install a diode bridge and a capacitor, and install the drilling head on the frame.
Manual router from a screwdriver: step-by-step instructions
It can be converted into a hand router. To do this, you do not need to purchase expensive materials. Everything you need can be found in the workshop or garage, practically under your feet. To make a manual router from a screwdriver, you will need pieces of thick plywood or chipboard, a clamp for attaching the tool, fasteners in the form of bolts and self-tapping screws, plumbing tools and a feather drill for wood. In the latter case, you can use a drill bit.
Assembling a homemade router is quite easy. To do this you need:
- From pieces of the selected material, cut out a base, a vertical stand on which a screwdriver will be attached using a clamp, a stop and a gusset to impart rigidity to the structure. The dimensions of the parts are chosen arbitrarily, in relation to the dimensions of the power tool.
- Using a pen drill, drill a Ø 40 mm hole in the base for free access of the cutting tool to the processing area.
- Make a clamp according to the diameter of the hand tool.
- Using a clamp, secure the screwdriver to a vertical stand so that its chuck is a few millimeters from the base.
- Install the stiffener.
- Secure the screwdriver with the stop on the vertical stand.
- Install the cutter into the tool chuck.
The screwdriver cutter is ready for use. Such a machine cannot become a full-fledged replacement for a manual milling cutter due to its low power and low spindle speed, but it will solve the problem of milling small parts in a home workshop.
Circular Saw
In addition, for your carpentry workshop you can make a circular saw from a screwdriver. To do this, you need to make a working surface using a sheet of chipboard or thick plywood. You need to make a cut in the tabletop to allow the circular saw to exit. The screwdriver must be securely fastened to the underside of the work surface using metal or wooden clamps. In the same way it is necessary to mount the shaft
It is important that the saw blade extends above the working surface of the table by no more than a third of its diameter
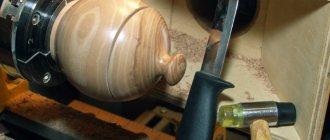
Vase
How can you make a vase on a lathe? To make it, you may need a certain tool. In addition to the lathe, you need to take cutters, a plane, a hacksaw, a ruler, a compass, an ax and a saw, sanding paper and a chisel.
The process of turning a vase is extremely simple. True, it should be noted that vases can be complex in configuration and simple. Let's look at how you can carve a simple option.
- First, a block of wood 10-20 cm long is cut out with a saw.
- It must be trimmed with a plane, both from the ends and along the length.
- The workpiece is installed in the machine chuck.
- The machine is turned on and checked for runout of the part.
- If it is present, alignment must be carried out.
- The top layer of wood is removed to a depth of 1 cm.
- A chamfer is removed at an angle of 45° from the outer end.
- A drill is inserted into the tailstock.
- A hole is drilled with a depth less than the length of the workpiece by 3-5 cm. That is, the bottom of the vase is determined.
- Now, using a cutting tool called a jamb, the cavity of the product is cut out.
Since the vase can have different shapes: straight, oval, and so on, the boring of the upper surface is accordingly maintained in the exact shape. After which the product is polished outside and inside. What is sandpaper used for? The wooden product is removed from the machine, the bottom is finished by hand using a plane and sandpaper. After which the souvenir is varnished.
The device of a wood lathe
This unit includes several main components. Each of them performs a specific function. To make a homemade device, you will need to become more familiar with the structure of these elements.
A homemade lathe, which you make yourself, will allow you to significantly save on the purchase of such expensive equipment
Bed. The basis of any machine, including woodworking. This unit ensures the stability of the structure on the working surface and also facilitates the fixation of individual elements of the machine. Thanks to the frame, all components are located in the right places.
It is important to remember that stationary devices have a larger frame equipped with legs. In turn, desktop units have a more compact base, which makes them mobile
When making a woodworking machine with your own hands, you need to pay special attention to this unit, since the accuracy and efficiency of the structure as a whole depends on it
Headstock. This unit performs a very important function: it ensures the rotation of the wooden block during its processing. The workpiece is fixed in a chuck located in the spindle shaft. It is worth noting that some small-sized machines include a headstock that can move along the guides of the base (bed). Its movement allows you to adjust the location of individual parts relative to each other.
When the part is being machined, the headstock of the lathe is securely secured. Models that are classified as stationary often combine this element with a frame, which makes it completely motionless.
Wood lathe diagram
Tailstock. This unit, which is part of the woodworking structure, is not static. It performs a very important function: it fixes the blank in the desired position during processing. Securing the workpiece by means of the rear assembly takes into account its pressing against the chuck. Due to the fact that the tailstock is able to move freely along the guide elements of the frame, fixing and processing of parts of different lengths is ensured.
Caliper. A very important design element, thanks to which the movement of the cutter is realized. Moreover, the latter may have a different location in relation to the spindle. In most homemade devices of this type, this function is performed by a tool rest, securely fastened in the working position.
This part of the machine is capable of moving along the guides of the base (bed). Small-sized desktop devices, as a rule, involve the use of an element such as a stop for cutters.
The support of a universal lathe is designed to move a fixed cutter along the spindle axis
Thus, both a serial and a home-made machine is a rather complex design. Any wood processing unit includes several interconnected units. Before you make a wood lathe with your own hands, you need to clearly understand the purpose of its components.
Varieties
There are many types of lathes
Before purchasing, it is important to familiarize yourself with the features of each type in order to make the right choice.
Find out why the LT-10M universal lathe is so good
Tabletop for home workshop
A small machine is fixed on a special table. It is lightweight and small in size, but allows you to perform a large number of operations. In addition to external processing, drilling and boring can be performed. Its advantages are low cost and energy consumption. There is almost no noise during operation.
Household, miniature (mini), small-sized
The weight of such machines often does not exceed 50 kg, but the technical characteristics of many models are not inferior to large-sized analogues. The bed is made mainly of cast iron - this reduces vibration during operation. The working diameter of the chuck is 50–100 mm, the spindle speed is 100–3800 rpm, and the motor power varies from 0.55 to 2.25 kW.
Automatic with cross feed
They are used in mass production for various operations with small parts, including processing of shaped surfaces. They are also used for turning products made of copper, brass, and alloy steel.
Universal
A common group of machines that are found in serial and mass production. This includes a screw-cutting lathe. Such equipment is distinguished by a wide range of modes (spindle speed, tool feed speed), as well as the ability to perform work of various profiles.
Classification of universal machines:
- Heavy - they can process large parts with a diameter of 1600–4000 mm.
- Up to 15 tons - designed for processing parts with a diameter of 600–1250 mm.
- Up to 4 tons - the maximum permissible workpiece diameter is 500 mm.
- Lightweight - for working with small products with a diameter of 100–200 mm.
Universal units also include turret lathes. They are intended for mass and serial production of parts from rods. The main thing that distinguishes it from a screw-cutting lathe is the presence of a turret head, to which several tools can be attached at once in the sequence necessary for work.
Mobile
Portable machines are compact in size and have a powerful design with hydraulic or pneumatic drive. Depending on the modification, it is possible to process external and internal cylindrical surfaces, pipes, flanges, and grooves. The machine is attached to the edge of the workpiece.
Features and Benefits:
- Easy installation and fixation of the part.
- Performing operations in hard-to-reach places.
- Possibility to use additional devices.
- High precision and processing quality.
Unusual
There are unusual types of lathes found in industry. This is expensive, narrow-profile equipment, which is serviced by highly qualified workers.
These include:
- Multi-spindle - allows you to process several parts at the same time. Used in mass production conditions.
- Semi-automatic copy machines - perform complex operations using several tools.
- Lathes - designed for parts whose diameter is many times greater than their height (pulleys, flanges, wheels).
- Carousel - industrial machines for precision processing of large parts.
- Backing - designed for sharpening cutting tools (mills, taps, reamers, countersinks).
Manual
The group combines types of manually controlled lathes (not CNC). They are not equipped with automation; the turner performs all actions manually. The tailstock is moved and the quill is fed by the worker without the help of additional mechanisms.
Only the feeding of the cutting tool is automated. Manual machines are gradually being replaced by analogues with CNC, automatic and semi-automatic machines.
Micro
Equipment is limited to a weight of 30–35 kg. The machines are used for small-scale work in the home workshop. They are powered mainly from a 220 V outlet. Low power consumption and lack of noise allow you to work without disturbing your neighbors.
What can be done?
A lathe is a tool not only for making construction workpieces. It is often used to create various souvenirs and decorative items: boxes, vases, chess, candlesticks, wooden toys and much more.
Vase
In addition to the machine, you will need other tools: chisel, ruler, compass, hacksaw, axe, plane. Considering the variety of forms that vases can take, these products can be quite simple or complex.
Let's look at a simple example:
- the workpiece, finished along the length and at the ends, is installed on the machine;
- the top layer of wood is removed and given the intended shape: oval, straight, etc.
- using a drill, a hole is made in the center of the free end with a depth less than the length of the vase;
- the cavity of the product is cut out with a “jamb” cutter;
- the product is polished, the bottom is finished manually;
- varnish coating.
Turned chess
Small wooden blanks with a cross-sectional diameter of 50–60 mm are suitable for making chess.
On one side of the workpiece, a smaller cross-section is needed - this end will fix the workpiece on the machine.
- the free end of the workpiece is trimmed with a cutter and pressed against the tailstock;
- a layer of wood is removed to give it a round shape;
- at the discretion of the master, the shape of the figure itself is turned;
- grinding, the figure is cut off from the fixed part;
- coated with varnish/paint.
Important!
The fixed part must be machined to a rounded shape, since installing a tetrahedral workpiece in the chuck will create additional load on the cutter!
Making a box
The box is a fairly simple product to make. As a base, you can use a cylinder-shaped workpiece.
The main difficulty here is the lid, which must be flush with the edges of the box body and fit into the grooves of the walls in order to close tightly.
- we fix the workpiece on the machine and use a semicircular cutter to give it a clearer shape;
- using a straight narrow cutter we form the inner cavity of the box;
- Using a triangular cutter, we bring the resulting niche to the walls of the body;
- Using a straight wide cutter, we form the bottom of the product and the groove for the lid;
- sand, apply varnish and wax.
The lid is made from a similar blank, only thinner. It goes through the same steps as the body, and the formation of the outer and inner sides, which can be straight or convex, is carried out with a straight wide cutter.
DIY wooden products from different types of wood
Even more amazing things made of wood are made entirely by hand, without a lathe. Thus, it has become popular to create a wooden case for everyday things: a flash drive, a computer mouse.
There is even a concept model of a phone made entirely of wood and with touch-sensitive buttons.
Animal figurines
Such art depends entirely only on the level of skill of the manufacturer and his imagination. Linden is better suited for such products.
This rock does not form cracks and is easy to process. But they also work with other breeds. For production you will need:
- a chisel with a rounded and triangular end to create appropriate shapes;
- a blunt knife and a knife with a beveled blade.
Before you immediately start working with wood, it is better to sketch on paper what the future product will look like. Often the drawing is transferred with tracing paper to the workpiece, and in order to avoid mistakes, before working with metal tools, an outline is drawn on the figure with a pencil.
Crafts-souvenirs
Various handmade wood products look great as small gifts and souvenirs. These can be kitchen utensils: spoons, spatulas. Various keychains, badges, entire paintings and much more.
Decor, souvenirs, advertising, jewelry, etc.
The ability to process completely different materials using several strategies - 3D milling, cutting and engraving - allows you to use CNC milling in completely different areas and produce an endless variety of objects.
Possibilities of a CNC machine in the production of promotional products and decorative items
The use of a milling machine allows us to produce a wide variety of products: toppers and words for celebrations, photo frames, boxes, plaques and signs from various materials including plastics, wood, metals and artificial stone. By engraving two-layer plastics of various colors you can make signs, badges, license plates, and nameplates.
Workshop of Daria Shved https://.com/id232777509 (Krasnodar), aluminum machine Modelist90120al
1/8
Nikita T., (Perm), aluminum machine Modelist60120
1/8
(Ekaterinburg, Belinskogo str. 34, office 321, tel. 89122455596, 89028733571) is engaged in the manufacture of products for advertising activities, decoration of premises and furniture made of artificial stone, aluminum machine CNC-6090al
1/6
FROSTBERG company (Dmitrov, https://.com/frostberg_decor), aluminum machine CNC-6090al
1/4
Using a CNC machine to make jewelry
A collection of works on the manufacture of jewelry, costume jewelry and souvenirs is listed on a separate page
Here is an example of using a CNC machine to make jewelry. Alexey Yuvelirov (Gelendzhik, https://.com/gelengrav), machine cnc2535al2
1/7
Milling of model wax in 5 axes on a 5-axis CNC machine
Milling a ring from model wax using a specialized rotary device, which, together with a special software plugin, makes it quite easy to create models of rings of complex shapes that require processing both from the end and sides of the ring, an example of such a ring in the photo
video of making this ring on a CNC machine
Using a CNC machine in furniture production.
A collection of works from our users on the production of furniture decor, milling furniture fabric, etc. is included on a separate page
Milling machines can be used to process a wide variety of wood types. Using the machines, it is possible to create signs and indicators made of wood, prototypes, unique products, toys, molds for casting furniture fittings and much more.
(Gorokhovets, gorfurnitura.ru) is engaged in the production of furniture decor, aluminum machine CNC-6090al. The slide show uses photos of decor made using molds made on a CNC-6090al
1/8
Andrey E. (Rostov-on-Don), made boxes for his workshop on an aluminum CNC-3040al2 machine
Souvenir products.
A CNC machine allows you to make souvenirs, award diplomas, dedicatory inscriptions, engrave a wide variety of products made of plastic, glass and non-ferrous metal, including cups, medals, tokens, pendants, bottles, and much more.
Dmitry U. (Novosibirsk), plywood machine Modelist3040
1/9
Andrey E. (Rostov-on-Don), aluminum machine CNC-3040al2. Making molds for creating gift chocolate bars
1/2
Vitaly F. (Orel), plywood machine Modelist3030. Cookie mold
Sergey K. (Gagarin), plywood machine Modelist4060. Coat of arms, bottle packaging and night light Eiffel Tower
1/3
Alexey P. (Moscow), plywood machine Modelist3030
1/2
Sergey (Krasnodar), plywood machine Modelist4090. Making models for construction companies from PVC
Vladislav G. (Krasnodar), aluminum machine CNC-3040al2. Milling parts of RC models for drag racing
1/4
Using CNC for equipment production. Devices, printed circuit boards, cliches.
Using engraving and milling machines, you can produce instrument cases, panels, engrave inscriptions, signs, serial numbers on a wide variety of parts, from plates on equipment and instrument panels, to final products.
Andrey K. (Primorsko-Akhtarsk), aluminum machine CNC-3040al2. Engaged in the manufacture of devices for video operators and video cameras from duralumin alloys. In the photo POOLiRiG is a shoulder rest for various video cameras.
Konstantin K. (Krasnodar), aluminum machine CNC-2020al. Printed circuit board manufacturing
Alpha, LLC (Simferopol), aluminum machine CNC-2535al. Magnesium cliche
A collection of works on the production of molds, clichés, and sealers is included on a separate page.
Wood turning tool
Most often, turning chisels are used for processing wood on machines. Compared to conventional chisels, turning chisels have longer handles, and their cutters are made only from high-quality tool steel. That is, the chisel consists of two parts - a handle and a metal blade mounted on it with a blade sharpened at a certain angle or a double-edged blade.
There are different types of chisels for different tasks. For a beginner in turning, in order to start working with wood, it is enough to learn how to use these two chisels:
Chisels for turning
- Reyer - this chisel has a semicircular blade, which is made of a thick plate; it is intended for rough turning of the workpiece;
- meisel - this type of chisel is intended for finishing the part; the blade is sharpened obliquely, on both sides.
Most of the other types of turning chisels are classified as shaped tools. They give the final appearance of a turned part. For example, decorative grooves can be cut out on a turned salt shaker. Here are some types of such chisels:
- chisel-hook - with such a cutter you can carve a recess at the end of the workpiece;
- chisel-comb - with its help you can cut internal and external threads or apply many decorative grooves;
- ring chisel - you can do the same thing with it as with a hook.
There are a great many types of shaped cutters. Experienced turners come up with their own cutters for a specific task and make them themselves.
Wood turning cutters
When you can't do without a hammer
A device for sharpening chisels.
For the purpose of gouging and chopping, both chisels and mallets are used at the same time. For both procedures, the mallet is held in one hand and the chisel is positioned perpendicularly in the other hand. When you hit the chisel with a hammer, it rotates simultaneously. Thus ensuring that the end of the tool is always in the right place.
They produce special devices that are intended specifically for chiselling, their name is chisels. Manufacturing companies that have similar products are MATRIX and KIRSCHEN. The handles of such devices necessarily have shockproof properties and high strength, because they will often take a heavy load.
Unlike the gouging procedure, you may encounter some difficulties during the cutting process. Using a chisel it is possible to cut out, for example, recesses for door hinges. Any modern door between layers of wood has a layer of hardboard or MDF. Due to this, warping (change in shape) is avoided. But if the wood is not dried enough, even this measure will not save.
The loops will have to be slightly seated. To set the seating depth of the loops, the material is cut along the direction of the fibers by hitting the chisel with a hammer. Each specialist chooses the direction for cutting independently, focusing on personal convenience, from himself or to himself. The chisel is held as carefully and accurately as possible, so as not to spoil the material and not to injure yourself.
When they come closer to the marking, they try to make the chisel spring back after knocking. Why are hammer blows performed with a drawbar? When selecting wood at the edges of the markings, do not use a mallet; they work manually, adding a little more effort to remove excess material.
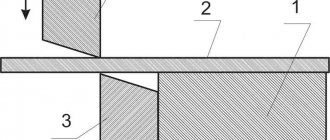
Selecting a transfer method
The transmission of torque from the engine to the workpiece can be carried out in two ways.
Direct transmission
Direct transmission of the drive to the workpiece is the simplest design method, but not the most perfect. Disadvantages of direct transmission:
- It is impossible to regulate the rotation speed, since the motor without additional units cannot change the rotation speed by simply changing the incoming voltage. This drawback is especially noticeable when working with hardwood, such as oak, teak or apple tree.
- High load on the motor shaft and shorter service life compared to belt drive. Heavy products will have a particularly strong effect on engine wear. This is primarily due to the fact that the bearings of most motors (except for motors in washing machines) are not designed for longitudinal load. You will also have to pay more attention to the centering of the material, because any inaccuracy will lead to excessive vibrations, which at high speeds can make the work impossible.
Belting
This method of transmitting rotation guarantees a longer service life of the motor and makes it possible to regulate the speed of rotation of the workpiece. In this case, the engine itself is located offset from the axis of rotation of the wooden product, and the torque is transmitted using a belt and several pulleys.
If you provide the machine with pulleys of several radii, it will be possible to change the rotation speed of the headstock. With three or more pulleys of different diameters, you can tackle hardwood with confidence. If you stock up on the necessary tools, you can even work with soft alloys.
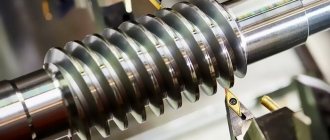
Design and principle of operation of a wood lathe
The main difference between a wood lathe and its counterpart, which processes metal workpieces, is that instead of a mechanical device for bringing the cutter to the workpiece, it has a tool rest - a device for holding chisels.
A lathe for woodworking is simple. The headstock and tailstock are located on the device frame. There is a spindle in the headstock; various devices are inserted into it, with the help of which the left end of the wooden workpiece is attached. The tailstock serves to support the right end of a long workpiece. A tool rest is installed between the left and right headstock, which serves to support the tool with which the workpiece will be processed.
The spindle is driven by an electric motor. The rotation speed can be adjusted. By the way, some turning work can be performed on milling machines, but this should be discussed in a separate article.
The workpiece is secured in a chuck mounted on a spindle. Then she presses up with the tailstock. If the tailstock support device is stationary, then it is lubricated with machine oil before installing the workpiece. Before you begin to install the workpiece, you need to accurately calculate and mark the center in it. The easiest way to find it is to use a corner finder. If the workpiece is not fixed in the center, then when the spindle rotates, this will cause it to “beat”, and it will not be possible to turn the part well.
Safety precautions when working with the unit
It is important to remember that before you start working, you must study the rules and safety measures very carefully. Important! Improper handling of the lathe can cause injury!
Important! Improper handling of the lathe can cause injury!
Basic Rules:
- before turning on the machine, you need to check its grounding and serviceability at idle speed;
- you only need to work in special clothing;
- eyes must be protected with goggles or a mask, and if necessary, wear a respirator;
- firmly fix the workpiece exactly in the center;
- when working, do not put pressure on the part, movements should be smooth;
- do not measure a rotating part;
- do not leave the machine during operation;
- do not use defective workpieces (with cracks);
- do not pass or take any objects through a working machine;
- do not stop the workpiece by braking with your hand;
- do not start work when tired;
- Do not approach the machine while intoxicated.
This is the main thing, but not everything you need to know before starting work. If you are not confident in carrying out any operation, then under no circumstances should you start it. It is necessary to consult with a specialist, and only then begin work. This will help avoid accidents and injuries.
Workpiece fastening
According to the markings, notches are made on the ends of the blank using a marking core. They guarantee reliable fixation of the workpiece and simplify its installation.
There are two main ways to work on a wood lathe:
- processing of a workpiece fixed between two centers;
- turning a product clamped in the headstock.
Regardless of the option chosen, before turning on the machine, you must ensure that the fixation is secure. If the tailstock is used, it must press down firmly on the workpiece while being securely locked to the bed.
After fastening, the tool rest is placed. Its edge should be parallel to the workpiece and recede about 5 mm from it. During the work, as the material is removed, it will need to be moved.
Preparation for work ends with a test rotation. To do this, turn the blank by hand to make sure there is no excessive fighting.
Manufacturing of CNC machine
Manufacturing a CNC machine is slightly different from the technology for creating a conventional machine in that there is a program that will control its operation. However, like many other machines, it is based on a beam with a rectangular cross-section.
It is important to use bolts rather than welding for fastening, as this will provide greater strength (vibration on bolts has less impact than on welds).
Try to provide for the possibility of moving the machine vertically. This will give you more room to experiment and use your imagination.
When assembling, it is best to start with the motors. They must run on electricity and be of the stepper type. They must be attached directly to the axis, vertically. One will move the router horizontally, the other - up and down. After installing the engines, proceed to attaching the remaining parts of the structure.
Rotational movements will be transmitted through a belt system. This will ensure the operation of the node system.
Wood turning: types and methods of artistic processing. Basic techniques for working with the machine
All photos from the article
Wood is not only a material for making beams, boards and other building elements, it is also a space for creativity, since this material is quite easy to process, so anyone can try themselves as a sculptor. Artistic processing of wood allows you to get a real masterpiece even from a piece of wood that seems ordinary at first glance.
Vases are turned on a regular lathe
How to operate the machine
A person has at his disposal several bodies of rotation (ball, cone, sphere and cylinder), by combining which he creates his creation on a machine. This is quite enough; the same turned wooden balusters, as a rule, use only a cylindrical surface, only the radius changes smoothly.
The operating instructions will look something like this:
It is undesirable to fix a 4-corner workpiece in the machine. Even at low speeds, impacts on the instruments will be sensitive. It is best to roughly trim the corners with an ax and achieve a shape that is at least vaguely reminiscent of a cylindrical one;
It is advisable to trim the rib
When installing, it is important that the workpiece does not touch the machine itself. To do this, it is simply turned by hand a full turn; Removal of chips must be carried out carefully, in several passes with light pressure on the cutter
It is important to maintain the correct grip - the right hand rests on the handle, and the left hand securely presses the metal part of it to the tool rest. It needs to be tilted slightly as it rotates (angle up to 30ᵒ);
Procedure for turning
- rough processing is carried out until the allowance is 2-3 mm. After this, you can proceed to finishing processing by changing the cutter;
- if it is necessary to select a cavity, then this is done before external processing with constant monitoring of the wall thickness;
- After giving the desired shape, the finished product is cut off with a cutting tool and polished.
Cavity sampling
The final stage can be considered impregnation with protective compounds. This achieves 2 goals - to reveal the texture and protect the wood. For example, turned wooden benches will be exposed to rain, snow, and subzero temperatures, so impregnation with antiseptics will not be superfluous.
The fillet is sharpened with a “spindle” chisel
Having turned several cylinders 200 mm long, mark lines on them in increments of 12 mm and begin to practice turning fillets.
The cone for the baluster can be turned with a roughing chisel and a “spindle”.
At the same time, the tool is slightly tilted in the direction of processing.
You can turn a fillet with only one tool - a “spindle”. First, a series of lines are drawn on the cylinder with a pencil in increments of 12 mm. The processing is carried out only with the tip of the chisel and the cutting edge is kept parallel to the surface being turned. You need to imagine how they cut the grass in the ditch. If you move along it, the mower goes horizontally, but when you need to mow the slopes, the tilt of the mower increases. The chisel should move similarly, but you need to watch the cutting edge, not the shank. Compared to working with a peeling chisel, the position of the hands on the “spindle” is the same, but the grip is weaker.
Place the chisel so that the heel of the cutting lump slides along the workpiece, and the chisel itself should be at a right angle to its axis. Lifting the handle, lower the cutting edge and grind a very small groove exactly in the middle of one of the 12mm sections.
To sharpen the right side of the fillet, turn the blade of the chisel counterclockwise and, touching the workpiece at the marking line with the tip of the chisel, rotate the blade in the opposite direction (clockwise), turning the fillet to its bottom. The rotation should be controlled and even, and the handle should move freely, so you don't have to rest it on your hip.
Now the left side of the fillet is machined in the same way. At the bottom of the fillet, the chisel should slide on the tool rest very easily. Then they alternate processing from the right to the left to obtain the desired fillet depth, but always finish the pass exactly in the middle.
It is impossible to sharpen a fillet with a chisel. For narrow fillets you also need appropriate chisels.
The roller for the baluster is the reverse of the fillet. And I think it's the hardest thing to learn how to sharpen. I sharpen them only with a “spindle”, although there are supporters of performing this operation with an oblique chisel. But sharpening the small rollers usually found in balusters with an oblique chisel is a risky business.
When making balusters, an elliptical roller looks good, and not in the form of a half circle. Therefore, it is not as tall as it is wide. To practice on a cylindrical workpiece, use a V-shaped cutting chisel to make grooves 3 mm deep in increments of 10 mm. You will get a row of rings 10 mm wide.
Like the fillet, the roller is sharpened in two stages - half at a time and always down the slope. To carve the right side of the roller, tilt the chisel slightly to the right and start processing from the middle of the ring. The processing is carried out to the right, while simultaneously moving the chisel handle to the left and turning the blade clockwise. To turn an elliptical roller, when processing to the right, the handle of the chisel must be moved to the right.
Then on the left they mirror what was just done on the right. At first, a beginner usually ends up with asymmetrical rollers due to the fact that a right-handed person is pulled a little to the right, and a left-handed person - to the left. As you gain experience, the problem goes away on its own.
On large rollers, processing should begin closer to the edge of the ring and the first pass should only round the corners. Subsequent passes increase the curvature. You should not try to remove a thick layer of wood in one pass.
The effect of the roller is greatly enhanced by emphasizing the corners with the toe of an oblique chisel.
Crafts on a wood lathe: photos, videos and drawings
Wooden crafts and dishes are very beautiful and many still use them in everyday life. Since ancient times, craftsmen have been turning such dishes. To show all the beauty of the wood, it was processed not along the grain, but across it. At the same time, the wood pattern stood out expressively.
The article will discuss several master classes on making crafts on a lathe.
Wooden vase on a lathe
Tools:
- A lathe, or a homemade one.
- Various cutters, you can make them yourself. Photos and videos of the manufacturing technology of such can be easily found on the Internet.
- Plane.
- Hacksaw.
- Compasses, rulers.
- Axe, saw.
- Drill, drill bits.
- Sanding cloths, files, chisel.
- Oil, non-toxic varnish, brushes.
Manufacturing process:
- Saw off the log to a length of about 20 cm. Split it into two halves.
- Go over the wood at the split site with a plane.
- Then you should measure the center of the circle and draw a circle.
- At the next stage, saw off the corners and ends of the workpiece (45° angle).
- Drill a hole at the point marked by the center of the circle, 10 mm deep, 5 mm in diameter.
- Secure the workpiece in the machine.
- Using a jamb cutter, carve out a cavity in the workpiece. Without touching the technological rod.
- Treat the outside of the craft and give it a cup shape.
- Completely clean the cavity of the product.
- Sand the wood externally and internally.
- The product is removed, there will be no more work on the machine. The bottom of the vase is processed.
- The rod is cut off and the cut area is sanded.
- Coat the outside of the vase with wood varnish, and wipe the inside with sunflower oil.
https://www.youtube.com/watch?v=knemzdYI9mc
Wooden salt shaker box
Materials and tools:
- Acacia tree.
- The cutters are homemade from ordinary files.
- Hacksaw.
- Sandpaper.
- Wax, varnish.
Stages of making a salt shaker on a lathe:
- Take a cylindrical piece of wood and attach it to a lathe. Why is acacia wood preferred? Because its wood has a decorative light green tint, and after sanding it gives off a mother-of-pearl appearance. Look at photos of other types of wood, maybe you like darker shades.
- First, round the block of wood by removing the edges with a semicircular cutter.
- Then, using a jamb cutter, make a smoother rounding and make indentations for the decorative bands of the salt shaker.
- Cut off both sides of the recesses to create bulges and round the edges.
- The next step is to cut out the inside of the box. Using a straight narrow cutter, make a recess without sudden movements, going deeper in steps. Approach this process diligently, it’s good if you watch a video of such work.
- Using a triangular cutter, moving center - edge, smoothly expand the cavity to the very bottom.
- Using a wide straight cutter, level the bottom and make a groove for the lid.
- Sand the bottom and walls of the craft with sandpaper.
- Use a hacksaw to cut the product from the machine. You can do this when the machine is turned on, by moving the hacksaw away from you towards the part. Before finishing, stop the machine and cut the workpiece.
- To finish, coat the top of the salt shaker box with varnish and the inside with wax.
Making a lid for a salt shaker box
Materials and tools:
- Acacia tree.
- The cutters are homemade from ordinary files.
- Hacksaw.
- Sandpaper.
- Wax, varnish.
Stages of work:
- The technology for making a domed lid is presented here, but you can learn how to sharpen other types of lids from photos and videos of various craftsmen. So, the lid should be adjusted to the size of the salt shaker.
- The inside of the lid is formed using a semicircular cutter.
- Then form the outer part of the lid and handle.
- Clean the lid with sandpaper and open it with varnish.
Wood crafts are not very complicated, but they require practice and precision of movements; watch photos and videos of master classes by other masters and you will be able to discover new techniques and styles.
https://www.youtube.com/watch?v=bS5BjRHCBis
Making the Steering Wheel as an interior item with a secret, part 1
- home
- Master Classes from “Master Class Direction” by tag: turning
A new project on Rubankov TV from the Moscow Rubankov Carpentry School. Uncle Vanya, the head of the workshop, started an interesting design project for the interior with a real steering wheel, see the details for yourself) In the video we will do a lot of planing, sawing, gluing, turning on lathes and much more. Enjoy watching and see you at our craft school courses.
Making the Steering Wheel as an interior item with a secret, part 1
7:53 Glue brush - https://goo.gl/yRqPg6 10:35 Japanese drills - https://goo.gl/yr7JR2 13:21 Rubankov turning school - https://goo.gl/iShd6R 19:50 Hegner jigsaw https://goo.gl/5mwLWx 20:50 Self-centering drills https://goo.gl/J4ohWr