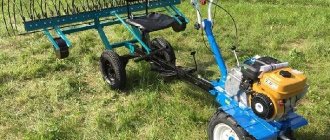
In the industrial production of lining, powerful woodworking machines are used to produce products of excellent quality, but not all users can afford it. Is it possible to make lining yourself and what is needed for this? We will talk about this in this article.
Do-it-yourself lining
Lining
Making at home. Machine for work.
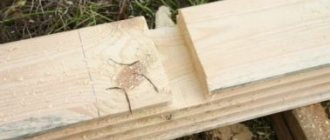
At home you can cut the board to look like walnut
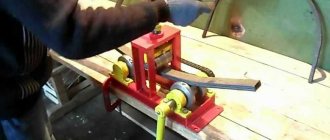
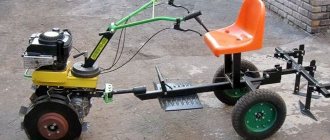
A special machine ensures that each panel is processed from all sides at once, which significantly reduces the time spent on work.
If you have experience in using such equipment, then in a short time you can produce a decent amount of high-quality material.
On the machine bed there are spindles that attach cutters to them. The powerful and strong gripping mechanism of the board guides it accurately into the work area. During leisurely work, vibration shocks are practically not felt.
Machines can be:
- Low power. They produce lining with a small cross-section. Due to the light load, the speed is increased. If they go down, the board is easily damaged.
- Great power. Thanks to the force and speed with which the machine operates, the manufacturing process is significantly accelerated and production volumes increase.
Video - production line:
Where to begin?
First you need to find a separate room for work. Remember that machines and woodworking equipment create a lot of debris and noise during operation. You also need to consider the condition of the electronic wiring. It must be able to withstand long-term loads. Otherwise, the wiring may simply burn out.
Experts convince us that if you have the technical base, certain skills and consumables, you can make different types of lining, differing in shape, size and type of connections.
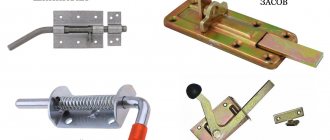
How to install
We will divide the whole process into 3 parts:
- Preparatory work.
- Frame construction.
- Fastening the lining to the wall or ceiling.
Remember that it is important not only to adhere to technology, but also to use quality materials and tools. Nails are also different
Nails are also different
Stage 1 – preparation
To begin with, you should stock up on everything you need, the list is shown in the table.
| Material | Recommendations for selection |
| Lining | Use material with a humidity of no more than 14%, otherwise after fastening you risk finding deformed elements |
| Bar | A frame will be created from it, most often the version with a section of 30x30 or 40x20 mm is used. The material must also be dry |
| Nails | Let's figure out what nails to nail the lining with. For work, a finishing option with a reduced head will be used; the length should be at least 30 mm, if the finishing material is thick, then the entire 40 mm. Galvanized nails are excellent, they resist corrosion well, and the price is lower than other options |
Finishing nails are the best solution for attaching lining
The technology for nailing lining with your own hands requires the presence of a certain set of tools:
A regular hammer will be used for fastening. You need to use small options weighing from 300 to 500 grams;
There is a hammer in almost every home
In order not to damage the lining with a hammer, it is necessary to use a special device - a hammer. With it you can hammer nails without hitting the wood;
A homemade finisher can be made in a few minutes
- The material is cut using a hacksaw with a small tooth size;
- The frame can be attached in two ways. For concrete and brick walls you need a hammer drill and dowels. For wooden surfaces - self-tapping screws and a screwdriver.
Stage 2 - frame construction
Before nailing the lining, it is necessary to build a solid foundation:
First, you need to check the base with a level to find out how crooked your walls are. Next, the lines for the location of the bars are marked. Remember a simple rule - if the lining is mounted vertically, then the frame is positioned horizontally and vice versa;
The easiest way is to sketch out a design diagram in advance to have a clear idea of what it should look like.
A block is attached along the lines; if the walls are smooth, then you can fix it directly to the wall, and if there are unevenness, then it is better to fix the hangers every 50 cm. Then the hangers are bent, the block is placed, leveled and fixed in the desired position. See also the article finishing the kitchen with clapboard.
With the help of hangers, setting the frame level is not difficult
Stage 3 – attaching the trim
We have come to the main stage and will look at how to properly nail the lining. The instructions consist of the following steps:
First, let's figure out how to nail the lining vertically. The first element is placed with a tenon in the corner and secured with nails through the groove; they are located at an angle of 45 degrees so as not to interfere with the joining of the next element.
We drive the nail with gentle blows of the hammer
The work continues simply: the tenon of the next element is inserted into the groove of the previous one, after which the element can be tapped more tightly through a wooden block and secured.
The next plank is nailed in the same way
Now let's look at how to nail the lining in a horizontal position. The most important thing here is the correct location, the groove should always point down and the tenon upward, then moisture will not accumulate in the recesses. The work is carried out from top to bottom, as you need to drive nails into the groove.
Horizontal trim looks great
If we nail the lining over the top, the work will be slightly different. Nails are hammered into the panels in advance so that they do not peek out from the back side. After this, the element is put in place, tapped through a piece of lining, and only after that the nails are hammered through a hammer flush with the finishing surface.
Nails are achieved after sealing the joints
This option can also be used
I hope you have figured out how to nail the lining and how to do it correctly. To make it even clearer, below is a diagram that shows the correct position of the nail, when it holds securely and does not interfere with the joining of the next element.
This is what the fastening technology looks like
And one more option on how to nail eurolining. As you know, it has a very wide tenon, so you can fix elements directly through it. The mounting area is covered with the next panel and everything looks great.
Eurolining can be mounted this way
General requirements
On what machines and no matter what complexity you try to make lining, you must comply with the following requirements.
- Quality of lumber . Boards should only be edged, with the same thickness and width. Wide planes must be passed through a surface planer on at least one, and preferably on both, sides. For these purposes, it is better to have a double-sided surface planer at home, and if you don’t have one, then at least a basic jointer.
Jointer
Double-sided thicknesser
If there are no such machines, then you can work with a manual electric plane. This work is quite difficult and long, and the quality will always be much lower than when processing lumber on machines.
Practical advice! We strongly recommend that you do not plan boards with a hand-held electric planer. It is much more profitable to take the lumber to a friend who has a double-sided planer; in an hour or two of work you will pass 1-2 m3 of boards - this amount is enough to decorate a small country house. You will have to plan them manually for more than one day, and, as we have already mentioned, the quality will be poor. Such lining can only be used for finishing auxiliary premises.
- Drying. You can only work with lumber that has no more than 24% relative humidity. If the indicators are higher, then dry the boards under a canopy or in a ventilated area. The larger the gap between the stacks, the faster the lumber will get rid of excess moisture. Fold them carefully, do not allow any distortions to appear, place the spacers correctly, and be sure to press the top tier with a weight.
Drying the lining
- Job. Absolutely follow safety regulations. Statistics show that woodworking machines are considered the most dangerous equipment. Moreover, the injuries are very severe and often cause disability. This does not mean that machines should be feared, but they should be treated with respect. As for the use of mittens, this issue must be approached wisely. Mittens protect your hands from splinters, that's true. But it is also true that when the mitten gets caught under the cutting element, the hand or arm is pulled in, and injuries are much more dangerous.
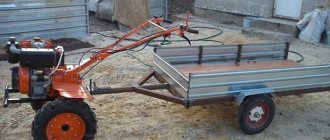
Machine for making lining
We will tell you what machines and equipment you need to make lining with your own hands as the article progresses. The fact is that there are a large number of technologies, taking into account existing machines, it is impossible to describe everything in one article. Let's start with making the simplest lining - such work is accessible to most inexperienced craftsmen.
Price for the model range of jointing machines
Jointer
Choosing lining for cladding
Lining
Wood paneling can be regular or euro. The first has roughness and lint on its surface, the second is perfectly smooth. On the back side of the eurolining there are ventilation channels that prevent the accumulation of moisture (condensation) and relieve stress in the material. According to GOST 8242-88, the moisture content of wooden products is allowed within 12±3%, however, ordinary lining can be made from wood with a moisture content of up to 25%, which can lead to deformation during the operation of the bathhouse. Based on this, we will choose a suitable wooden eurolining for lining the bathhouse.
Marking and technical requirements
The lining is made from coniferous and deciduous wood. The best options for a steam room are aspen, linden, cedar, spruce, alder, oak, and pine.
| Wood | Color | Properties | Photo |
| Aspen | White, acquires a silvery tint. The yellow growth rings are barely visible. | Lightweight, withstands high humidity and temperature well. Over time, it hardens so much that it is difficult to even hammer a nail into an aspen panel. Does not emit resin, does not heat up. | Aspen lining, Extra |
| Linden | Light, brown, less often reddish shades. There is a matte shine. | The fibers are homogeneous, the surface heats up little, and in the steam room it releases aromatic components that are beneficial to health. When in contact with linden wood in a humid environment, the iron oxidizes and rusts, and streaks appear. | Linden eurolining |
| Linden Cedar Canadian or Siberian | Brown with a pink tint. | One of the most expensive and healthy wood species. Does not rot, withstands mechanical loads well, does not crack. | Canadian red cedar paneling |
| Pine | Beige, brown with red shades. It gets darker with time. Pronounced pattern of growth rings and resin canals. | Good mechanical properties, toughness, moderate warpage. Does not cause difficulties during processing. It releases resin when heated, so it is not used for covering those surfaces in the steam room with which tactile contact is possible. It is not suitable for covering the ceiling of a steam room or it requires repeated heating of the steam room followed by removal of the resin that has emerged (repeat the procedure until all the resin comes out of the lining). For a bathhouse, it is better to choose Extra-class pine lining. | Pine |
The following table shows the classes and their descriptions. It is worth knowing that wood with a large number of knots heats up faster and can burn. The markings are the same for all types of wooden lining.
| Class or variety | Description |
| Extra | Free from cracks, knots and other defects. The surface is perfectly smooth and even. |
| A or 1 | The surface is smooth or slightly rough. There is 1 healthy knot per 1 linear meter (knot diameter no more than 1.5 cm). There may be cracks: hairline cracks - no more than ½ panel long, non-through cracks - less than 9.5 cm long (the crack exit is directed towards the end of the panel) that appear when drying - no more than the width of the panel. There may be tars and resin pockets of 2 pcs. by 1 m.p. |
| B or 2 | There are many knots, of which no more than 2 can fall out. by 1 m.p. There may be through cracks up to 1 mm wide and up to 15-30 cm long; hairline cracks are allowed along the entire length of the board. The presence of wormholes (3 pieces per 1 m.p.) and rot (no more than 1/10 of the panel) is allowed. Grade B lining is suitable for painting. |
| C or 3 | The quality is low. Many different defects. This lining is suitable for upholstery of technical rooms or rough work. |
Marking
Lining marking
The standards for defects according to GOST are shown in the table below.
Standards of defects according to GOST
Lining defects
All that remains is to choose the profile of the lining, because... each has its own installation nuances.
| Profile | Description | Scheme |
| Standard | Similar to the classic quarter-plank lining. It has a tongue-and-groove connection, with the tongue being shorter than the groove to prevent deformation. | Lining Standard |
| Calm or Kolkhoz Woman | It differs from the previous one in its rounded edges and the presence of channels on the reverse side to prevent the accumulation of condensation. | Calm |
| Euro | Manufactured according to DIN 68126 standard. Has an extended tenon. After installing the lining, the wall surface is ribbed. | Euro |
| Soft-line | Soft-line or soft line is a symbiosis of Euro and Shtil lining. Soft rounded corners, elongated tenon, relief texture of the wall after assembling the panels. | Soft-line |
| Block house | Used for finishing external walls and rooms. Stylized as a rounded log. There is a tongue-and-groove connection, the front side is usually rounded, and the back side is flat or with channels for ventilation. | Block house |
Lining profiles
About the material
Before you start making lining, it is recommended to understand what material you are dealing with. This knowledge will be useful for making optimal decisions independently while working at home.
The process itself takes place in several stages.
- Board production. The basis is a whip - a trunk that has already been cleared of the root part and knots. Using a band or disk sawmill, the log is sawed according to the specified parameters. The thickness of the board is taken as an approximate value within fifteen millimeters, and the width is one hundred millimeters.
- Drying lumber. Fresh wood has a lot of moisture. During transportation, cutting or storage, it may, to a greater or lesser extent, consume or accumulate moisture in its composition. In addition, wood is a hygroscopic material, that is, it is able to absorb water vapor from the air. For use in construction work, maximum dry wood material is required. In order to reduce the amount of waste, moisture and minimize the risk of cracking the board, this stage is extremely important.
It occurs in a specialized chamber drying.
- Sorting. Lumber is sorted according to quality. For the production of lining, boards are selected whose quality is not lower than class B (second grade). The difference in grade is based on external defects of the board, their presence or absence.
- Production of lining. This step involves a powerful four-sided planer. Thanks to various cutters and knives, up to four planes are processed at a time, that is, the desired profiles are obtained in two minutes.
- Quality control, placement and storage. This completes the process of obtaining the lining in production. This is a routine job and is not difficult if you have the necessary equipment. To preserve the qualities of the lining, it is necessary to properly create a place for storing this material. A dry, level room with an installed canopy; it is possible to use ordinary film covered over the boards. It is important to ensure systematic ventilation.
It is advisable to install the pallets in advance.
Cladding
Wooden lining for ceiling or MDF panel
Ceiling lining made of solid wood or MDF is attached to the frame in the same way:
- First, the strip of lining is cut to the required length so that there is 5 mm of free space from the panel to each wall. Then, when the material expands under the influence of unfavorable factors, the ceiling does not deform. If the walls are uneven, it is better to cut the panels as you lay the frame;
- the first strip along the length is attached to the guide profile, leaving a gap of 3-5 mm on the side. The next panel is inserted with a groove at a slight angle into the lock of the previous one, and pushed into it. To press the paneling tightly, tap the end of the part with a hammer with a rubberized tip. The other side of the plank is screwed to the profile at the bottom of the lock using self-tapping screws (if the frame is made of a metal profile) or nailed (for a base made of wooden beams);
- when using self-tapping screws, even before installing the lining, holes for fasteners are pre-drilled on the locking part of the strip. If you do this under the ceiling, the cladding may break off. When using nails, additionally use a hammer so as not to damage the front side of the sheathing material;
- As the cladding progresses, the cable is brought out under the devices, drilling holes in the panels. Thus, they advance to the opposite wall. The last strip is driven into the lock using small wedges driven between the panel and the wall surface.
Plastic lining
Plastic lining is installed in the same way as solid wood, leaving gaps from the wall of 3-5 mm. But first, a U-shaped groove is attached around the perimeter, which will hide the ends of the strips of material.
This groove either forms part of the plinth, or is represented by a collapsible structure made of parts in the shape of the letter “L”. The first part is fixed after installing the frame, and the second when the ceiling is completely covered with plastic.
How to attach false beams to a clapboard ceiling
Photo of a lining ceiling with beams
The use of false beams in the interior is a common type of finishing that is used by designers to emphasize different styles and trends. Beams are made from solid wood, plastic, polyurethane, etc. When choosing a suitable product, it is necessary to take into account the reliability of the supporting structure to which the elements will be attached. Thus, products made from natural wood are heavy, so the frame will have to be additionally reinforced in the places where the beams are attached.
It is better to choose polyurethane beams, hollow inside, painted to resemble natural wood. They weigh lighter, and will look no worse than natural wood. At the same time, they go well with the lining ceiling.
In general, attaching beams is not difficult. The main thing is to maintain consistency in your work:
- the side and bottom elements must fit tightly together. To do this, use a plane, which is used to adjust the end parts of the beams. The cut areas are rubbed with fine-grained sandpaper;
- special wedges for beams are made of wood. In this case, the wedge must exactly repeat the shape of the beam cavity (trapezoid);
- during marking, additional control lines are drawn on the side of the beam to provide guidance on the wedges;
- wedges are installed in the places where the beams are supposed to be located, screwed onto dowels and screws in increments of 1 m;
- in places where the beams are attached to the walls, a little glue is applied to the surface of the base. This will not only provide additional reliability, but also a tight fit of the product, which will prevent the formation of cracks;
- the false beam is put on a wedge, screwed with self-tapping screws, the heads of the screws are covered with decorative overlays or staples;
- if the beam is short, it is joined to the next one, the joint is also masked with a decorative element.
Lining with beams in a modern interior
If desired, you can install original lighting in the beams. To do this, the wiring of the electrical cable is done in the cavity of the beam, using a protective shell, having previously made holes in the cavity of the wedges-beams. For polyurethane products, the power of the devices is chosen to be no more than 50 W.
Spiral cutters
Spiral cutters are also actively used in furniture production. In appearance and design they are very similar to drills. Like spiral drills, their working part contains grooves, with the help of which chips of waste material are removed from the processing zone. Spiral cutters are divided into the following categories:
- with a downward cut;
- with an upward cut;
- combining both mentioned types.
The main areas of application of spiral-type cutters, which are presented in a wide range on the modern market, are:
- cutting of material;
- formation of elements of various configurations on the surface of solid wood products;
- creating grooves and recesses of various configurations on the surface of wood products.
Among the advantages of using spiral cutters for wood processing are the following:
- formation of a cut characterized by high purity and precision of processing;
- significantly less sawdust emissions than when using other tools;
- low level of noise and vibration during operation;
- high precision and processing performance when performing plunge milling.
Thus, the variety of cutters that can be equipped with both stationary and manual electrical equipment allows you to successfully perform various technological operations. With the help of such tools, you can not only make lining with your own hands, but also perform many other technological operations to improve your home interior.
Production technology
The information provided in this section will definitely come in handy if you decide to make the lining yourself. The cladding manufacturing process is divided into the following stages.
Step by step process:
- Making boards. Tree trunks are sawn into boards using disc or band saws. Thickness varies from 15 to 25 millimeters, width - from 100 to 150 millimeters.
- Drying. In special chamber dryers, the material is processed under high temperatures. After this, the risk of cracking and torsion of the boards becomes minimal.
- Sorting. Depending on the quality of the raw material, the material is carefully sorted. In the lining industry, boards are used whose quality is not lower than second grade.
- Manufacturing. The finishing material itself is produced using special equipment. Companies use a four-sided planer. In just one pass, all planes of the panel are processed thanks to the selection of knives and cutters. In the process, the necessary profile is created.
- Treatment. To preserve the natural beauty of the wood and extend the service life of the finish, the panels are treated. The lining is coated with oil wax or special varnish and enamel compounds. Another way is brushing. The technique is used when it is necessary to give the product an antique effect.
- Examination. At the end, the finished product is tested for strength, wear resistance, reliability and other technical characteristics.
Peculiarities
Lining is a type of facing material, which is a product of processing natural wood. It is used for the design of both conventional (straight-line) and complex structures. Depending on the technical features, the products are used for exterior or interior decoration. On the outside, these are flat panels with special joints on the sides.
In the production of lining, different types of wood are used, both deciduous and coniferous: alder, cedar, ash, pine, beech and almost everything else.
Products are divided into separate segments based on different features. One of them is the profile shape: panel, eurolining, “STIHL”, “American”, block house.
Wooden finishing combines excellent performance and aesthetic properties. Due to these features, finishing has become widespread. Lining is used for external and internal cladding.
- neat appearance;
- a wide range of products, differing in color, texture and performance characteristics;
- it is an environmentally friendly product, harmless to health and the environment;
- high-quality material has excellent practicality and wear resistance;
- wood finishing material is a classic that is always relevant and needed;
- normal installation process;
- natural finishes create a comfortable atmosphere in the room.
- highest cost;
- requires painstaking care.
What is needed for cladding and how much it can cost
If you decide to use lining as a facing material, it is worth assessing your future costs.
The cost, depending on the material, its quality and the type of panels, varies greatly (from 180 to 1300 rubles per m2).
Plastic and MDF panels are cheaper than those made from natural wood, and of the variety of available types, the most expensive is the block house.
Having decided on the type of lining and timber, it is worth considering the need for related elements:
- tools (hammer, screwdriver, drill, spirit level, hammer and pliers, plumb line);
- materials for insulation and waterproofing;
- processing agents (paint, varnish, stain, etc.);
- parts for fastening (staples, anchor screws, wood screws, nails).
List of the minimum set of tools and equipment
First of all, you must have a special separate room for work; woodworking machines create a lot of noise and dust. You will have to comply with the requirements of sanitary authorities. Another condition is that the electrical wiring must withstand additional loads, and they, depending on the brand of machines and their number, can increase significantly.
On a note! You can make both the simplest and quite complex lining with your own hands; we will consider both manufacturing options. But for all options there are several preconditions.
Making lining with your own hands
How to cover a balcony with wood
Independent finishing of balconies inside with clapboard is a job that can be carried out by a home craftsman. Remember a few important rules that will help you achieve good results:
- Prepare the walls carefully.
- Buy quality material, class A or B.
- Calculate the required amount of material and take it with a small margin.
- Prepare your tools.
- Consult with experts what type of insulation to use in your case.
- Think about what you will cover the tree with.
- Video instructions and photos of the work will help you carry out the installation of the frame and the finishing material itself.
Video - finishing a loggia with clapboard using logs:
Is it worth buying
It is not difficult to purchase a lining. There are different types of it on sale, they differ in the type of wood used, color, texture, shape of the outer surface, so you can choose a material that is perfectly suitable for any project. With all this, the lining has a significant drawback - the highest cost.
When undertaking a major renovation, it would be useful to consider the option of producing the lining yourself. It should be noted that even the most ordinary machine of this type will have a high cost, and before deciding to purchase, you need to evaluate its profitability.
Whether you need a similar machine in your home workshop or not is up to the master to decide; you can only give a few arguments in favor of the purchase:
- creating lining in a home workshop will allow you to significantly save on building materials;
- products made with your own hands will be of a higher quality in advance than similar ones going on sale;
- the machine can become a source of additional income due to the tangible difference in cost between edged boards and finished lining.
READ Cube of timber 100x150 how many pieces
Also, we must not forget that this machine is multifunctional. The scope of its implementation is not limited to the creation of lining. With its help, you can make a number of other profiled wooden products, among others: platbands, skirting boards, figured slats for various frames.
Installation of lining
Preparation stage
Cutting lining
- Before starting work, it is necessary to calculate all surface areas where the lining is planned to be laid.
- Next, you should purchase the number of boards that is required according to calculations. Be sure to add a small amount to this amount in the amount of ten percent of the total.
- When choosing planks, it is advisable to choose their length so that possible cuts are minimal, this will save money.
- If we are talking about the interior decoration of residential premises, then you will need spruce or pine lining, its width can be from 80 to 110 cm, and its thickness in the range of 12-16 mm.
- The humidity of the lining should not exceed 12%, since during shrinkage and drying, cracks may form, as a result of which the boards themselves will diverge in the future.
Installing the lining will not cause any difficulties
The next stage is to determine the option for laying the lining. If we are talking about covering a small room with a high ceiling, then the material should be laid horizontally. If the walls are too high, vertical masonry should be used to simplify the task and save material. Sometimes a herringbone installation method is used, but it is most often used when decorating exterior walls.
An important stage is the preparation of the lining itself, which must be unpacked and laid in the room where it is planned to be laid, so that the material undergoes so-called acclimatization and is not subject to further deformation.
Installation of sheathing
Before you start decorating the sheathing frame, you should level the walls as much as possible. For example, if a surface made of unrounded logs is used as a basis for laying the frame, the protruding parts of the logs must be cut down with an ax and then leveled with a plane.
Installation of sheathing
Having completed the preparation, you should begin installing the sheathing. The technology most often used is to lay the lining in a vertical position, and we will consider it when starting to carry out the sheathing.
- The lower beam is installed at the floor level, and the upper beam at the ceiling level.
- The evenness of their installation can be checked using a level or plumb line.
- The laces should be pulled between the beams at the corners, and then one more is added to them in increments of 1.5 meters.
- The bars should be fastened at a distance of 90-100 cm between them using self-tapping screws. If there are irregularities on the wall, you should level the sheathing in one plane using pads under the bars. But the use of self-tapping screws is mandatory.
Installing lining on the wall
Plank by plank - it's easy!
The lining should be laid from the corner of the room, and the most careful attention should be paid to installing the first plank, leveling its verticality, and also attaching it to the base bars. It must be installed in a corner with a comb, the groove will always go on the open side, the finishing nails are driven into it. In addition, it is possible to install a clamp on the groove side, if this is planned
Accordingly, the next lining with its ridge will overlap the attachment point of the previous one (photo). Each lining at the top and bottom is attached closer to the edge, this will then allow you to hide part of it with baseboards or ceiling cornices. If one of the boards does not lie entirely in the corner part of the room, the excess part should be cut down along its entire length using a jigsaw. When installing the material, you should take into account the possible shrinkage of the house and changes in the size of the boards in the event of changes in humidity levels. It is advisable to leave a small gap between the upper and lower levels of the room, which will later be closed with baseboards.
Using lining for doorways and windows
The most difficult moment in the work of cladding a room is the design of door and window openings. If, during the process of laying the lining near a door slope or window opening, the lining protrudes beyond it, you should cut off the excess with a jigsaw, having previously measured it with a pencil. During the finishing process, the slopes can be decorated with corners made of plastic and wood.
Planing boards
The board becomes even and smooth after the jointing procedure. This is an extremely important stage and requires no less care and concentration. To do this, it is again necessary to reconfigure the machine. The boards are planed one after another, strictly on one side. Boards that have curled into a spiral during the planing process are immediately thrown away, because they are no longer subject to further use. To obtain even and identical boards in width, count how many times you need to pass along the machine and repeat the same number with each new board, applying the same force.
READ DIY floor screed step by step
When working on the other side, minor differences in thickness will not be noticeable.
The first thing you need to do is adjust the ruler by raising and lowering the table until you set the required depth for the groove. After this, cut out the grooves on both sides of the board. There is no need to cut grooves strictly in the middle of the board, making the groove a little closer to the surface - visually there is a feeling of a thinner lining than it actually is.
Choosing the method of installing the lining
The lining in the baths is fixed vertically and horizontally. But a more rational option for a bathhouse is horizontal.
Finishing the bathhouse with clapboard block house
Let's consider a number of advantages of this type of fastening:
- the lining is positioned with the tenon facing up, so condensation does not accumulate between the foil and wood, as well as in the grooves;
- the sheathing under the horizontal lining is located vertically, that is, the space between the wood and the vapor barrier film is well ventilated. In the case of vertical installation of the panels, the sheathing will have to be mounted horizontally, that is, it will become an obstacle to the air flow between the floor and the ceiling, and the walls are likely to become damp;
- Sometimes fresh log houses are sheathed with clapboards. Such baths “shrink” over several years, the height of the walls changes and the vertical lining can become deformed. With horizontal panels, it is not difficult to remove/replace/repair the top or bottom strip without damaging the entire wall.
When constructing and finishing turnkey baths, builders often install the lining vertically, choosing panels that are suitable in height and installing them without trimming. With vertical mounting it is easier to arrange the corners, the work takes a little less time. But saving time often backfires, because if a vertical board is damaged by an accidental impact, falling coal or high humidity, the entire wall will have to be dismantled.
Finishing with paired eurolining
Figurine cutters
Using cutters for paneling (or figurine), thin planks of a certain configuration are made, which are used to frame various decorative elements. Panels are most often used for the manufacture of decorative frames, as well as for the design of furniture facades. A paneled element used exclusively for decorative purposes can be cut along the contour of the product. Using milling cutters for panels, it is possible to produce products that simultaneously perform two functions: they act as a decorative element and fix the connected elements together using the “tenon and groove” principle.
On the modern market, various cutters for infill are offered, which involve the production of such a decorative element in one or several passes. When making a panel in several passes, at each stage of the technological process, a layer of material is removed for which the tool used is designed. As a rule, in such cases, not one paneling tool is used, but a whole set of them.
Panel cutters can work in vertical and horizontal planes. Vertical cutters for infill are used to process baseboards and the edges of cornices, which involves processing to a greater depth. Horizontal cutters for infill are distinguished by a larger diameter of the cutting part. They are used to process furniture facades, shelves and door panels. Although cutters of this type can improve processing productivity, they are significantly inferior to vertical cutters in terms of cutting depth. It should be noted that almost no production can do without panel-type cutters.
Protecting wood from external influences
It is known that wood is very sensitive to changes in temperature, humidity and insects, so a protective coating should be applied to the surface of the lining. Specially designed for this purpose:
- quick-drying, moisture-resistant varnishes based on water, acrylic, alkyd or polyurethane, which favorably emphasize the texture of wood;
- thickly ground dyes on a water (“stain”) or alkyd basis, capable of giving the material new shades;
- wax compounds that protect the wood structure from rotting;
- antiseptic liquids (“PINOTEKS”, “BELINKA”, “SENEZH”) that prevent the formation of mold and fungal plaque.
The technology for using these materials consists of performing the following actions:
- Sanding the lining with sandpaper.
- Surface treatment with primer.
- Applying the first layer of coating, drying it completely (the drying time of the material must be indicated in the attached instructions).
- Re-coating with a finishing layer.
From time immemorial, natural wood has been held in high esteem in Rus'. Durability, strength and the ability to “breathe” have earned it the well-deserved fame of the main building material for all times. Decorating the balcony with wooden clapboard will reliably retain heat in the room and create a special atmosphere there, which will have a beneficial effect on our physical and emotional state. Now we can easily complete all stages of this work ourselves.
Trusted manufacturers
Today, there are hundreds of small and large firms in the construction industry. Experts recommend carefully studying all the nuances before contacting any of them.
The company has established itself as a reliable manufacturer of professional tools. End mills are designed for the manufacture of such products as lining, block house, eurolining. The kit includes two combined elements, a complex profile. This kit is good because it allows you to make a full-fledged eurolining strip in two passes, which can significantly reduce the cost of time and labor.
At all levels between the bearings, discs and nut there are installation spacers, thanks to which it is possible to easily adjust the gap between the discs. This will help adjust the gaps or tension of the tongue-and-groove connection. The carbide solders are soldered to a very high quality, without sagging or leakage of brass, and are made neatly.
"Inveld"
The company has been manufacturing carbide-tipped wood cutters for more than 20 years. One of the company's latest developments is a kit for making eurolining or simply lining. The set consists of two elements. One cuts out the front part, and the second makes the counter part.
The set is supplied in two types of configuration. The first variety is with an 8 mm shank. The second one has a 12 mm shank. This was done in order to work both on low-power milling machines and on more powerful equipment - milling machines. The design is collapsible. You can unscrew the fastening nut and remove the components, replace the bearing or sharpen the knives. Carbide knives, VK8 alloy. Soldered to the shaft using brass. They are easy to sharpen yourself with a diamond tool on the back of the knife.
"Slavic Courtyard"
This manufacturer produces options for four-sided and milling machines.
The Slavyansky Dvor enterprise supplies a wide range of models. They are intended for the production of all types of cladding boards (beams, linings, eurolinings, American boards, block houses). You can choose the type that suits you, either as a set or separately. With replaceable or brazed knives.
We make lining at home
Existing types of tools
Milling cutters for a manual router for making lining - a set for professional use
- Manual type cutters are divided into:
- edging,
- bearing,
- bearingless.
In order to make wood panels yourself, you will need bearing cutters; other types of tools require additional equipment, which means they are not suitable for us;
Cutting tools for hand work
- Mills for making lining for a manual router come in a wide variety. Before you start work, you need to decide what tools you will need to make wood panels. Do not forget also that some cutting tools can only be used for manual work, but it is undesirable because of the inconvenience;
Universal models
Mounted models
The cutter for making lining, which is shown in the photo, will help you make a panel with any tongue
It is important to set up the machine correctly, namely to select a cutter by diameter and depth.
Edge cutters
Designed for processing the edges of the product. All edge cutters are characterized by the presence of a bearing, which during operation rolls around the edge of the part. In this case, the working (cutting) part is located above or below the bearing.
Straight edge cutters
Straight edge cutters are most in demand when working with templates, and they have an upper or lower bearing. The latter are cheaper, but when they are used, the workpiece is located between the template and the router, which does not allow processing in two passes in depth (with an upper bearing this is possible).
Techniques for working with edge cutters - video
Such cutters are characterized by a working length, a working diameter, and also a bearing diameter (it is not always equal to the working one). For most cases, it is more convenient to choose cutters in which these diameters coincide, which makes it easier to manufacture and attach the template to the workpiece.
Shaped, or molding, edge cutters
They have a great variety. The choice of such cutters is dictated only by the desired edge profile, which is chosen based on the appearance of the product.
Their size, as a rule, is determined by the height of the working part, as well as the largest diameter and radius of curvature that they make. If there are several curves in a profile, then the profile of the largest of them is usually indicated. It is extremely rare, but there are adjustable molding edge cutters. They can adjust the distance between working parts.
Disc edge cutters
They are intended for making a rebate, but unlike straight groove ones, they are based on the edge with a bearing, which is why the groove they select is more accurately located relative to the edge of the workpiece. True, they are also more expensive than straight grooved ones. Often, such cutters are made adjustable to select grooves of different depths or widths. In this case, the set includes bearings of different diameters or a stack of thin cutters on an axis, so that the height is changed by disassembling the cutter and removing excess disks.
How to choose the right cutter. Tips for beginner millers in this video
Shaped edge cutters
They may have a bearing at the end, but the shape of their edges is much more complex than that of shaped edges, and the height is greater. Suitable for making baguettes and processing the edges of panels, skirting boards, and façade frames. Such cutters are also produced without bearings. In this case, they must be worked using a rip fence or a copying sleeve and a template.
Combined frame, or counter-profile, cutters. They are used when processing adjacent edges to create frame joining parts. Such cutters can also be assembled.
Horizontal figurine cutters
Designed for decorative milling of panel edges. Due to their large diameter, weight and cutting force, they are produced exclusively with a 12 mm shank and can only be used on a table, that is, with a stationary mounting of the router. Sometimes such equipment consists of two cutting discs and is capable of processing both sides of the panel in one pass. Such cutters have the largest diameter of all, so when choosing a milling machine you should immediately think about whether you will be making panels. This consideration directly affects the choice of tool based on the diameter of the hole in its base.
Types of tools for equipping a hand router
When choosing a tool to equip your hand router with, you must first decide what tasks you are going to solve with its help. In addition, you should take into account the characteristics of the material that will be processed (wood cutters, for example, are made of a softer material than stone cutters).
Working heads of cutters can have different profiles
On the modern market, as mentioned above, there are many different cutters designed to equip hand-held power tools. If we talk about the most popular types, we should highlight:
- cutters for lining;
- cutters for panels;
- tools for performing stone work;
- spiral cutters designed for woodworking.