Entrance doors should not only be beautiful, but also durable, warm and reliable. Metal doors provide this combination of qualities. But not all of those on the market can boast of reliability - many of the inexpensive ones can literally be opened with a kitchen knife. Really beautiful and reliable steel doors are very expensive. If you have a welding machine and some welding skills, you can make an iron door with your own hands. Even taking into account the costs of purchasing materials, it will be 30-50% cheaper.
Required materials and tools
Free instrument 50% success
Before you begin manufacturing a metal structure , you should prepare the necessary materials and tools for the work.
We will need:
- yardstick
- carpenter's square for taking measurements;
- metal corner for the door frame and door frame; it can be replaced with a square pipe 40x40 mm; for the manufacture of the internal frame of the box and stiffeners, slightly smaller pipes of 40x20 mm are used
- metal sheets: you should not take material that is too thin; its thickness should be at least 1.5-2 mm
- welding machine
- grinder or wire brush for cleaning welds
- drill with drill bits
- metal anchors or pieces of reinforcement for attaching the structure to the wall
- screws, bolts
- a wrench of the appropriate size for tightening the bolts
- screwdriver
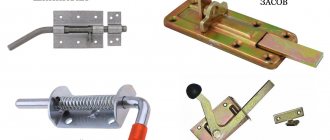
- door hinges capable of supporting the weight of a door weighing over 100 kg
- rim lock
- plywood, MDF, lining or laminate for finishing
Advantages of a homemade door
Making a metal structure with your own hands has a number of advantages over purchasing finished products. At a minimum cost, you can get an entrance door to your apartment without altering the doorways. When making metal doors yourself, you must follow safe work rules and perform all operations carefully and accurately at every stage. Advantages:
- by choosing the material for production yourself, you can be confident in its quality;
- can be made with an individual finishing option;
- You can make an iron door on a budget.
Doing it yourself can save a lot of time.
Taking measurements
Welding a metal structure
Even when using standard drawings to assemble an iron door, you will need to take measurements. Ideally even, symmetrical doorways simply do not exist. Therefore, it is necessary to be extremely careful when taking measurements.
One measurement will not be enough - you need to take measurements three times and then select the smallest number obtained. The door leaf should be measured at the top, bottom, and middle.
The height of the opening is determined in exactly the same way. If the old doors have not yet been removed, it is easier to measure them.
In most cases, the width of the canvas is a multiple of 10 cm - its width can be 70, 80 or 90 cm. Please note that the size of the future opening should be 1.5-2 cm smaller than the size of the opening itself. The remaining cracks are subsequently filled with polyurethane foam. After all, it will be difficult to insert and perfectly align a door cut exactly to the size of the doorway.
Immediately determine which direction they will open. According to SNiP, entrance doors must necessarily open outward, so that in the event of an evacuation or transfer of a sick person, it can be opened without hindrance. In this case, it will also be possible to save useful space in the hallway.
How to correctly measure the width of an opening
The opening side is selected taking into account comfort and convenience. Traditionally, doors are made right-handed so that upon entry they can be opened with the right hand. But this option can be changed taking into account specific circumstances.
After all, the door should open so as to occupy a minimum of free space without creating interference. In apartment buildings, the location of neighboring doors is also taken into account.
Proper preparation is one of the keys to success
Making a metal door with your own hands is quite a realistic task for an amateur, but there is one caveat: you must be able to work fluently with an angle grinder and have at least basic knowledge of a welding machine. But before you make the door itself, you need to prepare the tools and material.
Features and models
Entrance doors are installed both in apartments and in private houses. Regardless of the location of this structure, its direct purpose is considered to be reliable protection of housing from cold, noise and burglary. Therefore, when choosing this or that front door model, you need to take into account many nuances. Recently, homemade structures made of metal and wood have become extremely popular, while metal doors are distinguished by their functionality and design features; they are resistant to explosions, burglaries, fireproof and bulletproof.
As for wooden options, they are characterized by an original aesthetic appearance; doors with sliding systems also deserve special attention.
Today there are many types of entrance doors. According to their purpose they are:
- Fireproof and bulletproof. Such products are made of high-strength metal. In addition, these types of doors are additionally treated with reinforcing compounds.
- Shockproof. They are the most reliable option for protecting your home.
- Soundproofing. Prevents noise and sounds from entering the house.
- Sealed. Often installed in outbuildings.
Entrance doors can open in different ways. There are swing and sliding models of structures. In addition, doors are classified by the number of leaves and are:
- Single leaf. Made from solid fabric.
- One and a half. They are a structure consisting of two parts, where only one opens.
- Bivalve. Large doors with two opening leaves.
All entrance doors differ in appearance and shape, so a distinction is made between rectangular and arched products. Designs with a blind transom are also popular.
Recently, manufacturers have been trying to make the entrance to their homes unusual, so they often decorate the doors with glass.
Iron structure design
The process of manufacturing an iron door should begin with the creation of a drawing, which indicates the actual dimensions of the product. The resulting diagram will serve as the basis for the assembly and subsequent installation of the door.
You need to start by measuring the width and height of the doorway. The resulting measurements are transferred to paper, and a diagram of the future design is drawn with the specified width and height of the door leaf.
The standard size of the metal structure is 900 mm x 2000 mm. If the dimensions are larger, then an additional block is installed on top, covered with sheet iron, glass, grating, or a blind or hinged block is welded to the side. All elements are specified in the project.
The dimensions of the door frame should be 2 cm smaller than the size of the doorway. The resulting gap will subsequently greatly simplify the installation process of the box and allow it to be adjusted if necessary. The number of hinges is calculated taking into account the weight of the structure; as a rule, 2 - 4 canopies are used. To evenly distribute the load, the hinges are welded at the same distance from each other. In this case, the first and last ones are welded at a distance of 15 cm from the outer edge of the door.
The next step is to strengthen the door frame with additional stiffeners. The main stiffening element is located in the middle of the door leaf, and additional stiffening ribs can be placed from the corners of the product or from the hinges, which will evenly distribute the load over the entire area of the door. The main thing is that the stiffeners do not interfere with the insertion of the lock or the installation of the handle and eye. Stiffening ribs must ensure the strength of the finished product; their number is also chosen at your own discretion.
Don't miss: Decorating the front door from the inside with your own hands
Door frame
So, we will describe in detail how to make an iron door yourself:
1After cutting a metal corner or pipe to the specified dimensions, you need to fold the resulting parts into a rectangle on a flat surface or welding table, once again double-checking its dimensions.
2There is no need to cut 45° corners. The metal strips are simply joined end to end.
Metal strips are joined end to end
3We weld the inner frame from the corner with the smaller shelves. The distance between it and the frame is 3-5 mm.
4 Stiffening ribs are welded from the same corner - sections that are inserted inside the frame.
5 Don’t forget to thoroughly clean all seams with a sander, special abrasive fiber, brush, or pickle them with a seam treatment agent. Otherwise, the smallest remnants of metal, and behind it the metal corner itself, will immediately begin to rust. It is more convenient to grind off large deposits with a grinder or a file.
6A fairly common mistake made by novice welders is to join the frame parts together immediately, “tightly”. There is no need to do this under any circumstances - most likely, the frame will have to be trimmed. Therefore, first you just need to “grab” the metal corners, and then align the assembled door frame with a building level not only horizontally and vertically, but along the corners and both diagonals.
7Check that all parts fit exactly at 90°. Final welding can only begin after alignment.
Frame with internal frame
8The next step is drilling holes for the anchors and attaching the hinges. At the same stage, holes are prepared for the lock bolts.
9 To attach the sealing rubber and protect the frame from deflections, small metal plates are welded to it.
10To insert the frame into the doorway, you can weld steel eyes to it or provide through mounting holes.
Finished door frame
Seven stages of steel door assembly
You can make metal doors with your own hands only from a corner or only from a profiled pipe, but the mixed version turns out to be more reliable and practical. It is better to weld the outer frame (frame) from a 50x50 mm corner, and the frame for the door leaf from a 40x20 mm profiled pipe.
Stage No. 1. We cook the loot
First of all, we cut off the corners according to the diagram and fix them on the work table or sawhorses with clamps. Here it is important that the lower plane is flat and the corners meet at 90º. We check the rectangle of the box by its diagonals, if they are the same, then the corners will be right.
Fixing the frame with clamps.
You shouldn’t scald the corners right away, they can lead, first we grab them at several points and measure the diagonals again until everything is boiled, you can still adjust minor inaccuracies.
Spot tack.
When scalding corners, first apply all the vertical seams, and then move on to the horizontal ones, so the metal will overheat less. We will cut out the excess part of the corner later.
Welding corners.
Now we turn the frame over and check the plane with a long level or any even standard. There should be no distortions or bends.
Checking the plane of the frame.
We boil the external joints and immediately sand these seams with a grinder.
Welding external seams.
As shown in the photo above, we still have a piece of the corner left uncut from the inside; it needs to be removed, as it will interfere with installation. To do this, turn the frame over again and cut out the excess parts with a grinder. The loot is ready, now you can move on to the frame for the iron door.
Cut out the excess parts.
Stage No. 2. Frame for the door leaf
When cutting profiled pipes for the frame of a door leaf, first measure out all the long parts, and then cut out the short ones from the rest. Otherwise, you may not guess, and then large vertical posts will have to be welded from pieces.
It is better to make the slot for the lock right away. To do this, measure 1 m from the bottom of the post and make 2 vertical cuts according to the dimensions of the lock, and cut this strip diagonally in the middle. To make the pieces easier to break out, we make small cuts on them; the arrows in the photo point to these cuts.
Preparation for locking.
Next, we break out the strips, turn the pipe over and cut out a similar hole on the reverse side, after which you can drill the side holes for the screws, cut threads into them and try on the lock.
Initial fitting of the lock.
To ensure that the frame of the door leaf fits neatly into place, we fix the profiled pipes on the inside of the door with clamps. Don’t forget: there should be a gap of 5 mm between the profiled pipe and the corner; to do this, insert spacers. You can use the same corner trims as spacers.
Fixing the profiled pipe on the frame.
It is important here how to install profiled pipes; any such pipe has a welded seam, so this seam should “look” inside the canvas.
Welding seam of a profiled pipe.
When constructing a frame for a door leaf, it is no longer necessary to check the diagonals, since we are “attached” to the outer frame. The corners are welded by analogy with the loot, that is, we grab it at several points, and then weld the joints from the center to the edges.
Welding door frame corners.
Here, while the frame is in the sump, we weld the transverse stiffeners; they are made from a profiled pipe.
Fastening of stiffeners.
Now we remove the clamps, remove the outer frame and weld the ends of the joints in the corners, after which we sand all the seams. Be careful, the metal is thin and burns easily.
It is necessary to grind the weld seams on the outside.
Always control where your top, bottom, hinges and lock are. At this stage it is very easy to get confused and then it will be difficult to correct the situation without losses.
Stage No. 3. Attaching the sheet
First we need to cut the sheet to size. From the frame of the door leaf to the edge of the sheet we leave 20 mm (5 mm for the gap, plus 15 mm for the overlap of the slit). To cut the sheet exactly according to the markings, you can use a profiled pipe; simply secure it with clamps and cut along the edge with a grinder.
Standard for cutting sheets with a grinder.
We place the door frame on the cut sheet, check that the overlap is clearly observed everywhere, and spot weld the profiled pipes to the sheet (steps of about 100 - 150 mm). To prevent the frame from moving during welding, it can be secured with clamps.
You grab the frame not along the perimeter, but diagonally. That is: we welded one point, then moved to the opposite one, and so on until everything was scalded. Otherwise, the design may fail.
Spot welding of door leaf.
Stage No. 4. How to weld hinges
| Illustrations | Recommendations |
| We buy ordinary awnings, the male-male type (male with a pin). Canopies must be lubricated immediately before installation. | |
| There should be 20 - 25 cm from the bark cloth to the canopies, both above and below. | |
| The canopy should be slightly raised so that the sheet does not cling to the frame when opening. | |
| The canopy is positioned so that when viewed from above, there is a gap of 1 - 2 mm between it and the sheet. | |
| Before welding the structure, place a spacer (a piece of the same sheet) under the sheet. The gap is needed for the rubber seal. | |
| We scald the awnings. | |
| To hold the canopy more securely, you can weld a metal plate with an overlap onto the canvas frame, but this is more of a recommendation than a rule. |
Stage No. 5. We cut into the lock
The lock has already been inserted into the door frame, now you need to try it on and mark the places of the cuts in the door.
Marking for holes in the corner.
We drill holes for the keyhole with a large drill, and then bring it to the desired size with a round bastard file.
Hole for keyhole.
The holes in the corner for the lock itself are cut out with a grinder and also processed with a file. It is advisable to cover the lock bolts from the inside with a metal casing; it can be made from a profiled pipe or angle, the casing must be welded.
Cover for protecting the lock bolts.
Now all that remains is to try on the overlay on the made holes and you can move on to the facing work.
Installation of the lock escutcheon.
Stage No. 6. Cladding and insulation
It is cheaper and best to insulate iron doors with foam plastic; as a rule, PSB-S-25 slabs with a thickness of 40 mm are used. The slab is cut out slightly smaller than the opening, and the gap is then filled with foam.
Insulation of entrance doors with foam plastic.
There is no need to insulate entrance doors with mineral wool. The fact is that any cotton wool is afraid of moisture and shrinks after getting wet, so after a couple of years such insulation will stop working.
The inside of the structure can be covered with any board you like, from OSB to laminated MDF.
Laminated MDF door trims.
You can also read a more detailed article on insulating metal doors - How to insulate a metal entrance door .
The outer front of the doors can also be finished with a laminated board, but it will be easier and cheaper to paint the metal with hammer paint; this is done like this:
- All metal is cleaned with a cord brush (it is convenient to use a cord attachment on an angle grinder);
- The structure is degreased with acetone or gasoline;
- The metal is coated with primer for the previously selected hammer paint;
- Apply 2-3 layers of paint with a brush, roller or spray gun.
Painting iron doors with hammer paint.
Stage No. 7. Installation of metal doors
To secure the iron doors, you must first weld unique shanks made from a 40x4 mm strip around the perimeter of the door.
Shanks for fastening iron doors.
The structure is installed in the following sequence:
- Insert the loot into the doorway;
- Use a hammer drill to drill blind holes in the slopes through shanks;
- Next, you can hammer in metal crutches or fix the structure with anchor bolts;
- Hang the door leaf;
- Blow out the gaps around the perimeter of the tray with polyurethane foam;
- The door is installed, now all that remains is to cut off the excess dried foam and arrange the slopes.
This is how you install an iron door with your own hands.
Also read our article about installing a metal door in a wooden house .
Door leaf
- The height and width of its frame must match the size of the door frame minus 5 mm on each side for the door to move freely.
- After cutting the sheets (this can be done with a grinder), we clean the edges from burrs with a file or grinder with emery.
- Metal sheets are attached to the frame so that they protrude 10 mm at the top, bottom and side of the lock. The allowance on the hinge side is made slightly smaller - 3-5 mm.
- After “grabbing” the sheets, we check the correctness of fastening, and then weld the seams completely. If the sheets do not move, we proceed to final welding. First, we “sew” them to the main frame, and then attach them to the intermediate stiffeners. There is no point in making continuous seams - it is enough to weld the sheets in small sections.
- The cutout for inserting the lock must be provided before the sheathing.
- At the same stage, you can attach a wood frame to the door leaf to secure the trim. To do this, holes are drilled in the metal in the right places.
Single sheet metal door design
Lock installation
To install the lock in the flange of the corner of the door frame, make a cutout of such a size that the lock fits into it without a gap. Having installed the lock, you need to mark all the holes: mounting, key, handle, etc. Based on the markings, you need to drill holes of the required diameter.
In addition, you need to make holes around the entire perimeter of the door for screws with a diameter of 4 mm, with which boards will be screwed to the door from the inside (one of them should have a cutout for a lock). For fastening, you can use screws 35-40 mm long.
All cutouts for the latch and various latches in the box are made only when the box is installed and the door is hung. At the stage of installing the lock, a door peephole is also made.
Do-it-yourself cold forging of metal is a real art that takes a long time to learn. When welding titanium, certain difficulties can arise, especially if the welder is inexperienced. Read more in this article.
Do you need to cut metal quickly and efficiently? Useful tips and recommendations at https://elsvarkin.ru/texnologiya/plazmennaya-rezka-metalla-svoimi-rukami/ link.
Connecting the door leaf to the frame
- Just as with the previous assembly, the seams should first be “tightened” by welding. The final connection is made only after checking the correct installation.
- We drill holes for inserting a key and, if necessary, a peephole.
- To attach the hinges, you need to step back 20 cm from the bottom and top of the door.
- Raise the door (it’s easier to do this together). We fasten the canopies in such a way that the lower elements (the pins are attached to them) are attached to the frame, and the upper ones, called counters, are attached to the door leaf.
- All loops must be located strictly along the same axis. This is not easy to do - you will have to take measurements many times. Otherwise, if an error occurs, the door will warp.
- It is better to hang a massive door not on 2, but 3 hinges.
- Lubricate them immediately so that the door opens easily and does not creak.
Entrance metal structure
Even if the door will be upholstered or decorated with decorative panels in the future, it should be treated with an anti-corrosion compound or painted. For painting metal, it is better to use the so-called “hammer” enamel, made on an alkyd-styrene base.
Installation of a lock and locking hardware
There can be no trifles in the question of how to weld a metal door with your own hands. Especially when it comes to safety. Installation of the lock and safe hooks must be carried out during the manufacturing process of the door frame.
Until the frame is covered with a metal sheet, it is convenient to make holes in it and install a lock. When placing the lock, you need to keep in mind that an armored door, like any other, can be lowered during operation. This means that the locking mechanism should be placed so that when the door is lowered, it cannot jam.
The gap between the bottom of the lock tongue and the bottom of the hole in the block must be no less than the gap between the door and the threshold of the block. When marking the mounting hole on the door frame, this fact must be taken into account. Alternatively, you can cut an opening in the door frame to the size of the lock mounting plate. Then, simply make a mounting strip from a metal strip and weld it into the body from the inside.
The second installation option involves making a slot in the door frame pipe and filing it to the desired size. However, the lock may prevent the door from closing. It simply will not allow the door to close if the gap between the frame and the block is less than 4 mm.
To strengthen the location where the lock is installed, it is recommended to weld two horizontal struts into the frame - this will strengthen the structure and prevent the frame from being bent when breaking.
Insulation
insulate an iron door welded from metal with expanded polystyrene, polystyrene foam or mineral wool. When using polystyrene foam, sheets 4 cm thick are sufficient. Too much density of the material is not needed - after all, the load on it will be small. You will need to purchase 4 square sheets of 1 m wide.
When purchasing polyurethane foam, choose a composition with minimal expansion, otherwise the foam will simply squeeze out. We apply it around the perimeter of the frame, stepping back slightly from the edges. Next, polystyrene foam is laid. All seams between sheets, cracks between foam plastic and a metal corner should also be sealed with foam. It can be replaced with Moment glue or any other suitable adhesive composition.
Installation of insulation
Mineral wool or stone wool has a significant disadvantage - these materials can absorb moisture. A metal door with this type of insulation will quickly rust. For apartment buildings this is not critical - there is not much moisture in the entrances. But it is highly not recommended to insulate a street door with mineral wool.
If in the future the door will be finished with self-adhesive film, there is no need to cover the insulation with chipboard. Any irregularities will be immediately visible. Replace chipboard with furniture-grade moisture-resistant plywood. It is attached to the metal using self-tapping screws through pre-drilled holes.
Metal door covered with film, trimmed with molding
You can decorate a door covered with film with moldings - decorative strips made of metal or polymer materials, painted to resemble wood, stone, silver or gold.
Inserting a metal door into an opening
It is unrealistic to install a massive metal structure alone. You will need an assistant.
Removing the old door
- Before installing iron doors, the old door leaf should be removed from its hinges. To do this, place a crowbar under its bottom, lift the structure and remove it from its hinges. Some types of hinges have to be unscrewed. This must be done starting from the bottom.
- After dismantling the slopes of an old metal door, you need to find its attachment points. To do this, plaster is knocked down in the area of the proposed anchors or reinforcement. All metal parts are cut off with a grinder, and then the old box is pulled out.
- A regular wooden box is easier to remove. It is enough to cut the side posts in the center, and then, using a crowbar, pry them out of the opening.
- All loose pieces of brick and putty should be knocked down. The resulting voids are filled with new bricks and then covered with cement mortar. Small potholes will be filled with foam in the future, so you can leave them alone for now.
- Significant protrusions are knocked down with a hammer or cut off with a grinder.
- Pay attention to the condition of the threshold. In old houses, wooden beams are installed in these places. If it is damaged, the beam needs to be replaced. You can check its safety with an awl. Insert it into the wood and try to loosen it. If this can be done easily, the timber has become unusable.
Removing the door frame
Door insert
1It is more convenient to install it with the door leaf removed from its hinges.
2The frame is installed on pads 2 cm high. With their help, the structure will be leveled. If no mistakes were made when welding the front door and all measurements were taken correctly, it should fit into the opening freely.
3Check the horizontal and vertical position of the structure with a bubble or laser level. When checking vertically, you can use a plumb line - a weight suspended from the side.
4After leveling, we wedge the door frame using wooden or special plastic wedges. They are located closer to the fastening points. There should be three of them on the sides, two on the top.
5Check the level again to see if we accidentally moved the frame to the side.
6There are two ways to fasten metal doors. In the first case, the lugs should be pre-welded to the frame. If the walls are not thick enough, through holes are made in the box into which anchors or small pieces of reinforcement will be inserted.
Door fastening methods
7To install anchors or fittings in the wall, you will need to prepare holes with a depth of 30 cm. The size of the drill must match the diameter of the fastener. You can mark the drilling depth on it using masking tape.
Installation of anchors
8After inserting anchors or reinforcement, they are additionally driven in with a hammer. If you need to move the fastener slightly, insert a screwdriver between it and the wall, tapping it with a hammer.
9Attachment begins from the hinge side. Then two fasteners are inserted from above, below and one from the side of the lock. The anchors should not be over-tightened - the door frame may need to be adjusted.
10We check with a level to see if we have displaced it when driving in the fasteners.
The frame must be clearly leveled
11We hang the door leaf. Let's check its progress. If there are distortions, cracks, or jammed locks, you will have to remove it and re-align the position of the box horizontally and vertically.
12If the door leaf is installed correctly, it needs to be removed again and the anchors finally tightened. First, tighten the bolts from the hinge side, then from the lock side. The last ones are the bottom and the top.
13After the final hanging of the web, its progress is checked again.
14To create a reliable sound and heat insulating barrier, all gaps between the door frame and the wall are filled with foam. Its expansion coefficient should be minimal - it is easier to work with such a solution.
15Excess foam should be removed immediately with a damp cloth. If you delay a little, after 5 minutes it will be problematic to erase it - the surface of the door will have to be scraped.
Due to strong shrinkage in wooden houses, doors are not attached to the wall itself, but through a frame (beam) or casing (assembled frame). But even in this case, it is possible to install the front door to the house only a year after the construction of the log house.
To insert a structure into a wall made of foam or aerated concrete, additional installation of a metal frame to the size of the doorway is required. She will stay in it due to the emphasis. In this case, the mounting holes will be located in the metal frame crosspieces.
How to avoid mistakes?
To prevent unforeseen situations from taking you by surprise, you must:
- take correct measurements;
- create a drawing of an object;
- carefully measure angles and parallels;
- adjust the frame and canvas;
- treat materials with protective compounds.
Making a front door takes time and patience. Only by carefully following all the recommendations can you achieve a good result. Accuracy is important in the work, so you need to measure the doorway in several places. If it is uneven, it should be strengthened with cement mortar.
Sources
- https://ODveryah.ru/montazh/izgotovlenie-metallicheskih-dverej
- https://filippovdoor.ru/dveri/dver-iz-profilnoj-truby-svoimi-rukami.html
- https://dekoriko.ru/dveri/vhodnye/svoimi-rukami-kak-sdelat/
- https://o-dveryah.ru/metallicheskie/zheleznaya-svoimi-rukami/
- https://aystroika.ru/remont/metallicheskie-dveri-kak-sdelat.html
- https://rezhemmetall.ru/metallicheskaya-dver-svoimi-rukami.html
- https://melt-spb.ru/oborudovanie/dveri-iz-profilnoj-truby.html
- https://gorodverey.ru/izgotovlenie-zheleznoj-dveri-svoimi-rukami.html
- https://vitdoors.ru/dveri/izgotovlenie-metallicheskoy-dveri-svoimi-rukami.html
- https://stroy-podskazka.ru/dveri/vhodnye/metallicheskie/svoimi-rukami/
- https://novamett.ru/dver/vhodnaya
- https://krrot.net/zheleznaya-dver-svoimi-rukami/
- https://VseoDveri.ru/vhodnye-dveri/vhodnaya-dver-svoimi-rukami/
[collapse]
Post Views: 3,257
Slope fastening
The appearance of our door is still far from ideal - polyurethane foam and pieces of broken plaster stick out from all the cracks. It is necessary to bring the entrance structure to perfection by making slopes.
Of course, the doorway can simply be plastered over. But it is quite difficult to perfectly align its corners. It is much easier to install slopes - to decorate the part of the wall framing the door frame with panels, for example, made of MDF, laminated or veneered chipboard.
To do this, it is enough to correctly mark, cut out the parts and attach them to the wall.
There are three ways to install slopes:
- using polyurethane foam
- on plaster mortar or special glue called liquid nails
- on a pre-assembled frame
Slope fastening
After fastening the slopes with self-tapping screws or gluing with liquid nails, the platbands are attached. The screws are recessed a couple of millimeters deep and then sealed with putty matched to the color of the platbands.
Entrance door threshold
According to the standard, its height should be 30 mm. But in most cases this parameter is not followed. The threshold can be made a little lower - about 20 mm. Too high will make it difficult to enter or drag heavy bulky objects into the house. Yes, and stepping over a high threshold is not very convenient.
Such a structure can be made not only from metal, but also from wood, stone or plastic.
- All debris and dust must be removed from the installation site.
- After taking measurements and cutting, grooves are prepared in the thresholds according to the size of the door frame.
- Holes are drilled in each part for inserting screws.
- There is no need to screw the threshold on right away - you just need to secure it with self-tapping screws and check whether it interferes with the opening/closing of the door.
- If it moves freely, without effort, we finally attach the threshold, and cover the locations of the screws with the help of special covers, which can be purchased at a furniture store.
Threshold for entrance door
Assembly of the structure
Essentially, it all comes down to hanging the sash, checking its position, the operation of the locks and adjustments (if necessary). All that remains is to install the handle, lock and peephole. If the door design includes crossbars and lower (upper) stops, then you need to make markings.
The sash is covered, and the places for drilling holes are marked on the jamb. After readiness, their coincidence with the fixing elements is checked. This applies to both the main canvas and the additional, small one.
The final “touch” is installing the manufactured door into the opening and lubricating all rubbing parts (which many people forget about). After this, we can state that everything is complete, the work has been completed.
For those who have skills in working with metals and want to get a high-quality iron door at low cost, making it yourself is the best option. Moreover, the drawing, diagram, and external finishing are chosen not by the manufacturer, but by the craftsman. This means that the entrance to the house will not only be reliably protected, but also designed in an original way, and the block structure will fit perfectly into the interior of a particular building.
Finishing
A metal iron door looks too rough, so it is better to finish it using veneer, MDF, laminate, self-adhesive film or painting with special paints. Chipboard is not suitable for these purposes - even with internal lining, after a year the sheets will begin to delaminate.
Special powder paints, which are applied by spraying, look very decorative. However, their cost is quite high. Finishing with laminate is allowed only in apartment buildings - this material is too afraid of moisture.
Laminate installation
The finishing of an iron door can be done with MDF panels - they are produced according to the size of the door in the form of solid overlays, called cards, including from natural wood veneer. You can also order panels according to your own dimensions.
For quite reasonable money you will receive elite doors that are indistinguishable in appearance from products, for example, made of natural oak. MDF panels from Belarusian and domestic manufacturers have very good quality.
Types of MDF overlays
- When finishing a metal door with clapboard, you will need to make a special frame. In principle, wooden planks can be attached to it with liquid nails or using special fasteners - clamps. But still, the frame method is considered more convenient. You can additionally lay thermal insulation material under a wooden frame made of narrow timber.
- After cutting the wooden parts, the cut areas are carefully sanded. To protect the wood from moisture penetration and premature destruction, it is treated with a special impregnation and dried well.
- The door leaf must be removed and all interfering elements must be unscrewed from it - handle, locks, peephole. The sealing tape must also be removed.
- After attaching the wooden frame to the metal door (for this purpose holes are prepared in it), the installation of the lining begins. The planks must be joined to each other as tightly as possible. The step between the fastenings is 15 cm.
- Working on the floor will not be very convenient - it is better to lay the canvas on a table or workbench.
Options for finishing the door with clapboard
We have described in detail the entire process of manufacturing such structures from start to finish - from welding to installation and finishing. A detailed video of making iron doors with your own hands can be seen at the following link:
Conclusion
In a forum thread dedicated to making metal doors yourself, the opinion was expressed that the costs of homemade products would be significant, and the savings would not be so significant that the game would be worth the trouble. However, for skilled hands, the manufacturing process is quite feasible, and the ability to choose decent materials, and not guess what’s inside the purchased structure, is an important factor. Therefore, while some are talking about the feasibility, others are doing and sharing real experience to make the task easier for beginners.
You can learn how to save on wooden entrance doors from the article about transforming budget blanks. How to insulate an already finished metal door is also on our portal. The video contains an overview of popular new doors from the famous exhibition.
Subscribe to our Telegram channel Exclusive posts every week