How to make a groove in a board with your own hands
The construction of a wooden house or bathhouse is gaining more and more popularity every day, and often home craftsmen decide to build a building from timber with their own hands.
In addition to creating a working design, you should know the technology of laying logs. For high-quality and competent assembly, you should study all possible connection methods.
Therefore, in this article we will tell you how to make a groove in a beam and connect it correctly.
How to cut timber?
When folding a log house, its connection may be needed in two cases:
- If the length is insufficient for extension;
- When connecting a log house at the corners.
Each of the above connection methods has several types of grooves for fastening.
What types of beam corner ties are there?
To efficiently connect a wooden frame at the corners, you can use a tie with or without residual ends.
In the first case, the connected beams will have leading ends; this option is good because it provides better piping and protection of the corners from precipitation.
But with this connection method there is an increased consumption of material. In the second case, laying the timber is much more economical, and the corners are smooth.
Examples of the above connections are shown in the photo below.
Sawing method
If we consider this connection option as with the remainder, we can distinguish the following types of grooves:
- Connection using the “slam” method;
- A similar method is “to the point”;
- The simplest type is a bowl or “oblo”, also known as “in the paw”.
Although the “oblo” is simple, there are three types of its grooves:
- cut on one side;
- double-sided cut;
- cut on four sides.
Examples of such connections are shown in the photo. Let's look at each of them separately.
One-sided cut
For single-sided masonry, a simple connection technology is used, which is used by many construction companies.
To implement it, a perpendicular in the form of a bowl is sawed into the timber.
The size of this cut is selected in such a way that each previous log fits without gaps and matches in size.
Double-sided cut
This connection option is a little more complicated than the previous one, because the groove is cut from both sides.
It looks like the first one, only two perpendiculars are cut out at the top and bottom at ¼ of the thickness of the frame on each side.
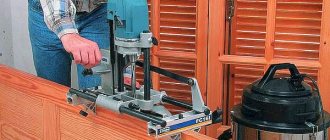
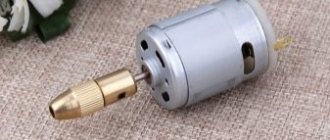
If you do the sampling yourself, you can use a chainsaw as a tool or purchase a special milling cutter.
Four-sided cut
This connection method is the most complex, but at the same time very high quality and durable, because the correctly chosen groove allows you to fit the logs together like a children's construction set.
The bowl in this method is cut through on all four sides and, as in the second option, each cut is made to ¼ of the thickness of the timber.
To make sampling easier, the ideal solution would be a timber groove router; with its help, the cuts will be smooth and neat, especially when compared with a chainsaw or jigsaw.
We connect the beams using the “oblo” method at the corners
When making a corner connection of a log house using the bowl method, there are three possible methods:
- sampling with an oval comb;
- groove in the tail;
- half a log sample.
Of the above methods, the last one is the most used and simple.
Technologically, making a groove is similar to a “groove”, but in addition, a laying groove is selected along the length of the beam.
During the installation of logs, the laying cutout is filled with insulating material, and this procedure is repeated during the installation of each subsequent log house.
Important! For reliable and high-quality fastening, in addition to the groove, the logs are attached to dowels. They are round dowels that are driven into drilled holes in the logs being joined.
When laying using the oval ridge method, in addition to the main and laying grooves, an oval protrusion is left in the bowl, and a cut of the same shape is left in the lying log. Thanks to this protrusion and cutout, reliable fixation of the log house is ensured.
The fat tail laying is the most complex of the three listed, because the groove made in the log has an unusual shape (most often it is rectangular) and is located across the log, and in the next log the cutout has a longitudinal cut of the same shape. Although making a selection in this way is very problematic, such a connection is very strong. When building and installing it yourself, you will have to acquire not only a chainsaw, but a router and an electric jigsaw.
Considering other installation methods, it should be noted that they are all very similar to each other. For example, “Oblo” and “Okhlop” have a difference in the location of the cut; in the latter, the groove is cut from the bottom of the log.
If we consider the “ohryap” method, then the groove in the beam is cut longitudinally and transversely, that is, there is a double cut in the bowl, and at the same time it is made in both logs.
How to make a groove in a board with a drill
For a long time, a tongue-and-groove connection has been used in carpentry and carpentry. Ancient architects, using this method, managed to create unique wooden buildings without a single nail or screw. And although a wide variety of hardware is now quite accessible, the articulation of individual parts of various structures by this method not only has not lost its relevance, but is also widely used in modern products and materials.
The principle of connection and its varieties
In terms of design, all tongue-and-groove joints are made according to the same principle: a protrusion is made on one part, and a recess is made on the second. They are exactly the same in configuration and size.
When these two parts are tightly joined, a strong technological unit is obtained.
When building houses, such a connection prevents the shift of one part of the structure relative to another; in the manufacture of furniture, it significantly increases the area on which glue is applied, thereby providing additional strength to the product.
Based on the geometric shape of the protrusion and recess, such joints are divided into two main types:
- rectangular cross-section (sometimes with rounded edges of tenons and grooves);
- in the form of a trapezoid (also called a “dovetail”).
Based on the number of spikes and grooves that need to be made for one joint of parts, these connections are divided into:
- single-spike;
- multi-spike.
Important! Regardless of the number and geometric shape of the protrusions and recesses, they must be made only parallel to the grain of the wood.
Application area
The tongue-and-groove connection has found application in many areas of our daily life. For example, when arranging the floors of premises according to this principle, common coverings such as laminate, parquet, parquet boards, ordinary floorboards, chipboard, fiberboard or MDF boards are joined together.
Wood, as one of the most environmentally friendly materials, is used to make a wide variety of furniture (from a simple kitchen stool to a designer set for a living room or dining room), roller blinds, blinds and much more. And all these products are mainly made using a tongue-and-groove connection.
When constructing wooden frame buildings, houses made of timber, when arranging the beam-and-truss structure of the ceiling and roof, one also cannot do without arranging protrusions and recesses.
Beam connection
The tenon and groove in the beam connection is used both for arranging corner structures made of wood, and for longitudinal alignment of individual pieces. Depending on the cross-sectional dimensions and expected loads, the geometry and number of protrusions and lugs are selected. For example, in the construction of wooden houses, a single-tenon connection is mainly used. And to increase the length of small-section bars using glue, a multi-tenon method is used.
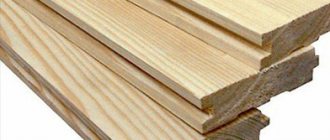
Connecting boards
Almost all owners of country real estate have long fallen in love with such a material as lining, as a result of which they obtain an absolutely flat vertical surface. The tongue and groove connection of boards is used for arranging floors, interior decoration of a house, as well as for external cladding of a building (with an antiseptic coating, of course).
The protrusions are tightly fixed in the recesses of adjacent boards, which prevents them from moving relative to each other. When arranging floors, the tight connection of tongue and groove boards with each other prevents them from moving in the vertical plane (the floor is level) and significantly increases the heat-saving properties of the coating (there are simply no gaps between the boards).
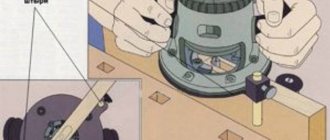
Using a manual electric router
Arranging tenon-groove joints with a router minimizes labor costs and significantly reduces the time for carpentry work. Of course, this useful tool will not help when building a house, for example, from timber with a cross-section of 150 x 150 mm, since there are no cutters of this size for a hand router, and the power of this unit will not be enough to install them.
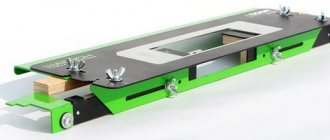
How to make a tenon pick-up device
When forming tenons on wooden workpieces with a manual router, it is not fixed in any way in space and is brought to the workpiece manually. That is why it is very important that when using a power tool, the workpiece is in a device that can ensure not only its reliable fixation, but also the accuracy of the spikes formed on its surface.
The design of the simplest device that is able to cope with such tasks is:
- several fixed guides (lower, upper, side);
- movable bar, due to which you can adjust the sampling length.
Device No. 1 – for removing the tenon
Such a device is manufactured, the dimensions of the components are selected individually, in the following sequence:
- Along the edges of the plywood sheet, vertical side elements of equal height are fixed, with cutouts made in the central part.
- Guides are installed on the side elements along which the sole of the hand router will move.
- To limit the movement of a hand router along the upper guides, the side strips should be fixed to them.
- On a sheet of plywood, which plays the role of the base of the device, it is necessary to install a movable element, with the help of which the amount of overhang of the edge of the workpiece will be adjusted. For fixation, you can use a regular thumbscrew or any other suitable fastener.
When manufacturing a device of the proposed design, the following points must be taken into account:
- The height of the upper guides should correspond to the sum of the thickness of the workpiece and the small gap required to install the locking wedge.
- The cutouts in the side vertical elements are made of such a width that it takes into account the length of the tenon being formed.
Device No. 2 – for making a groove
You can work using the device of the proposed design with a hand-held milling cutter of almost any modern model, the options of which provide the ability to adjust the cutting speed, feed rate and overhang of the working part of the tool used.
Read also: The chain on the chainsaw does not tension
To create a dovetail tenon on the side surface of a beam or board, a device is used that is manufactured as follows.
- A hole is made in a sheet of multi-layer plywood from which the cutting part of the dovetail cutter will protrude.
- A hand router is attached to the bottom of the prepared plywood sheet. To do this, you can use clamps, screws or any other fasteners.
- A 2.5 cm thick board is fixed to the surface of the plywood sheet on which the workpiece being processed will move. It will act as a guide element. This board is a consumable material and is used once with a cutter of a certain diameter.
Device No. 3 – for dovetail milling
Such a device can be installed between two chairs or a more convenient and reliable design can be used to place it.
How to cut a groove in a beam: an overview of methods
The construction of a wooden house or bathhouse is gaining more and more popularity every day, and often home craftsmen decide to build a building from timber with their own hands. In addition to creating a working design, you should know the technology of laying logs. For high-quality and competent assembly, you should study all possible connection methods. Therefore, in this article we will tell you how to make a groove in a beam and connect it correctly.
How to cut timber?
When folding a log house, its connection may be needed in two cases:
- If the length is insufficient for extension;
- When connecting a log house at the corners.
Each of the above connection methods has several types of grooves for fastening.
Secrets of making half-timber frame joints
Half-timber cutting is a simple and reliable way to connect two identical parts at right angles. This method is useful when creating corner, cross and T-shaped joints. By marking and selecting half the thickness of the material in each part, you will get a neat and durable connection, which will become indispensable when assembling frames and timber structures.
Cutting into half a tree is done in different ways: using a router, circular saw or band saw. We'll show you how to create perfectly tight joints using a classic set of hand tools.
TOOLS
- carpenter's square;
- marking thicknesser;
- pencil or marking knife;
- axing saw;
- wide carpenter's chisel.
How to cut a groove in a beam?
The construction of a wooden house or bathhouse is gaining more and more popularity every day, and often home craftsmen decide to build a building from timber with their own hands. In addition to creating a working design, you should know the technology of laying logs. For high-quality and competent assembly, you should study all possible connection methods. Therefore, in this article we will tell you how to cut a groove in a beam and connect it correctly.
When folding a log house, its connection may be needed in two cases:
- If the length is insufficient for extension;
- When connecting a log house at the corners.
Each of the above connection methods has several types of grooves for fastening.
How to make a groove in a beam using a router, a hand-held circular saw and a chainsaw
All photos from the article
Sometimes when carrying out work there is a need to make a groove in a beam, for example, when installing internal partitions or when installing door and window blocks in openings, this is necessary for a better connection of elements and improving the appearance of the structure. Also, sometimes there is a situation when a beam with grooves needs to be joined with a conventional option, in this case a longitudinal recess is needed, we will also consider this in this review.
On the issue of fixation
Half-timber joinery joints do not have a mechanical connection, so they are secured using gluing. We discussed in detail how to properly glue wood and choose the appropriate glue in previous materials.
While drying, the structure must be secured with clamps. When placing the clamps, make sure that their pressure is distributed evenly. An incorrectly installed clamp can deform parts or disrupt the fit of the connection.
Unlike frame structures, logs or beams are strengthened using a different technology. In this case, screws, dowels or dowels are used to secure the connection.