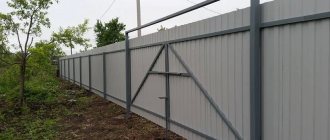
If you make gates and wickets from corrugated sheets, then you can safely say that such work will take a minimum of time and materials. In other words, this is a budget option, although it involves choosing ordinary swing gates without artistic elements. Recently, forging elements have been used as artistic additions, but such work is quite expensive, both in time and money. As for simple swing gates, even a novice or amateur welder can easily cope with such work.
Types of gates
There are several types of gates. They differ in design features that determine the method of opening.
Swing
The construction of such structures involves the installation of pillars to which the doors will be welded. When opened, they move to the side. Swing gates are extremely convenient. They allow even large vehicles to enter the site.
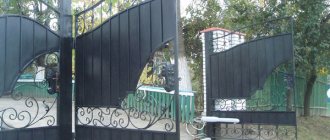
Forged swing gates are quite easy to make. They can be built with different configurations, which gives the owner of a summer cottage a lot of room for imagination. You can install a single-leaf structure.
Sliding
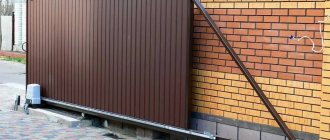
This type of gate can have either 1 or 2 leaves. A special feature of the device is the need to install beams and rollers along which the sash leaves will move when closing and opening. If necessary, floodplains of any height and width can be installed.
Such structures can be equipped with automatic opening and closing systems. The advantages of this type include durability and the absence of the need to allocate a large amount of space for swinging the doors open. Using a drawing of a metal gate of this type, you can make it yourself.
Lifting rotary
Lifting and rotating structures are a complex mechanism. In this case, the installation of supports is carried out, as well as an adjustable suspension to which the ceiling guides are attached. Installation of such elements as:
- sliding roller;
- frame struts;
- shock absorber;
- guide bar;
- cables;
- levers;
- lifting mechanism.
This design of metal gates, when opened, involves lifting the leaf and turning it to a horizontal position. DIY installation is difficult.
Features of sliding gates
Sliding options are increasingly being used during the construction of fencing. They take up relatively little space. In addition, the machine can be located just a few centimeters from the fence and this will not interfere with opening or closing them. The availability of a variety of building materials makes it possible for everyone to make sliding gates with their own hands. Drawings, photos and videos will allow you to more carefully study all the features of the work.
Sliding option
The main types of sliding gates:
- console;
- hanging;
- recoil.
Hanging variety
The hanging option is not particularly popular. This is due to the fact that a rail is installed in the upper part along which the canvas moves. This rail is a kind of limiter, so not every vehicle will be able to enter the yard.
Product Installation
Sliding products
To operate sliding options, the rail is installed along the wall and directly in the opening itself. It is not practical to use such a system in the northern regions. Because with a large amount of snow, the operation of the shutters will be difficult, and snow-covered areas will constantly need to be cleared.
Sliding options diagram
Advantages of the console type
The console type is by far the most popular. They can be used in both southern and northern regions. The movement of the canvas occurs above the ground, so there is no need to constantly clear the path. In addition, the advantage is that there are no restrictions at the top. This makes it possible for even high-height vehicles to enter the yard.
Console type
For an installation of this type, only one support column is required, which will bear the entire load from the canvas. Therefore, it is important to make it as high quality and reliable as possible. The cantilever beam itself on the gate can be located below, above or in the middle of the door leaf.
Helpful information! The beam located in the middle is considered the best option, since it generally strengthens the entire structure.
Sliding model
Everyone can handle making sliding gates with their own hands. Drawings, photos and videos allow you to study the principle of the sliding system. It is important to take into account all recommendations when performing work.
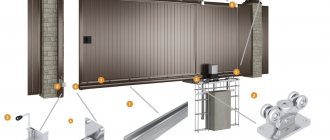
Electric drive and accessories kit
Features of sliding gates
Sliding options can significantly save space in the yard. But at the same time it is necessary to control the space along the fence. For the system to function properly, it is first necessary to clear the area of debris and any vegetation.
Sliding design device
Installation of support elements
The beginning of the work is the installation of the main support column, which will bear the main load. If you wish, you can make sliding gates yourself: drawings, diagrams and videos will help you follow the technology. To work you need to prepare the following tools:
- welding machine and grinder;
- drill and screws;
- suitable sized rails and rollers.
Rails and rollers
To make the shutters itself, it is best to use galvanized material. It is able to last a long time, while maintaining its original appearance. Polymer-coated corrugated sheets are often used.
Helpful information! The use of corrugated sheets is considered the most successful solution, since it is treated with special agents that prevent corrosion.
Products of this type can be equipped with automatic or manual drive.
Sliding type drawing
At the beginning of work, it is worth preparing drawings according to which the work will be carried out. Drawings and diagrams also allow you to calculate the exact amount of material required. The height of the gate must correspond to the fence. The width of the opening can be very different. Sliding products exert pressure not only on the rails, but also on the pole, so special attention must be paid to its design. Its lower part must be immersed in the soil and properly concreted.
Support for sliding products
Arrangement of rails for moving the web
Sliding gates will run on a rail that is located on the ground. To do this, you need to choose a U-shaped metal profile. Its length should be equal to two lengths of the canvas. For reserve you need to make another 30 centimeters. It is important that the rail is installed on a concrete base. Only in this way can you obtain the most reliable design that will last for a long time. After all the rail systems are installed and secured to the support pole, the electric drive can be installed.
Rail device
Assembly of the canvas and its installation
The door leaf is made from a metal frame, to which a profiled sheet will subsequently be attached. Rollers are attached to the bottom of the metal frame. The door leaf is installed last. Do-it-yourself sliding gates: drawings, photos and videos provide complete information about the design and process of the work.
Gate leaf
Types of metal structures
Steel structures are most often made of single-leaf, double-leaf, with or without a gate.
Single leaf
Single leaf gates have only 1 leaf. They can be hinged, sliding or lift-and-turn. The simplest design is in which hinges and 1 sash are welded to 1 post. It can open both inward and outward.
However, with such installation there is a possibility that the sash will warp under its own weight during regular use. Sliding options are more reliable, in which the sash is supported, which allows it to better distribute its weight and reduces the risk of breakage.
Bivalve
If you need to build metal gates with your own hands, preference should be given to simple swing double-leaf options. Such designs have 2 doors that are installed on poles.
In this case, the gate leaves open in both directions. Most often, the opening is carried out towards the yard. Using 2 sashes allows you to reduce the load on posts and hinges. It is possible to install double-leaf structures using the sliding method.
Double doors with gate
If there is a need to arrange a gate, it can be done in leaf 1 of the leaves. The wicket area must be additionally reinforced with a profile. They arrange it in the hinge area. This will reduce the load when opening and closing the gate frequently.
Why choose swing gates
Depending on the method of opening, gates can be swing or sliding. Swing gate leaves are hung on metal hinges, which allow you to partially adjust their position and eliminate the possibility of them falling.
It is very important to position the gates correctly in relation to each other. Only when properly aligned do they allow them to open and close freely and smoothly.
According to building regulations, swing gates must open towards the property.
When deciding on this type of gate, you need to leave enough space for the wings to open. The above conditions do not necessarily have to be met by sliding gates.
The choice of gate depends largely on the preferences of the property owner, but is often also determined by other factors such as the size of the lot or the length of the driveway.
- The main function of the gate is to provide convenient and safe vehicle access to the territory. In addition, aesthetic appearance is no less important.
- Swing gates are a traditional solution that is very popular. This type of gate is mainly installed in areas with a large distance between the fence and buildings.
Swing gates also have a classic look and beautiful design (it can be seen in the photo of swing gates), which is suitable for most styles, and therefore finds recognition among many fans of dachas and private homes.
How to make metal gates with your own hands
In order to carry out manufacturing and installation correctly, you should carefully plan not only each element (and do it according to plan), but also mark out the area where the process will take place. When creating a gate with your own hands, it is important to purchase only high-quality materials, especially for support posts, hinges and locking mechanisms, because... They are the most prone to breakdowns.
In addition, during installation it is important to take into account the characteristics of the soil, because in winter, the soil may swell, which will make it impossible to open the gate leaves if they are located too low to the ground.
Design
First of all, you should consider the design of the simplest options that can be used to form a fence for the site. The gate diagram must be drawn up in advance. The size of profiled pipes for load-bearing pillars must be at least 60x60 mm, for sashes - 40x40 mm.
All necessary elements should be calculated in advance. The total height of the main pillars should include the height of the above-ground and underground parts. For stability, at least 1 m of the main pillars must be buried in the ground.
If the above-ground part is 2.5 m, then the total height of the main pillars will be 3.5 m. The width of 1 leaf is 1 m 50 cm.
Cutting of individual elements can be ordered when purchasing the material, after which the leaves can be quickly welded at the gate assembly site.
What you need for the job: list of tools and materials
During the work process you will need a number of tools and materials:
- profile;
- pipes;
- sheets of metal;
- welding machine;
- self-tapping screws;
- drill;
- cement;
- brick;
- loops;
- Bulgarian;
- hammer;
- Boer;
- drill;
- goniometer;
- roulette;
- building level.
Additionally, you may need sandpaper, rags, primer, brushes and paint, as well as personal protective equipment (gloves, mask and goggles). If the metal shows signs of rust, it will need to be cleaned with an anti-corrosion agent.
The main stages of manufacturing gate leaves
The simple design of the valves is a 1.5 m long rectangle made of a profile to which stiffeners are welded. First, the profile is cut according to the specified parameters. The end of each element is cut at an angle of 45 ° with a grinder. After this, the frame is welded.
Lastly, transverse and diagonal crossbars and stiffeners are welded. Welding areas should be cleaned. The frame is treated with an anti-corrosion agent and painted. Welding of the second sash is also carried out. They should be sheathed with sheets after hanging them on hinges welded to the posts.
Step-by-step instructions for assembling and installing the gate
To install the pillars, you need to make indentations of about 1 m using a hand drill. A small amount of crushed stone must be poured into the bottom of the hole. Cement mortar should be prepared so that after installation of the main support pipes, they can be fixed by pouring the mortar into the remaining space of the pits. After installing the support pillars, you can weld hinges to them. Be sure to attach the finials.
It is important to correctly mark the location of the hinges so that the structure does not become skewed in the future. When measuring their position, you need to use a spirit level. When the main elements are completed, the pillars are installed, the doors are hung, then you can attach the trim to the gate. You can fix the sheets using self-tapping screws with wide heads.
Materials used
The pillars can be made from a welded profile pipe measuring 80 x 80 mm, which has a wall thickness of at least 3 mm. It is necessary to take into account the fact that they need to be dug into the ground to the depth of its freezing. In addition, it is necessary to ensure that they stand strictly vertically, after which they are filled with concrete. Work should continue after the concrete has gained about 50 percent of its strength. At an ambient temperature of about 20 degrees Celsius, one week is enough for concrete, and if the temperature is below this mark, then you will have to wait two weeks.
To make gate leaves, a profile pipe of various sections is suitable, depending on the strength of the wind, as well as the size of the gate. You can use a profile pipe measuring 60x40mm or 40x20mm, which depends on the operating conditions. It is permissible to use a profile pipe with a cross section of 20x20mm as jumpers. The wall thickness of these pipes can be from 2 to 3 mm. Naturally, the thicker the pipe walls, the more expensive they are, but it is easier for beginners or amateurs to weld them.
Prepared metal
The gates are sewn up with the same material from which the fence is made - from corrugated sheets. Fastening to the base is carried out using the same technology and using the same screws. The work begins with the process of preparing metal surfaces, which are cleaned and then coated with Anti-Rust. Work continues after the surfaces have completely dried.
Advantages of gates made of metal profiles
When faced with the problem of purchasing or replacing old gates with new ones, it is not always easy to find what you want, and even at an affordable price. Therefore, assembling a metal profile gate with your own hands will be an excellent solution in such a situation.
The main advantages of such gates:
- strength and reliability of the materials from which they will be made;
- appearance - it’s easy to think through the design of the structure so that it fits into the environment and harmonizes well with the house;
- reasonable price (the cost of purchased gates is much more expensive).
The advantages of homemade gates are very obvious, and with proper preparation, the assembly and installation process will not take much time.
Main stages of hanging a gate
In order to carry out all the work correctly, before manufacturing and hanging the gate on the supports, you should calculate the main dimensions of the structure and make a sketch or assembly drawing.
At the same stage, the consumption of materials is determined. The gate should be depicted both open and closed in order to take into account all the parameters as accurately as possible.
The following stages of mounting are distinguished: installing supports, manufacturing doors, welding hinges, hanging gates on poles.
General rules for welding hinges
In order for the installed hinges to work properly and last a long time, and for the gates not to sag under their own weight after time, all work should be done according to the rules and very carefully.
So, what should you focus on when welding:
- The evenness of the seam and its continuity. The weld should be as complete as possible, without gaps.
- Maximum welding depth. Ideally, it is necessary to weld the hinges with the entire plane that is adjacent to the surface of the post.
- The canopies should be welded very evenly so that there is no excessive pressure on them during operation and in a standing position.
- For heavy structures, it is necessary to supplement the hinge system with an additional pair, which is located slightly below the upper load-bearing hinge.
In general, there are no more rules, but these should be adhered to and taken with complete seriousness.
Installation recommendations
For square-section posts, it is recommended to always use plates, maintaining a gap of 3–5 mm between the edge of the gate and the support. There are several ways to weld hinges to round posts:
- without the use of mounting plates;
- with a plate only on the sash;
- with a narrow spacer on the side of the post and a full plate on the gate.
When using spacers, it is possible to increase the gap between the hinge and the support, and the spacer can be placed at an angle. This design is more forgiving of welding flaws, but it looks sloppy.
What drive for swing gates
This type of gate is available in single and double leaf versions. The wings are mounted on hinges attached to the fence posts. When choosing swing gates, some owners think about buying a drive.
For some people, using a gate without appropriate automation seems like an inconvenient solution. If the owner is going to purchase a swing gate operator, then he should consider some extremely important points.
- Firstly, this is the number of leaves - completely different mechanisms can be used in single-leaf gates than in double-leaf gates.
- The second criterion is the length of the wing and its weight. These factors must be taken into account in order for the installed drive to operate correctly.
The distance of the hinge from the edge of the rack is also extremely important - the drives will differ significantly in the case of narrow and wide racks. You should also take into account the frequency of use of the gate, as it significantly affects the service life of the installed drive.
The duration of operation of swing gate drives and their functionality is also greatly influenced by air resistance, which is especially noticeable during strong gusts of wind.
For gates where ventilation is limited (for example, doors with wooden or incomplete filling), it is recommended to use a drive with a higher power.
Solid doors have significantly greater resistance, so the drive power may be lower. This can be taken into account when creating a drawing of swing gates.
Preparatory work
Every design idea should begin with a work plan and detailed description. When drawing up a drawing for a garage door, you should take into account all the requirements that apply to them. If installation is required in an existing opening, then its measurements are first taken, after which the sashes are created. However, if it is possible to increase or decrease the opening, then the following rules must be followed:
- The minimum distance from the gate post to the side of the car should be 30 cm. It is better to do it with a margin, because in the future it is possible to purchase a new car with larger dimensions.
- The height of the opening should be 2 m.
- The thickness of the steel sheet required for the garage is 3 mm.
who decides to take on such work
must know these If these requirements are met, the question of how to correctly make a drawing for a garage will never arise. The work will also require welding. Before you start using it, you should take care of the necessary materials and tools. To create a standard design you will need:
- steel corners;
- valves;
- loops;
- a metal sheet;
- profile;
- locks.
Required tools:
- roulette;
- square and level;
- welding machine and grinder.
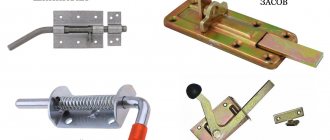
Choosing a lock for gates and wickets
The mechanism for closing gates and wickets should not be overlooked. Locks can be built-in or attached separately.
The latch should be long enough to provide additional support to the gate and protect it from unnecessary swinging in strong winds
It is best not to use simple hooks or soft metal locks. They are not reliable enough.
There are many different locks on the market today, but models with a sliding mechanism are especially popular.
Well, that's all - the gate is ready for use. And if you still have material left, you can immediately assemble a new fence from corrugated sheets.
