01/24/2022 Author: VT-METALL
From this material you will learn
:
- Requirements for welds
- Differences between welds and joints
- Types of welded joints
- Main types of welds
- Weld quality control
Different types of welds are used in certain conditions to specifically connect parts. Neglecting to choose the most suitable option entails an inevitable loss of connection quality, up to its complete rejection. To prevent this from happening, you need to understand the differences between welds.
Equally important is knowledge of the difference between a weld and a welded joint. In our article we will talk about this, give a typology of connections and seams and outline the quality requirements that are provided by regulations.
Types of Welding Machines
To choose the right welding machine, it is necessary to take into account all the pros and cons of various types and models of welders.
Transformers are the simplest and most traditional devices, quite heavy in weight, made on the basis of a step-down transformer, which brings the voltage value to that required for operation. The peculiarity of transformers is that they operate on alternating current, which creates an unstable arc. In combination with an increased amount of slag and gas impurities, such an arc contributes to metal spattering and spoils the appearance of the weld. A high-quality weld with such a device can be made by an experienced welder with skills in working on a transformer.
A simple device operating on alternating current
Rectifiers are welders that can convert alternating current into direct current and reduce the network voltage using semiconductor diodes. Direct current produces a stable arc and allows you to make the welding seam uniform and sealed, strong and beautiful. The rectifier is universal, all types of electrodes are suitable for it, all types of metals can be welded with this device: stainless steel, aluminum, copper, titanium, various alloys.
Universal welding machine, suitable for all types of electrodes
Inverters are very popular because they are light weight, excellent functionality, and automated settings. Such technical characteristics allow beginners to work on it. The design of the device includes a number of blocks that convert alternating current from the network into high-power direct current. The advantage of this type of welder is:
- possibility of precise settings;
- performing a wide range of tasks;
- stable arc;
- resistance to power surges;
- high quality welding, smooth seam;
- work with all types of electrodes;
- connection of all types of metals of any thickness and position in space.
- has additional functions that prevent electrode sticking and tear-off drops;
- possibility of igniting the electrode at maximum current supply;
The disadvantages include:
- the need for frequent dust removal;
- limited cable length of 2.5 m;
- impossibility of working at air temperatures below – 15 degrees.
The inverter is suitable for novice welders
Semi-automatic machines come in two types. The former increase the productivity of welding work due to continuous wire supply. In this case, there is no need to constantly change the electrodes. The seam is smooth, continuous and without defects. The latter operate in a gaseous environment; for this they use oxygen, nitrogen and carbon dioxide, as well as argon and helium. Gas welding has the following advantages:
- one apparatus is designed to work with both gas and wire;
- excellent quality and aesthetics of the seam;
- stable, even arc;
- high functionality;
- Possibility of welding complex joints.
With this machine you can make a high-quality weld
Welding seam: how to move the electrode?
When performing welding work, the electrode should be moved along one of three trajectories.
- Translational - the electric arc is directed along the axis of the elements being connected. This allows not only to maintain its constant combustion, but also to form a fairly thin and durable weld.
- Longitudinal - allows you to obtain a thread seam of different heights, which will directly depend on the speed at which the electrode moves. In fact, the connection turns out to be very strong, but to strengthen it you will have to make some lateral movements.
- Transverse - ensures the formation of the required width of the welded joint. It involves performing oscillatory movements. The width of the seam is selected based on the thickness of the elements being connected, their sizes and a number of other parameters.
Usually, when carrying out work, all these movements are used, which, when combined with each other, form a specific trajectory. It is usually different for each welder. In principle, the trajectory itself is not very important, the main thing is that the edges of the workpieces are fused as best as possible and, accordingly, a seam is obtained with predetermined parameters.
What does a novice welder need to get started?
First of all, you need to prepare equipment and clothing.
Tools and protective equipment
You will definitely need a welding machine, a set of electrodes, a hammer and chisel for knocking down slag, and a metal brush for cleaning seams. The electric holder is used to clamp, hold the electrode and supply current to it. You also need a set of templates to check the dimensions of the seam. The diameter of the electrode is selected depending on the thickness of the metal sheet. Don't forget about protection. We prepare a welding mask with a special light filter that does not transmit infrared rays and protects the eyes. Screens and shields perform the same function. A canvas suit, consisting of a long-sleeved jacket and smooth trousers without cuffs, leather or felted shoes to protect against metal splashes, and gloves or mittens, canvas or suede, with overlapping sleeves. Such straight, closed clothing protects the welder from getting molten metal on his body.
There are special protective equipment that are used for working at heights and inside metal objects, when working in a lying position. In such cases, you will need dielectric boots, a helmet, gloves, a mat, knee pads, armrests, and for high-altitude welding you need a safety belt with straps.
Stripping
Do your welds often have defects?
Never! Rarely, but they happen
After welding, it is recommended to clean the seam.
This process is carried out in 3 stages:
- Cleaning the area closest to the seam - often drops of metal get here. They are beaten with a hammer or chisel.
- Polishing the seam - so that the seam does not catch the eye, it is polished using a grinder.
- Tinning the seam - this stage is necessary if soft metals are welded. A thin layer of molten tin is applied to the seam.
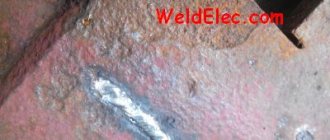
Before stripping, you need to check the seam for the following defects:
- Cracks on the seam.
- Holes that are formed from sparking.
- Scale from electrodes.
- Uncooked areas.
All these errors can be easily avoided if you follow the welding technology, use high-quality and clean electrodes, and monitor the condition of the seam during operation.
Thus, there are many types of welds. Each of them is used depending on the welding joint, position in space, and other factors. The key when choosing the type of seam is its feasibility and justification for the future design.
Types of welds
Connecting welds are divided according to location, strength, technology, and design features. Types of seam locations:
- Lower. The simplest and most convenient, thanks to gravity, the metal fills the gap between the parts. This is the most durable and economical seam.
- Horizontal. The workpieces are located perpendicular to the electrode and the seam runs horizontally. Some of the metal leaves the welding zone and the electrode is consumed faster.
- Vertical. In this case, the workpieces are also located perpendicular to the electrode, but the seam is formed vertically. The molten metal tends downwards, the consumption of the electrode is significant.
- Inclined. The movement of the welder's hand occurs at an angle. Used for corner and T-joints.
- The ceiling seam is located above the master.
Separation by design:
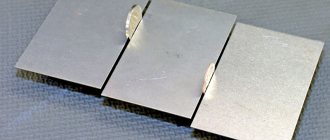
- Butt. The butt joint is quite durable and economical; it does not distort the joint surface. This is a universal connection.
- Overlapping parts are welded when there is not enough space for a butt seam. The thickness of the workpieces should not be more than 8-10 mm.
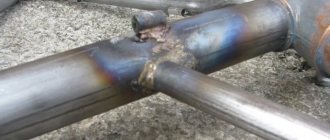
- It is recommended to weld a corner seam on both sides, with the workpieces positioned at an angle to each other. This seam is not easy to perform due to the increase in the heat-affected zone and the high consumption of the electrode.
- A T-weld is a fillet weld where the planes of the parts are welded perpendicularly. The seam is formed on both sides and is quite complex.
- A seam for electric rivets is used when there is no need for a sealed seam; it is the most economical and inconspicuous.
Welding can be carried out either in one layer or in several layers for thick workpieces.
Methods for quality control of welded joints
Control of welds is an important key component to ensure reliable and high-quality connection of parts and operability of the structure. After completing the welding work, a mandatory quality check of the welds is carried out. The control procedure makes it possible to identify defects that affect the strength of the connection and the performance characteristics of the finished product. Timely detection of defects allows you to avoid emergency situations and increase the safety of the structure.
At large manufacturing enterprises, inspection of welding seams is carried out by a separate inspector. But in small industries in the state there is often no such unit and the inspection is carried out by the welder himself.
1. Preliminary control - here the metal surface, quality of electrodes, fluxes, filler wire and gas mixtures are checked. Then, immediately before starting welding, the assembly quality is monitored, the workplace is prepared and the condition of the welding equipment is inspected.
2. Welding control is checking the correctness of the chosen mode and compliance with the technology in the process of welding parts.
3. Quality control - it occurs at the end of the welding process, which is carried out in various ways, given below.
4. External inspection - here a visual inspection of parts takes place for the presence of visible defects.
The procedure for checking the quality of welded joints is carried out in accordance with GOST and other regulatory documents. They indicate the permissible errors. Upon completion of the measurements, a test report and test report are drawn up, which indicate the results. Often, visual inspection of the weld is not enough, since defects may be hidden. Therefore, in practice, various methods are used to control the quality of welds, which are described in detail below.
How to learn to weld by welding - a guide for beginners
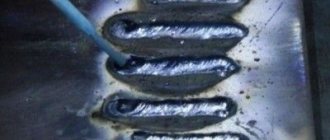
Welding is a high temperature process. To carry it out, an electric arc is formed and held from the electrode to the workpiece being welded. Under its influence, the base material and the metal rod of the electrode melt. As experts say, a weld pool is formed, in which the base and electrode metals are mixed. The size of the resulting pool directly depends on the selected welding mode, spatial position, speed of arc movement, shape and size of the edge, etc. On average, its width is 8-15 mm, length 10-30 mm and depth - about 6 mm.
The electrode coating, the so-called coating, when melted, forms a special gas zone in the arc area and above the bath. It displaces all air from the welding area and prevents the molten metal from reacting with oxygen. In addition, it contains pairs of both base and electrode metals. Slag forms on top of the weld, which also prevents the melt from interacting with air, which negatively affects the quality of welding. After the electric arc is gradually removed, the metal begins to crystallize and a seam is formed that unites the parts being welded. On top of it there is a protective layer of slag, which is subsequently removed.
During the welding process, the electrode coating melts, forming a special gas zone. Inside it, the base metal and electrode are mixed
It is best for novice welders to gain their first experience under the guidance of a specialist who can correct possible mistakes and give useful advice. You should begin work by securely fastening the part. For fire safety purposes, you need to place a bucket of water near you. For the same reason, you should not carry out welding work on a wooden base and be careless with even very small remnants of the used electrode.
Connecting the welding machine
For welding to work safely, you need to connect the machine to the network, observing the following rules:
- First you need to check the voltage and frequency of the current. This data must be the same on the network and on the device body.
- We set the calculated value of the current power on the welding machine, which should correspond to the selected electrode diameter. If the welder settings block allows you to select the voltage, you need to set it right away. The connection is made through a special plug and grounding lug.
- We securely fasten the “grounding” clamp. We check that the cable is insulated and neatly tucked into a special holder.
- Be sure to check all connections, cables, plugs.
- You can use a special extension cord that is connected without intermediate connections.
- In older houses with weak wiring, voltage drops may occur. It stops the work process and can damage the welding equipment. In this case, you need an electric generator that will provide voltage at the operating level.
The welding machine is simple
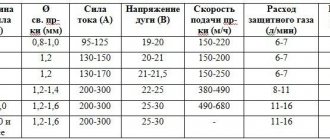
How to choose the right current
Welding current is an important indicator of welding and determines the type and nature of the seam and work productivity. The higher the current, the more stable the arc and the greater the penetration depth. The current strength depends on the location of the workpieces in space and on the size of the electrode. The highest value is set for welding horizontal workpieces. For vertical seams, the current value used is 15% less, and for ceiling seams - 20%.
The current strength depends on the location of the workpieces and the size of the electrode
How to strike an arc
The first way is touch. To do this, we install the electrode at an angle of about 60° relative to the product. Slowly move it across the surface. Sparks should appear, now we touch the electrode to the metal and lift it to a height of no more than 5 mm.
If the operation was performed correctly, the arc will light. The five-millimeter gap must be maintained throughout the welding. It should be taken into account that when properly welding metal using electric welding, the electrode will gradually burn out, so we constantly bring it slightly closer to the metal. The electrode should be moved slowly; if it suddenly gets stuck, you will have to slightly swing it to the side. If the arc does not ignite, the current may need to be increased.
The second method is chirping. You need to bring the electrode to the surface of the workpiece and strike it over the part, as if you were lighting a match. You can make it easier to ignite the electrode by tapping the coating on its edge.
Tilt and movement of the electrode
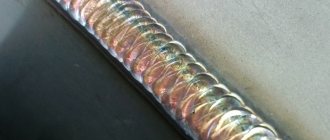
Once you can light and maintain the arc without any problems, it’s time to move on to fusing the bead. We light the arc, slowly and smoothly move the electrode horizontally, performing slight oscillatory movements with it. In this case, the molten metal seems to be “raked” to the very center of the arc. The result should be a strong weld with small waves formed by the deposited metal.
For a novice welder, it is better to keep the electrode angle at about 70 degrees, that is, with a slight deviation from the vertical. Below is a diagram of arc welding.
Electrode tilt angle is about 70 degrees
If during the process of welding parts the electrode has burned out almost completely, and the seam has not yet been completed, we temporarily stop the work. We replace the used element with a new one, remove the slag and continue working. At a distance of about 12 mm from the depression formed at the end of the seam, which is also called a crater, we light the arc. We bring the electrode to the recess so that an alloy is formed from the metal of the old and newly installed electrode, after which welding of the seam continues.
During the welding process, the electrode makes certain movements, mainly translational, longitudinal and transverse. Their combinations make up various types of seams, the most common ones are shown in the diagram
The arc movement trajectory during the welding process of parts can be done in three directions:
- Progressive. Involves moving the arc along the axis of the electrode. This makes it fairly easy to maintain a stable arc length.
- Longitudinal. Forms a thread welding roller, the height of which depends on the speed at which the electrode moves and its thickness. This is a regular seam, but very thin. To secure it, in the process of moving the electrode along the welded seam, transverse movements are also performed.
- Transverse. Allows you to obtain the desired seam width. Performed by oscillating movements. Their width is selected based on the size and position of the seam, the shape of its cutting, etc.
In practice, all three basic movements are used, which are superimposed on one another and form a certain trajectory. There are classic options, but each master usually has his own handwriting. The main thing is that during the work the edges of the joined elements are well fused, and a seam of the given shape is obtained.
As a rule, all three directions are used; they can overlap each other and form a trajectory
Making welds
Ceiling welding seam
This seam is considered the most difficult, since the weld pool is turned upside down and is located above the welder. Select an electrode no larger than 4 mm and move it slightly to the side so that the metal does not spread. Use a short arc and completely dry electrodes; the seam for ceiling welding should be thin. The movement is self-directed, making it easier for the welder to control the quality of the seam. There are several ways to do it:
- ladder;
- crescent;
- back and forth.
The ceiling seam is considered the most difficult
Video: making a ceiling seam
Vertical
When making such a seam, you can move the electrode from top to bottom or from bottom to top. To prevent the metal from draining, the electrode should be placed at an angle of 45-50 degrees downward from the perpendicular position. Experienced welders recommend making this seam in one pass.
When making a vertical seam, the electrode is positioned at an angle of 45-50 degrees
Video: vertical seam
23.03
Making a horizontal seam
When making such a seam, the main difficulty lies in the metal flowing down. To solve this problem, the welder must adjust the electrode angle and pass speed. Welding is carried out from left to right or right to left.
When making a horizontal seam, you need to correctly select the angle of inclination of the electrode and the speed of passage
Angular
When forming fillet or tee welds, the parts are placed at different angles in a boat so that the molten metal flows into the corner. Then they are tacked by welding on both sides, one edge of the structure should be slightly higher than the other. The movement of the electrode begins from the bottom point.
In fillet welding, the movement of the electrode begins from the bottom point
Arc Welding Basics
To make a reliable welded joint and correctly place the molten electrode material, close attention must be paid when starting work. It is best to start mastering this work under the supervision of an experienced welder, who will help you avoid the most common mistakes and provide advice if necessary.
The parts connected to each other must be rigidly fixed. Due to the fact that the work is carried out at high temperatures, it is necessary to take all measures regarding fire safety. You need to place a bucket of water near you. Work should not be carried out on a wooden base.
The grounding clamp is fixed to the elements to be welded. Before doing this, you should carefully check the quality of its insulation. If it is damaged, this cable should not be used. In addition, it must be securely fastened in a special clamp.
Properly selected equipment settings allow you to apply the electrode smoothly and evenly, due to which the metal is deposited onto the elements being welded.
When all these preparatory work is completed, carefully strike the arc. This should be done as follows: the electrode is held at an angle to the workpiece of approximately 60 degrees, it is slowly moved along the surface of the metal until sparks appear. Then they lightly touch the workpieces and move them away from them at a distance of approximately 5 mm, thereby forming an electric arc.
This gap will have to be maintained throughout the entire operation. If everything was done correctly, the electrode will begin to gradually melt and burn out, so it will have to be slowly brought to the workpiece, thereby maintaining the required distance. You should not bring it closer, as it may stick. If an arc does not occur, you will have to increase the current on the equipment.
Application areas of welding work
Welding is used to solve a very wide range of technological and structural problems. Let's consider several typical applications of this method of metal processing:
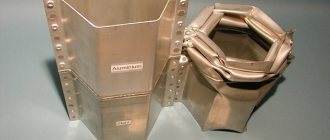
- production of metal structures. Using welding, you can create solid metal structures of almost any complexity and size, for example, ramps, fences, load-bearing elements of buildings, vehicle bodies, sports equipment, hangars and boxes, various frames and frameworks;
- gate production. Using welding, it is possible to produce not only durable, but also aesthetic structures. The technology makes it possible to produce sliding and swing gates from corrugated sheets, which is one of the most popular materials for fencing suburban areas and areas of industrial enterprises. In this case, welding can be carried out not only in the factory, but also directly at the installation site;
- production of stairs. Escape routes in case of fire or other emergencies must meet very stringent standards. Only welded fire escapes can provide the necessary strength and reliability. They are installed inside or outside residential high-rise buildings, business and shopping centers, industrial and public buildings.
To perform welding work, a variety of equipment is used - from simple and compact household current transformers to powerful industrial automated lines.
Share: