How nice it is to choose knives for your favorite kitchen, how beautiful and sharp they are new. Working with them is a pleasure! But very little time passes, and chopping vegetables becomes less flawless, and yes, our wonderful tools have become dull. How to sharpen knives with a whetstone by hand? You will find about this, as well as how to sharpen a tool without a whetstone, in our article.
Sharpening a knife at home is the very skill that is useful to everyone: both owners and housewives. After all, cooking food with the help of perfectly sharpened tools is incomparably faster and more enjoyable than suffering with dull blades that are unable to work smoothly and beautifully.
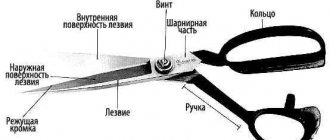
Strange as it may sound, a sharper tool is less dangerous, so let’s take care of our safety.
In our article we will also tell you about the types of sharpening stones, about sharpening ceramic specimens, and about the nuances of working with a hunting knife.
As in any business, there are a number of subtleties in sharpening that you need to know about. For example, you should not overdo it and remove too much steel - the knife will undoubtedly be sharp, but brittle, and you will soon have to think about replacing it.
Types of whetstones for sharpening knives
Each type has individual abrasive properties, durability and features of use. Tools can have different shapes, the standard ones are “boat” and rectangular parallelepiped. Types of sharpening stones by material:
- Diamond. Often used for kitchen models. The advantages are ease of handling and durability. It should be noted that diamond bars have large abrasive particles that can leave scratches on the blade, which will affect its external qualities, but will not affect the cutting ability.
- Ceramic. They have medium to fine grains on the grinding surface. Such bars are more susceptible to clogging with metal particles, so it is recommended to use a soap solution instead of water during work.
- Made from natural stone. Particle sizes range from small to large. Before work, it is better to lubricate the bar with mineral oil (but not vegetable oil, since over time its residues will polymerize and spoil the sharpener matrix).
- Elborovye. Medium and fine grain. They are inferior in strength to diamonds.
- Japanese water stones. Fine grain. This type is also called a “touchstone”. Used to sharpen the blade after rough cutting. Before work, the bars are soaked in water for 15-20 minutes to clean the stone pores. Be prepared for more dirt to accumulate on the grindstone due to the wetting of metal dust.
The amount of metal removed by abrasive particles is directly proportional to their size. Coarse-grained stones are used for initial processing of the blade to remove flaws. Medium and fine-grained - for finishing and final polishing. Accordingly, the smaller the grain size, the sharper the edge will be.
Grinding whetstone made of natural stone.
The stone should be chosen the same length as the blade, but preferably 1.5-2 times longer. To begin with, you can take one medium stone or a double-sided block with different grain sizes.
When purchasing a sharpening stone, make sure that it is not chipped or cracked. Otherwise, you risk damaging the blade.
The bars marked “Made in the USSR” have high-quality material with uniform grains. You can find them at flea markets.
Flaws
It would seem that if a diamond whetstone for sharpening knives has so many advantages, why doesn’t everyone rush to quickly purchase it or use it exclusively. Everything is very simple, these abrasives have two significant disadvantages, which play an important role for sharpeners:
- quick and productive grinding of metal during sharpening in the hands of a beginner, and in some situations, even in the hands of a master, a little carelessness can seriously damage the blade;
- Another minus is the price. Diamond bars are worth an order of magnitude higher than natural stones. The reason for this is the expensive production process. Therefore, if you see inexpensive diamond bars on sale, avoid them. After a few sharpenings, such a diamond sharpener will turn into a pile of garbage.
How to properly sharpen knives with a whetstone: step-by-step instructions with photos
Installing and fixing the sharpening stone
Safe and efficient turning is possible when the sharpener is stationary. It can be placed on a rubber mat, in a special frame, or secured with nails or a clamp.
Fixing the knife block with nails.
In addition, there are devices that allow you to secure stones and blades in the system (sharpening angles). In such devices, the angle of inclination is adjusted and immobility is ensured.
Determining the sharpening angle
To determine the angle, you can use a square piece of paper folded several times. So, a square folded in half once displays an angle of 45°, and if folded a second time, we get 22.5°. This stencil is suitable for kitchen models.
A piece of paper to determine the sharpening angle.
Proper sharpening process
For the first time, practice on a knife that you don't mind. This way you can get the hang of it, get a feel for the key points and then move on to the main instrument.
- Position the knife perpendicular to the stone so that the beginning of the cutting edge at the handle coincides with its edge.
- Select the required angle by tilting the blade not with the movement, but against it. Paper and cardboard blanks will help with this.
- Now move the knife away from you, pressing lightly with your second hand. Make sure that the entire blade is sharpened to the end of the stone. Gradually raise the handle as the contact point moves along the edge to maintain the angle. Try to drive smoothly, otherwise sharp jerks may leave chips and deep nicks on the tip.
- Turn the knife over and do the same on the other side, taking the handle in your other hand. For uniform sharpening, make only one movement per side.
During the initial processing, you can determine whether the edge is even by placing the blade at an angle to the light. This way chips and unevenness will be visible. They look like lines and dots.
Metal dust will be generated during sharpening. It needs to be washed off so that it does not affect the quality of turning. If you use containers of water for cleansing, then there should be one for each stone. Otherwise, the pores of the sharpener will become clogged with metal particles of the wrong size.
After use, wash the knife with soap and rinse the bar so that abrasive particles and metal shavings do not get into the food. Over time, when working with the same stone, it becomes clogged and becomes ineffective. This can be corrected by sanding off a small layer with sandpaper.
If you decide to sharpen the blade in several stages, using stones of different grain sizes, then you need to do this in order of decreasing grains.
Fighting burrs on the blade
Burrs form on the cutting edge between the planes when the required amount of metal has already been removed and further sharpening will not lead to improvement. The fight against them is carried out on a fine-grained stone or sandpaper. Instead, you can use an abrasive paste. It is sold in hardware stores. To do this, apply and rub the paste on smooth leather (for example, a belt), then perform the same actions as during the main processing, but with the knife tilted in the direction of movement.
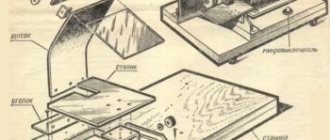
Making a homemade machine
It is quite possible to make a knife sharpening machine yourself at home. The main requirement when creating a homemade sharpening machine is to rigidly secure the blade being sharpened and the abrasive element. Thanks to this, the main requirement for the entire procedure is achieved: creating and maintaining a sharpening angle.
Elementary vertical device
The device is designed for quick manual sharpening of knives with your own hands and is a wooden structure assembled in the form of a corner. The exact assembly drawing will not be given here, since the dimensions depend on the size of the grindstone used. You need to prepare:
- 4 bars or planks 5-7 cm wide and 2-3 cm thick. The length of the plank is determined by the length of the stone;
- 4 M4-M6 bolts with a wing nut. The length of the bolts is determined by the formula: (thickness of the board) x 2 + thickness of the whetstone + 1 cm;
- 4 self-tapping screws for wood. The length is selected based on the following calculation: board thickness minus 0.2 cm;
- Protractor or other angle measuring tool;
- A drill with a drill, the size of which is equal to the size of the bolt, or larger by one unit of the size range;
- Wood hacksaw;
- Chisel or chisel (or a powerful knife);
- Pencil or marker.
Making the device involves assembling two corners from existing planks. On one of them, at a distance equal to its width, a cut is made with a hacksaw to the middle. Then, from the end of the board, the sawn-off part is chopped off with a strong knife or chisel. A similar chip is made on the second plank. This is done so that when connecting the boards into a corner, both sides have a common plane. Then the boards, with their chipped parts, are joined into a corner. The second half of the device is assembled in the same way. Next, holes for connecting bolts are drilled in the upper and lower parts of the device. The holes are marked at the ends opposite to the junction, 3-4 pcs. on every board. The holes are marked so that there is at least 3 cm from the edge of the board to the outer bolt, and the distance between it and the other holes allows the edge of the sharpening stone to be securely clamped.
A mark corresponding to each of the future sharpening angles is applied on the inside or outside of one of the boards.
Sharpening work is carried out in the following algorithm: the knife to be sharpened is placed with the blade on the sharpening stone so that it is in a vertical plane. Then you need to move the knife along the sandpaper in a back-and-forth motion, with light pressure. Finer sharpening or grinding of the blade on this machine can be done if the sharpening stone, before installing it in place, is wrapped in sandpaper of the desired grain size.
The advantage of such a device is its simplicity, ease of assembly and low cost. The disadvantage is the lack of rigid fastening of the sharpened blade.
Materials and tools required for the device
To make a simple and quite high-quality device, you need to take care of preparing the following workpieces and tools:
- plywood or small laminated chipboard sheet;
- steel stud with a diameter of 8 mm (the thread on it must be cut along the entire length);
- textolite or ebonite bars (alternatively can be replaced with hard wood - beech, oak, etc.);
- aluminum plate (with a thickness of at least 5 mm);
- fasteners – bolts, nuts (wing);
- neodymium magnet (you can find it on an old computer HDD).
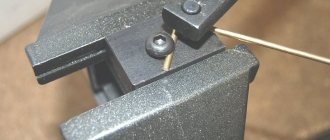
Sharpener from mounting angles
The proposed device is more advanced compared to the previous one. The blade to be sharpened is rigidly fixed in it and the angle of inclination of the emery in relation to the blade is fixed. Another difference is that in this device the moving part is a stone rather than a blade.
The device is attached directly to the knife blade, in its upper part. The device consists of two interconnected metal corners and a movable part resting on one of the shelves.
The following figure is schematically indicated:
- The basis of the design is 2 corners.
- A movable rod or knitting needle with a thread.
- Clamping nuts with washers for securing the emery to the rod.
- Lever.
- Holes for adjusting the sharpening angle and supporting the moving part.
- Set of adjusting washers.
- Tightening bolts with nuts.
- Stitched edge of the top corner.
- A sharpened blade or knife.
- Whetstone (whetstone).
Manufacturing the device begins with selecting the corners of the base. In the vertical shelf of the upper corner, 3-4 holes are drilled with a size larger than the size of the rod by 3 steps. For example, for a rod with a diameter of 6 mm, 9 mm holes are required. The outer edge of the upper plane of the upper corner is ground down “to the bottom” at a distance of 10-12 cm from the end, so that the emery does not touch it when sharpening. In the horizontal shelves of both corners, two holes are drilled coaxially for the coupling bolts. These holes are drilled according to the principle: the first - at the end of the grinded part of the upper corner, the second - 10-12 cm from the first. The thickness of the set of shims should be equal to the thickness of the blade being processed. The diameter of the clamping washers located on the movable rod should be equal to the thickness of the sharpening stone multiplied by 2. As a handle, you can use a piece of PVC pipe of a suitable diameter or wrap several layers of electrical tape. To prevent the moving part from jumping off the blade, the rod on the outside of the upper shelf must be bent in the shape of the letter “L”, or secured with a locked nut if there is a thread.
Drawings of a device for sharpening knives with your own hands
After preparation and provision of materials, you can begin the process of assembling the device. First of all, we take plywood to use as a frame, which should rest on the mounting legs at a certain angle in the range from 15 to 20 degrees. After this, the pin we prepared is screwed into the lower part; its length should be approximately 35-40 cm. To make the mounting thread more durable, you can use glue or sealant.
We fasten an aluminum plate in the center of the installed plywood. Before fastening it, it is necessary to make a groove, which in size will correspond to the diameter of the fixing bolts. It is worth noting that we use an aluminum plate as this will help avoid damage to the steel blade of the knife.
After this, we proceed to making a lever that will allow you to secure the emery to the device. To assemble it we use the remaining part of the pin. Then we take two textolite (or wooden) blocks and, by sawing out, we make holders for the lever. The stops should be secured on one side with a wing nut.
It is optimal to provide a spring-loaded block near the handle, which will allow you to quickly change the emery stone.
As the main elements, you can use blanks from homemade bars - we glue sheets of sandpaper to the aluminum plate, and their grain size should be different. Such a device can be quite easily fixed in the lever.
The main design feature is the presence of a hinge with a double degree of freedom. Such a device can be easily assembled using the same PCB bars. One of them should be screwed onto the threads of the vertical stud, and used as a horizontal rotary axis and a height adjuster for the lever support (this is necessary for setting the sharpening angle).
The function of the second bar, which has a horizontal hole for the lever, is that it should be screwed to the first.
Thanks to this, it is possible to ensure free vertical movement of the entire lever structure.
The knives are clamped with a plate, or fixed to the surface of a neodymium magnet. When removing the first layer with coarse types of abrasive, the blade must be securely fixed.
If it is necessary to perform fine-tuning, you can install the blade on a magnet and perform the sharpening operation with little effort. The horseshoe of magnets should be recessed at the same level as the table top and set with epoxy glue.
The manufacture of a homemade device for sharpening knives can be considered complete. It is enough to set the desired angle and sharpen the edge slowly and smoothly along the entire length of the blade.
Progress
First you need to make the device case. The steel strips are bent in such a way that the chamfers of the knives pressed to the ends of the arc are not only parallel, but also in the same plane.
After making an arc from the same steel strip, a pressure plate is bent, which serves as a clamp for the knives being sharpened
Holes for M12 or M14 bolts are drilled in the body and pressure plate. Having tightened the body and the pressure plate using a bolt and nut, we clamp the knives between them and check the strength of their adherence to the surface of the end of the emery circle.
If the knives are not located at the required angle (the chamfers do not fit exactly to the circle), then the device is modified by bending the body arc to the appropriate level. If the knives are positioned correctly, then the structure is disassembled, and stiffeners are welded to the body arc on both sides.
Sharpening knives is best done on an emery stone that rotates horizontally. In this case, when wetting the knives with water, the latter remains on the blade and stone longer, ensuring their safety. Dip knives in water frequently. This will help prevent the steel from overheating.
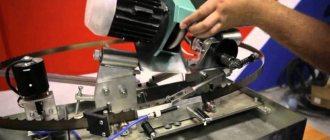
Device for sharpening knives using electric sandpaper
An electric sharpener will not only speed up the work, but also make it possible to obtain high-quality concave edge profiles on the blades, the so-called fuller sharpening. It is impossible to achieve such forms using a linear bar; therefore, these types of devices are not interchangeable, but complementary devices.
It is noteworthy that a person, working on a manual sharpening device, controls the speed and intensity of the processes performed, while the emery wheel has a constantly high rotation speed, which can negatively affect the condition of the knife.
During friction, the metal surface is subject to strong heating, which results in the “tempering” of the hardened steel. The material loses many properties, it becomes less hard, which leads to abrasion and the appearance of torn edges. Another problem with a “released” knife is the rapid loss of sharpness. In this regard, you need to work carefully with an electric sandpaper, bringing the blade for sharpening to the abrasive for short periods of time and taking frequent breaks to allow the knife to cool.
When working in such modes, it is quite problematic to maintain constant angles, so the tool needs to be securely fixed during such processing.
The design of such a device is quite simple to implement. In the direction of the rotating axis, there are guides on the emery along which carriages with knives move. The angles are maintained mechanically, and the forces are determined directly by the operator.
This type of device is quite easy to make with your own hands - there is no need to perform precise work for processing metal parts. The base material is actually used to make the guides.
On the workbench, near the sharpener, guides are mounted, with the help of which it is possible to change the distance from the knife stops to the abrasive. This distance affects the sharpening angle. The vertical rod must necessarily have up and down free movement regulators that have durable types of fixation of the current positions.
The knife blade should be held horizontally, pressing against the thrust element. The force in contact with the emery must be adjusted directly during operation. The processing needs to be done symmetrically; you just need to change the sides of the knife and sharpen them at the same angles.
The use of this method can only be suitable when processing classic types of knives. Kitchen, hunting, hiking and other types of cutting surfaces of various tools require a slightly different approach.
Checking the quality of sharpening
A sharp knife when sharpened correctly.
There are several ways to check the sharpness level of a knife. They do not require special skills or materials.
On paper
Take a piece of office paper and cut off a corner without any effort. If the knife is not sharpened, it will tear the sheet.
On a tomato
Soft vegetables and fruits are crushed under the influence of a blunt blade. Sharp ones can cut the thinnest slices. Knives, brought to the level of a straight razor, have enough of their own weight to cut a tomato.
Testing on hand hair
A well-sharpened blade will shave hair without any problems. This method should be used with caution, as if the angle is incorrect, there is a risk of cutting yourself and causing infection.
On a hair
For this test, you need to take a long hair and lower it onto the blade turned upside down. If the hair is cut in two under its own weight, then this is an indicator of razor sharpness.
With sufficient sharpness, you can plan the hair by moving it at an angle to the knife.
Preventing the knife from becoming dull
A blunt instrument can come off at any time and injure the owner. This is not only inconvenient, but also unpleasant to cook with. Therefore, it is important to sharpen regularly. How often it will have to be done depends on the strength of the material from which the knife is made, and on how carefully it is wielded. Below are tips to help increase the time between forced sharpenings:
- Do not cut on surfaces harder than wood, such as glass, metal, ceramic, porcelain, etc.
- Do not use the cutting edge to crush hard foods (bones and ice, for example). For these purposes it is better to take a special tool.
- Use the knife for its intended purpose - to cut. They should not pick nails or open cans or bottles.
- Rust affects the need for sharpening. Once in the human body, it has a toxic effect. After washing the dishes, you need to thoroughly dry the iron utensils or at least leave them in a well-ventilated place.
If you still have questions about sharpening knives with a whetstone, the video will clear them up. It shows the sequence of the described actions, and it will be easier for you to repeat them.
Features of using the device
Of course, a simple whetstone is suitable for sharpening a knife or the cutting edge of a plane. But its quality will not be the best. To ensure uniform removal of the metal layer and precision processing, it is necessary to use special sharpening devices.
The advantage of such a product is not only its ease of use, but also factors such as:
- The ability to fix the blades, which is quite reliable and does not cause unnecessary stress. a properly designed device does not allow the metal to be damaged during operation.
- Possibility of installing the bar at a certain angle. Thanks to this, when the cutting edge moves, the angle value will not change.
- Variation in setting different sharpening angles. With this functionality, it is possible to process various tools, even sharpening knives with a stepped structure.