Cutting tools for milling and boring machines are distinguished by their variety and the presence of several cutting edges. A complex configuration requires high precision grinding, so the cutter is sharpened on automatic and CNC machines. It is impossible to manually make all corners and edges the same.
Each type of cutter has its own sharpening machines. It is impossible to process facing and cutting tools on the same equipment.
Sharpening a cutter on a machine
End mill sharpening angles
To properly sharpen an end mill, you first need to study the geometry of the teeth. They are backed and pointed.
Image No. 1: pointed (a) and backed (b) teeth
The back surfaces of the backed teeth are made in Archimedean spirals. Sharpening of such cutters occurs along the front surfaces.
In pointed teeth, parts of the rear surfaces are planes. Most often, such cutters are sharpened along the rear surfaces. The front ones are treated if necessary.
Let's talk about the geometry of the teeth in detail. Each of them has 4 important parameters.
Image #2: tooth geometry
Surfaces and sharpening angles of end mills.
- Site f. It is this that undergoes the main wear and is sharpened when processing the back surface. The size of the pad directly affects the friction force between the tool and the workpiece. Therefore, the width must be maintained within a certain range.
- Auxiliary clearance angle α1. The cutters are sharpened along it at certain levels of wear and a strong increase in the size of the pads f.
- Main relief angle α. This is the angle between the tangent to the flank surface at the point in question on the main cutting edge and the tangent to the circle of rotation of that point. The purpose of this angle is to reduce friction between the tool and the workpiece.
- Main rake angle γ. Located between the axial plane and the tangent to the front surface. For cutters designed for processing viscous materials, the size of this angle varies from 15 to 20°. Mills for processing steels have an angle of 0 to 5°.
Note! The teeth are either straight or helical. The amount of inclination is characterized by the angle λ. It is located between the axis and the deployed screw edges.
Back sharpening
When setting up to sharpen a cutter along the back surface, it is set in such a position that the tooth supported on the stop is shifted relative to the horizontal position by an angle α.
The required distance by which the cutter tooth moves, forming an angle α, can be calculated using the formula:
- α – displacement angle;
- H – tooth displacement distance;
- D – diameter of the cutter being sharpened.
Since the cutter teeth rest on the stop, it is recommended to place it as close as possible to the top of the individually sharpened tooth in order to reduce the error in the angle α.
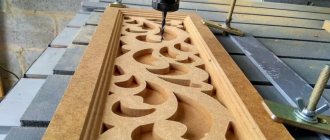
Manual sharpening of end mortises designed for processing tough materials
To sharpen an end mill designed for processing tough materials (such as wood), you will need the following tools, equipment and materials.
- Table or workbench.
- Diamond beam.
- Soap solution.
- Solvent.
The end mill is sharpened according to the following scheme.
- Soak the diamond bar in soapy water and secure it to the edge of the table.
- Remove the guide bearing (if equipped) from the cutter.
- Clean the cutter with solvent.
- Sharpen all cutters.
Image No. 3: cutter sharpening diagram
Please note the following features.
- Before sharpening, be sure to make sure that the diamond stone has the correct shape.
- To achieve uniform sharpening of the cutters, make the same number of movements with approximately the same pressure.
- If you don't have a diamond wheel, you can use sandpaper to sharpen it. Glue it to a solid piece of wood or strip of steel.
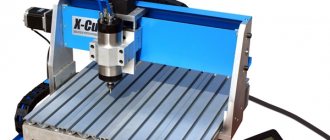
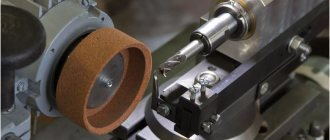
Machines for sharpening end mills for metal
To sharpen end mills for metal, special machines are used that provide translational and rotational movement of the tool being processed.
Image #4: Precision end mill sharpening machine
Let's talk about the features of sharpening end and side teeth.
Grinding of end teeth
To sharpen the end teeth, the cutters are installed horizontally. If the machine does not have a graduated ring specially designed for this, horizontality is checked using a square.
During the sharpening process, the operator moves the edge of the abrasive wheel along the edge of the tooth. The sharpening angle is adjusted either by tilting the spindle with the cutter, or by moving the wheel vertically.
Photo #1: sharpening the end mill teeth
Sharpening side teeth
The side teeth are sharpened according to the following scheme.
- The cutter is fixed in a collet.
- The copier needle is set to its highest position, where the tip touches the outer edge of the groove.
- The abrasive wheel moves to a position where the outer edge coincides with the needle.
- The machine starts.
- Using the direct feed handle, the circle is brought to the cutter (before sparking begins).
- The thickness of the metal layer to be removed is set (25–50 µm).
- The tooth is sharpened to its full length. To do this, the spindle with the cutter is retracted until the tool comes off the needle.
- The passage is repeated.
Photo #2: sharpening the side teeth of the end mill
Next, the remaining teeth are sharpened using the same pattern.
Front sharpening
When sharpening the front surfaces of a cutter, only disc wheels are used, since, due to their geometric properties, they can fit in the space between the teeth. If the working surface of the abrasive wheel is installed along the vertical center line of the cutter, then the rake angle γ will have a zero value. In order for the front angle γ to provide a positive value, the end surface of the circle that comes into contact with the cutter tooth during sharpening must be shifted by a certain distance H1, which can be calculated using the formula:
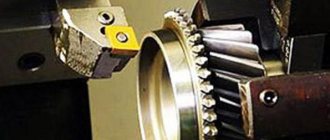
Selection of devices (abrasive wheels) for sharpening end mills on machines
To sharpen end mills, machines are most often equipped with devices made from the following materials.
- Diamond and green silicon carbide. Wheels made from these materials are suitable for sharpening carbide tools.
- Elbor. This is a superhard material based on the cubic sphalerite modification of boron nitrite. CBN wheels are used for sharpening cutters made of high-speed steels with increased productivity.
- Electrocorundum. It is a chemically resistant solid material based on aluminum oxide. Electrocorundum wheels are used for sharpening cutters made of tool and high-speed steels of normal productivity.
- We list the characteristics of devices that must be taken into account when choosing.
- Heat resistance. With increasing temperature, the microhardness of abrasive materials decreases. Therefore, sharpening end mills on machines necessarily requires the use of coolant. Plain water will not work. Its use will lead to corrosion of machine elements. Soap and various additional additives (soda ash, sodium silicate, potassium nitrite, etc.) are added to the water. For the heat resistance of materials used to make abrasive wheels, see the table below.
Image No. 5: heat resistance of materials used for the manufacture of abrasive wheels
- Grain. It is selected depending on the required class of cleanliness of the surface to be sharpened. The higher the grit, the better the performance of the wheels. This increases the service life of the devices.
- Form. To sharpen the rake corners of end mills, disc or flat jigs are used. The back corners are treated with cup and disc models.
Image No. 6: Shapes of grinding wheels used for sharpening end mills
Another important parameter for sharpening end mills is the rotation speed of the wheels. Carbide tools are processed at high speeds, and cutters made from high-speed and tool steels are processed at lower speeds.
Hardness.
Often, when processing wood or plastic, the question arises: if the hardness of the cutter is much higher than the material of the part, then why sharpen the end mill; in theory, it should not become dull.
However, in everyday life we don’t think about why a table knife needs to be sharpened after cutting very soft products, such as bread or sausage. Sharpening occurs quite often, sometimes several times a month. How many times do you sharpen your knife? At the same time, everyone has long known that a sharp knife will cut, and a dull knife will crumble and crush. The same goes for end mills. What materials are hard enough to make cutters? For example, carbon steel or high-speed steel, since their hardness is approximately the same (62-65 HRC for carbon steel, 62-67 HRC for high-speed steel). Carbide is also suitable, because carbide has even higher hardness.
But besides hardness, there are several other characteristics that limit the use of certain materials. For example, end mills are not made from carbon steel. It was discovered that at temperatures above 170 degrees, steel tempering begins. At the same time, the hardness rapidly decreases. For high-speed steel, the critical temperature starts from 490-540 degrees, for hard alloy from more than 900-920 degrees. Therefore, carbide end mills have higher tool life. In science, this phenomenon is called “Red fastness”.
Sharpening quality control
After sharpening, you need to ensure its quality. There are various technologies and devices for this.
- You can make sure there are no marks, cracks or chips using a magnifying glass. When monitoring the quality of sharpening carbide cutters, kerosene is additionally used. If there are cracks, it protrudes. This makes it easier to detect defects.
- Pendulum and special protractors are used to measure front and rear angles.
Image No. 7: measurement technology with a pendulum inclinometer
Note! It is not recommended to leave nicks on the surfaces of the teeth. Milling cutters with defects quickly fail. When sharpening, strive to ensure that the surfaces are perfectly smooth.
Types of cutting elements
Milling is a delicate process that requires a special approach, so craftsmen very carefully select equipment, focusing on different needs. Depending on the material being processed, there are:
- for metal;
- on wood;
- for plastics;
- on glass.
The second important feature is the purpose; cutters are distinguished:
- angular (for corners);
- shaped - depending on the part being processed;
- keyed - to create a special groove with the appropriate name;
- for recesses in the material in the shape of the letter “T”;
- cutting machines for dividing the sample into parts, etc.
Also, when purchasing products, the first thing that is usually called is the shape of the cutter; it can be:
- cylindrical;
- conical;
- disk;
- terminal;
- worm, etc.
It is difficult to list all the types, since for each milling procedure you can buy or even grind your own tool. There are several tens of thousands of items in total, and their range is constantly growing along with increasing production needs. In each variety, the cutting base is quite large in length, regardless of how it is located. Therefore, it is very difficult to ensure correct and uniform sharpening. Sometimes this requires special tools; in other cases, meticulous sanding by hand is more suitable. Lack of experience or work done poorly for other reasons can lead to chips, scratches and cracks on the surface on the cutting edge.
How to achieve high quality end mill sharpening
The rules listed below are aimed at complying with the established standards of permissible runout and obtaining tools without defects.
- The total runout of the machine spindle, mandrel and fixture must be less than the permissible runout of the cutter being sharpened.
- It is necessary to ensure accurate seating of the grinding wheel. Otherwise, vibrations will not only lead to sharpening defects, but will also accelerate wear of the abrasive device.
- Feed mechanisms should not jam.
- The fixed cutter must be moved as smoothly as possible.
- Machine spindles must have sufficient vibration resistance.
- They need to be well lubricated to ensure they rotate as easily as possible.
- Axial and radial runout should not exceed 0.01 mm.
Recommendations for the use of cutters for longitudinal wood fusion
I. Installation of cutters on the spindle of a tenoning machine.
1.1. Before installing cutters, ensure that the spindle of the tenoning machine is clean.
1.2. Install the cutters in the order of the numbering stamped on the cutters and rings, starting with the installation of cutter No. 1 (Fig. 1). Each subsequent cutter is installed with the knives offset relative to the previous cutter by 45°, and the pin must fit into the corresponding hole. The second hole for the pin is intended for arranging the knives on all cutters in one line for subsequent sharpening if the necessary sharpening equipment is available.
II. Work of cutters on a machine.
2.1. Before starting work, be sure to check the tightness of the mounting screws.
2.2. Preliminary calibration of the blanks will provide better tensing and the possibility of subsequent selection of blanks by texture.
2.3. The presence of dust, sand and other abrasive materials on tenoned workpieces significantly reduces the service life of knives.
2.4. It is recommended to work in the following modes:
– The number of spindle revolutions with installed cutters should be in the range of 3–4.5 thousand rpm.
Increased speeds lead to “burning” of the cutting edges of the cutter knives, which significantly reduces the service life of this tool.
– workpiece feed speed 5–8 m/min. – mechanical feeding of workpieces increases the service life of the cutter before regrinding.
2.5. When using cutters, it is imperative to ensure reliable horizontal and preferably vertical clamping of the workpieces.
Failure to comply with these recommendations leads to breakage of knives due to undermining of workpieces.
2.6. It is recommended to install an adjustable miter saw in front of the router. This makes it possible to increase the service life of knives between regrinds by 3–4 times and ensure high-quality closure of the machined ends of the workpieces (Fig. 2).
By moving the adjustable miter saw, tenoning is achieved, ensuring a tight connection between the workpieces even after repeated sharpening of the knives.
2.7. It is necessary to prevent excessive dulling of the knives. The criterion for dullness is the inability to ensure a tight seal even when adjusted with a miter saw.
2.8. If the machine on which the workpieces are tenoned for splicing is not equipped with an adjustable miter saw and a clamp, you can purchase them from us or make them yourself, but the presence of these devices is required.
III. Sharpening knives, caring for the cutter.
3.1. Maintenance is one of the most important factors that will help you operate your cutters correctly and efficiently. At the end of each working day, it is necessary to remove the adhering resin on the body and cutter blades with a brush dipped in diesel fuel, and at the end of the working week, lower the cutters into a container filled with diesel fuel. This must be done because adhered resin leads to “burning” of the knives and, as a result, to their release, which significantly reduces the service life of the cutter.
Also, soaking the cutters in diesel fuel makes it easy to unscrew the mounting screws to remove the knives when resharpening.
3.2. Resharpening cutter knives can be done in two ways:
– without removing knives;
– with removal of knives.
To perform sharpening without removing the knives, it is necessary to install cutters with the knives arranged along the same line (see paragraph 1.2). Such sharpening is carried out in the presence of specialized sharpening equipment and trained personnel to service it.
In the absence of such specialized equipment, all knives are removed and sharpening is carried out by simultaneously grinding all knives along the front plane. To do this, the knives are laid out in a row against the stop on the magnetic table of a surface grinding machine and a layer of 0.08...0.1 mm is removed (Fig. 3).
3.3. As a result of resharpening, it is possible to thin the knives up to 4 mm (40–50 resharpenings).
3.4. After sharpening, rinse all knives in diesel fuel to remove abrasive from the grinding wheel.
3.5. The installation of knives after sharpening must be controlled with a dial indicator in accordance with Fig. 4. The indicator leg is installed on the cutting edge. The difference between adjacent knives must correspond to the nominal pitch of a given cutter with a tolerance of ± 0.01 mm. Before installing the knives, the seats must be cleaned with a brush.
Manufacturer: Iberus
Homeland of the brand: Ukraine
Finishing of end mills
If, after sharpening, microcracks are found on the surfaces of the end mill, fine-tuning is applied. Its main purpose is to remove the defective layer. The second task is to improve the cleanliness of surfaces. In addition, during finishing, blockages of the tooth surfaces are eliminated.
Such operations are carried out on sharpening and finishing machines with cast iron discs. With their rotation speeds of 1 to 1.5 m/sec, the best results are achieved. For finishing, boron carbide paste is most often used. Grit size - from 170 to 230.
Photo No. 3: sharpening machine
Diamond wheels can also be used for finishing. When using them, productivity increases by 1.5–2 times.