Their reliability and service life depend on how the hinges on the garage or yard gate are welded. The same can be said about the gate. In this case, it is necessary to take into account the design features and characteristics of the material from which they are made. For example, when welding hinges on a door with a thin metal sheet, you can accidentally burn through the skin or warp the frame.
Selection of loops and their quantity
The correct choice of hinges for metal gates, gates and doors should be based on several factors:
- determining and selecting the type of loop;
- determining the number and overall dimensions of the loop.
Types of loops
First of all, welded hinges differ in shape. They can be:
- cylindrical. A variation of this group is the welded drop-shaped loop;
- square. They are used extremely rarely. Currently practically not produced;
- hexagonal.
The main types of welded loops, differing in shape
Experts recommend choosing cylindrical or teardrop-shaped hinges, since this type is the easiest to install.
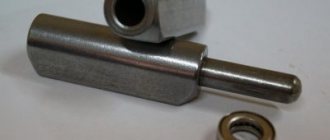
All welded hinges can be additionally equipped with a ball that acts as a bearing. The ball makes it easier to open the door and reduces friction, which negatively affects the life of the fittings.
Welded hinge equipped with a ball bearing
Also on sale you can find reinforced welded hinges, which are used for installation on a metal door of large size or weight. Additional plates allow you to evenly distribute the load on the hinge, which increases the service life of the product.
Welded loop complemented by metal strips
The most optimal option for a welded loop is a cylindrical ball loop, supplemented with strips. It is this kind of fittings that will serve for a long time without unnecessary problems.
Table for choosing the sizes and number of door hinges
If you decide to use welded hinges to install the gate, you can choose from several types:
- the simplest and most inexpensive option is a split cylinder with a rotating axis in one part and a cavity-cap in the other. Such hinges require periodic lubrication, without which they quickly begin to creak;
- The most popular are hinges of the same design, but improved with a ball or bearing on which the axis rests. They can be either two- or three-section;
Benefits of using teardrop hinges
In addition to the simplified installation scheme, this type of product is characterized by a number of other equally noticeable advantages. These include the following features:
- the presence of a special ball as part of the hinge structure, located at the end of the axis, and during the assembly process of the product rests against the bottom of the counter cylinder;
- the presence in the design of most drop-shaped hinges of a special mechanism that facilitates the process of lubrication of canopies. It is located at the top of the hinge and looks like a small hole that does not have any effect on the overall strength of the structure. A grease fitting is installed inside this recess, in the presence of which lubricant, poured in with a conventional syringe, is supplied to the moving parts of the product;
- Another important advantage of the design is the presence of a bearing. This addition, like the ball, is intended to reduce friction of mechanisms by reducing the area of surfaces in contact with each other. The bearing is easy to lubricate from the outside, so it does not cause discomfort in operation.
Taking into account all the above listed features and advantages, we can say that teardrop-shaped hinges are one of the most popular options for door canopies today.
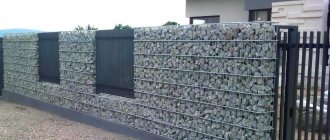
Cinder block garage
Garage made of cinder block
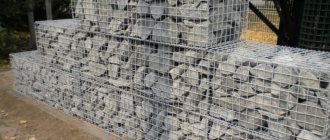
Cinder block can be different, for example:
- shell rock;
- blast furnace slag;
- brick fight.
Their durability has been tested by time - they are even used to build houses in warm climate regions, not to mention garages. To strengthen the slabs themselves, manufacturers add polystyrene, perlite and various useful components to the composition.
The only drawback of cinder block is its sensitivity to moisture. Therefore, for areas where groundwater flows, it does not serve for a long time; there it is better to choose another material. Unfortunately, a budget cinder block cannot even be varnished like wood.
How to build a cinder block building
The technology for constructing a garage cheaply with your own hands from cinder blocks is in many ways similar to the process of building from wood:
- clean and level the area, while you should have a plan of the future building in your hands;
- install a strip foundation, for which you dig a trench around the perimeter to a depth and width of about half a meter, lay a brick-sand cushion, reinforcement and fill it with cement.
- After waiting a month, build walls;
- complete the screed;
- install the roof;
- attach the gate.
Some tips:
When erecting walls, the corners are first made, cords are stretched between them, thanks to which the evenness of the structure is ensured. The floor is screeded with about 10 cm of concrete grade M200.
All you have to do is wire the electricity and then finish the inside of the garage.
How to weld the hinges yourself
Welding hinges is not an easy task, especially for beginners. But, if you have patience and desire, you can cope with such work even in the absence of serious experience.
To work you will need the following tools:
- metal tape measure;
- level;
- hammer;
- welding machine;
- Sander;
- special mask;
- gloves for welding work.
Rules:
- When working with a welding machine, you must strictly follow safety rules. A protective mask and gloves must be used.
- In accordance with fire safety standards, welding is prohibited near flammable liquids and objects.
- When hinges are welded to the gate, they need to be lightly “grabbed” by welding.
- Since the hinges are welded to the door leaf, when drawing up the drawing, you need to take into account that the distance from the lower edge of the leaf to the lower hinges, as well as from the upper edge to the upper hinges, must be at least 20 cm. On the wings, the place where the hinges are attached is marked with a pencil.
- Fasteners should be thoroughly lubricated with grease. This measure will protect them from cracking when exposed to high temperatures.
- It is believed that if a match is placed along the edges of the hinges, the door will not jam during welding.
- You need to wedge the doors so that when closed they are level. To level the sashes, use a building level.
Stages of work:
- First, the hinge part located at the bottom is welded. The gate hinge must be fixed in the direction from bottom to top. During the welding process, the electrode should be moved horizontally and with extremely smooth movements.
- After the first seam, the gate leaves must be wedged to check their operation. The hinges are fully welded only after the quality of opening and closing the doors has been checked.
- After welding is completed, the frame must be removed from its hinges, generously lubricated with grease and returned to its place.
- All welding seams must be processed with a grinding machine, and then covered with metal paint.
- Properly welded hinges provide the structure with quick, delay-free opening. You can also close such gates easily - with one movement of your hand.
Additional features:
- During welding, only serviceable equipment should be used. A faulty device must be repaired by a qualified technician.
- The work of welding hinges to the gate cannot be carried out alone.
- It is prohibited to weld on metal whose surface has traces of fresh paint.
- If there are traces of gasoline, fats, or oil on the protective overalls or gloves, they must be changed. The presence of flammable liquids on clothing is considered unacceptable.
- It is prohibited to weld vessels under pressure.
- Do not place rags soaked in oil on the cylinders, as such carelessness always leads to a fire.
What not to do during welding
In order for welding work to proceed without incident, it is necessary to adhere to certain rules:
- Be sure to use protective equipment to avoid harm to your health. This kit includes a protective mask, gloves for welding, a thick jacket or shirt, and pants.
- Never touch a hot welding seam with oil-soaked rags, as they may catch fire.
- It is strictly forbidden to carry out work by eye, even if you are confident in your eye and skill, double-check everything with special tools, then the result is guaranteed to be of high quality and durable.
Now you know how to weld hinges yourself and you can share this information with your neighbors or friends who are still wondering how to weld hinges on their gates without any problems.
Watch the video: Tips and tricks
Loop welding technology
Before we talk about how to weld hinges on gates, it is worth taking a closer look at the conditions necessary for their normal operation.
Even if the load is calculated correctly, the hinges may not be able to cope with it if their position deviates even slightly from the vertical. They will quickly fail. And the second point: there should be a small gap of 1-2 mm between the hinge body and the support post so that the metal parts of the post and the mating part of the canopy do not touch or rub against each other. The same gap should be left on the side of the sash.
Video description
To understand what we are talking about, watch the video
The nuances of installation on supports of different sections
The supporting posts on which the sashes are hung can be round, square or, less commonly, rectangular in cross-section. There is a difference between how to properly weld gate hinges to round posts or supports made of profile pipes.
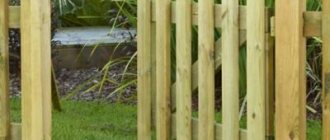
If the profile pipe has smooth edges without bends or distortions, then it will be easy to cope with the task of how to properly weld gate hinges to square posts. They are installed on the outer plane of the support.
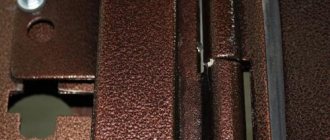
Canopy with plates on a square postSource distroy.ru
In the case of a round support, you must first decide in which direction the doors will open. Then they find the most protruding line (the middle of the pillar relative to the opening) and step back from it a few millimeters outward - in the direction of plowing. 5-6 mm is enough for the wicket or gate leaf to move smoothly and without jerking around the axis of the canopy. Since it is more difficult to weld hinges on gates to round posts than to square ones, here you need to be especially careful and attentive, maintaining the same indentation size for all hinges.
Installation and welding work
Experienced welders recommend first welding the canopies to the sashes, laying them on a flat horizontal surface. A half in the form of a hollow cylinder is welded to them, and a mating part with a pin (pin up) is subsequently welded to the supports. They retreat approximately 15 cm from the top and bottom edges.
Wicket frame with welded hingesSource www.chipmaker.ru
Then the sash with welded canopies is installed in the opening on stands that provide the required distance to the ground, and is rigidly fixed with clamps, pliers and other devices. They do this so that it stands strictly vertically, and there is a gap of 5 mm or so between it and the support. To do this, use a laser level or a plumb line, and spacers of the required thickness are inserted between the elements.
Other craftsmen prefer to first install the gate, and then weld the hinges to both it and the post. There is no big difference, everyone does what is convenient for them.
Another option is to make the upper and lower ribs of the frame whole when making the sashes and cut them after hanging them on the hinges. Source sqezo.ru
Now let’s talk about how to properly weld canopies on gates. The sequence of work looks like this:
- 1.5-2.5 mm thick wire is wrapped and twisted around the loops at the top and bottom to form a gap between it and the welding plane. You can place matches or other objects of suitable thickness, but they fall out, move or break, which is very inconvenient;
- The places where the canopies are attached are marked on the supports and an even long block or profile pipe is applied to them. Fix it level, ensuring a vertical position.
Materials
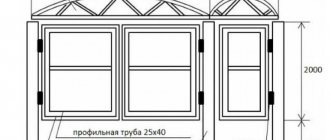
The pillars are made from profile pipes with shelf sizes of 80 or 100 mm. Taking into account its lowering into the ground by 800 mm, the length of the pillars should be 3 m. Plugs are welded to the upper ends to prevent water from entering.
For greater rigidity and securing the rack, you can weld small pieces of reinforcement or other rolled steel, 1 m long, on the section extending into the ground.
For standing ones, take a 40/40 or 40/60 profile, cut off two parts with a length of 2100 mm using a grinder. The edges of the pipes are cut at an angle of 450 for a larger welding area and reliable fastening.
The upper and lower lintels are prepared from the main profile, with a gate width of 1000 mm. parts are cut to size 980 mm. This will provide a gap of 10 mm between the loot and the gate on each side. Cut the edges at an angle of 450.
For the middle lintel you can take a 25/40 profile, its length should be 900 mm, it will be inserted inside the frame, so the width of 2 profile shelves is subtracted from the total length of the workpiece, in this case it is 80 mm.
You will need 2 hinges with an outer diameter of 30 mm and 4 steel plates with a thickness of 5 mm and a width of 40 mm. The hinges must be disassembled and the internal surfaces well lubricated with grease or other thick lubricant, then assembled. It is better to purchase loops with balls.
The plates are laid out on a flat surface and loops are attached to each part from different sides. That is, if a plate is attached to the part of the loop with a hole from the outside, then on the mating part the plate is placed towards the inside.
Welding is mandatory on both sides to ensure welding of the root of the seam. After the first pass, you need to beat off the slag and weld the second pass. At the root, welding is performed in one pass.
Video description
See how it looks in this video:
loops with twisted wire are pressed against the block and the post and are also fixed in a vertical position;
the loops are welded to the supports at 2-3 points;
in the same way, they grab the second (upper) part of the hinges to the frame or leaf of the doors;
when the tacks have hardened, the gate is checked for opening - it should swing open 180 degrees without jamming or warping;
if everything is in order, the sashes are closed again, fixed and the hinges are welded onto the finishing surface with a continuous seam from the bottom up;
cooled seams are cleaned of scale with a hammer and sanded with a grinder to give a more aesthetic appearance
But this work must be done carefully so as not to damage the joint. After painting, the sanded joints will become almost invisible Source i.ytimg.com
After painting, the sanded joints will become almost invisibleSource i.ytimg.com
Do not open the gate until the welds have completely cooled and gained strength.
Metal gates can also be hung on other awnings, which are secured with screws or nuts. But the welded method is more reliable and durable, especially if you know how to properly weld hinges on gates and strictly follow all the requirements regarding their installation technology.
Frame welding
Welding can be done first, and then installing the pillars, but it can also be done the other way around. It will not take much time to weld the structure. The pillar parts and lintels are laid out on a flat surface.
They are set according to level. Connect the pillars and the top jumper. Place 2 potholders on each rack on the outside and sides. The lower part is grabbed in the same way.
Use a tape measure to measure the diagonal. A 2 mm skew on the side is allowed, but it is better to do it without skew. Having set the diagonal, they grab it from the outer end surface of the joints. Mark and grab the additional strut of the structure. It should be flush with the surface of the racks.
The entire structure is scalded on all sides. The front side of the gate, on which the lining will be attached, is cleaned with a grinder. All other joints are hammered and the quality of the weld seam is checked.
If the pores are large, scald these areas again. Now you can clean up the uneven joints a little without disturbing the seam. The wicket structure is ready.
It is necessary to weld the hinges onto the gate frame. This can be done when hanging it on poles, but welding in the lower position will provide a better quality seam.
For welding, mark the same distance from the edge of the structure, align the hinges coaxially to each other and the gate, and grab them in several places. Once again check that the hinges are installed correctly and weld them on both sides.
Main types of garage hinges
The building materials market offers a wide variety of hinges for swing doors. Each variety has individual parameters and advantages of use. The first thing you need to do when choosing is to select an installation option. The following installation methods are available:
- welding - the hinges are fixed on the door leaf and frame;
- installation using bolts - used when working with wood material;
- fastening with self-tapping screws - suitable for structures made from profiled sheets.
Based on placement, clamps are divided into hidden and internal. Their main differences lie in the installation method and decorative characteristics. When choosing garage hinges, the weight of the door is of great importance. Incorrect calculation of the expected load provokes skew of the canvas and difficulties with opening. For dense sheet steel with a large mass, it is recommended to purchase reinforced clamps.
With support bearing
Hinges equipped with a support bearing are the basic type of cylindrical type fasteners. The support bearing and swivel joint are reliably protected from external influences by the main body made of metal alloys.
Models with support bearings are intended for lightweight swing structures. The maximum permissible load is 100 kg. The clamps with support bearings are attached to the sashes and frame using a welding machine.
Cylindrical with additional reinforcement
Reinforced clamps are equipped with additional plates, which helps distribute the load over a large surface of the sashes or pillar. It is recommended to use cylindrical hinges with improved plates for thin profile structures. The parts are fixed to the swing gate leaves and frame by welding or screw connection.
Depending on the side of location, cylindrical reinforced hinges are divided into right and left. The diameter of the element is 50 mm. The maximum total load reaches 600 kg.
End-to-end
If it is not possible to secure the hinges by welding or screwing to the frame, a through type is used. For installation in the gate frame, mounting columns are drilled along the entire length, into which part of the retainer is threaded. For final fastening, nuts of the appropriate size are used. Thanks to a special fastening scheme, through-type fasteners can withstand loads of up to 200 kg.
Three-section invoices
For massive swing gates, it is necessary to increase the number of latches and choose a type with increased wear resistance. The best option is three-section models that can withstand the load of a heavy structure. The main advantages of overhead three-section hinges are:
- smooth sliding when opening and closing the gate;
- no creaking;
- reliable protection against burglary;
- preventing the sash from warping and sagging.
Boom loops
Garage boom hinges are suitable for attaching large swing doors, gates and thin-profile structures. The main distinguishing feature is the increased area of the clamp, due to which it provides additional strength and prevents distortions.
At the connection points, the arrow loops are able to withstand increased stress. This is facilitated by uniform distribution along the entire length of the sash. The range of dimensions of the clamps varies up to 700 mm, which makes it possible to find the optimal option for any gate design. The fastening parts are made from durable sheet steel, which ensures a long service life.
Invoices
Despite the ease of installation, overhead types of hinges are highly reliable. The fasteners are made from durable materials, including steel alloys, brass and stainless steel, which significantly increases the variability of their use. Inside the housing there are 2-4 ball bearings necessary for smooth opening of the gate.
To fix the overhead hinges on the frame, you need to mark their exact location and secure it with self-tapping screws. The clamps are included in the universal category and are not divided into left- and right-handed ones. If after installation it becomes necessary to remove the canvas from the hinges, you will need to unscrew the screws.
Creating a Project
Initially, the owner needs to decide whether the product will be swinging or sliding. Swing gates are easier and faster to make. Sliding models are more difficult to build: the work is complicated by rollers that must be correctly installed in the profile.
The product cannot be installed blindly; for this purpose, a competent drawing must be created. There are several options: ask for help from a familiar specialist who will quickly deal with the matter, use a sheet of paper and draw diagrams, or make them using a graphics editor. If the owner does not have the skills to use the program, then it is not worth doing the project on a computer, because this will take a lot of time.
Step-by-step design:
- If a car enthusiast has no desire to engage in drawing, then he can use ready-made diagrams on the Internet. It is enough to adjust the dimensions of the opening to the option of interest.
- In addition to the drawing, a design sketch is made. No artistic skills are needed here, just a simple image is enough.
- After drawing, the owner creates a list of materials, dimensions, dimensions of the opening, and parameters of the sashes on a separate sheet of paper. For example, 4 profile pipes with a wall thickness of 3 mm, of which the first two are 200 cm long, the others are 300 cm long.
- Experts advise making an estimate that indicates the financial costs for certain types of parts. This also includes the price for delivery of building materials.
In order not to walk around the market for a long time in order to find out the prices for this or that material, the owner just needs to ask his neighbors or friends who installed welded garage doors about the amount spent on purchasing metal.
Selection of corrugated sheets
Corrugated sheets differ among themselves in thickness, degree of strength and rib height.
- “C” is a lightweight and durable galvanized wall sheet with low thickness and rib height. The most common choice;
- “NS” is a denser profiled sheet with a higher rib height, but also heavier;
- “N” is a massive load-bearing corrugated sheet, used for roofs of a huge area. Not suitable for gates due to heavy weight and high cost.
The best choice would be a profiled sheet of grade C8 or C10. The number indicates the height of the wave in centimeters. The thickness of the sheet of this brand is from 0.4 to 0.8 mm. Sashes made from grade C corrugated sheets will weigh from 25 to 40 kg, so they can easily be hung by two people, without the use of special lifting equipment. Due to the fact that one profiled sheet per sash will not be enough, the size is calculated based on the width of the material.
Roof
To make your garage feel as comfortable as home, its roof must provide complete protection from moisture. The market offers a variety of materials for roofing: metal, slate, tiles, corrugated sheets and roofing felt.
Roofing felt is most often used to create a reliable roof. This material has excellent waterproofing properties, is resistant to any weather influences, does not require complex maintenance, and can be easily installed by one person armed with a torch. Laying is done using bitumen mastic. You can also use “new generation” roofing felt – with a ready-made adhesive layer.
Corrugated sheeting is an excellent material for a garage roof: light, durable and reliable. It is inexpensive and easy to install. The low weight of the sheets allows the use of a lightweight rafter system. The sheets are fixed using self-tapping screws with rubber gaskets.
Re-weld the hinges on the gate. Types of loops
It is important to choose the right fasteners, taking into account the weight of the door and its dimensions. For heavy metal doors, modern industry produces the following types of hinges:
- Cylindrical. The most popular because they make it possible to open the gate to the maximum angle. Disadvantages include difficulty in attaching to a flat surface.
- Teardrop-shaped. They are a type of cylindrical hinges.
- Hexagonal.
- Square. Used extremely rarely.
In this article you will learn how to properly weld hinges
Regardless of the cross-sectional shape, a door hinge is a part consisting of at least two elements. In the simplest hinges, the connection of these elements is made by a pin and a counter groove. Their main advantage is their low cost and ease of further maintenance (lubrication). At the same time, simple hinges fail faster.
In more complex designs, at the end of the pin there is a movably fixed ball (ball loops), the function of which is to replace sliding friction with rolling friction, which, as is known, is much less. This makes it easier to open and close the doors, and the hinges themselves will last longer.
There are also hinges equipped with ball bearings, but it is not recommended to use them for heavy doors, since the complex mechanism quickly becomes unusable. For massive gates and gate leaves, hinges are produced that are additionally reinforced with plates. Due to the plates, the weight of the door is more evenly distributed on them, which allows you to increase its service life.
Reinforced ball ones are considered the best option for heavy metal doors, garage doors and gates. They compare favorably with their cheaper counterparts in their long service life, ability to withstand significant weight loads and ease of installation.
In that
For heavy metal doors, the welded method is recognized as the best. It allows you to fix the hinges as securely as possible, eliminating play and gradual loosening of connections.
Basic truths
The process of installing hinges can be considered using the example of a metal gate. In order for it to properly perform its main functions, a number of conditions must be met when welding hinges:
- Provide a gap between the support post and the gate frame, which should be 3-5 mm.
- Provide a gap of several millimeters between the hinge and the gate frame by welding plates - metal plates of the required thickness - to the hinge. In total, for each loop you need two strips, the length of each of them is 2 mm less than the length of half.
- The optimal distance from the edge of the gate to the loop is 15-20 cm. If you need a middle loop, then it is located exactly in the middle between the outer loops.
First, the lower part of the fastener (with the pin) is welded to the post, then the upper part (with the groove) is welded to the sash.
A properly assembled structure should have the following parts:
- a loop;
- plate; wicket frame;
- support pillar;
- lower part (with pin);
- upper part (with groove).
All loops must be coaxial, that is, their centers must be on the same straight line. The alignment requirement is extremely important. It is on its compliance that it depends on how evenly the weight of the gate will be distributed on the fastenings and, accordingly, how long they will last.
To work, the master will need:
- welding machine;
- metal plate for making plates;
- Bulgarian;
- hammer;
- plumb line;
- oil for lubricating hinges;
- protective equipment - mask, gloves, overalls.
At the preparatory stage, you should mark the gate frame and sash, determining the places where the hinges will be welded. Clean them from dust, dirt, and rust. To do this, you can use a wire brush and solvents. Next, a similar treatment is performed on the surface of the hinges, and lubricant is applied to their inner part.
The traditional welding method involves the installation of plates at this stage, for which it is recommended:
- Take 2 identical plates of the required thickness and length. Place them so that there is a gap of 2-3 mm between them.
- Place the bottom part of the loop on them.
- Weld the loop to one of the plates (in this case, to the right one).
- Do the same for the top of the hinge and weld it to the left plate.
- Then you need to install the shutters in the working position and fix them.
- The plates with the lower part of each hinge are spot welded to the post, then the upper hinge elements are inserted into the lower parts and spot welded to the sash. After checking the alignment of the hinges and the operation of the gate, final welding is carried out along the contour of the plates.
We weld the hinges with our own hands
As you know, there are different types of gates and hinges should also be welded to them in different ways. Next, you will learn how to secure hinges on a round and square post. We will also tell you how hidden internal hinges are installed on gates or wickets and how to weld hinges on gates made of profile sheets.
Installing awnings on a round pole
In order for the awning to function normally on a round post, it needs to be slightly moved away from it. To do this, it is best to place a small metal plate under it, about two to three millimeters thick.
When welding canopies to a round post, push them outward by 5 mm on it and on the gate. This will eliminate the gap between them when closing.
Also, from the middle of the post, the loop should extend to the outside by five to six millimeters. Then the gate will be installed exactly in the middle, and the loop will be able to move along its axis without jamming and very smoothly.
We weld the curtains on a square support
Here it is already necessary to install the hinge flush. It is not necessary to make a lining, but it is better to play it safe and do it. First, apply a loop and grab it with several points so that it holds on its own.
You need to cook from bottom to top using small oven mitts and follow the order of work.
After this, take a flat wooden block or a metal corner and align the loop with it so that it stands level, simultaneously checking everything with a plumb line.
To eliminate possible welding deformations, the canopies must be welded to the canvas and the frame “crosswise”.
After both hinges are secured, you should put the gate on and check its movement, if everything is in order, continue welding. At the end, clean the seams with a grinder and you can paint them.
Installing hidden internal hinges
If you want to keep the hinges out of sight, making your gate more attractive, then you should use special hidden hinges for internal installation. But it is quite difficult to install such hinges and you need to have skill and dexterity in welding; if you are an unprofessional welder with experience, then you will not be able to master such work.
It is best to entrust the process to a professional, then the installation will be done efficiently and the gate will be installed reliably and for a long time. Of course, you will need to pay money for such work, but the quality is worth it.
Installed on a fence made of profile sheet
The process of installing hinges on such a fence is somewhat different from the standard one, although there is also nothing super complicated or time-consuming in it, you just need to have the desire and strive to get the highest quality result from the work done.
Metal hinges for gates made of corrugated sheets
So, the entire installation process consists of the following stages:
- Two small jumpers are made, align them parallel to the long side and secure them at the top and bottom, respectively.
- The distance between these jumpers will make it possible to install three such elements.
- We weld our hinges to the installed jumpers.
- The profile sheet must be screwed on top of the installed hinges, since during welding work it can simply burn and lose its attractive appearance. Garage door hinges are best suited for such purposes.
Why are mounting plates used?
Such plates help simplify work and lighten the load on the curtains. They are welded in advance before the installation of the hinges themselves begins.
The dimensions, shape and thickness of such plates will depend on the parameters of the gate that will be installed. In addition to lightening the load and installation, such elements can perform decorative functions.
Sheathing
If you are sewing up the gate with mesh or rods, they should be secured before installing them on the posts. When laying a sheet of corrugated sheets, it should be fastened after welding. The corrugated sheeting is secured with self-tapping screws, the heads of which are covered with decorative overlays.
Without high-quality welding, the gate will not last long. For reliability, be sure to check the filling of the seam with molten metal.
Before welding, double-check that the part or the structure as a whole is installed correctly. Take your time.
Before sheathing with corrugated sheets, be sure to degrease all surfaces and first apply a primer and then paint that matches the color of the decorative coating of the gate and fence.
Having completed all the work on welding and installing the gate correctly and efficiently, you gain invaluable experience in the manufacture of frame structures.
Gate hinges are a simple device that serves to attach gates to posts, as well as for easy opening and closing. The reliability of the design and ease of operation depend on the choice of this mechanism.
They are mainly equipped with hinges, which can be quite heavy. Therefore, special attention must be paid to the quality of installation, namely the fastening of hinges. A person who knows how to handle electric welding can weld hinges on the gate themselves, but those who do not have such skills are recommended to turn to professionals.
Classification according to GOST
Today on the market you can find a huge number of all kinds of hinges from different manufacturers, shapes, types of fastening, and external design. High-quality hinges for country gates and gates are divided into certain groups according to current GOSTs so that the average person does not get confused when choosing them. This makes it much easier for customers to select the necessary components and navigate their types and prices. Knowing the features of each type, the client can easily choose the right part for fastening the doors.
The main types of hinges for modern gates are the following:
- cylindrical type with support bearing;
- secret type for hidden installation;
- through-type curtains;
- models with a reinforced structure for mounting on gates;
- three-section type for installation in industrial facilities.
Now, let's take a closer look at each of these types in order to evaluate the features of each of them.
Cylindrical with support bearing
This type is made in a standard form and is not particularly different. Outwardly, they look like a cylinder of two halves. In the first part, which is the top, there is a pin, and in the second, which is the bottom, there is a hole into which the first part is inserted. Some models have a ball-type bearing inside to facilitate movement.
Such curtains are used in structures whose weight does not exceed 400 kilograms. For heavier systems, reinforced special cylindrical hinges are used. The connectors are fastened by welding. The ball bearing is installed in the hole in the lower curtain. Often, on the back side of the bearing there is a hole with a plug that makes it easy to lubricate and clean it. This small revision will improve the performance.
Up to four cylindrical hinges are installed in such structures to ensure the best movement and reduce the load on each. In some models, the bearing is not installed in the lower part, but between two moving elements. This modification greatly simplifies the opening and closing process. However, such a mechanism is difficult to lubricate, since to do this you need to lift one of the flaps.
Secret hinges
The main advantage of this type is hidden installation, because the design reliably hides them inside when the system is closed. A special feature of the design is that the hinge itself is hidden in the sash frame and attached to the side of the support. The advantage of such a fastening system is that it reduces the chances of hacking, because the loop is difficult to find and almost impossible to dismantle without the necessary tools.
Through-type hinges
The design feature of this type is that the two curtains are connected by a rod that enters the upper part and protrudes slightly from the lower part. The simplest design consists of two halves and a pin. This type is widespread on the market and is used mainly for office doors; the design can withstand a weight of up to 200 kilograms.
Assembling elements is somewhat reminiscent of a construction set, because each element has several ears
It is important to note that there can be several such elements on the door, which significantly increases reliability. Sometimes, bearings are installed between the hinge elements, allowing movement to occur more smoothly, with less effort.
If the plug is not provided for by the design, then a special limiter is installed on the top part, which does not allow the pin to be removed. This prevents hacking without special tools.
Reinforced gate models
Special reinforced models of cylindrical hinges allow them to withstand greater loads than conventional ones. They are made of metal of greater strength, as a result of which the walls and rods are thicker. This allows you to increase the load-bearing capacity of each loop.
This type has modifications in which bearings are added. They have special markings that indicate increased wear resistance and maximum pressure on them. This makes it easy to open and close heavy gates.
Three-section industrial
This type is in great demand in structures with significant weight of the connected web. Structurally, they are similar to through models, however, they are more reminiscent of cylindrical ones. Their design consists of two oppositely directed pins onto which cylinders are placed and welded to the posts.
How to make a lift-type garage door: step-by-step instructions
Below we will step by step analyze the creation of sashes covered with corrugated sheets. We will indicate the most important points during installation.
Tools, materials
To work you will need:
- Corrugated sheeting 0.7 mm thick for cladding.
- Profile pipe dimensions 20*40 mm, thickness 2 mm for the frame.
- Metal corner 40*40 mm, thickness 4 mm.
- 2 springs with a diameter of 30 mm.
- 2 rollers for bolting. The width depends on the size of the guides.
- Fastening elements: 30 cm anchor bolts, 10 cm self-tapping screws.
- Steel sheet 4 mm thick.
- Channel - 40*80 mm.
The tools should include:
- set of wrenches;
- screwdriver;
- electric drill;
- hammer;
- screwdriver;
- tape measure, level, marker or pencil;
- Bulgarian;
- welding machine.
Preparing the opening
Before installation, it is worth considering that the garage door opening must meet the following requirements:
- Availability of sufficient free space for fastening guides.
- Evenness of the walls both vertically and horizontally.
- Correspondence of load-bearing capacity to future load from the gate.
A room built from concrete blocks or solid bricks is quite reliable and does not need reinforcement for fastening the guides. But structures assembled from hollow foam blocks, boards, gas blocks will need to be strengthened or simply abandon the gate with a lift and choose a different type.
To strengthen it, apply several layers of plaster to the walls or fix metal corners measuring 50*50 mm, 75*75 mm at the ends of the doorway.
Making a box
The main strength component of the future gate will be the box mounted in the opening, since it will bear the main load.
It can be made from timber or a metal corner. Let's consider the second option. It's more reliable.
The elements are mounted in the form of the letter U: two on the sides and one on top.
We fasten the corners with anchor bolts. It is recommended to recess the lower part at least 2-3 cm into the floor.
Frame assembly, installation of guides
The description for making the frame looks like this:
- The profile pipe is cut with a grinder to the required dimensions in accordance with the drawing.
- The finished parts are laid out on a flat table or any flat plane. The observance of right angles is checked.
- The joints are tacked by welding.
- The length of the diagonals is checked. If no deviations are found, then continuous welding of the joints is performed.
- To increase the rigidity of the frame, gussets can be welded in the corners.
- All seams are cleaned. The structure is coated with an anti-corrosion primer.
- A trial installation in the opening is being carried out. Compliance with the level is checked.
Now you need to start creating another frame that will be under the ceiling:
- Two guides are made for the rollers. The easiest way is to weld them from metal corners.
- They are attached to the support beams with bolts.
- Levers made from channel bars are also attached here to open and close the sash.
- The springs are fixed to the edges of the levers, to supports, and to moving brackets.
All connections are checked for compliance with the vertical and horizontal.
Trim, sash fixation
Work order:
- The finished frame is placed on a horizontal plane.
- Sheets of corrugated sheets are screwed to it using roofing screws with a rubber seal. The fastening pitch is from 15 to 20 cm.
- The handle for opening the blade is fixed with bolts.
- The sash is placed in the opening. The fastening of the spring arms is checked.
- The operation of the gate is checked. If the sash moves smoothly, then it is removed and the levers are secured with bolts.
- Spring tension is adjustable.
With mechanical control, a locking device or lock is installed.
Gate insulation
For thermal insulation, foam or polystyrene boards are best suited. Mineral wool is also acceptable, but it shrinks over time.
Expanded polystyrene should be taken with a thickness of 4 cm, a density of 20 kg / cubic meter. m. First, measurements are taken and suitable pieces of material are cut.
The slabs are attached to the corrugated sheet from the inside of the room using liquid nails. A steel sheet is mounted on top with self-tapping screws and a drill.
Control system installation
To increase operating comfort, an automatic one with an electric drive is added to the manual opening method.
The standard kit includes:
- Control block;
- signal receiver;
- remote control.
A brief procedure for installing the automation:
- The sash is checked for gaps.
- The drive is assembled according to the manufacturer's instructions.
- A guide beam is fixed in the center of the ceiling.
- At the rear of the beam, brackets are attached to dowels.
- The drive is mounted.
- The lever is attached. One part of it is fixed to the sash, the second to the cable.
- Electrical wiring is being laid.
- A test run is in progress.
The hinge on an iron door broke: repair with welding at home
is a Moscow service department that specializes in welding work at home. Our craftsmen will competently and inexpensively weld hinges on the entrance metal door, carry out repairs or other necessary work, visiting the apartment. Welder services are ordered from us because our specialists work:
- Comprehensively. If, during the welding of hinges, defects in the operation of the locks are discovered, our craftsmen will point out these defects to you and replace the door locks on the spot.
- Inexpensive. The prices for all our services are quite loyal and reasonable, which is why Moscow residents turn to us again and recommend us to their friends.
- Professionally. The welder’s departure is carried out as quickly as possible, and he arrives at the customer’s apartment with a set of necessary tools, locks, and materials.
Do you want to weld a new hinge instead of a broken one? Do you need guarantees for work performed? Then contacting our service is the right choice. By entrusting us with the replacement or welding of damaged elements, you will forget about broken hinges on a metal door for a long time!
Tools for work
When all the main parts of the gate are ready, you should decide on the lock and handles. If necessary, you will need to weld brackets to attach the handle from the inside.
- welding machine;
- electrodes for welding steel grades MP-3 or ANO-21;
- hammer, sledgehammer;
- protective clothing and welding mask;
- building level or simple plumb line;
- trowel or spatula;
- several sections of pipe, 1000 mm long, for lintels when concreting pillars;
- concrete solution;
- For installation and welding of hinges, embedded parts are prepared to provide gaps between the gate, hatch and floor.
Having prepared all the materials and tools, we begin to manufacture and install the gate.