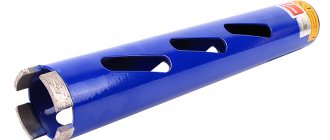
Feather drill for metal, solid or with replaceable cutting plates, is used for drilling deep holes, including stepped and shaped ones, in workpieces made of steel, cast iron, non-ferrous metals and alloys. Feather-type cutting tools are used in industry in the production of metal products for various purposes, and by home craftsmen in the manufacture of handicrafts, construction and repair work. The pen tool has a simple design; it can be used with any equipment that has an appropriate chuck for clamping it (hand and electric drills, desktop, industrial, multi-operational, universal, CNC machines).
When is sharpening required?
While wood drills can be used for a long time and still remain sharp, metal tools become unusable very quickly. Of course, an experienced craftsman can identify a dull drill by eye or by its first contact with the metal surface. If you are a beginner, you can determine the need for sharpening of a tool by the following criteria:
- during the drilling process, creaking and whistling occur;
- the tool heats up much faster than usual;
- the quality of the hole is low - there are jagged and burrs;
- chips come out of only one spiral groove (this sign may also indicate improper sharpening).
Keep in mind that if you use a blunt tip you are putting yourself in danger and it may break. In this case, its flying parts can cause serious injury. In addition, the drill can “bite”. In such a situation, if the drill is powerful or you are working on a machine, the part is torn out of your hands, which often also ends in injury. Therefore, under no circumstances should you delay sharpening or replacing the tip.
Rules for using a feather drill
Following certain rules will help you correctly drill in metal with a cutting tool of a feather design. They are as follows:
- mark the position of the future hole by punching;
- securely fasten the metal workpiece before performing the drilling operation;
- start drilling at minimum speed and only when entering the metal increase the rotation speed (the larger the diameter of the hole, the lower the rotation speed of the tool should be);
- do not press with force on the tool;
- ensure that the drill does not overheat during the drilling process (if necessary, use special sprays or coolant);
- When jammed, in order to avoid breaking the drill of the feather design, use rotation in the opposite direction (reverse) of the tool.
How to properly sharpen a drill at home
For steel the angle is 140 degrees.
120 degrees is the optimal angle for most drills.
Wood drill sharpening angle
Let's get acquainted with drilling wood. For manual drilling of wood materials, a drill and a brace are used, using chucks (clamping) of certain shapes.
Note that a hand-held screw drill is often used when drilling holes with a diameter of up to 5 mm.
When drilling, it is necessary to take into account the hardness of the wood, the placement of cracks, the depth of drilling, the presence of nails and other foreign materials
If the diameter of the hole is large, then it is better to pre-drill the centers with thin drills so that the drill does not change direction, and if the wood is fragile, it is advisable to do countersinking.
If there are through holes, you need to make a certain barrier when the drill exits, for example, from a piece of wood.
Remember! That when drilling, you cannot point the tool towards your side. Carefully examine the condition of the drill and the alignment of the drill in the chuck. Use these rules for your personal safety and efficient handling of materials.
If, during work, particles of sharpened material get into your eyes, consult a doctor immediately.
If you are drilling in wood, then you don’t have to worry about the sharpness of the drill, because the drill lasts a long time without systematic sharpening.
However, when working with metal, the sharpness of the drill plays an important role, since it is possible to drill through metal only with a sharp drill.
Thus, the sharpening angle of a wood drill
will be 140 degrees.
Metal drill sharpening angle
For example, for hard metals, the drill sharpening angle
approximately 120 degrees, for softer metals - 90.
If you have to work with soft bronze, then the angle at the apex will be 120-130 degrees; red copper – 125; aluminum -140; plastics – 90-100; brittle materials – 140.
The sharpening angle cannot be the same for all materials!
Thus, the sharpening angle of the drill is set depending on the characteristics of the material (its ductility and condition are taken into account).
So, the softer the material, the greater the angle of inclination.
However, this principle applies in production.
At home, when the same drill is used for many materials, the angle of inclination depends on the diameter of the drill and varies from 19 to 28° for drills that have a diameter of 0.25-10 mm.
Sharpening feather drills
Depending on the design, the tip drill is sharpened either in 2 or 4 planes, while the sharpening angles specified in the instrument’s passport data are maintained, and the tip of the centering tip (nose) must also be sharpened.
It must be remembered that in this case the tool loses its diameter and sometimes its thickness. Sharpening is carried out on a sharpener, a diamond wheel and using a fine-grained abrasive substance. At the same time, the feather drill should not overheat during the sharpening process, as this leads to a deterioration in its strength properties. To do this, it is necessary to periodically wet it in coolant. The video clearly shows how to make a large diameter hole with a feather drill:
We ask those who have worked with such a cutting tool to share their experience in the comments to the text, and also tell us what equipment and tools were used when performing the drilling operation.
Types of wood drills
Typically, high-quality drills are used by experienced craftsmen who require various types of products in their work to create holes in wood. These could be holes, for example, for tenons, bolts or dowels. Moreover, the drilling process itself can be very diverse in quality, which will lead to thoughts about how to properly sharpen the drill after use and whether it will have to be sharpened at all.
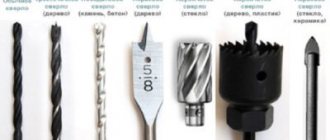
The most common types of drills today include: screw, spiral, feather, center, ring and Forstner drills.
Screw
If you need to drill wood across the grain without once again asking yourself the question of how to properly sharpen a drill for wood, then a screw drill with a fine thread at the end will come in handy. They can reach up to 50 millimeters in diameter. A special screw shape will help remove chips from the work site in a timely manner and thus not overheat the rod. Depending on the required hole depth, you can purchase drills longer than a centimeter, with a minimum size of 400 millimeters.
Screw drills for wood
Spiral
A spiral product can immediately be distinguished by a perfectly polished milled spiral with an edge that prevents any movement of the rod to the side during operation. It is thanks to the spiral shape that they can easily drill holes in veneer structures. The diameter of the corresponding drills reaches 52 millimeters, and the smallest can be found at 3 millimeters. In order to accurately target the intended drilling location, the tail of the product is equipped with a conical shape, which gives a lot of convenience.
If, when purchasing, the choice fell on twist drills, then you should always remember the relationship between the diameter of the product and the maximum number of revolutions that it can produce. Otherwise, the service life of the product will be sharply reduced. If you need to process hard wooden surfaces, it is better to set a maximum of 900 rpm with a drill diameter of 14 millimeters or less. But for soft wood, you can set the drilling tool to 1800 rpm.
Twist drill bit set for wood
Feathers
The most common type of drill is the feather drill. It is this that makes you think about how to sharpen a feather drill for wood, and is most often used in repair and construction work. It is the most convenient and has various options in diameter.
It has only one important drawback: this shape of the drill does not facilitate chip removal and the drilling process becomes significantly more complicated, especially when a hole with a large depth is needed. That is why experts recommend using this type of drill when working with wood boards or thick boards, where the drilling process will occur as efficiently as possible.
A special type of tip for a feather drill or a similar product with an extension can correct the situation. This extension has a hexagonal shape and can be used for other types of drills. In this case, the diameter of the final hole can reach up to 52 millimeters.
Feather drills for wood
Center and ring
But center drills are useful for creating perfectly smooth through holes in a wooden surface. Typically, such products take the form of a 50 mm (minimum 12 mm) rod with a cutting edge at the bottom, reaching a length of up to 150 mm. Of course, it will not be possible to make deep enough holes. For this purpose, ring drills are suitable, which look similar to a crown or a ring with teeth. They are usually sold as a whole set in the form of attachments with a centering drill and a single base.
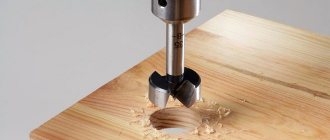
Forstner drills
When it comes to repairing or creating furniture, and not about thoughts with the question of how to sharpen a feather drill for wood, then you can immediately safely go for Forstner drills, which are best suited for this task. They allow you to drill completely blind holes with a perfectly flat bottom. In this case, the diameter of the product reaches from 10 to 50 millimeters. The drill itself is coated with a specialized alloy, which serves as protection and increases service life.
Forstner wood drill bit
Correct sharpening of the drill
Before you start directly sharpening an expensive and high-quality drill, you should try your skills on old, used products. Thus, if the result is negative, the old drill can always be used as a consumable. When your hand is full, you can switch to a new drill without fear.
For the most correct sharpening of a wood drill, its geometric parameters should be observed. This means that it is important to maintain the factory sharpening angle. Sometimes the result can be just like this - perfectly sharpened for a hammer drill. The drill itself can be processed either manually or using an electric sharpener.
Device for sharpening drills at home
Manual sharpening
When sharpening by hand, a mild steel file is used. Moreover, it is worth starting the processing process with a tool with a wide notch pitch, processing both the cutting edge and the back side. After this, you can bring the drill to perfect condition using a file with a fine notch.
Sharpening with an electric sharpener
When sharpening a drill occurs in an “automatic” mode using an electric sharpener, it is very important to have cold water nearby (in a container or running water), since it is necessary to constantly cool the rod. This will keep the product from overheating and damage.
With this option, the drill should be sharpened on the edge of the sharpening disk. Once the required drill geometry has been achieved, it is worth finishing the drill at low speeds.
Homemade drill sharpening machine
If you don’t have a sharpening machine at hand, you can easily make one yourself.
- It is necessary to firmly install the grinder in a comfortable position. A stationary frame with a motor speed of up to 1500 rpm (with a power of 200 W) is also suitable.
- The basis for a homemade machine may well be thick plywood or a wooden beam.
- For more correct sharpening, it is necessary to eliminate any vibration of the engine and create conditions for a smooth transition to different speeds. To achieve this result, you can use an abrasive wheel.
Step-by-step instructions for sharpening a drill
The result of the above actions is a certain scheme of actions:
- Guide the drill to the edge of the grinding machine disk.
- Mandatory adherence to the factory sharpening angle of 95 degrees.
- To improve the quality of sharpening, the drill should be secured in a washer, the rear edges of which should be tucked a couple of millimeters.
- Once sharpening is completed, it is worth continuing work at lower speeds.
- After this, you can cool the sharpened product and test it for functionality.
When sharpening a drill, it is important to understand that a person must have very good eyesight. Therefore, for better results, you need to organize high-quality lighting of the work place. If the rules are strictly followed, a sharpened drill will last a very long time and will always be a “savior” during repair or construction work.
Feather drills for wood
Since we have a roofing portal, we are interested in feather drills designed for working with lumber and other wood materials.
In terms of quality and accuracy of work, these drills are imperfect and have their own advantages and disadvantages. They are used mainly for rough operations.
Feather drills stand out due to their high productivity. Of course, the ease of drilling directly depends on the hardness of the wood and not all tree species are easy to drill. But with lumber widely used in construction, a feather drill can easily cope with drilling. It is often used for drilling large diameter holes when working with laminated wood and can even be used when working with plasterboard and plastic.
Feather drills for wood are single-sided and double-sided. Accordingly, they are designed to work with rotation in one and two directions, respectively. The cutting angle of a single-sided pen cutter is 75-90°, and that of a double-sided pen is 120-135°.
Workmanship
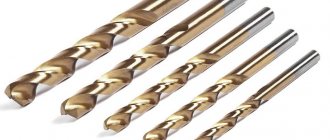
Like any other tool, the quality of the drill and its service life directly depend on the raw material and the method of its processing. Visually, the quality of drill processing can be determined by its color:
- Steel gray shade - The drill part has not been processed (can be painted with colored paint);
- Dark - The drill is treated with live steam to increase the strength of the metal (it can also be painted with colored paint);
- Golden - A special technology for processing the drill part is used;
- Bright golden - The surface of the drill has a layer of titanium nitride, which increases service life and strength characteristics.
Currently, there are a large number of manufacturers of feather drills
In order not to make a mistake in choosing a drill, when purchasing you should pay attention to:
- shape – the drill tip should be symmetrical;
- the cutters on the drill must be perfectly straight;
- absence of chips and irregularities on the drill;
- material and manufacturing processing of the product.
Spade drill for wood: video on how to sharpen
Wood is a material that can be easily processed with various tools. One of their types may be a drill. You have to use a drill quite often when processing material.
The holes that need to be drilled can be of different diameters, as well as blind or through.
- Twisted or single-stranded
- Ballerina
- Crown
- Forstner drill bit for wood
- Feather drill
- What is a drill?
- Features of use
- How to sharpen a feather drill?
For small sizes, a metal tool is usually used, but for larger diameters, a specialized large-diameter wood drill is used.
There are several types:
There are, but are rarely used, drills for cutting conical tenons, cork drills, etc., etc. Let's look at some of them.
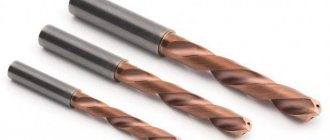
How to sharpen a twist drill correctly
You don’t have to worry about sharpening a wood drill; you can work with such a drill for many months and even years without any sharpening. Unfortunately, the same cannot be said about a metal drill, which must be sharp. That is, you can drill metal only with a sharp, well-sharpened drill.
Loss of drill sharpness is characterized by a sharp creak at the beginning of drilling. A drill that is not sharpened in time generates more heat and thus wears out even faster than a sharp one.
You can sharpen a drill on special machines or using devices. Naturally, if possible, it is preferable to do this on special equipment. But in a home workshop, as a rule, there are no such machines, so you have to use a regular electric sharpening machine with a stone.
Main components of a twist drill.
The type of sharpening depends on the shape that should be given to the back surface of the drill and can be single-plane, two-plane, conical, cylindrical and helical.
The drill is sharpened along the back edges. Both teeth (feathers) of the drill should be sharpened exactly the same. It's not easy to do this manually. It is also not easy to manually maintain the desired shape of the back edge and the desired back angle.
1. Single-plane drill sharpening is characterized by the fact that the back surface of the pen is made in the form of a single plane. The rear angle ranges from 28-30°. The drill is simply attached to the circle, so that the cutting part runs parallel to the circle and sharpening is carried out without rotating or moving the drill.
With such sharpening, the cutting edges of the drill may become chipped during drilling, which is a disadvantage of this sharpening method. This is the easiest method of manual sharpening, which can be used for a thin drill with a diameter of up to 3 mm.
2. Drills with a diameter of more than 3 mm are preferably sharpened conically. It is difficult to perform such sharpening manually without skills, but it is possible. The drill is taken with the left hand by the working part as close as possible to the fence cone, and with the right hand by the tail.
The drill is pressed against the end of the grinding stone by the cutting edge and the back surface, and is slightly rocked with the right hand, creating a conical surface on the back feather edge. During sharpening, the drill does not come off the stone, hand movements are slow and smooth. For the second pen everything is repeated in the same way.
Move the drill with its cutting edge to the grinding wheel.
We swing the drill down and then up again.
When sharpening, you should try to maintain the original shape of the factory surface of the rear part as much as possible in order to maintain the desired rear angles. If sharpening is done correctly, then it is quite sufficient for drills with a diameter of up to 10 mm. For diameters above 10 mm, this sharpening can be improved by sharpening the front surface, as shown in the photo:
Front surface point.
What is the point of a point? By reducing the rake angle and increasing the cutting edge angle, chipping resistance increases, which increases drill life. In addition, the width of the transverse edge becomes smaller. The transverse edge does not drill, but scrapes the metal in the central part of the hole. The second picture clearly shows that here it is shortened, which makes drilling easier.
For drills with a selected small clearance angle, you can further sharpen the flank. In this case, the drill rubs less in the drill hole with its back surface. See photo:
Rear surface undercut.
In production conditions, after sharpening, as a rule, finishing is done, which smoothes the surface, removing small nicks. A drill that has been fine-tuned wears out less than a simply sharpened drill. If possible, fine-tuning should be done.
For finishing, you need to use grinding round stones made of green silicon carbide (grade 63C, grit 5-6, hardness M3-SM1) on a bakelite bond, as well as wheels made of CBN LO (grit 6-8) on a bakelite bond.
Below we present to your attention an excellent selection of training videos by watching which you will definitely be able to sharpen your drills.
Design and classification of feather drills
Structurally, the product consists of a working part in the shape of a feather and a shank, which serves to clamp equipment or tools into a chuck. A pen with a centering tip has 2 or 4 cutting edges located at a certain angle. The design of the pen can be one-piece, i.e. the shank and the pen itself are made of the same grade of metal, or it can be made in the form of a prefabricated structure. In the latter case, plates of a certain shape are attached to a special holder or using a boring bar. For this purpose, a hole is provided in the pen design.
Feather tools are classified according to the following criteria:
- manufacturing method (solid, composite);
- material of manufacture (different grades of high-speed steel);
- designs (one- and two-sided);
- accuracy class (increased, normal);
- type of shank (cylindrical, conical);
- the method of fastening the pen on prefabricated products (holder, boring bar);
- diameter in mm (from 10 to 130);
- length (short, medium, long).
Most often, flat metal drills of a feather design with replaceable cutting plates are used. This makes it possible to attach plates of different sizes to one mandrel. The shank and plates must be produced in standardized sizes in accordance with the requirements of TU 2-035-741-81. Some manufacturers produce spear drills with the possibility of supplying coolant, that is, with special grooves that allow the tool to be cooled during operation.
The material for the manufacture of holders is high-strength steel grades U10, U12, 18ХГГ, 20Х, 25ХГТ, 30ХГ. The plates are made of high-speed steel, which includes molybdenum, tungsten and other wear-resistant elements of grades R9, R18, R9K5, R6M5K and R6M5.
The cutting angle of the drill bits depends on the shape of the drill and the material in which the drilling is performed. For a single-sided tool it can be in the range of 45÷900, for a double-sided tool – 120÷1350.
Dimensions
Depending on the nature of the work, craftsmen purchase individual copies or a complete set of feathers, which usually includes the most popular nozzles of the following diameters: 25 mm, 35 mm, 40 mm, 50 mm and 60 mm. It is these diameters of joinery that will allow you to cope with standard tasks when forming various holes. If you need to cut a groove with a diameter of more than 60 mm, it is better not to purchase feather drills, as they will not be able to cover a large area of the material and the drilling will not be correct.
Operating rules
To ensure that the drill bit does not become deformed during operation and that the work is completed correctly, it is necessary to follow the basic rules for its use. Before starting drilling, craftsmen recommend marking the place where the hole will be formed and using a core to make a small indentation at a given point. Whenever possible, when working with pen-shaped drills, it is better to use a drill with variable speed control. The thing is that in this case the diameter of the pen is directly dependent on the cutting speed: the larger the size of the cutter, the lower the shaft rotation speed should be, and vice versa. If you neglect this rule, you may encounter an unpleasant moment when, at high speed, rapid wear of the cutters will be provoked or the drill will simply break.
If you need to drill deep holes, initially purchase a special extension. Such an auxiliary device, installed on wood drill bits, is equipped with a locking element, which is clamped using a 3 mm hexagon, making the cutter itself and its extension turn into a single piece.
To correctly outline the contour of the groove at the beginning of drilling, set the minimum rotation mode of the drill shaft; for this, it is recommended to use an adjustable power tool. The drill bit must be installed strictly perpendicular to the surface of the workpiece, with moderate pressure applied to it
We draw your attention to the fact that due to the design features of the pen, during the drilling process, sawdust is not thrown upward, as is the case with, so do not forget to periodically stop work and remove chips from the groove
Selection rules
All companies that produce carpentry tools produce feather drills, so to select a quality sample, do not be lazy to familiarize yourself with the following product parameters:
- configuration - must be symmetrical;
- cutting elements must be smooth, which indicates the decent quality of the factory model;
- the absence of any defects on the drills is mandatory, since chips and all kinds of irregularities are more likely to be characteristic of handicraft products.
In addition to the signs listed above, pay attention to the color of the pen drill, because it can tell a lot about the quality of the metal. If in front of you is a steel-colored cutting element with a gray tint, then it was not amenable to additional processing that improves the quality of the drill
Dark metal indicates that the manufacturers strengthened the product with steam, thereby increasing the strength of the nozzle.
If the drill is produced using a special technology that involves removing material by internal pressure, the metal will acquire a golden color. The highest quality factory drills have a bright golden color, which is typical for products coated with a layer of titanium nitride. This coating significantly increases the service life of the tool by enhancing its strength characteristics, which means that with its help you can drill grooves longer, and you will need a mandrel for feather drills much less often.
How to sharpen a tool?
Judging by reviews from owners, sharpening feather cutting tools is not difficult.
To work, you will need a diamond wheel mounted on a sharpening machine. If such equipment is not available, the home craftsman can use the quality rule. The sharpening procedure will be easy and quick if you follow the following sequence:
- Prepare a previously unused cutting attachment. It will be used as a sample.
- During sharpening, you need to periodically check the cutting attachment being processed with the geometric parameters of an unworn new tool.
When aiming the cutting edges of a pen drill, it is recommended to be as careful as possible. The main thing is that after sharpening the central protrusion of the tool is not damaged.
According to numerous reviews from experienced craftsmen, it is not always advisable to sharpen such products. Very worn feather drills with heavily ground cutting parts are considered waste material. Since such a tool is not very expensive, it is better to immediately purchase a new drill than to waste time and “plant” the diamond wheel.
Drills for ceramics and glass
Ceramic tiles or glass are drilled with a crown or a special spear-shaped tool. Its tip is made of either pobedite or tungsten carbide. If a specialized tool for glass or tiles is not available, you can use a concrete drill
It just needs to be sharp, and you need to work with it carefully, since its shape is not entirely suitable for such work.
Spear drill bit for ceramic tiles and diamond-coated bit.
A crown for glass and tile is almost no different from a crown for stone. Only on its cutting edge instead of teeth there is a diamond coating.
A tool called a ballerina is used to drill large holes in tiles. It resembles an ordinary compass. Drilling is done from the underside of the tile. The drill speed is set to minimum.
Main characteristics
When using pen drills for wood, it is advisable to know how they differ from other types of cutting tools and what advantages they have.
Comparison with other types of instruments
Like metal drills, tools designed for woodworking are available in various designs and, accordingly, differ from each other in characteristics and functionality. When choosing such tools, you should have an idea of the advantages and disadvantages they have.
Table 1. Comparison of different types of wood drills
Feather drills, as can be seen from the table presented, have a number of advantages when compared with other types of tools. Meanwhile, a pen-type tool is not recommended for making large-diameter holes (more than 60 mm), since their edges may turn out torn. For such purposes, it is better to use core drills, which are made in the shape of a metal cup with cutting teeth located on its end part.
A pen with a threaded tip is more suitable for working on a machine: it drills faster, but the hole may end up oval-shaped if the part is not secured with clamps
Due to the low cost of feather drills for wood, any home craftsman can purchase a set of them. Having such a set in your home workshop makes it easy and quick to select a tool for drilling holes of different diameters.
Design Features
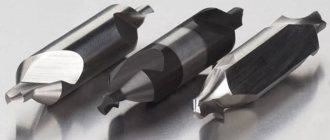
The tip drill has a very simple design, the elements of which are the working and tail parts.
Feather drill design
The working part is a flat blade, in the center of which there is a sharp protrusion used to center the hole being made. On the working part of the pen drills there are two cutting blades located on either side of the central protrusion. Each of these blades starts from the tip of the central protrusion and reaches one of the edges of the working part. The tilt of sharpening the blades of feather drills for wood, if you look at their working part in cross section, is done to the right. When making drills of this type, manufacturers adhere to certain ratios between the thickness and width of the cutting part.
Table 2. The ratio of the thickness and width of the cutting element of the drill
The tail part is made in the shape of a hexagon. This cross-sectional shape allows not only to securely fix the tool in the chucks of drills and screwdrivers, but also to use magnetic adapters and extensions for these purposes.
The simplicity of the design, which distinguishes drills related to pen drills, the absence of spiral grooves, ribbons and other complex elements, are not indicators of the low efficiency of this tool.
Twin-scoring point drills penetrate wood more smoothly and leave fewer burrs along the edges of the holes.
Recommendations for selection
When choosing a pen drill intended for woodworking, you should pay attention to several parameters:
- correctness of shape (wood drill feathers located on the right and left sides of the central protrusion must be symmetrical and identical in their linear dimensions);
- degree of sharpness of the cutting part (sharpening of new pen drills must be carried out in the factory and meet standard requirements);
- absence of visible defects (if the surface of a new drill contains visible defects of various types, this is a clear indicator of the low quality of such a product, most likely produced in artisanal conditions);
- color (by the color of the metal you can determine the types of additional processing to which the finished product has been subjected).
Table 3. Influence of manufacturing technology on the color of the drill bit
How to do it yourself?
If you don't want to buy an extension from a hardware store, you can make a long drill bit yourself. To do this, you first need to take a long nail of a suitable diameter. His hat will need to be carefully riveted. This can be done using a simple hammer. All edges of the nail head are gradually ground down, little by little giving it the pointed shape of a regular drill.
If in the future you have to drill in loose wooden surfaces, it is better to rivet the nail head in the form of a pointed tip. During the process of drilling with a homemade part, the walls of this material are compacted, which is an important condition for easy and quick tightening of screws. You can also lengthen the drill yourself by increasing the length of the shank. To do this, you need to create a small hole in it for the internal thread. Then it is cut with a tap. An external thread is made on a rigid metal rod. The resulting parts are twisted together.
The shank can be extended in another way. To do this, you first need to prepare a strong, thin metal rod. In this case, its diameter should be slightly larger than the diameter of the shank. Its surface must be absolutely smooth, without small scratches or cracks. You will also need turning equipment for the job. The extension begins by slightly reducing the diameter of the shank on a lathe. At the same time, a small depression is made in the metal rod. It will act as a hole for inserting the tool itself. After this, the shank is fixed as tightly and firmly as possible in the rod.
It is recommended to weld and clean the joint. At the final stage, the diameters of the old drill and the new extended shank are equalized. This can also be done using turning equipment. In some cases, the extension is made by welding a new metal rod and drill. But at the same time, the diameters of both components must be the same. At the end, the junction of the parts is welded and cleaned so that there are no unevenness or scratches on the surface.
To learn which drill extension to choose, see the following video.