Drills designed to perform work on such complex materials as concrete are made using carbide plates, which are soldered onto their cutting part. Like any other, such a tool wears out during use, which is when the question arises of how to sharpen a drill for concrete. To restore the geometric parameters of the working part of a concrete drill without damaging the tool itself, you can try several methods of sharpening it, each of which is relevant under certain circumstances.
A pobedite drill with blunt edges takes a long time to drill but overheats quickly
Work process
When drilling (drilling) solid concrete, it is necessary to monitor overheating. Every 10-15 seconds you will need to let this drilling structure cool down. Under no circumstances should you cool it with water or any other liquids. High-quality modern drills can withstand fairly high heat (more than 1000 degrees).
It happens that a hard stone can get caught in concrete. If an impact drill is used, it may not drill through the stone. In such a case, you can take a special chipper or some old similar drilling device for concrete and, using a heavy hammer or sledgehammer, you can try to manually crush such a stone. After this, you can continue with the drilling process.
The hard stone in concrete is crushed by hand using a heavy hammer or sledgehammer.
Drilling into stone and hard concrete is a somewhat labor-intensive process, especially if you plan to use an impact drill. In some difficult cases, for example, when you need to make holes in ceilings or load-bearing walls, you should use a hammer drill in impact drill mode. Especially when making a suspended ceiling and it is necessary to make holes to secure profiles in the concrete floor, you should not try to work with a drill. The apartment owner will only get tired and lose some time.
Sometimes concrete drills are sharpened using a grinder with a diamond blade. If the work is carried out using a hammer drill and there are high-quality drills, they will not require sharpening.
Do not use the impact drill mode when drilling ceramic tiles. Ceramics must be drilled using a concrete drill, but in the mode of an ordinary drill. Do not press too hard, otherwise the tile may crack.
This is interesting: Making a profile bender with your own hands - drawings of a homemade machine
How to properly sharpen an sds plus and sds max drill for concrete for a rotary hammer
A concrete drill is a specially designed drill whose cutting part is made of alloys based on tungsten and titanium. A drill of this design is designed to drill brick, concrete, stone and marble. A properly sharpened sds drill is the key to quick drilling and savings. The drill has two functions simultaneously:
- It acts as a twist drill.
- Breaks material like a chisel.
Most often, concrete drills are a rod with a soldered tip made of carbide material.
Unlike a drill for concrete and stone, the sds plus drill is used when working with a hammer drill. The tool is affected not only by the force in the plane of rotation, but also by the impact force. The drill operates under very harsh conditions.
During operation, any cutting tool becomes dull, including drills and drills. Tools heat up and drilling time increases.
In a hammer drill, the drill also experiences shock load and the question arises of how to sharpen the drill for concrete.
A few tips during the drilling process to extend the life of the concrete drill:
- Constantly monitor the heating of the tool, preventing it from overheating.
- Do not cool a heated drill or drill by sudden immersion in water.
- When drilling ceramic tiles, do not use the hammer drill mode.
Tips for sharpening a drill bit at home
Before you learn how to sharpen a drill or drill for concrete, you need to clarify the main design features of the tool.
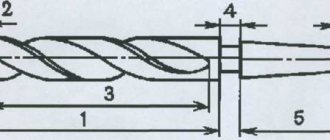
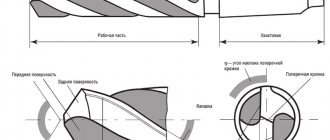
The working edge of the drill is formed by the convergence of the front and rear edges. The angle between the front edge and the axis of the drill is 30°. The angle between the rear edge and the axis of the drill has a value of 60°.
The working edges of the drill should form an angle of 120°.
This is what a sharpened drill looks like
There is an opinion that the sds+ drill for concrete does not require sharpening and is replaced with a new one after complete wear. This version is especially warmly supported by workers in construction tool stores.
But by learning how to sharpen a drill or auger correctly, you will see that the life of the drill can be significantly extended.
Sharpening a drill involves setting the cutting edge of the drill to the desired shape. Both the front and back edges of the drill are sharpened.
When inserting a drill into a material, only the cutting edges of the tool should work, and the back of the drill should not touch the surface being processed.
At any time during the drilling process, the back surface of the drill must have a gap with the surface being machined.
Otherwise, the tool not only drills poorly, but also quickly heats up, becomes dull, and collapses.
Important tips on how to sharpen a metal drill correctly.
Methods for sharpening drills for concrete
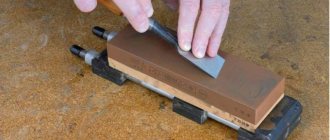
How to sharpen a drill bit for a hammer drill and with what? Pobedit is a very strong alloy and cannot be sharpened with regular sandpaper and a stone. Correctly sharpening a drill or auger for concrete can only be done with diamond or abrasive wheels made of silicon carbide or CBN. We highly recommend buying a diamond wheel for sharpening the tool; it will last a long time and the tool will be sharp.
Work order
The wheel must be installed on the sharpening machine. Sharpening on a sharpening machine is carried out in strict compliance with safety precautions. The thrust bearing is installed with minimal clearance, work is performed without gloves, and the eyes are protected by a special shield or glasses.
Before sharpening, it is necessary to correct the peripheral surface of the wheel using a CBN insert, that is, to level the sharpening surface of the stone.
Before moving on to the answer to the question of how to sharpen a drill bit for concrete at home, let’s take a closer look at the sharpening process.
Drill bit with insert for working on concrete
We will carry out standard sharpening of drill bits for concrete.
Having secured the device, place the drill on it and bring it to the surface of the sharpening stone so that the cutting edge is parallel to the plane of the sharpening stone.
We sharpen both edges, checking their symmetry for clearance and the angle between them at 120°.
Let's move on to sharpening the leading edges
The drill rests on a fixture that provides an angle of 30°. The drill is brought to the stone plane to be sharpened at an angle of 30° and the front edge is sharpened.
Turning the drill 180°, we also sharpen the second front edge.
Now the drill must be brought to the surface of the stone to be sharpened at an angle of 60°. This is achieved by placing the drill on another part of the fixture.
Sharpening the rear edges is done in a similar way. If after sharpening you end up with cutting edges of different sizes, sharpening should be repeated in full.
To fully understand the sharpening process on a sharpening machine, watch the instructional video.
Everything is clear with the sharpening machine. Or you can use a used diamond blade for an angle grinder.
But in order to sharpen a drill on a grinder, the latter must be carefully secured.
To ensure high-quality sharpening of the drill, it is necessary to equip the machine with a thrust bearing, on which the drill should rest when sharpening. A piece of corner, firmly attached to a grinder or table, can serve as a thrust bearing.
If the diamond disc is not placed on the grinder, then it can be easily secured by performing the simple manipulations shown in the video about sharpening the drill. When sharpening, it is necessary to give the back surface of the drill the required shape.
The cutting edges of the drill are sharpened and the back surface is removed. Any point on the back surface of the drill should not touch the material being processed.
Tool selection criteria
To make the right choice of which drills to drill concrete with, you must first determine the volume and type of work to be performed.
To carry out small repair operations in your home, it is enough to use diamond drills with a diameter of 6 - 10 mm. If you need to hang a picture, it is better to take thinner tools with a diameter of 3 mm to 5.5 mm.
The diameter of the drill affects the depth of the mounting hole:
According to GOSTs, all tools are marked, indicating the diameter and length, which helps to choose without error the size of the drill for a concrete screw to make a hole on a specific surface.
For example:
- Drill 6×110 mm. This is the most versatile and indispensable tool when making repairs in your homes;
- Drill 8×600 mm. Such long tools are used to drill deep holes;
- Drills 12×200 mm and 12×460 mm are used when it is necessary to drill holes for fastening furniture and laying electrical cables;
- Drill 24×460 mm. This drill is quite large in size and is often used when installing water supply and heating systems.
These are the main characteristics when choosing a drill. To learn in detail what types of tools there are for drilling and drilling holes in concrete, and how to choose the right ones for a particular case, you should watch the video in this article. Particular attention should be paid to the manufacturer.
Several ways
A drill, penetrating into the material being processed, must come into contact with the workpiece exclusively with its cutting edges. All other points on the flank surface must have clearance with the bottom of the hole (cutting surface). For clearance to exist, the shape of the back surface must be different from the shape of the bottom of the hole.
There are a fairly large number of possible sharpening methods that make it possible to create the desired clearance angles, the gap between the back surface of the drill and the cutting surfaces. Depending on the shape that the back surface will receive, they can be divided into helical, conical and flat sharpening methods.
Using a conical sharpener
When conical sharpening a drill, it is necessary to correctly set the geometric parameters.
Conical sharpening is the most common method. The drill is installed in a prism, which has the ability to swing around an axis that is inclined to the working surface of the grinding wheel. The swing axis and the drill axis are crossed. This means that they will lie in two parallel planes.
The drill, which is fixed in the prism, is brought to the grinding wheel. The rear surface will take the shape of a section of a conical surface. The vertex of the cone will lie at the intersection of the generatrix of the working surface of the circle with the swing axis.
Depending on the geometric sharpening parameters that were specified. When conical sharpening you should adjust:
- The distance between the crossing axis of swing, which is the axis of the sharpening cone, and the axes of the drill (h).
- Distance from the drill axis to the tip of the sharpening cone (H).
- The angle of intersection between the axis of the sharpening cone and the axis of the drill (o).
- Half the sharpening cone angle (b).
Two types of conical sharpening are used:
To obtain other values for the inclination of the transverse edge, change the parameters and settings.
- The tip of the sharpening cone is located higher than the tip of the drill. In this case, the settings will be as follows: a = 45 degrees, b = 13-15 degrees, H = 1.9D, h = (0.05-0.08)D. The angle of intersection of the axis of the drill and the cone in this case is less than the angle φ0 between the axis of the generatrix of the grinding wheel and the drill.
- The tip of the sharpening cone is lower than the tip of the drill. The distance of the tip from the drill is H = 1.16D, half the sharpening cone angle b = 30-35 degrees, the intersection angle of the drill axis and the cone axis is o = 90 degrees, offset h = (0.05-0.08)D. For this type of sharpening 0 > f0.
The specified installation parameters are capable of providing clearance angles for the peripheral point a = 5-7 degrees, a leading angle 2f = 116-118 degrees, and an inclination angle of the cutting transverse edge Ф = 55 degrees.
If there is a need to obtain other values of the rear angles a and f (inclination of the transverse edge), the setting parameters should be measured.
The clearance angle is adjusted by changing the distance h between the crossing axes of the drill and the sharpening cone. The inclination angle of the cutting transverse edge (φ) is by rotating around an axis, the planing angle is a change in the angle o and b. With increasing distance between the axis of the drill and the axis of the sharpening cone (h), a will increase, and angles φ and 2φ will decrease. An increase in o, b and H, on the contrary, reduces 2f, f and a.
The clearance angle, which is measured in cylindrical sections, increases as it approaches the drill axis during conical sharpening.
Cylindrical section of the drill.
The first type of sharpening is capable of creating a sharper increase in the rear angles. Such a change in the rear angles is favorable. This is explained by the work of the drill. In addition to the rotational movement during operation, the drill will move along the axis. Consequently, the trajectory of each of the points is a helix. This line is inclined to the cutting plane, which is determined without taking into account the axial movement of the drills at an angle m. Its value is determined by the formula tg m = So / pD, where So = feed, mm/rev.
The actual clearance angle will decrease by a value of m. The closer the point in question lies to the drill axis, the more the clearance angle, which is measured during operation, will decrease. Consequently, an increase in clearance angles closer to the axis, which can be obtained with conical sharpening, will help increase durability.
Use of screw
When using the screw method, automation of the sharpening process is possible.
Screw sharpening is the method that makes it easiest to automate sharpening. The drill will be given rotation and two translational movements, which are coordinated with it, in relation to the grinding wheel. One of the movements is directed along the generatrix of the circle, the other along the axis of the drills. Oscillating is the movement along the generatrix of the circle parallel to the cutting edge, because it will not create back angles.
The backing movement is along the axis of the drill. During the screw sharpening process, there are 2 sections on the cutting edge: section 0-1, which is located on the diameter of the core. Sanded with a wheel edge. Section 1-2 of the circle's generatrix. In section 0-1, a sharpening of the jumper can be observed. In this section, the plan angle will decrease by the value of the angle v, which is formed by the vector vc. It is equal to the sum of the oscillation vectors v0 and the backing vectors v3 with the direction of the oscillation vector.
In a cylindrical section, the back angle in section 1-2 will be determined by the value of the backing vector: tg a = 2 | v3 | / (wD) or tg a = 2H3 / (nD), where H3 is the backing stroke, w is the angular speed of rotation of the drills.
The oscillation stroke is assumed to be approximately equal to or slightly greater than the core diameter. Relief angles will increase with increasing backing stroke. The clearance angles will not change as the oscillation stroke increases.
Diagram of screw drill angles.
Just as with conical sharpening, with helical sharpening the clearance angles, which are measured in a cylindrical section, increase as they approach the axis of the drill. In this case, the increase in the rear angles occurs to the same extent as their decrease as a result of the peculiarities of the drilling kinematics. Consequently, when setting even small clearance angles on the periphery, it will be possible to obtain clearance angles of the required size close to the drill axis.
When sharpened with a screw, the transverse cutting edge will become less durable as a result of sharpening. This will worsen the operating conditions of drills during drilling of strong and hard materials and cause increased wear of the transverse edge due to increased specific loads.
In the process of drilling materials of relatively low strength (aluminum alloys, cast iron and others), the strength of the tips will be quite sufficient. The drill can easily penetrate the material being processed. This can significantly improve drilling productivity and accuracy.
When working with solid carbide drills, two-plane sharpening can provide high durability when drilling material of relatively low strength and hardness - aluminum alloys, cast iron, non-metallic materials. When drilling hardened and difficult-to-cut steels with two-plane sharpening, increased wear of the cutting transverse edge near the centering point at the tip will be observed.
Choosing a tool base for sharpening
You don't need much to sharpen drills at home. A simple electric sharpener, better known as “emery”, is enough. At the same time, the power of a simple household model is quite enough, and there is no need to be puzzled by the search for some kind of professional device. The optimal size is one that allows you to install grinding wheels with a diameter of 200 to 300 mm.
The grinding wheel itself can be diamond or CBN - the best choice. But, if they are not available, then the more familiar silicon carbide will do. Those who are not well versed in sharpening wheels can be guided by the color of the stone. For victory, gray or greenish is suitable. Red and white are no good.
The winner itself tolerates intense heat well. But the solder, with which it is attached to the body of the drill, and the steel from which this steel is made, do not tolerate overheating during sharpening. Therefore, care should be taken to cool the drill in advance. That is, prepare a small container of water.
Pobedit does not like thermal shocks, like most solid materials. That is, when a heated pobedite drill tip is lowered into water, it can collapse and crack. To prevent this from happening, the drill being sharpened, when it heats up, is first cooled in air for some time and only then dipped into water. The duration of exposure to air depends on the intensity of heating and the size of the drill.
By the way, if you are not confident in the correctness of independently determining the critical temperature point for safe cooling with water, then it is better to do without it altogether - regularly cool only in air. True, this method will delay the sharpening process.
The difference between a drill and a drill is simple: the diverting spiral does not start immediately from the cutting edge, but a little later
General rules for sharpening a circular saw
Discs are sharpened a limited number of times. With each procedure, the size of the tooth decreases. Sooner or later, the tooth is ground down to a critical value, after which the use of the disc becomes impossible.
Schematic illustration of proper tooth sharpening
Marking of the saw blade indicating sharpening angles
For sharpening discs, there are special machines that mechanically control the selected angles for each tooth. Depending on the intensity of use, the sharpening machine can have an automatic or manual drive. At home, as a rule, inexpensive models are used in which the rotation of the disk to the next tooth and control of the thickness of the metal being ground is carried out manually.
In such devices, the disk is fixed perpendicular to the grindstone, and the angle and pitch of the tooth are set. The master passes the sharpened surface over the whetstone a fixed number of times and moves on to the next tooth.
Sharpening discs are made of CBN, silicon carbide or use diamond sputtering. It makes no sense to talk about the fundamental advantage of one material over another. There are only specifics of application. For example, diamond sharpening stones can handle harder teeth but are sensitive to overheating.
You can sharpen it manually using a high-quality file. It is better to leave the disk in the machine. The first tooth is marked with a marker, the disc is fixed using wooden blocks, a clamp or a vice. A fixed number of file passes must be made on each tooth surface. Then rotate the disc by one tooth and repeat the procedure.
How to sharpen a circular saw with your own hands video
Basic Rules
Dull concrete drill bits can be sharpened on a corundum grinding wheel.
Like any cutting tool, concrete drills will gradually become dull and lose their properties. However, at home this happens somewhat slower, and therefore the cutting tool is most often not sharpened at all - the easiest way is to purchase a new one. However, if there is such a need, carbide tips of drills can be sharpened on a corundum grinding wheel in the same way as ordinary devices.
It is imperative to take into account the fact that concrete drills are afraid of heating when sharpening - in this case, the carbide plates fall off and crack. Therefore, the tip will need to be cooled with water from time to time, and then ensure that the drill does not get too hot on the sharpening stone.
If the tip does get hot, it is strictly forbidden to immerse it in water - the plate will immediately burst. This drilling device must be allowed to cool slowly and gradually in the air.
To protect the drill bits from heating up when sharpening, the tip must be cooled with water.
In case of correct sharpening, the cutting edges must be straight, and their intersection must exactly coincide with the axis of rotation of the drill. If the length of the cutting edges is not the same, the short one will be less loaded during operation than the longer one. Consequently, the long one will become dull much faster.
In addition, under the influence of increased loads from the longer edge, the drill may begin to be pushed away from the axis of rotation. As a result, the drill may break. If the sharpening angles of the cutting edges turn out to be different, only the edge that has a larger sharpening angle will work. This can also lead to the risk of breaking the drill during operation and to a one-sided load.
This is interesting: Do-it-yourself manual three-roll rollers: drawings, photos, videos
Measuring the degree of sharpening of a circular saw
In most cases, circular saws with pobedit tips are rarely used, but for significant volumes of material and for a long time. Therefore, it is quite normal that the incisors begin to wear down over time. This product must be sharpened as needed. Determining the degree of sharpening is quite simple:
- When sawing the material, irregularities, nicks, and chips begin to appear, and when cutting wooden objects, a characteristic smell and black marks on the material begin to appear;
- Working on the machine becomes more difficult, since more effort must be applied, resulting in a heavy load on the engine.
Important! Failure to monitor the sharpness of the disc cutters can lead to the fact that the product can no longer be sharpened or repaired. Therefore, it is worth carefully monitoring the condition of the instrument.
It should be noted that, as a rule, these machines are equipped with protective relays. But if there are none, the device may fail faster if sharpening is done incorrectly or at the wrong time.
Types of products
The peculiarity of the drill for concrete is the presence of a special solder, made of an alloy of very high strength, almost as hard as diamond. Such pobedite tools are superior in strength to all other products.
They can be classified as:
- Drill bit. The shank of the structure is made in the shape of a cylinder or polyhedron.
- Drill bit for hammer drill. The shank has the shape of a cylinder with recesses, and its surface is marked SDS MAX or SDS PLUS.
Making a hole in reinforced concrete using a simple drill is not always possible. For this purpose, a hammer drill is used with a hammer drill for concrete, which is called a drill.
To imagine how a drill differs from drills for different materials, it’s worth getting acquainted with what these tools look like:
| Drill type | Peculiarities |
| The tool has a steep spiral of different types, which allows the dust generated during drilling to be quickly removed from the hole. Used for drilling large diameter holes. | |
| The length of the tools ranges from 100 mm to 1 meter, which allows you to make holes of sufficiently deep depth. Debris is removed from the drilled hole faster than with a spiral device. Its advantage is ease of use and no need to sharpen the tool. | |
| Used for passages of small diameters and depths. It is not intended for very strong concrete. After working with such a tool, it takes a lot of time to remove debris from the hole. The advantage of flat drills is high strength and reliability. |
Table 2 - drills:
| Photos of drills for different materials | Peculiarities |
| |
for bronze, duralumin, brass - within the range: 110° - 120°. | |
|
The difference between a pobedit drill and a regular drill
Traditional drills for metal or wood are most often made of tool steel or the so-called high-speed cutter - an alloy steel that can withstand temperatures and high cutting speeds. With materials like brick, tile, stone and concrete, this option is not suitable because:
- abrasive working environment;
- the instrument heats up quickly and intensely;
- Due to the heterogeneity of the material being processed, the working edges experience strong impact loads.
Therefore, drills and drills have a complex design. The main part of the tool, which is responsible for the removal and ejection of drilling products and fastening the tool in a hammer drill or drill, can be made of inexpensive, low-alloy steel. And as a cutting element, a pobedit plate is used - a special alloy of tungsten carbide with a small addition of cobalt and carbon. The plate is attached to a steel shank using copper soldering.
This tip resists abrasion well and can withstand high temperatures. But it is quite fragile and requires attention when sharpening. The service life of a drill or auger is most often determined by the degree of wear of this particular plate.
Drilling performance largely depends on proper sharpening of the tool.
Now about the differences between a drill and a drill. A drill for stone or concrete with a pobedit tip differs little from a drill for wood or stone in appearance, approach, and sharpening. The usual one allows for impact during drilling, but is still more suitable for drilling. Therefore, only one rear edge is sharpened. The drill was created to work with a hammer drill, where impact prevails over rotation. That is, the drill works both as a chisel and as a drill. Therefore, it sharpens from both edges - both the back and the front.
The design of the shank depends on the mounting method in the tool. The design of the spiral that removes crumbs from the cutting zone may also vary. The differences are largely due to the tool production technology and the characteristics of the material to be worked with. Although the configuration of the spiral part is only important when drilling deep holes. In small drills there is a body without a spiral at all or with a spiral made as schematically as possible, even primitively. Although there are modifications and four-way ones, in which the problem of dust removal is radically solved.
Basically, the performance characteristics of a drill or auger depend specifically on the condition of the pobedite soldering, so when sharpening for materials with different characteristics, you should pay attention to this part of the tool. Although the general principle remains unchanged. The harder the material to be drilled, the smaller the angle given to the cutting edge.
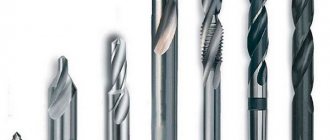
Drills are a very specialized tool - for each material there is one.
Safety precautions when sharpening
In the process of sharpening drills for concrete on sharpening machines, observe the following simple safety rules:
- make a minimum gap between the tool rest and the grinding wheel;
- do not use cotton or other fabric gloves;
- eyes are protected with glasses or a special transparent shield made of durable and dense plexiglass.
When working in a small, cramped room, use special headphones to prevent damage to your hearing.
Sharpening at home
When sharpening drills with your own hands, the user is advised to adhere to safety rules. When working on sanding wheels, safety glasses must be worn. This will protect your eyes from abrasives and pieces of scale. Glasses must be used even if there is a protective screen on the sandpaper.
It is strictly forbidden to carry out work wearing gloves. The drill may get caught in the thread, causing hand injury. It is recommended to carry out work in tight-fitting clothing, the buttons of which are pre-fastened. It is recommended to adjust the support so that the gap between it and the stone is small.
Sharpening drills can be carried out in various ways, which allows a person to choose the most suitable option for himself. To avoid injury, you must adhere to safety precautions during work.
Tooth material and shape
Saw blades are iron disks, the tips of which are cutters welded by high temperature welding. You, these parts of the tool are made of sintered tungsten-cobalt alloy (grades 6, 15, etc.). Hard alloys are also used. Unfortunately, it should be taken into account that the strength depends on the grain size of the carbide phase.
The soldering itself (tooth) has the following planes:
- Front;
- Rear;
- Two side (auxiliary).
In other words, when they intersect, they form two cutting edges:
Do-it-yourself sharpening of circular saws - cost and reliability
A circular saw (the modern name is a circular saw) is a much more effective tool compared to reciprocating, longitudinal and chain saws. The quality of the cut and ease of use are beyond doubt. Using a circular saw, you can perfectly evenly cut a large workpiece, make cuts at different angles and work with a variety of materials.
A circular saw allows you to cut material both along and across the fibers with the same accuracy and quality. Of course, you can get a clean cut only with properly sharpened teeth. Circular saws are divided into three categories:
- All metal
- All-metal with spraying of hard materials in the working area
- Saws with tipped teeth made of hard alloys
The presence of technological grooves on saw blades is very important
Any disc must be sharpened with high quality, and the teeth must be correctly set. Dull teeth impair the quality of the cut, increase the load on the drive and make work unsafe. In addition, disks intended for working with hard materials must have technological grooves. Otherwise, when heated, the sheet may become deformed due to the expansion of the metal. This will lead to dangerous vibrations and poor cutting quality.
Types of Ice Pick Knives
The cutting part is made according to accepted international standards, from steel grades R18, R9, R12, R6M5K5 and hardness from 62 to 72 HRC units.
Special cold hardening gives the knives the desired properties, such as:
- Protection against breakage and deformation;
- Impact resistance;
- Resistance to dampness;
- The ability to periodically sharpen them yourself.
They are divided into several types according to the type of cutting part and are universal in use:
- With two straight edges (requires caution when completing drilling, as “biting” often occurs at the exit);
- With a rounded edge (suitable for wet, sticky ice);
- With a stepped edge (more designed for strong, “dry” ice);
- With serrated edge (for loose and damp ice);
- Triangular in shape with three cutting edges (rarely common type of knives, claimed to be suitable for all types of ice).
Over time, with use, the knives will definitely become dull. Due to the hardness of the ice, sand and small pebbles contained in it. On the spot, while fishing, you can temporarily sharpen them, having with you an ordinary sharpening stone or a needle file. But this must be done thoroughly with a special tool. There are two options: mechanical sharpening on a machine and manually.
Some useful tips when working with a drill
To drill a concrete surface with your own hands without any problems, you should follow the advice of experts. Some of them can be found below:
- Before you start working on concrete, you should stock up on drills for different materials, including metal. This is because concrete drills are only used for drilling holes in concrete, ceramic, stone and other hard materials. But often, when entering concrete, the drill encounters metal reinforcement. This requires the use of a metal drill, which temporarily replaces the concrete tool used to drill through the reinforcement and then put the old one back;
- During operation, it is necessary to constantly monitor the temperature of the tool. Every 15 seconds of continuous drilling, you need to pause to cool the drill, but only naturally, without the use of water or other liquid;
- If, when entering concrete, the drill rests on a hard stone, it is better to use a punch, crush the stone, and then continue working with the same tool;
- If it is necessary to make a hole in the ceiling or load-bearing wall, it is better to replace the impact drill with a hammer drill;
- If drilling ceramics, use a concrete drill, but turn off the impact drill mode to prevent splitting of the tiles;
- A dull drill can be sharpened using a grinder by installing a diamond disc on it. If you purchase high-quality expensive tools for work, they will not need to be sharpened.
Tips on what and how to choose drills, concrete drills, and how to use them are useful for both beginners and experienced craftsmen. Drilling concrete is quite difficult, so it is better to first take into account all the recommendations of specialists and choose the right working tool.
Signs of wear
Saw sharpening is a common activity, as is DIY chain sharpening. You can entrust the device with carbide, pobedit tips to specialists. This is due to the fact that pobedit tips have increased hardness, which makes it impossible to sharpen with a regular file. This will require an expensive diamond grinding tool.
The first thing you need to do is determine the current condition of the saw wheels. Chainsaw blades and chains show certain signs of wear. If you are aware of them, you will easily know that the sharpness of the circular saw has deteriorated significantly.
- The temperature on the motor housing of your circular saw has started to rise significantly.
- To cut a workpiece, you have to put in more physical effort with your hands. A similar phenomenon is typical for dull chainsaws.
- Smoke may occasionally come out of the engine.
- When processing workpieces, an unpleasant burning aroma is formed.
- Dark spots form on the edges of the saw blade. This is soot. It can also appear on the surface of chainsaw chains.
- The wooden workpiece begins to move jerkily around the machine, although during normal sharpening the movements should be smooth.
- There is some extraneous noise when the machine is operating.
- The geometry of the teeth of the saw blades of your circular saw is disrupted.
Varieties
Drilling a concrete layer can be done using:
- impact drill and drill that corresponds to this type of material;
- hammer drill and concrete drill.
A drill and a drill are used in different types of tools, and they also differ from each other in appearance. The drill shank has a cylindrical smooth or multifaceted shape; the drill has grooves on the shank and is marked SDS, SDS+, SDS max. A drill can also be called a drill with an SDS shank for a hammer drill.
The drill is:
- Impact - provides quick cutting and makes geometrically accurate holes. Suitable for drilling in plain, hollow, cellular concrete, building stone and brickwork.
- Pobedite drill bit with strong tips. The material for making the teeth will win.
- Blued with carbide – durable, strong, high-performance. Well suited for deep drilling, creates minimal friction.
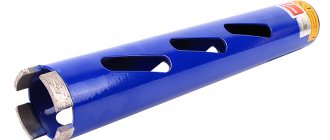
- Diamond – the cutting element is diamond coating, which provides high-quality, fast, easy drilling of fresh, old ordinary, high-strength reinforced concrete and reinforced reinforced concrete.
- Core drill. With its help you can drill holes of large diameters (up to 120 mm). Its shape resembles a hollow crown or tube, which is fixed on a rod (shank).
The latter type comes with diamond coating on the edges or with pobedit teeth. Well suited for drilling recesses for future sockets, switches or other communications.
There are drills:
- auger (breakthrough) - have a light weight structure and allow drilling to more than one meter;
- flat – used when you need to drill a shallow and small hole;
- spiral ones create large depressions.
Drilling holes
The instructions for carrying out the work are quite simple:
- Working tools are carefully selected. With a hammer drill, due to the transverse runout, the hole is slightly larger in diameter; it is better to purchase a drill of a smaller diameter. A diamond bit cuts through concrete with minimal tolerances;
- The surface is marked for drilling holes;
- To clearly position the tool in the center of the hole, it is better to mark the starting point with a concrete punch or bolt;
- The tool is installed in a pre-designated recess and a hole is drilled in the concrete using a hammer drill;
Tip: When working with a rotary hammer or impact drill, a lot of dust is generated. Therefore, when drilling holes, you should use safety glasses, gloves and a respirator.
- Pressing with great force on the handle of the hammer drill, you gradually need to move deeper into the concrete;
- When drilling a sufficiently deep socket with a low-power impact drill, it is necessary to use several techniques, periodically cooling the drill;
- For large holes, you first need to go through the center of the intended hole with a drill of a smaller diameter, and with a more powerful one, expand the cavity to the desired size;
- Upon completion of processing, the cutting edges of the tool are inspected;
- If necessary, the drill is sharpened.
How to determine the wear of a circular saw?
All the qualities of a circular saw are available only with timely sharpening of the teeth. A dull blade spoils the material, increases wear on the saw’s drive mechanisms, and increases the risk of injury during operation. There are signs of dullness, when they appear, it is necessary to urgently sharpen circular saws:
- To advance the workpiece during cutting, a lot of force is required
- Chips and cracks appear on the cut
- The drive motor gets very hot during operation
- There is a smell of burnt material
- Dark marks from overheating are visible on the edge of the cut
In addition, the sharpness of the teeth can be checked tactilely and using a magnifying glass. The rounding radius of the cutting edge should be within 0.1-0.2 mm. When sawing thick workpieces, not only the main working edge is subject to wear, but also the side ones.
Peculiarities
There are a number of criteria that allow you to distinguish a device for concrete from a tool designed for processing other materials.
Work Item Form:
- Wood drills have a sharp tip that penetrates into the structure of the material at the initial stage of processing.
- The tip of a drill for metal alloys is shaped like a cone with a pointed part on it.
- The blunt end of concrete drills is made of pobedite.
Surface shade:
- Metal drills are characterized by a black tint.
- Tools for working with wood are distinguished by an ordinary metallic sheen.
- Concrete drills have a whitish metallic color.
Cutting edge angle:
- For devices for working with metal alloys, this angle does not exceed 140 degrees.
- For products for processing duralumin, bronze and brass, it varies from 110 to 120 degrees.
- For tools for plastic, copper and wood, the angle ranges from 90 to 100 degrees.
With a careful approach to choosing a tool, taking into account all the above-described features, drilling work will be completed without difficulty and in the shortest possible time.