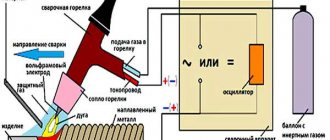
Almost two years have passed since I moved into our Data City. It's time to report on the work done. The first thing I want to talk about is the simplest transmotor. I decided to defeat the myth about the difficulties in winding transformers, both sound and power. The eyes are afraid, but the hands are doing!
It all started with such a simple machine for 7 rubles 20 kopecks, purchased back in the 80s of the last century.
Manufacturing of turns counter
To determine the number of wound turns on the machine, a special counter is needed. In a homemade machine, the device is made like this:
Counter for winding machine - diagram
- An electromagnet is attached to the upper shaft.
- The sealed contact is located on one of the sidewalls.
- The output contacts of the reed switch are connected to the calculator in the place where the “=” button is located.
- The coil with the wire is placed separately - on another shaft with levers that lift the device up and fold it inside the machine.
Thanks to these elements, the equipment becomes compact and does not take up much space.
Let's talk about the article?
Braking
Without braking the feed reel, the winding of the wire on the frames will be loose and high-quality winding will not work. Felt tape “2” slows down drum “1”. Turning the lever “3” tightens the spring “4” - adjusting the braking force. For different wire thicknesses, its own braking is adjusted. Off-the-shelf VCR parts are used here.
Figure 3. Braking mechanism.
Bobbin alignment
The small dimensions of the machine and the location in close proximity of the winding reel and the feed reel with wire required the introduction of an additional mechanism for centering the feed reel.
Figure 4, 5. Centering mechanism.
When winding the coil, the wire from the reel acts on the shutter “5”, made in the form of a “fork” and the stepper motor “3”, through a gearbox with division 6 and a toothed belt, along roller guides “4”, automatically moves the reel in the desired direction. Thus, the wire is always in the center, see Fig. 4, Fig. 5:
Figure 6. Sensors, rear view.
Composition and design of sensors.
19. Optical sensors for the bobbin centering mechanism. 5. A curtain covering the sensors of the reel centering mechanism. 20. Curtains covering the positioner direction switching sensors. 21. Optical sensors for switching the direction of the positioner.
↑ DETAILS:
All dimensions are as in the original.
bed
The machine bed is welded from steel sheets. The base of the frame is chosen to be 15 mm thick, the sidewalls – 6 mm thick. The choice is determined primarily by the stability of the machine (the heavier the better)
Before welding, the sidewalls of the frame are folded together and holes are drilled simultaneously in both sidewalls. After this, the frames are installed on the base and welded to it.
Bronze bushings are inserted into the upper and middle holes of the sidewalls, and bearings into the lower ones. The bearings are taken from an old 5 inch drive. The bearings and bushings on the outside of the sidewalls are secured with covers to prevent movement.
Calculation of product parameters
Before winding a toroidal transformer at home, you will need to calculate its values. To do this you need to know the source data. These include: the output voltage, the outer and inner diameter of the core.
The power of the device is determined by the product of the areas S and Sо, multiplied by the coefficient: P=1.9* S * Sоk.
The cross-sectional area is calculated using the formula: S=h*(Dd)/2, where:
- S - cross-sectional area;
- h - height of the structure;
- D - outer diameter;
- d is the internal diameter.
To calculate the window area, the formula is used: Sok=3.14*d2/4.
The number of turns in the secondary winding is equal to the product W2=U2*50/Sok.
This calculation method can be applied to almost any type of toroidal transformer. But for the calculation of some products there is its own methodology.
Welding device
This type of transformer is characterized by a high output current. The maximum current and voltage are used as input parameters. For example, for a device with a welding current of 200 amperes and a voltage of 50 volts, the calculation is as follows:
1. The power of the transformer is calculated: P = 200 A * 50 V = 1000 W.
2. The window cross-section is calculated: Sok = π * d2/ 4 = 3.14 * 144 / 4 (cm2) ≈ 113 cm².
3. Cross-sectional area: Sc=h * H = 2 cm * 30 cm = 60 cm².
4. Core power: Рс = 2.76 * 113 * 60 (W) ≈ 18712.8 W.
5. Number of turns of the primary winding: W1 = 40 * 220 / 60 = 147 turns.
6. Number of turns for the secondary winding: W2 = 42 * 60 / 60 = 42 turns.
7. The area of the secondary wire is determined based on the highest operating current: Spr = 200 A / (8 A/mm2) ≈ 25 mm².
8. The area of the primary wire is calculated: S1 = 43 A / (8 A/mm2) ≈ 5.4 mm².
This calculation option is applicable not only for welders, but can also be successfully used for other types. As you can see, no difficulties should arise during the calculation.
Current transformer device
It is not difficult to make a current transformer with your own hands, but before making it you will need to perform a calculation. This calculation differs from the generally accepted one due to the design features of the product. It starts with the required value of the secondary current (unit ampere): Iam = Iper / Ivt, where:
• Iper - the value of the primary winding current, multiplied by the number of turns in it;
• Ivt - the number of turns in the secondary winding.
In order to figure out how to correctly perform the calculation, it is easier to consider a practical example of a homemade current device. Let it be necessary to obtain 4 volts at the output of the current device, and limit the current to 5 amperes.
The step-by-step calculation method looks like this:
- Take a ferrite ring, for example 20x12x6 from 2000hM.
- 100 turns of wire are wound. These turns constitute the secondary winding, since the primary is simply one turn of wire passed through ferrite.
- The value of the current in the secondary will be equal to: I/Ktr = 5 / 100 = 0.05 A. where Ktr is the transformation ratio of the transformer (the ratio of the number of primary windings to the secondary).
- The size of the load shunt is calculated according to Ohm's law: R = U/I. It turns out R= 4/0.05 = 80 Ohm.
In this way, calculations can be performed for any required parameters. Regardless of the shape of the current at the input, the voltage at the output of the current device is always bipolar. It is the resistance, not the diode, that is used as the secondary winding shunt. If there is a need for a diode, then a resistor is connected first, and then a diode or diode bridge. In the second case, the resistance is included in the diagonal of the bridge.
Winding machine mechanism
The winding machine is classified into groups:
- private;
- universal;
- toroidal winding.
Each product has an individual design.
A winding machine that performs row laying of wire consists of the following elements:
- The winding mechanism has the form of a welded frame, which is equipped with a motor, a toothed belt drive, a headstock and a tailstock.
- The layout mechanism allows you to move long material along the winding axis. This is a welded structure along which a carriage with guide rollers for the wire moves.
- Device models differ from each other in size and functionality.
The standard model of a device for laying wires with several bends in one turn assumes the presence of the following elements:
Machine components
- The main frame, consisting of wooden or metal posts that occupy a vertical position.
- Between the supports there are two horizontal axes: one for the plates, the other for the coil.
- Replaceable gears that send rotation to the reel.
- The handle that rotates the reel axis. A collet clamp is used to secure it.
- Fasteners: nuts, screws.
Winding of wire onto toroidal cores is carried out using specialized ring-type equipment:
- The device looks like a shuttle, working on the principle of a sewing needle.
- The spool is a mechanism of two intersecting rings with a removable sector on which a toroidal frame is installed.
- The rotation of the spool is set by an electric motor.
Rewinding a transformer with your own hands. Case Study
Now, having understood some points that you need to know, let's start rewinding the transformer. Next, an example of rewinding in a “live story format” will be described, if I were to record all my actions in chronological order for you under a dictaphone :). So, the “Record” button is turned on, the cassette film with a characteristic rustling winds the film from one reel to another. It’s evening, the table lamp is burning on the table, and the smell of rosin is in the air...
A friend asked me to assemble a bipolar power supply to power the Yunost-21 synthesizer. It was necessary to obtain stable +/- 10 volts at the output. I did not find a specific transformer in my amateur radio stocks. It was decided to manufacture it ourselves to the required parameters. The basis for the modification was an armor-type transformer with an Ш-shaped magnetic core, which previously worked in the power supply of a single-channel amplifier. According to preliminary calculations, the total load on the transformer in the amplifier was 3A, which corresponded with a margin for the load of the designed power supply.
Taking into account the overall power of the transformer and the thickness of the wire of the secondary winding, I figured that the primary winding should be wound with wire of a suitable diameter (measurements with a micrometer after winding the secondary winding confirmed this). Measuring the no-load current also confirmed the suitability of the selected transformer (there was no need to rewind the primary)
All that remained was to deal with the secondary winding.
For a bipolar power supply, it is necessary to have two symmetrical windings designed for 1 Ampere load (the transformer for conversion already has them). We connect the transformer to a 220V network and measure the voltage at the taps of the windings. We write down the obtained values on a draft for subsequent calculations. Next, we disassemble the transformer to rewind it.
Unscrew the studs and remove the transformer brackets. Before us is a W-shaped armor-type magnetic circuit. It consists of W-shaped plates and I-shaped plates, which alternate with each other and are rearranged in a certain way.
To facilitate the disassembly process, carefully remove the varnish/paint
Removal of the paint coating (if necessary) is carried out extremely carefully so as not to damage the surface of the plates and not to leave a burr that can short circuit the magnetic circuit plates. If possible, we do without these manipulations.
First, the I-shaped plates must be removed. Carefully pry it up with a knife or a flat thin screwdriver, pry it up and pull them all out. After this, we remove the W-shaped plates from the transformer coil frame one by one.
After the transformer coil has been separated from the magnetic circuit, we proceed to further actions. We are now faced with the task of counting the number of turns in the secondary windings. We do not touch the primary winding.
Based on the measurement results, the two secondary windings have the same voltages and are symmetrical to each other (they mirror the number of turns). If we find out the number of turns of one winding, we will know how many there are in the other. After counting, you won’t have to completely wind up all the turns; we’ll just calculate how much wire needs to be wound in order to get the desired voltage.
Having sat down at the table in a calm atmosphere, we place in front of us a piece of paper, a pen (pencil) and a transformer coil. We begin to unwind the wire and count the turns being wound. After every ten winding turns, we mark a piece of paper with a mark, for example, a vertical line, which will correspond to 10 turns. We will do the same when winding wire onto a reel. This is necessary in order not to get confused and lose count. You can also use a simple calculator, adding the values of the turns.
Some tips:
-Before work, make sure that there are no sharp surfaces of furniture around you on which the winding wire may rub or get caught (do not damage the enamel insulation of the winding wires!);
-Wind the wire onto a separate reel. This way it will be laid evenly without damage, which will allow it to be reused;
-It is also important to carefully wind the wire to avoid the formation of loops and creases in the process - this way we will keep the wire relatively straight and will not damage the enamel coating of the copper wire when bending it
↑ Table of steps
The rows indicate the diameters of the driving pulleys, the columns indicate the diameters of the driven pulleys. In the cells of the table there is a wire winding sword.
| 25 | 30 | 35 | 35 | 45 | 55 | 60 | 70 | 80 | |
| 25 | * | * | * | 0,71 | 0,555 | 0,454 | 0,416 | 0,357 | 0,31 |
| 30 | * | * | * | 0,857 | 0,666 | 0,545 | 0,5 | 0,428 | 0,375 |
| 35 | * | * | * | 1,0 | 0,77 | 0,634 | 0,583 | 0,5 | 0,437 |
| 35 | 1,4 | 1,166 | 1,0 | * | * | * | 0,583 | 0,5 | 0,4375 |
| 45 | 1,8 | 1,5 | 1,28 | * | * | * | 0,75 | 0,642 | 0,56 |
| 55 | 2,2 | 1,833 | 1,57 | * | * | * | 0,91 | 0,78 | 0,6875 |
| 60 | 2,4 | 2,0 | 1,71 | 1,71 | 1,33 | 1,09 | * | * | * |
| 70 | 2,8 | 2,33 | 2,0 | 2,0 | 1,55 | 1,27 | * | * | * |
| 80 | 3,2 | 2,66 | 2,08 | 2,08 | 1,77 | 1,45 | * | * | * |
This table is only indicative, since it depends on the manufacturing accuracy of the pulleys, the diameter of the belt and the thread pitch on the lower (feed) shaft. After manufacturing the entire machine, it is necessary to clarify the resulting relationships using the test winding method and draw up a similar table. Inaccuracy in manufacturing will not affect performance; other diameter ratios will lead to different winding steps. But a large number of combinations will allow you to choose the right step in any case. If you need to wind with a thinner wire, you can make another triple pulley with diameters of, for example, 12, 16 and 20 mm. The presence of such a pulley will further expand the range of wires used (starting from a diameter of 0.15 mm)
Current transformer
In addition to the standard type of voltage transformers, there is a special type called a current transformer. Its main purpose is to change the current value relative to its input. Another name for this type of device is current.
The current device is no different in appearance from a voltage transformer; its differences are in the connection and the number of turns in the winding. The primary is made using one or a pair of turns. These turns are passed through a toroidal magnetic circuit, and it is through them that the current is measured. Current devices are made not only of the toroidal type, but can also be made on other types of cores. The main condition is that the wire being measured makes a full turn.
With this design, the secondary winding is shunted with a low-resistance resistance. In this case, the voltage on this winding should not be large, since during the passage of the highest currents the core will be in saturation mode.
In some cases, measurements are carried out on several conductors that are passed through the torus. Then the magnitude of the current will be proportional to the strength of the sum of the currents.
What power will it have?
Once you can answer each of the questions listed, purchase the required materials. You can easily buy the necessary materials in specialized stores. You will need wires, premium quality tape insulation, and a core.
The transformer itself requires winding. For these purposes, a machine should be created, the manufacture of which is carried out from a board forty centimeters long and ten centimeters wide. Several bars need to be attached to the board using screws.
A thread should be created on one side. By tightening the equipped washer, you will get its handle. The dimensions of the winding machine can be chosen at your own discretion. First of all, the right choice directly depends on the size of the core. With its ring-shaped form, the winding is created manually.
According to the diagram of the transformer device, the device can be equipped with a varied number of turns. The required quantity is calculated based on power. For example, if it is necessary to create a device up to 220 volts, the power should reach at least 150 watts.
The shape of the magnetic wire should be O-shaped. You can make it out of a used TV. In this case, the cross section is determined using a certain formula.
Operating principle of the machine
It is not difficult to work on the designed machine. The technological process requires certain actions:
- The upper shaft is prepared for work: the pulley is removed, the required length of the coil frame is set, and the right and left disks are installed.
- A fastener is inserted into the hole in the upper shaft, centered and the frame is clamped with a special nut.
- The required pulley for the primary winding is mounted on the feed shaft.
- A stacker is installed opposite the reel frame.
- The belt is placed on the pulleys in a ring or figure eight, depending on the type of installation.
- The metal wire is inserted under the additional shaft, placed in the groove, and secured.
- The wire tension is adjusted using clamps located at the top of the stacker.
- The wire should be wound tightly around the base of the coil.
- The numerical value “1+1” is recorded on the calculator.
- Each revolution of the shaft adds a given count.
- If the turns need to be rewinded, press “–1” on the computing device.
- When the wire reaches the opposite part of the frame, use a collet clamp to change the position of the belt.
For different thicknesses of metal wire, the pulley is correlated with the winding pitch.
Winding machine operating method
A winding machine is a popular equipment with which transformer single-layer and multilayer cylindrical coils and all kinds of chokes are wound. The winding device evenly distributes the winding wire with a certain tension level. It can be manual or automatic, and works on the following principle:
How does the winding machine work?
- Rotation of the handle sets the winding of the wire or cable onto the coil frame. It serves as the base of the product and is put on a special shaft.
- The wire moves horizontally thanks to the guide element of the stacker.
- The number of turns is determined by special counters. In homemade designs, this role can be played by a bicycle speedometer or a magnetic reed switch sensor.
The manual device for laying wires is quite primitive, so it is rarely used in production.
A mechanically driven winding machine allows you to perform complex winding:
- private;
- toroidal;
- cross.
Manual winding machine with mechanical revolution counter
It operates using an electric motor that drives the intermediate shaft using a belt drive and three-speed pulleys. The friction clutch plays a big role in this. Thanks to it, the machine operates smoothly, without shocks or wire breaks. A spindle with a fixed frame, on which a coil is placed, starts the counter. The winding machine is adjusted using a screw to any width of the reel frame.
Modern models are equipped with digital equipment. They work through a specially defined program that stores information in a storage device. The value of the length and diameter of the wire allows you to accurately determine the point of intersection of the lines.
Modern winding machines are equipped with special counters
Features of repair of commutator drives
This type of electric machine is more likely to experience mechanical failures.
For example, brushes worn out or commutator contacts clogged. In such situations, repairs come down to cleaning the contact mechanism or replacing graphite brushes. Testing the electrical part comes down to checking the resistance of the armature winding. In this case, the probes of the device are applied to two adjacent contacts (lamellas) of the collector, after taking readings, measurements are taken further in a circle.
The displayed resistance should be approximately the same (taking into account the instrument error). If a serious deviation is observed, then this indicates that there is an interturn short circuit or open circuit, therefore, rewinding is necessary.
Tools
To make a transformer yourself, you should take tools, as well as certain materials:
- Lakotkan.
- A core for which a used TV is quite suitable.
- Thick cardboard paper.
- Boards and bars made of natural wood.
- Steel rod.
- Saw, special glue.
Making a transformer with your own hands, as in the photo, is not at all problematic. If you need to make a transformer designed for halogen light bulbs, then you can also use the tools listed above.
Do not forget that it is very important to adhere to the winding process. If you strictly follow the important rules, the device will serve you for more than a decade.
These materials, as well as tools, will be enough for you to create a high-quality and practical transformer with your own hands.
Based on such a homemade product, you can create a transformer for recharging a machine battery, or create a step-up device for a laboratory power source, a wood burner, or another device that will satisfy the needs of a DIYer.
↑ Shafts
The upper shaft on which the reel frame is attached is made of a rod with a diameter of 12 mm. In this design, all shafts are made from shafts of suitable diameter from used dot matrix printers, they are made of good steel, hardened, chrome-plated or ground.
The middle shaft on which the wire feeder rests is also made of a rod with a diameter of 12 mm. It is advisable to polish the shaft.
The choice of the diameter of the lower shaft - the feeder - was determined by the need to have a thread pitch of 1 mm, and there was only one suitable 10x1.0 holder. It is advisable (for greater reliability) to make this shaft also with a diameter of 12 mm.
Stacker bushing.
Diameter 20 mm, length 20 mm, internal thread is the same as on the lower shaft M12x1.0 (in the original - M10x1.0)
Pulleys
The pulleys are made of triple pulleys, i.e. 3 grooves of different diameters in one block. The diameters are selected to best cover the required range of wire cross-sections.
Machined from steel, the combination of pulleys allows for 54 different wire winding pitches. The width of the groove for the belt is selected based on the existing belts, in this particular case 6 mm. Please note: the total thickness of the pulleys should be no more than 20 mm. If the thickness of the pulleys is greater, it is necessary to increase the length of the left shanks of the lower and upper shaft (the diameter of which is 8 mm, length 50 mm)
If necessary, single pulleys of appropriate diameters can be manufactured. The selected pulley diameters allow the wire to be wound in 54 different pitches.
Toroidal transformers: self-winding, calculations
Winding a transformer with your own hands is not a difficult task if you prepare for it in advance. People who make various radio equipment or power tools have a need for transformers for specific needs.
Since it is not always possible to purchase certain products, craftsmen often wind toroidal transformers themselves.
Those who try to wind the winding for the first time encounter difficulties: they cannot determine the correctness of the calculations or select the appropriate parts and technology. It is necessary to understand that different types are wound differently.
Toroidal devices are also radically different. The calculation of a toroidal transformer and its winding will be special. Since radio amateurs and craftsmen create parts for power equipment, but do not always have sufficient knowledge and experience to manufacture them, this material will help this category of people understand the nuances.