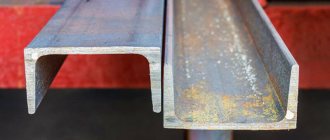
The easiest way to make a frame is to connect the planks at right angles. In this case, the joining area will be equal to the cross section of the plank. If you cut the planks at an angle of 45 degrees, the cut will be noticeably larger and, therefore, the connection will be stronger.
However, it's not just about durability. With this combination of parts, the frame looks more elegant. And yet, as a rule, one adhesive connection is not enough. Even on medium-sized frames, not to mention large ones, the connections should be additionally secured - with nails, insert or through tenons, corners.
The most common frame shape is rectangular. But it can be either hexagonal or octagonal. It is clear that with such a frame the joining seams run at a different angle. However, in any case, this seam should divide the corner of the frame itself in half.
The slightest deviation from the given angle - even by one or two degrees - will lead to the fact that the cut strips will be impossible to fit closely to each other. This means that an accurate and therefore durable connection will no longer be possible.
To make a frame for a picture according to the scheme described on pages 206-209, you need to have a solid set of materials and tools and the qualifications of a cabinetmaker. For our home craftsmen, this material is unlikely to have “applied” value. Wrong requests, wrong opportunities.
Such connections can be seen on any picture frame. The glue seam between the two planks runs exactly at an angle of 45 degrees, that is, it bisects the right corner of the frame.
It's done like this
- Cut the planks according to the markings.
- Treat the cut with a plane, in some cases just clean it with sandpaper.
- For additional strength, drill holes for tenons in the cut areas.
- Cover the sections with glue and secure the joints using clamps until the glue sets.
- Secure the frames on the outside with nails or on the back with corrugated wire or corners.
- If necessary, glue thin ridges on the outside.
What you will need
Materials:
- Frame strips.
- Carnations with a hidden head.
- Wavy wire.
- Picture or window corners.
- Glue.
- Screws.
- Thin pieces of wood or plywood for tenons.
- Wooden rods for tenons.
Tools:
- Saw with a “back”.
- Drill or drilling machine.
- Bow saw.
- Hammer.
- Miter box.
- Plane.
- Marking pins.
- Sandpaper.
- Frame clamping devices.
Corrugated wire and corners
Sawing
First, markings are applied to the planks according to the format of the picture, leaving a margin for corner connections. The next step is to apply 45 degree angles. This marking will indicate the outer sides of the frame.
An ordinary miter box secured to a workbench with a clamp will help you cut the planks at an angle so that the position of the miter box itself and the plank in it is stable. However, an ordinary wooden miter box allows you to saw the workpiece only at an angle of 90 and 45 degrees. To make a frame with a complex contour, you will need a more advanced and expensive device, using which you can cut the workpiece at an angle of 67.5 degrees for a pentagonal frame or 60 degrees for a hexagonal one. The blanks for frames should be sawed with a finishing saw (with a “back”).
Using this device, you can saw wood pieces at different angles.
A regular miter box should also be firmly fixed. A stable position of the miter box and the bar in it is necessary to obtain an even cut.
Mandatory requirements for the bench
In addition to the previous nuances in the process of designing a product, it is worth taking into account a certain list of requirements that it must meet. The following must be taken into account:
- Safety. You should not allow an unreliable design of the product, because this can bring a lot of troubles when using it. To ensure safe use, it is worth choosing only high-quality material, as well as fastening devices and any accessories.
- Convenience. Undoubtedly, such an item in the garden as a garden bench should be comfortable so that nothing interferes with the relaxation process. To do this, you need to approach the project creation stage very competently and carefully and think through all the details in advance.
- Immune to influence of external conditions. To ensure long-term preservation of appearance and service life, it is necessary to select only solid material at the assembly stage of the product. Additionally, it is worth treating it (if made from wood material) with special means that can provide protection to the product.
Cleaning the cut
No matter how thin the saw is, sawing alone will not produce a perfectly smooth cut.
Therefore, each cut is carefully processed. First of all, you need to remove the “fringe” from the back side of the workpiece (such a flaw is inevitable, since the saw works in jerks). It is also necessary to clean the entire cut surface. Only then will the connection be tight.
Using a plane
It is customary to clean surfaces with sandpaper. But in this case, it is better to use a plane and place the workpiece in a device that will “allow” the plane to remove the “extra” without changing the angle of the cut.
Such an auxiliary device can be made from a piece of board or a piece of wood slab, as well as a small block and a piece of plank. The block is hewn on one side, and the plank is sawed off at an angle of 45 degrees, after which it is sequentially (see photo above) screwed to the board with screws.
The plane must be carefully guided along the cut (with the right side of the plane facing the workbench). Only the workpiece should be hemmed, but in no case the auxiliary device, otherwise the cut itself may be damaged.
Using a simple device, you can process a cut better with a plane than with sandpaper.
Options for welding fillet welds
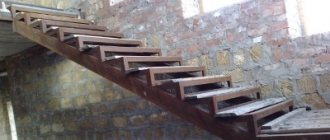
A simple flight of stairs made of rolled metal is, in fact, a single element from which complex transitions with intermediate landings and turns can be made. To work with your own hands, you can try to do one of the three most common options:
- A simple staircase with load-bearing beams - stringers, onto which sheet metal platforms are welded;
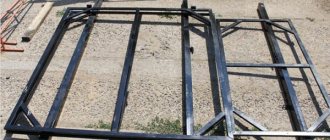
- Staircase with stringers in the form of L-shaped angles. The step is formed by a welded rectangular frame;
- A combined option, when L-shaped steps, welded into one span, are laid on two additional beams.
The first option is the easiest to manufacture; such a staircase can be made even without a drawing; you just need to correctly calculate the cross-section of two beams that will bear the main load.
The cross-section of the beams directly depends on two factors - the angle of inclination and the length of the metal staircase. The steeper the flight of stairs, the smaller the profile section; the longer, the thicker and more massive the supporting beams need to be made.
The calculation must be made according to the second condition. First you need to make a preliminary assessment of the load-bearing capacity of the beam. To do this, we define the load as 400 kg, this corresponds to the weight of two people going down the stairs. Next, knowing the approximate length of the future staircase and the load, using the reference book we select the section of the beam for conditions of concentrated force. Divide it in two and get the moment of resistance, according to which you need to select a profile with the appropriate cross-section.
You can also calculate a metal beam for a staircase using the traditional method. To do this, you need to do a control load - the beam is placed on supports and placed in the central part. Deflection under load should not be more than 3 mm per meter of length.
Gluing
Until the glue sets, the miter joint, as carpenters call it, must be under pressure. To do this, clamping brackets are installed using spacer pliers. You can also use special frame vices, which are sold in various designs. Choose from them the ones that best suit your frame. When using regular staples, first check that the framed pieces form perfectly right angles. It is important here that all diagonal cuts match exactly in length. Note that when using expensive frame vices, time for control measurements is saved.
The frame is assembled. All that remains is to secure the glued joints with clamping clips, which are installed using spacer pliers.
Special frame vices fix the connections with great precision.
Rolled metal for the opening frame
Before looking for a suitable metal staircase project, you will need to correctly assess your capabilities and skills, and find the necessary tools and equipment.
It is not difficult to make a high-quality metal staircase, but before that you will need at least a little preparation:
- Make a sketch of the future staircase, and use an accessible method to calculate the dimensions of the main components - stringer beams and riser crossbars. The remaining parts, as a rule, are not considered; it is easier to tie them in place when assembling a metal staircase;
- According to the diagram, it is necessary to make details and describe how much and what kind of metal profile will be needed to make the stairs;
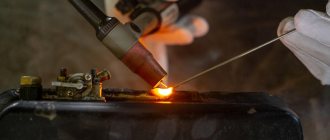
- Test welding equipment in practice, select the required mode, welding current value and polarity in accordance with the thickness of the metal.
For your information! If you are not sure that you will be able to do the welding work yourself, then it is best to invite a professional welder or train for a week with an experienced specialist.
The last item on the list, despite all its obviousness, has always been and remains the most important in preparation. Welding metal is a rather complex technological operation that cannot be learned in an hour or two of inept attempts to make a weld. As soon as you can make at least short centimeter rollers, you can start testing.
The easiest way to check the quality of welding is to beat off the slag and give a dozen maximum blows with a heavy hammer or sledgehammer. If the welding joint remains intact, it means that the welding quality is fine, and you can try welding the simplest parts of a metal staircase.
In addition to welding, you can make a metal staircase in two ways:
- Riveted with steel or brass rivets. The result is a very reliable and durable connection, but in order to make riveted stringers, it will take ten times longer than when using welding;
- Bolted connection is the most accurate and safe. Making a metal staircase using hardware is easier and faster than using riveting; the cost of material and labor intensity are significantly higher than when assembling parts by welding.
Riveting and welding have one serious drawback. By welding, you can assemble a metal staircase from a relatively thin steel profile, while making the structure very rigid and durable. If you make a staircase with rivets, then, despite the thick and powerful rolled metal, the whole structure turns out to be a little “floating”.
In addition to the above, you will need to stock up on a grinder, a set of cutting discs, a marking tool, a building level, welding clamps, an electric drill and a marking tool.
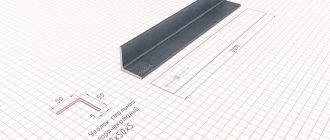
Which profile to use to frame the opening with a frame depends on the size of the opening itself. If we have a small opening, for example, 500 x 500 mm into which a louvre grille will be inserted, a small door ∟ 45 x 45 x 5 or ∟ 50 x 50 x 5 will be enough. In the case of mounting a simple metal gate in the opening, the size of the corner can be will use 63 x 63 x6 or 70 x 70 x 7. In some cases, if these corners are not available, you can use channel No. 8 - 10.
Fastening with nails or corners
Even for small picture frames, it is recommended to additionally secure the corner joints (after the glue has set) with countersunk nails.
The heads are called secret heads because they allow the entire head to enter the tree. Only a small depression remains, which must be filled with putty or carefully steamed with water. It’s done, oh, like this: a drop of water is introduced into the recess, and then heated with a soldering iron or iron. The wood fibers, clamped by the rod and the head of the nail, swell and fill the recess. As a result, the surface is leveled.
Another very common way of additionally securing the corner joints of frames is “flashing” with wavy wire (also called wavy nails). Two or three pieces of such wire are driven across each joining seam on the back side of the frame.
Secure the corners with screws
The corner joints of large heavy glazed frames can be secured with special frame or window metal corners. They come in different sizes, so you can choose suitable corners for any frame format.
The corners are not visible from the outside, but you can make sure that they are not noticeable even from the side. To do this, trace the contours of the corners on the back side of the frame and then use a chisel to remove a layer of wood of the required thickness along the contour. The corners are inserted into the resulting recesses and screwed tightly.
How to choose a place to install a country bench
Before you start making your own bench, you need to be very careful about where to place it. This issue is worth addressing because a bench is not only an object for the convenience of relaxation, but also a place where a sufficiently large amount of time will be spent, and therefore the view and atmosphere must be suitable. In addition, much in its design and installation process will depend on the selected area for installing a garden bench, as well as its type.
Examples of the location of garden benches from the design side.
| A bench for a summer house made of wood combined with forged wood frame. A bench made of logs with a stone base. | It will fit very harmoniously into a garden in which trees with large crowns and various fluffy shrubs grow. |
| Romantic style bench, openwork | A garden of young trees or a vineyard would be a good place to place it. |
| Miniature bench painted white | It would be ideal to be in contrast with a dense hedge of rich green color. Also a good option for such a bench would be a pond, flowering flower beds, or simply in a secluded corner decorated with flowers. |
| Retro bench made of “old” wood | It can create a very mysterious atmosphere together with old trees with curved trunks located nearby, near which flowers of different types are planted. |
| Bench combined with decorative items | A very popular place to place a bench is a veranda or gazebo. In this case, a do-it-yourself garden bench should be made in a similar style with existing decorative items and the veranda or gazebo itself. |
| Combined benches and table | This design will be good on a small spacious plot of land, which can be decorated with floral vegetation, and can also be located next to the house or under a canopy. |
In addition to the options listed, you can install a bench in a place where children usually spend their leisure time, which will allow you to be close to them when they play. It will be especially good to organize a place to rest if there is a lone tree on the site, which has a spreading crown, by installing a bench directly under it.
Hidden Thorns
A rectangular tenon joint looks the neatest because the tenons are completely hidden.
Insert the tenons across the joining seam and as close to the inside of the frame as possible. The holes for the tenons are first drilled on one strip. Then, using marking pins inserted into the finished holes, the locations for drilling in another strip are determined.
There is another way of marking: small nails are driven into the bar, then they are bitten off with pliers. When two planks are tightly joined, the protruding tips will leave the necessary marks on the second workpiece.
Two or three tenons will add extra rigidity to any joint, even large, heavy frames.
Only with an exact match of the holes for the insert tenons can you obtain a perfect rectangular connection from two frame parts.
Design engineer website
- > Home
- > Calculations
- > Load-bearing structures
- > Insulation materials
- > Drawings in dwg format
- > Projects repeat. applications
- > Directory of materials
- > Hardware
- > Buildings and structures
- > RAL, textures, colors
- > Design software
- Metal calculation. designs
Connections with through tenons and ridges
Processing planks to secure corner joints with through tenons or insert ridges requires certain professional training. After all, you need to accurately cut the grooves for inserting tenons or ridges, which is quite difficult for a beginner, but it is thanks to the grooves that the area of the joining areas and, accordingly, the adhesive coating increases noticeably. The result is a connection of increased strength.
Grooves for through tenon
After the planks for the frames are prepared, you need to cut grooves on the oblique cuts approximately one third of the width of the plank (but no more). However, you can also take the thickness of the wooden plate, which will be used as a through tenon, as a guide.
When making a tenon, you should pay attention to the fact that the fibers in it are located transversely. If the direction of the fibers and the seam coincides, then the tenon, after rigid fixation with grooves, can easily break.
The through tenon, in the form of a thin wooden plank or plate, must be long enough to fill the entire length of the grooves.
How to weld a corner at 90 degrees - Machine tools, welding, metalworking
Welding is a process that requires considerable skill and skill. In addition, knowledge of physics and construction is also very important. Truss welding is especially difficult. This is caused by the combined influence of a large number of different factors.
Starting from the fact that for the production of trusses it is most often necessary to use thick metal, which requires significant pre-treatment, and ending with the fact that it is very difficult to simply weld at a specific angle required in a particular case.
But first things first.
The farm is the basis of many buildings
For the construction of large and small industrial premises and buildings, as well as bridges, towers and masts, metal (usually steel) welded trusses are widely used. This is not surprising.
After all, the use of high-quality material in combination with the right approach to design allows trusses to be one of the most durable structures, despite the low metal consumption.
The truss is manufactured by welding disparate steel structures (channels, angles, gussets) into a single whole. This connection occurs according to a pre-approved drawing. Prepared elements are collected on racks and stocks. They are then fastened together with welds to form a truss.
To fix individual products on the rack, additional devices are used: magnetic clamps, clamps, clamps, etc.
With their help, the truss structure acquires the required geometric shape. After assembly and fixation, it is removed from the rack along with magnetic latches and clamps.
The final welding of the seams is carried out outside the rack, which is already used to assemble the next truss.
It is necessary to pay close attention to the process technology. Welding of the truss must be carried out in strict accordance with the approved procedure and according to the drawings. This will avoid unwanted warping, and, consequently, damage to the entire structure and a significant reduction in its overall strength.
Any process consists of several main stages. Welding is no exception.
It can be divided into three main parts, which are necessary for execution: preparation of the material and welding machine, welding itself and, finally, quality testing.
Each stage has its own tasks, the high-quality implementation of which guarantees the reliability of the entire final product.
Preparation of material and apparatus
The process of preparing a product for welding includes several separate moments. These include: cleaning the edges that will be welded from dirt and rust; setting the necessary gaps between the edges; mandatory tack welding of parts being welded, taking into account the geometric dimensions of the product.
The first point must be carried out with maximum diligence if you do not want to end up with a lot of defects in the welds. The result may be a significant loss of reliability and strength of the entire structure. You will also provide yourself with additional work in the form of the need to clean the welding seams from carbon deposits and other things.
Cutting metal edges is a process that is absolutely necessary when welding metal of large thicknesses. It is mandatory for several main reasons. But the main thing that cutting gives is complete penetration of the entire edge along the length of the seam.
This allows you to significantly strengthen the entire structure. Cutting is especially important when welding trusses that will form the basis of load-bearing metal structures.
After all, the main property of trusses is their amazing strength, which allows them to be used in almost all construction processes.
Setting gaps between the edges of the parts to be welded is no less important than cutting them. Correctly adjusted distance between parts of the corner will help make the entire structure of the farm stronger and more reliable.
Welding corners requires joining parts whose thickness is over two millimeters, and sometimes thicker. The use of such metals requires the installation of gaps from half to two millimeters.
Naturally, its size depends not only on the thickness, but also on the overall design of the truss, which should be obtained by connecting all the parts, including the corners.
The next process is probably the most important in the preparatory stage of work. The quality of the product after welding directly depends on it.
So, after you have prepared, cleaned, and set everything up, you can start placing the entire product on tacks.
Correctly performed planting will guarantee that the entire truss will withstand all the loads that will be applied to it, as it will be assembled in accordance with all technical requirements and drawings.
Tack assembly allows you to take into account all the nuances that may arise when connecting parts. After all, this process allows you to clearly identify a possible change in the planned geometric structure and correct it in time.
Further, after the tacks have cooled, you get a structure that is resistant to minor physical impacts. This will allow you to calmly move on to the main stage of welding corners for assembling trusses.
Remember that deformations cannot be avoided, but they can be minimized.
The welding machine is prepared according to the instructions that come with it. Before you start reading it, decide on the material you will use.
It is also worth making sure that the required voltage is available in your electrical network.
Otherwise, welding the corners will end in failure, and the farm will end its existence without taking on its final form.
Connecting corners
To ensure the connection of the two parts that will make up the corner, you need to follow a few simple rules. Most often, the corner is made at an angle of ninety degrees. But anyone who has been involved in creating trusses knows very well that making a perfect angle, and then welding it, is truly not an easy art. Let's try to simplify this task for ourselves.
https://www.youtube.com/watch?v=7C1m6ahAMSk
The first step is to fit a tack on each side of the part, which becomes perpendicular to the part that acts as the base. Otherwise, an elementary blockage will occur in one of the directions, and all the work will go down the drain, and your farm will remain just a good idea. To properly place the potholders, you must do the following:
- Place tacks on the side where the main seam will go;
- We measure the angle and, if necessary, correct it;
- We put the potholders on the other side and proceed to the main process.
A more complex process is connecting steel pipes at a ninety-degree angle.
After all, they are characterized by increased instability due to their shape, as well as high density due to their composition. In this case, the process logic is completely preserved.
The only difference is in the number and placement of tacks. As a rule, their number is four. They are placed opposite each other.
Their final arrangement should be such that if you draw imaginary straight lines between adjacent tacks around the circumference, you should get a square.
Placement order: put it first, check the corner; put the second one diametrically opposite to the first one, check the angle; We place the third one, moving along the circle in any direction by ninety degrees, and check the angle again; We place the fourth diametrically opposite to the third. That's all.
This is how almost all the corners are assembled, which subsequently become the basis for assembling the trusses. Naturally, if the pipe is pulled to the side, it will not be able to perform the tasks assigned to it. The result will be absolute unreliability of the entire structure of the farm. Therefore, carefully monitor the angle that the structure forms.
Magnetic holders - help in work
The modern building materials market provides a wide selection of different devices that can significantly simplify the welder’s work process. One such device is a magnetic holder.
As discussed above, the process of alignment at a certain angle, as well as fixation to ensure high-quality, and most importantly correct welding, can be very labor-intensive. At the same time, it is not always possible to fit everything at once and you have to start over each time.
A magnetic holder will help avoid these inconveniences. With its help, you can significantly increase your productivity and greatly improve the accuracy of your work.
The average time spent on the production of metal structures is reduced by approximately four times.
Corner clamps help to perform preliminary fastening of elements of various metal structures. They will help you accurately set the required angle for welding trusses or corners. In addition, it does not matter at all what parts you fix: flat or round. In any case, success awaits you.
Magnetic angles occupy a special niche. They help, with the help of a large magnetic force, to securely fix parts, both for assembly and for welding work.
Once welding is complete, they are easily detached and can be used for other purposes.
There is also no need to attract more than one worker per design, which significantly reduces labor costs for production. These magnetic devices can be safely used in the process of cutting, cutting, and stripping parts. Magnetic holders significantly reduce the likelihood of falling parts of the structure, and, consequently, there are much fewer injuries at work.
They are of greatest practical value when it is necessary to accurately fix irregularly shaped parts. The stability of the shape they fix makes it possible to safely perform high-quality welding.
Design verification
After the welding seams have cooled, it is necessary to knock off carbon deposits from them and check for cracks, chips, and air bubbles. After all, any deformation of the seam can ultimately lead to disastrous consequences.
https://www.youtube.com/watch?v=W3NxaiwFnHY
It is worth trying to apply some force to break the structure. It should be stable enough so as not to react in any way to your influence: not to bend, not to crunch, not to crumble.
If nothing like this happened, then you have received a truly reliable design that will perform all the tasks assigned to it.
If you need to weld a corner, then you must be well prepared and learn all the techniques.
It is also worth taking a responsible approach to the choice of equipment for welding, as well as the material from which the structure will be made.
Welding a corner is not an easy task at all. Take this task seriously.
If you follow all the rules and welding techniques, you will end up with an excellent quality structure.
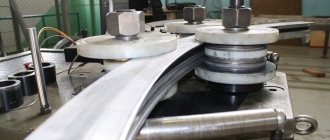
How to bend a metal corner 90 degrees
If you have already started a major renovation with your own hands, regardless of where it is carried out: at home or in an apartment, then you need to be prepared for many tests.
GENERAL PROVISIONS
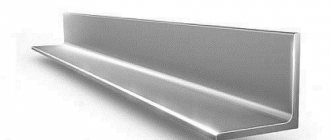
1.1. Single corner trusses are trusses in which all the elements of the chords and lattice are formed from single corners, one flange located in the plane of the truss, and the other from its plane (see appendix).
1.2. In trusses made from single corners, the chords and saddle brace should be designed from steel class C 46/33 with design resistance R
= 2900 kgf/cm2. The remaining truss rods, nodal gussets and linings should be designed from steel class C 38/23.
Note
. In some cases, with truss spans of 18 - 24 m and light loads, it is rational to design all truss elements from steel class C 38/23.
INTRODUCTION
This Guide applies to the design of welded metal trusses from single angles for coatings and floors of industrial and civil buildings, transport overpasses and other similar structures.
Trusses made from single angles, compared to conventional trusses from paired angles, are more corrosion resistant due to the open sections of the elements, which are easily accessible for painting and inspection. The labor intensity of manufacturing these trusses is less than the labor intensity of manufacturing conventional trusses by 30 - 40% due to the fact that they are formed from a smaller number of parts. The mass of trusses from single corners is the same as that of ordinary trusses, or slightly less (5 - 7%).
The Manual contains formulas recommended by TsNIISK for calculating elements of trusses from single angles and provides recommendations for the manufacture and installation of trusses.
The appendix to the Manual provides an example of solving a truss with a span of 24 m from single angles with parallel chords, which provides a general view and sketches of the truss nodes.
The manual was developed by the Department of Strength and New Forms of Metal Structures of the TsNIISK named after. V.A. Kucherenko (Doctor of Technical Sciences, Prof. V.A. Baldin, Candidate of Technical Sciences G.G. Golenko).