Today, welding is the most popular, simple and reliable way to connect metal parts. To do this, you need to have knowledge and practical skills on how to use welding. To understand how to properly weld, you first need to go through the theoretical part, and then begin to develop practical skills. This process is not complicated, but it is necessary to become familiar with many aspects before mastering the practical aspects of this process. We will teach you how to use a welding machine to get a perfectly straight and correct seam, even if you have never encountered one before.
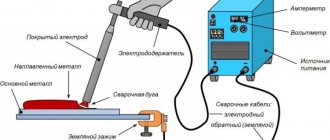
Before learning how to weld, you need to understand the essence of how a welding machine works. It is as follows: a unit connected to an electrical network provides a powerful welding current, under the influence of which an electric arc of high temperature is created between the conductor and the part that needs to be welded. Under this heat, the metal melts and a bath is formed - a melt area. At this moment, the parts are connected to each other and, when they cool, they form a strong and durable monolithic connection.
Due to the fact that do-it-yourself welding work is simply irreplaceable in construction, during repair work and simply in everyday life for repairing any iron parts, you must remember that there are several technologies for working with welding:
- manual arc technology, which is implemented using special conductors - electrodes. These are small pieces of metal coated with a chemical coating that creates an electric arc. The advantage of this type is its simplicity. Even a novice welder will figure out how to learn to work with such a machine. It does not require the use of gas cylinders or special skills. It is enough to practice to get a high-quality and beautiful seam as a result. The disadvantage of the arc type of connection of products is that you can only work with stainless and ferrous metals;
- semi-automatic welding technique, which is performed by a machine using a special gas that protects the metal from oxidation, which occurs as a result of the combination of oxygen with the molten material. Such welding work can be done with your own hands both in industrial and at home conditions.
Experts recommend always starting with a manual unit, and when you learn how to make the correct seams yourself, then you can switch to a semi-automatic machine.
What you need to know and where
In order to learn how to weld on your own, you need to learn how to weld, how to work with welding machines for beginners, how to learn to weld metal and other welding secrets.
It is useful to watch a video where a master class on metal welding is conducted. There you can clearly see how to work with welding for beginners. These welding lessons for beginners will help you quickly understand how to learn to weld. Visual welding lessons will provide an invaluable service in learning how to weld on your own.
A manual on welding for beginners will help you understand how to learn how to weld by welding, namely, how to learn how to weld by welding from scratch.
Another way to learn welding is to work with an experienced welder who can point out possible mistakes and give tips on how to correct them.
Courses for welders
Welding can be mastered in special courses. Welding training is divided into theory and practical classes. You can study face-to-face or remotely. The courses teach welding technology for beginners and other important wisdom. It is important to have the opportunity to learn how to weld in practical classes under the supervision of a teacher. Students are given an idea of the available welding equipment, the choice of electrodes, and safety rules.
You can study according to an individual program or together with a group. Each option has its own advantages. When studying individually, you can only acquire knowledge that can be useful in the future. But when studying in a group, you have the opportunity to hear an analysis of the mistakes of your fellow students and thus acquire additional knowledge.
After completing courses and passing exams confirming acquired knowledge and practical skills, an approved certificate is issued.
Selecting a mask
No matter how welding is performed, it is an unsafe process that can cause significant damage to the health, in particular the vision of the welder. A necessary accessory is a mask that will protect against possible sparks hitting the face, neck and eyes and causing burns.
The mask protects against ultraviolet and infrared radiation. It will also protect against the possibility of hot metal particles getting on the skin and eyes and from harmful gas fumes. A mask is an integral part of a welder’s equipment, regardless of whether he has many years of experience or whether he is taking on such work for the first time.
There is a large selection of masks on sale. However, in addition to the type of this type of protection, it is necessary to choose the right size. The mask should fit tightly on your head and not fall off at the most inopportune serious moment. Otherwise, instead of protection, it will become a thing that poses additional danger.
A mask that is small for a particular person will also not work. Ideally, the mask should fit tightly on your head and not fall off. Therefore, it makes sense to purchase it not online, but during a personal visit to the store.
The welding helmet contains a transparent viewing window through which it is possible to observe the welding process. This window is covered with plastic or tinted glass. The most basic types of masks include welding goggles.
The open look is similar to regular glasses that have special lenses. The closure type has the ability to be fixed with an elastic band. Mineral glass or polycarbonate are used to cover the window. Most models have glass anti-fog protection. The disadvantage is the exposed areas of the face and neck. In order to learn welding, it is recommended to purchase other types of face protection. A good protection option is protective masks.
The advantage of a welding helmet is complete protection of the face, eyes and neck. Preference should be given to those types that are mounted on the head, rather than those that have to be held in the hand.
It must be taken into account that during welding, from time to time it is necessary to inspect the intermediate results of the work or replace a burnt electrode. To do this, you have to free your face from the mask, which is extremely inconvenient. This type of protective mask, such as the “Chameleon”, solves this problem.
This can be considered a breakthrough in the field of welder equipment, and gives him a lot of convenience, being the most convenient option that uses automatic adjustment of glass tinting. A crystal-based filter allows only visible rays to pass through, and blocks ultraviolet and infrared rays. There is thorough neck protection. The mask fits tightly on the head, but without unnecessary tension, thanks to the position regulator. The presence of ventilation prevents the glass from fogging up.
The main important function is performed by the auto-dimming regulator. Thanks to its presence, the welder can not remove the mask from his head or lift it. The mask itself monitors the light level thanks to the presence of polarizing filters. When welding occurs, the glass acquires maximum darkness, and when exposure to bright light ceases, it becomes more transparent. The filter will also react to changes in the brightness of the arc.
Masks of this class are lightweight. The advantages include the possibility of a wide overview. Welding work for beginners is recommended to be done in such universal masks, which will ensure maximum safety.
You should not leave anything unprotected, so in addition to the mask, you should take care of thick clothing, canvas mittens, strong shoes and a durable hat. The ideal option would be to purchase a special suit made for protection during welding.
Electrodes for welding
Welding for beginners involves studying different types of electrodes and the principles of their selection. Electrodes for beginners to master this science, but who do not yet have experience in practical work, all seem the same in appearance, but this is far from the case.
The correct selection of these consumables is a guarantee that welding will be performed competently and efficiently. A tutorial on these problems will help in this matter, but we will try to outline the main selection criteria.
Electrodes make it possible to connect metal products of various shapes, sizes, and grades of material. Their work is based on the initiation of an arc between them and the surface of the part, resulting in the creation of a high temperature, under the influence of which the metal melts and a weld is formed that connects the products being welded.
The electrode is a metal rod with a special coating - coating. The role of the coating is that it provides protection against the penetration of oxygen into the welded zone, which will significantly deteriorate the quality of the seam. The coating ensures faster ignition of the arc, and also guarantees stability and uniformity of its combustion.
There are different sizes of the rod and types of coatings. It is necessary to learn to understand this diversity, and not waste money on electrodes that will be useless for a specific job.
Electrode welding for dummies recommends mastering different types of welding on small pieces of metal and mastering various techniques. If you purchase a large number of different electrodes and train with them, you can master the technique of using them until it becomes automatic. Those samples that produce a beautiful, high-quality seam will be considered successful.
Electrode welding for beginners also involves the practice of joining products of different thicknesses and from different types of metal. It is better to choose electrodes for novice welders no larger than three millimeters. For training, this size is the most optimal. Two-millimeter electrodes are also well suited for metal welding for beginners. The selected electrodes must match the parts being welded.
We must not forget that before starting welding with electrodes, preliminary preparation of the surfaces of the parts to be joined is necessary. It consists of cleaning and freeing them from dirt, dust, traces of paint, and oil stains. The absence of such training will not make it possible to obtain the correct seam and master the basics of welding with electrodes for beginners.
Before you start welding with electrodes, it is necessary to securely fix the products to be joined. Their displacement during the welding process will be an unpleasant surprise for an inexperienced welder. Fixation can be carried out using special equipment, but before spending money on it, it is better to master fixation using tacks.
They are short seams made across the future main seam. They must be made with the same electrodes that will be used for further connection, that is, suitable for the given material. Performing tack work will be part of the electrode training.
In order to learn welding, you need to understand what kind of electrodes there are. There are the following types of most popular coatings:
- basic;
- rutile;
- sour;
- coal
Rutile electrodes are mainly used for manual arc welding. The current can be either constant or alternating.
The name of this type of electrode is explained by the fact that the coating includes the mineral rutile, obtained from titanium oxide. Rutile has a positive effect on obtaining a good weld by protecting the weld pool, which reduces the possibility of the formation of defects such as pores. When purchasing, you should pay attention to the designation, which includes the letter “P”, which means rutile electrodes.
The advantages of using rutile electrodes also include faster and easier removal of the resulting slag. The resulting seam has significant resistance to tears and fractures.
Despite their positive qualities, rutile electrodes also need to be prepared for the welding process by drying them and calcining them. You should work with rutile electrodes when welding low-carbon materials, as well as low-alloy materials. Rutile electrodes can also be used if pipe-shaped parts are to be welded. The most popular types of rutile electrodes include ANO and MR.
Acid-coated electrodes will provide good welding even if the surfaces of the parts are not very well cleaned. These types of electrodes are used for welding products made of low-carbon steels in structures with low requirements.
If you intend to weld with electrodes with a basic coating, then it is recommended to choose the UONI brand. When electrodes of this type melt, carbon dioxide is released, which begins to act as a protection for the weld pool, which guarantees a strong weld.
Carbon electrode rods are infusible. In order for novice welders to practice working with them, they will have to choose parts not only from metal, but also from cast iron and bronze. A pleasant bonus for them will be the absence of carbon electrodes sticking to the surface of these materials. You can also try to remove external defects formed after the welding process with these universal electrodes.
Using electrodes will become much simpler and easier if you insert them into special clamps.
Such a holder will securely fix the electrode using a spring located inside. The choice of electrode diameter is directly dependent on the thickness of the steel. This rule is simple and easy to remember.
What electrodes should be used to weld a 2 mm profile pipe?
When choosing electrodes for electric welding, they are guided by the thickness of the workpieces, which is directly related to their diameter.
The necessary data can be obtained from the tables on the packaging or you can determine the dimensions yourself, taking into account that the diameter of the electrode approximately corresponds to the wall thickness with values not exceeding 4 mm.
Selecting the welding mode and type of electrodes
The current passed through the electrodes is directly related to their diameter; its rating is usually indicated on the packaging. Additionally, its value can be determined from tables or approximately determined by calculations, based on the fact that 1 mm. electrode thickness requires a current of 30 amperes.
There are four main types of electrodes depending on the coating material:
- Sour (A). Characterized by a high content of iron and manganese, the metal electrode passes into the seam in the form of small drops with the formation of a liquid bath; upon hardening, the slag is easily separated. During operation, too high an arc temperature leads to undercuts, the seam is highly susceptible to cracks - this limits the use of this type.
- Cellulose (C). In addition to cellulose, the composition includes ferromanganese ores and talc, which completely burn out when heated, forming a protective gas, while the seam does not have a slag coating. The electrode enters the seam in medium to large drops, forming a rough, uneven structure with numerous splashes.
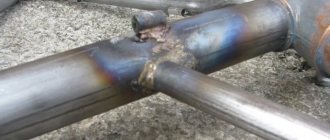
Rice. 10 Appearance of the electric arc apparatus and electrode
Rutile (R). The coating consists mainly of titanium dioxide or ilmenite; the electrode metal passes into the weld pool in medium and small drops with a small amount of spatter and the formation of an even, high-quality seam. The slag coating has a porous structure and is easily separated from the seam.
For electric welding of low-carbon steel alloys from which profile pipes are made, good electrodes of the brands UONI-13/55, MR-3, ANO-4 are most often used; for welding stainless steel, grade OK 63.34 can be used.
Fig. 11 Welding thin-walled pipes
Lighted the arcs
Welding for beginners, first of all, requires the ability to light an arc, and also correctly tear off the electrode from the part after that. The welding tutorial recommends two methods of igniting the arc. The first of them is carried out by touching, and the second by striking.
Touch or scratch the surface of the part to be welded. You can first practice doing this with an electrode not connected to the welding machine. The touch should be light, after which you should quickly move the electrode back. The striking is reminiscent of the well-known making of fire using matches and a matchbox.
If the arc is ignited by touch, then the electrode should be kept as perpendicular to the surface as possible, and raised upward by only a few millimeters. Quick retraction ensures that the electrode does not stick to the surface of the product. If this trouble does happen, then you need to tear off the stuck electrode, sharply tilting it to the side. After this, arc ignition should be continued.
Welding for dummies recommends using the second method to ignite the arc - by striking. To do this, it is enough to use your imagination, imagining that the striking occurs not with an electrode, but with an ordinary match. In hard-to-reach places, this method is inconvenient, but this has nothing to do with novice welders, since they will still learn from simple connections.
You will have to return to igniting the arc more than once after the electrode has completely burned out and needs to be replaced with a new one.
Since the initial part of the seam will be completed, some rules will have to be applied when re-igniting. First, the welding seam must be freed from the slag formed during operation with the previous electrode. The arc should be lit directly behind the crater.
Preparation for welding does not begin with igniting the arc. Next comes the formation of the weld pool. To do this, the electrode will have to be rotated several times around the point from which you plan to start welding the seam.
Welding and its training includes the ability to hold the arc once it is struck. For the training to be successful, the current on the welding machine should be set to 120 Amps. This will not only make it easier to ignite the arc, but will also reduce the likelihood of flame extinction, and will also ensure control of the filling of the weld pool.
You can understand how the bath can be controlled by gradually lowering the current value. In this case, it is necessary to increase the distance between the end of the electrode and the part so that it does not stick to its surface.
A novice welder should be prepared for the fact that as the arc length increases, the metal spatter will also increase. When welding, the length of the electrode used will invariably decrease as it burns out, therefore, to maintain the magnitude of the arc, it should be brought closer to the surface of the product at an appropriate distance.
If the distance becomes insufficient, the metal will not heat up well and the seam will turn out to be too convex, and its edges will remain unfused.
However, this distance cannot be made too large, since in this case peculiar jumps of the arc will occur, which will lead to the formation of an unsightly seam with a shapeless shape.
Welding technology to obtain a satisfactory result requires choosing the correct distance between the electrode and the workpiece. There is a hint - the optimal length of the arc will be its size, which does not exceed the diameter of the electrode, including its coating with coating. On average this is equal to three millimeters.
Peculiarities
Welding stainless steel can be accompanied by certain difficulties. This is due to the composition of this metal. It contains from 12 to 30% chromium, which determines the high corrosion resistance of stainless steel. Due to the content of this component, some difficulties arise when welding:
- Low thermal conductivity. It is two times lower than that of low-carbon alloys. Because of this, the metal melts at lower temperatures, which must be taken into account when welding.
- Increased linear expansion coefficient. Because of this, when exposed to high heat, parts are subject to deformation. If the thickness of the workpieces is large and the distance between them to the joint is small, cracks may appear.
- High electrical resistance and low thermal conductivity negatively affect chromium-nickel electrodes. The rods begin to overheat, which makes the technological process difficult.
- Intergranular corrosion. This process occurs after heating stainless steel over 500 degrees. Along the edges of the grains of the metal structure, layers appear, which consist of iron and chromium carbide.
If the welding mode was chosen incorrectly, this can lead not only to damage to the integrity of the seam, but also to a loss of corrosion resistance of stainless steel. After heating this material above 500 degrees, it undergoes oxidation. To avoid this process, parts must be cooled with water or special oil.
Electrode movement and angle
You can manipulate the electrode by moving it in one of the following ways:
- Progressively . The electrode will move along its own axis. This method is good in that a constant arc length will be ensured, and the selected metal melting rate will also be maintained.
- Straightforward . In this case, the electrode must be moved in the direction of the seam formation line. The advantage is the guarantee of maintaining the required speed of the welding process. The seam will be of high quality.
- Oscillatingly . With a wide seam, you should choose this option for moving the electrode. In this case, edges located at a considerable distance will warm up well.
If multi-pass welding is performed, then the lower root seam can be performed using the first or second method, which will ensure a narrow thread-like seam. But for subsequent passes it is necessary to use oscillatory movements of the electrode. When using this simple method, both the root of the seam and its edges will warm up.
An important role for good formation of a seam is played by the inclination with which electrode welding is carried out.
It can move in a variety of directions - towards the welder and away from the welder, left and right, forward and backward, rising and falling. The main thing is to observe the angle of inclination of the electrode corresponding to the direction of movement. It must be optimal. An angle that is too sharp will not allow the edges to warm up properly; the edges will remain uncooked, which will lead to a decrease in the strength of the structure.
The strength of the product will be given by maintaining the selected angle of inclination of the electrode and the speed of the process throughout the entire process. The exception is pipe welding, in which the angle inevitably changes as it moves around the circle.
It is important not only to start, continue, but also finish the welding process correctly. In the final stage, the end of the electrode is moved before the arc stops burning.
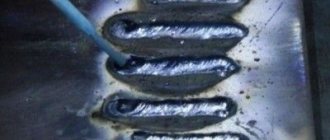
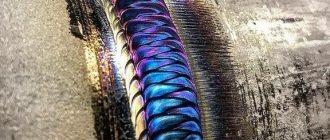
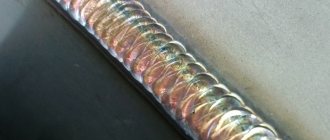
Correctly designed welding seams for beginners will mean that they have already become quite good specialists in this field. It is possible to choose from the whole variety of oscillatory movements, choose the one that you like and succeed the most. To do this, you need to practice on small pieces of metal.
Each of the proposed methods has its own name and involves performing oscillatory movements across the axis of the seam. This method can be used to weld both horizontal and vertical seams.
Beautiful names like herringbone, crescent, loop schematically indicate the movement of the electrodes. Some of them, for example, hinges, are advisable to use for welding thin-walled parts, others also have specific application features. A good option is the crescent motion, which guarantees good heating of the edges.
The amplitude of movements can have different values, depending on the width of the seam. The choice of movement pattern also depends on the location of the connection in space.
Welding training should begin with the lower horizontal seam, as it is the easiest to perform. To begin with, you should choose simple, small-sized parts.
Weld defects
Novice welders often make mistakes when making welds, which lead to defects. Some are critical, some are not.
In any case, it is important to be able to identify the error in order to then correct it. The most common defects among beginners are unequal seam widths and uneven filling.
This happens due to uneven movements of the electrode tip, changes in speed and amplitude of movements. As experience accumulates, these shortcomings become less and less noticeable, and after a while they disappear altogether.
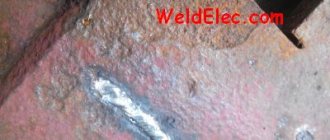
Other errors - when choosing the current strength and arc size - can be determined by the shape of the seam. It is difficult to describe them in words; it is easier to depict them. The photo below shows the main defects in the form - undercuts and uneven filling, and the reasons that caused them are described.
Errors that may occur during welding
Lack of penetration
One of the mistakes that novice welders make: lack of penetration
This defect consists of incomplete filling of the joint of parts. This deficiency must be corrected, as it affects the strength of the connection. Main reasons:
- insufficient welding current;
- high speed;
- insufficient edge preparation (when welding thick metals).
Eliminated by adjusting the current and reducing the arc length. By selecting all the parameters correctly, this phenomenon can be eliminated.
Undercut
This defect is a groove along a seam in the metal. Usually occurs when the arc is too long. The seam becomes wide, the arc temperature is not enough to warm up. The metal around the edges quickly hardens, forming these grooves. It can be “treated” with a shorter arc or by adjusting the current strength upward.
Undercut in corner joint
With an angle or T-joint, an undercut is formed due to the fact that the electrode is more directed towards the vertical plane. Then the metal flows down, a groove is formed again, but for a different reason: too much heating of the vertical part of the seam. Eliminated by reducing the current and/or shortening the arc.
Burn-through
This is a through hole in the weld. Main reasons:
- too high welding current;
- insufficient driving speed;
- There is too much gap between the edges.
This is what a burn through a seam looks like during welding
The correction methods are clear - we try to select the optimal welding mode and speed of the electrode.
Pores and sagging
Pores look like small holes that can be grouped in a chain or scattered across the entire surface of the seam. They are an unacceptable defect, as they significantly reduce the strength of the connection.
Pores appear:
- in case of insufficient protection of the weld pool, excessive amounts of protective gases (poor quality electrodes);
- a draft in the welding zone, which deflects shielding gases and oxygen enters the molten metal;
- in the presence of dirt and rust on the metal;
- insufficient cutting of edges.
Sagging appears when welding with filler wires with incorrectly selected welding modes and parameters. They are numb metal that is not connected to the main part.
Main defects in welds
Cold and hot cracks
Hot cracks appear as the metal cools. Can be directed along or across the seam. Cold ones appear already on a cold seam in cases where the loads for this type of seam are too high. Cold cracks lead to destruction of the welded joint. These defects can only be cured by re-welding. If there are too many imperfections, the seam is cut off and reapplied.
Cold cracks lead to product destruction
Edge preparation
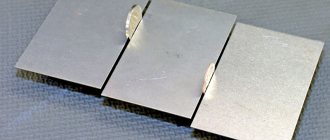
Do-it-yourself metal welding begins with proper preparation of the edges of the products being joined. It is impossible to reliably connect two parts simply by placing one of them next to the other and welding it. In this case, we cannot talk about the reliability of the connection. The edges are shaped after preliminary cleaning.
According to their configuration, the cut edges will look like different letters, so a novice welder will easily remember them. After cutting the edges, begin to securely fix the components to be welded relative to each other. The best way to fix is to use tacks. If the parts are small, they can be inserted into a clamp and secured with clamping bars.
We prepare the equipment
Working with a welding machine requires setting it to a mode corresponding to the upcoming welding. First of all, the device must be turned on and checked for functionality. If malfunctions are detected, working on it is strictly prohibited.
A novice welder should once again study the operating instructions that are included with any device. Then it is advisable to consolidate theoretical knowledge with practice by practicing on small pieces of metal elements. If the work will be carried out using an inverter, then it is necessary to set the polarity on it.
The choice of polarity depends on what current the welding will be carried out - direct or alternating, as well as on the material of the elements being welded.
The choice of the required current value is directly dependent on the diameter of the electrode - the larger the diameter, the greater the current value should be set. You can accurately calculate the current value based on the following relationship: each millimeter of electrode diameter will require a current of the order of ninety to one hundred amperes.
A novice welder must practice and learn how to correctly set the current value on the equipment used.
Required Tools
For welding work you need a set of tools and special protection. This is the welding machine itself, electrodes, hammer and brush. The diameter of the electrodes depends on the material to be worked on.
Don't forget about protection . To protect your eyes, a welding mask is a must, and you should also wear thick clothing, suede gloves, and durable shoes. Devices that convert alternating current into direct current are also useful - this is a rectifier, inverter or transformer.
Welding transformer
Manual arc welding will be provided by a welding transformer. When working with it, an electric current of variable value is used. Manual welding for beginners will present some difficulty due to arc surges. It is possible to control these jumps, but this will still require at least a little experience.
In addition, the resulting power surges can cause household appliances to fail. The loud noise when the welding transformer is operating is unpleasant. The large size will mean that you will need a lot of space to store it, and the significant weight will cause difficulties if you need to move it to another location.
However, if the farm already has this welding unit, then you should not neglect it and master all the necessary basics of welding with it.
Metal welding for beginners on a transformer should proceed according to the following steps:
- Choose a thick enough piece of metal.
- Take one electrode and strike an arc. The scratching method is more suitable. After a spark appears, move the electrode back two to three millimeters from the surface of the element.
- Use circular rotational movements of the electrode to achieve the appearance of a weld pool.
- Holding the electrode at an angle of 45°, begin moving it along a straight line, symbolizing the seam.
You can assume that your hand has already been filled a little and begin connecting the two metal elements. Welding metal for dummies begins with preparatory operations. Using a grinder, remove any dirt and burrs from the parts. Degrease the ends to be welded. This must be done not only directly at the ends themselves, but also on the adjacent surface.
By making tack welds, you can ensure reliable fixation of the elements being welded relative to each other. It is permissible to leave a small gap between the parts. Since the seam is supposed to be small, two tacks will be enough - at the beginning of the seam and at the end.
When making a seam, it is necessary to ensure that a small gap is maintained between the electrode and the parts. You also need to maintain the selected angle of inclination.
If the training has reached the point where a vertical seam is welded, then this must be done with regular detachment of the electrode. The seam will be made pointwise from top to bottom.
The resulting seam should be assessed visually and appropriate conclusions should be drawn about possible errors made. The main ones include:
- inappropriate seam width;
- irregular shape;
- cracks on the surface;
- areas left uncooked;
- presence of foreign particles.
The most common miscalculations also include inappropriate arc length. Beginners make this mistake often. A short arc will produce a rough, uneven weld with a high slag content. With a long arc, the seam will be uneven and the amount of hot splashes will be large. Instability of arc combustion can lead to lack of penetration.
An incorrectly selected too high speed will result in unevenness and a high slag content. When moving slowly, the seam becomes awkward. Too little current will result in incomplete fusion of the parts.
Insufficiently good preparatory operations, in particular poor-quality cleaning of surfaces, are disastrous. Remaining dirt, paint stains and grease will result in incomplete fusion, gaps in the seam and uneven areas. Deformations may occur during further use.
An incorrectly chosen angle when guiding the electrode will have a negative impact. A strong slope will result in unevenness of the seam, and if the position is closer to perpendicular, the bead will turn out to be too high and with a high slag content. Many errors can be attributed not to the shortcomings of a novice welder, but to faulty equipment.
This training on unnecessary pieces of metal should be repeated several times until a satisfactory result is obtained.
How to weld metal correctly
Learning to hold the electrode correctly and move the bath is not enough for a good result. It is necessary to know some of the subtleties of the behavior of the metals being joined. The peculiarity is that the seam “pulls” the parts, which can cause them to warp. As a result, the shape of the product may differ greatly from what was intended.
Electric welding technology: before starting to apply a seam, the parts are connected using tack welds - short seams located at a distance of 80-250 mm from each other
Therefore, before work, parts are secured with clamps, ties and other devices. In addition, tacks are made - short transverse seams laid every few tens of centimeters. They hold the parts together, giving the product its shape. When welding joints, they are applied on both sides: this way the resulting stresses are compensated. Only after these preparatory measures do welding begin.
How to choose a current for welding
It is impossible to learn how to weld using electric welding if you do not know what current to set. It depends on the thickness of the parts being welded and the electrodes used. Their dependence is presented in the table.
But with manual arc welding, everything is interconnected. For example, the voltage in the network has dropped. The inverter simply cannot produce the required current. But even under these conditions you can work: you can move the electrode more slowly, achieving good heating. If this does not help, change the type of movement of the electrode - passing over one place several times. Another way is to use a thinner electrode. By combining all these methods you can achieve a good weld even in such conditions.
Now you know how to weld properly. All that remains is to practice the skills. Choose a welding machine, buy electrodes and a welding helmet and start practicing.
To reinforce the information, watch the video lesson on welding.
Welding with inverter
The best welding machine for beginners is an inverter. Working with a welding machine of this level is not difficult and, so to speak, even enjoyable. Such a welding device has many advantages over the now outdated transformer.
When purchasing an inverter, you should first of all pay attention to such characteristics as power. The basics of welding work for beginners recommend choosing a device of such power that will be sufficient for the upcoming work, so as not to overpay.
To carry this unit, there is an adjustable shoulder strap or a handle. The device itself is installed on supporting legs. Cooling is carried out by a fan. This is also facilitated by ventilation holes in the metal body of the device. Overheating of the power unit is detected by a special regulator.
The inverter is controlled by the power button. When connected to the network, the power indicator lights up. There is a special connector for connecting the holder with the electrode installed in it. Welding parts using an inverter is only permissible with direct current. You can change the welding parameters by changing the polarity on the unit. The current on the inverter is selected depending on the thickness of the parts.
It is best to practice working with an inverter on small, massive parts. It is convenient to carry out the connection when the parts are on the workbench. If training is carried out on only one piece of metal, then a line should be drawn on it with chalk along which the electrode will move. It is recommended to start cooking by setting the current to the minimum value and choosing reverse polarity. In this case, the electrode must be moved at an angle forward.
The optimal current can be determined by taking a metal workpiece and setting a high current value on the device. If metal burns through, the current should be reduced to achieve its optimal value.
Welding technique
The DIY welding process requires preliminary setup of the machine. To do this, the welder needs to perform a number of actions:
- When using non-consumable tungsten electrodes, they must be prepared in advance. The working rod must be sharpened using a needle file.
- After sharpening the electrode, it must be installed on the burner. A collet clamp is used for this.
- Open the valve on the argon cylinder. Using the reducer, set the operating gas flow rate. The optimal rate is 13 l/min.
- Fix the mass on the workpiece or metal work table.
- Turn on the oscillator. Bring the burner to the metal surface.
- After pressing the power button, a spark will appear. Open the gas supply to the burner.
The distance between the end of the electrode and the working surface must be at least 3 mm. You can guide the pointed part in different ways. If you increase the distance between the tungsten tip and the metal, the seam will become wide and the welding depth will decrease. When connecting thin workpieces, you need to move the torch from right to left. To make a root seam, you need to guide the electrode evenly. Corner joints are connected at an angle of 45 degrees.
TIG welding is used to join metals and metal-based alloys. The shielding gas used during the work prevents an oxide film from appearing. It is important to set up the equipment correctly, sharpen the non-consumable electrode before work, and keep the arc at the same distance from the workpiece.
Welder safety
The basics of welding for beginners include ensuring the safety of the person about to begin this art form. First of all, this applies to his equipment. It should protect the welder’s skin and eyes from hot splashes. Too much brightness from the arc flame will be detrimental to vision.
To protect himself, the welder must wear a special work suit called a robe. It is made of fire-resistant material, so even if fiery splashes hit it, it will not burn through. If you don’t have such a suit or don’t want to spend money on it for working at home, you can simply get by with thick clothing that covers all areas of the skin.
The welder must wear canvas gloves on his hands. You should not be afraid that it will be uncomfortable to work in them - what is more important is the protection of your hands, which are in the most dangerous zone when welding.
An integral attribute of the equipment is a protective mask. You won’t be able to make it yourself, so you’ll have to choose from a wide range of masks available for sale. The advice, all about welding for beginners, suggests that Chameleon masks with an automatic darkening function will bring the greatest ease of use.
Sparks and splashes can also land on your feet, so when welding you must wear sturdy shoes with thick soles. Safety measures also include removing from the work site all materials that could ignite when exposed to hot metal splashes. A bucket of water should be installed near the work site, which can quickly extinguish a possible fire. It is mandatory to have a fire extinguisher nearby. The lighting of the work area must be sufficient.
The ideal option for an inexperienced welder would be to have another person nearby who can quickly react to a dangerous situation. Sparks from welding can fall into cracks on the floor and smolder there for a long time, so after completing the welding process a thorough inspection of the room is necessary.
If welding is carried out using gas, safety precautions must be observed especially carefully. The gas cylinder should be checked for leakage. The cylinder must be moved carefully to prevent it from falling over without permission.
A faulty welding machine can also cause a fire. Care should be taken when using equipment that is approaching the end of its useful life. Smoking is strictly prohibited near the welding site. You must also ensure that there are no pets nearby.