Unified inch threads of the UN standard (UNC, UNF and UNEF) are widespread in America and Canada, where the inch measurement system is used. Here this standard is the main one for bolts, screws, nuts and many other fasteners used in mechanical engineering. Their production is regulated and controlled by ASME and ANSI organizations.
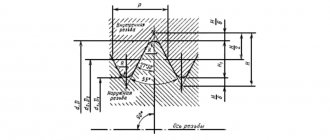
American thread has the same profile with an apex angle of
60°
as the metric ISO standard, but its main parameters are expressed not in millimeters, but in inches. Depending on the frequency of turns, it can also be large (main) UNC, small UNF and superfine UNEF. The number of turns per inch is called pitch TPI, while in the metric the pitch refers to the distance between adjacent vertices of the helix P (mm). These parameters are related by the ratio: P = 1″/ TPI (remember that 1″ = 25.4 mm).
Legend
The thread designation indicates its outer diameter - D
, followed by a pitch -
TPI
(threads per inch) and its type -
UNC
or
UNF
.
For diameters less than 1/4″,
the size is indicated by an integer from
0 to 12
, which appears after the
#
or
No
. Each number corresponds to a specific external D, the exact value of which can be found in the reference table. For all other diameters above 1/4″ this value is expressed in inches.
American thread with coarse pitch - UNC
| Thread size | Threads per inch | D - outer diameter | Dp - average diameter | Di - internal diameter | Thread pitch, mm | |
| inches | mm | millimeters | ||||
| #1 | 1,85 | 64 | 1,85 | 1,6 | 1,42 | 0,40 |
| #2 | 2,18 | 56 | 2,18 | 1,89 | 1,69 | 0,45 |
| #3 | 2,51 | 48 | 2,51 | 2,17 | 1,94 | 0,53 |
| #4 | 2,84 | 40 | 2,84 | 2,43 | 2,16 | 0,64 |
| #5 | 3,17 | 40 | 3,18 | 2,76 | 2,49 | 0,64 |
| #6 | 3,50 | 32 | 3,51 | 2,99 | 2,65 | 0,79 |
| #8 | 4,16 | 32 | 4,17 | 3,65 | 3,31 | 0,79 |
| #10 | 4,83 | 24 | 4,83 | 4,14 | 3,68 | 1,06 |
| #12 | 5,49 | 24 | 5,49 | 4,8 | 4,34 | 1,06 |
| 1/4 | 6,35 | 20 | 6,35 | 5,52 | 4,98 | 1,27 |
| 5/16 | 7,94 | 18 | 7,94 | 7,02 | 6,41 | 1,41 |
| 3/8 | 9,53 | 16 | 9,53 | 8,49 | 7,81 | 1,59 |
| 7/16 | 11,1 | 14 | 11,11 | 9,93 | 9,15 | 1,81 |
| 1/2 | 12,7 | 13 | 12,70 | 11,43 | 10,58 | 1,95 |
| 9/16 | 14,3 | 12 | 14,29 | 12,91 | 12,00 | 2,12 |
| 5/8 | 15,9 | 11 | 15,88 | 14,38 | 13,38 | 2,31 |
| 3/4 | 19,1 | 10 | 19,05 | 17,40 | 16,30 | 2,54 |
| 7/8 | 22,2 | 9 | 22,23 | 20,39 | 19,17 | 2,82 |
| 1 | 25,4 | 8 | 25,40 | 23,34 | 21,96 | 3,18 |
| 1 1/8 | 28,6 | 7 | 28,58 | 26,22 | 24,65 | 3,63 |
| 1 1/4 | 31,8 | 7 | 31,75 | 29,39 | 27,82 | 3,63 |
| 1 3/8 | 34,9 | 6 | 36,93 | 32,17 | 30,34 | 4,23 |
| 1 1/2 | 38,1 | 5 | 38,10 | 35,35 | 33,52 | 4,23 |
| 1 3/4 | 44,4 | 5 | 44,45 | 41,15 | 38,95 | 5,08 |
| 2 | 50,8 | 4 1/2 | 50,80 | 47,13 | 44,69 | 5,64 |
| 2 1/4 | 57,1 | 4 1/2 | 57,15 | 53,48 | 51,04 | 5,64 |
| 2 1/2 | 63,5 | 4 | 63,50 | 59,38 | 56,63 | 6,35 |
| 2 3/4 | 69,9 | 4 | 69,85 | 65,73 | 62,98 | 6,35 |
| 3 | 76,2 | 4 | 76,20 | 72,08 | 69,33 | 6,35 |
| 3 1/4 | 82,5 | 4 | 82,55 | 78,43 | 75,68 | 6,35 |
| 3 1/2 | 88,9 | 4 | 88,9 | 84,78 | 75,68 | 6,35 |
| 3 3/4 | 95,2 | 4 | 95,25 | 91,13 | 88,38 | 6,35 |
| 4 | 101,6 | 4 | 101,60 | 97,48 | 94,73 | 6,35 |
How to determine the weight of a pipe
There are several ways to find out the mass of a pipe. The easiest and fastest method is to use a directory or get information on a thematic website. The profile tables indicate the calculated weight of 1 linear meter. for various sizes.
There are sites on the Internet where you can calculate the weight of a pipe using an online calculator. To do this, you need to know the wall thickness, internal or external diameter. Another option is to calculate the weight using the formula. This formula is prescribed in document GOST No. 8732. It is suitable for calculating the mass of pipes of any type. Therefore, the data obtained from such calculations will only be approximate. But in most cases there is no need to obtain the most accurate mass. In addition, the indicators obtained as a result of calculations using the formula are within the permissible error. Therefore, you can operate with such values.
American fine pitch thread - UNF
| Thread size | Threads per inch | D - outer diameter | Dp - average diameter | Di - internal diameter | Thread pitch | |
| inches | mm | millimeters | ||||
| #0 | 1,52 | 80 | 1,52 | 1,32 | 1,18 | 0,32 |
| #1 | 1,85 | 72 | 1,85 | 1,63 | 1,47 | 0,35 |
| #2 | 2,18 | 64 | 2,18 | 1,93 | 1,76 | 0,40 |
| #3 | 2,51 | 56 | 2,51 | 2,22 | 2,02 | 0,45 |
| #4 | 2,84 | 48 | 2,84 | 2,50 | 2,27 | 0,53 |
| #5 | 3,17 | 44 | 3,18 | 2,80 | 2,55 | 0,58 |
| #6 | 3,51 | 40 | 3,51 | 3,09 | 2,82 | 0,63 |
| #8 | 4,17 | 36 | 4,17 | 3,71 | 3,4 | 0,71 |
| #10 | 4,83 | 32 | 4,83 | 4,31 | 3,88 | 0,79 |
| #12 | 5,49 | 28 | 5,49 | 4,90 | 4,40 | 0,91 |
| 1/4 | 6,35 | 28 | 6,35 | 5,76 | 5,37 | 0,91 |
| 5/16 | 7,94 | 24 | 7,94 | 7,25 | 6,79 | 1,06 |
| 3/8 | 9,53 | 24 | 9,53 | 8,84 | 8,38 | 1,06 |
| 7/16 | 11,1 | 20 | 11,11 | 10,29 | 9,74 | 1,27 |
| 1/2 | 12,7 | 20 | 12,70 | 11,87 | 11,33 | 1,27 |
| 9/16 | 14,3 | 18 | 14,29 | 13,37 | 12,76 | 1,41 |
| 5/8 | 15,9 | 18 | 15,88 | 14,96 | 14,35 | 1,41 |
| 3/4 | 19,1 | 16 | 19,05 | 18,02 | 17,33 | 1,59 |
| 7/8 | 22,2 | 14 | 22,23 | 21,05 | 20,26 | 1,81 |
| 1 | 25,4 | 12 | 25,40 | 24,03 | 23,11 | 2,12 |
| 1 1/8 | 28,6 | 12 | 28,58 | 27,20 | 26,28 | 2,12 |
| 1 1/4 | 31,8 | 12 | 31,75 | 30,38 | 29,46 | 2,12 |
| 1 3/8 | 34,9 | 12 | 34,93 | 33,55 | 32,63 | 2,12 |
| 1 1/2 | 38,1 | 12 | 38,10 | 36,73 | 35,81 | 2,12 |
Metric tapered thread. GOST 25229 - 82
Parameter unit: mm
Produced on surfaces with a taper of 1:16
Used when connecting pipelines. The angle at the top of the turn is 60°. The main plane is shifted relative to the end ( see figure above
).
Symbol
The letters MK are followed by an indication of the diameter in the main plane and the thread pitch in mm: MK 30x2
size table
| Thread diameter d for row | Step P | Thread diameter in the main plane | ||||||
| 1 | 2 | d = D | d2=D2 | d1=D1 | l | l1 | l2 | |
| 6 | — | 1 | 6,000 | 5,350 | 4,917 | 8 | 2,5 | 3 |
| 8 | — | 8,000 | 7,350 | 6,917 | ||||
| 10 | — | 10,000 | 9,350 | 8,917 | ||||
| 12 | — | 1,5 | 12,000 | 11,026 | 10,376 | 11 | 3,5 | 4 |
| — | 14 | 14,000 | 13,026 | 12,376 | ||||
| 16 | — | 16,000 | 15,026 | 14,376 | ||||
| — | 18 | 18,000 | 17,026 | 16,376 | ||||
| 20 | — | 20,000 | 19,026 | 18,376 | ||||
| — | 22 | 22,000 | 21,026 | 20,376 | ||||
| 24 | — | 24,000 | 23,026 | 22,376 | ||||
| — | 27 | 2 | 27,000 | 25,701 | 24,835 | 16 | 5 | 6 |
| 30 | — | 30,000 | 28,701 | 27,835 | ||||
| — | 33 | 33,000 | 31,701 | 30,835 | ||||
| 36 | — | 36,000 | 34,701 | 33,835 | ||||
American thread with extra fine pitch – UNEF
| Thread size | Threads per inch | D - outer diameter | Dp - average diameter | Di - internal diameter | Thread pitch | |
| inches | mm | millimeters | ||||
| #12 | 5,49 | 32 | 5,49 | 4,97 | 4,63 | 0,79 |
| 1/4 | 6,35 | 32 | 6,35 | 5,83 | 5,49 | 0,79 |
| 5/16 | 7,94 | 32 | 7,94 | 7,42 | 7,08 | 0,79 |
| 3/8 | 9,53 | 32 | 9,53 | 9,01 | 8,67 | 0,79 |
| 7/16 | 11,1 | 28 | 11,11 | 10,52 | 10,13 | 0,91 |
| 1/2 | 12,7 | 28 | 12,70 | 12,11 | 11,72 | 0,91 |
| 9/16 | 14,3 | 24 | 14,29 | 13,60 | 13,14 | 1,06 |
| 5/8 | 15,9 | 24 | 15,88 | 15,19 | 14,73 | 1,06 |
| 11/16 | 17,5 | 24 | 17,46 | 16,77 | 16,32 | 1,06 |
| 3/4 | 19,1 | 20 | 19,05 | 18,22 | 17,68 | 1,27 |
| 13/16 | 20,6 | 20 | 20,64 | 19,81 | 19,26 | 1,27 |
| 7/8 | 22,2 | 20 | 22,23 | 21,40 | 20,85 | 1,27 |
| 15/16 | 23,8 | 20 | 23,81 | 22,99 | 22,44 | 1,27 |
| 7/16 | 11,1 | 20 | 11,11 | 10,29 | 9,74 | 1,27 |
| 1 | 25,4 | 20 | 25,40 | 24,57 | 24,03 | 1,27 |
| 1 1/16 | 26,9 | 18 | 26,99 | 26,07 | 25,46 | 1,41 |
| 1 1/8 | 28,6 | 18 | 28,58 | 27,66 | 27,05 | 1,41 |
| 1 3/16 | 30,2 | 18 | 30,16 | 29,25 | 28,64 | 1,41 |
| 1 1/4 | 31,8 | 18 | 31,75 | 30,83 | 30,22 | 1,41 |
| 1 5/16 | 33,3 | 18 | 33,40 | 32,42 | 31,81 | 1,41 |
| 1 3/8 | 34,9 | 18 | 34,93 | 34,01 | 33,40 | 1,41 |
| 1 7/16 | 36,5 | 18 | 36,51 | 35,60 | 34,99 | 1,41 |
| 1 1/2 | 38,1 | 18 | 38,10 | 37,18 | 36,57 | 1,41 |
| 1 9/16 | 39,7 | 18 | 39,69 | 38,77 | 38,16 | 1,41 |
| 1 5/8 | 41,3 | 18 | 41,27 | 40,36 | 39,75 | 1,41 |
| 1 11/16 | 42,9 | 18 | 42,86 | 41,95 | 41,34 | 1,41 |
What is carving and its types
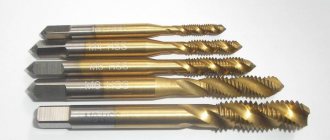
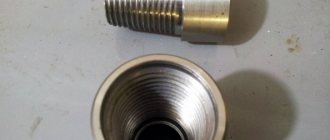
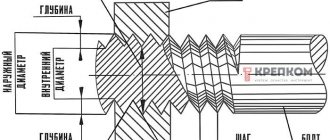
A thread is a groove of a special shape and size, applied in a spiral to the inner or outer surface of a pipe or metal rod. Can be applied to cylindrical or conical surfaces. It is characterized and differs from each other by the shape of the groove, the height/depth of the relief and the distance between the turns - the pitch. In order to connect two parts, they must have the same or compatible threads, with one part having an external thread and the other having an internal thread of the same type and size.
In general, threads are divided into fastening and running threads. Chassis are used in machine elements and provide movement. We are more interested in those that are used in everyday life and that we encounter in the process of repair and construction. This is just a mounting thread. In fact, that’s what we’ll talk about.
Types of thread according to the direction of turns and surface
It is also worth knowing that in the direction of application of turns, threads there are right and left, and in the direction of the surface on which they are applied - cylindrical and conical.
Types of threads
Pipe threads have their own profile, which provides a tight seal. It is used for non-welded connections of metal pipes in pipelines, installation of various types of fittings, and connection of devices. Recently, threaded connections have also been used on some types of plastic pipes, but there the approach is different - it is cast, although the essence is the same.
Three types of pipe threads and their differences
There are three main types of carving:
- Metric. You can distinguish them by the sharp tops of the turns and grooves. Shape: triangle with 60° angles. It is called so because its parameters are indicated in millimeters, and these are units of measurement of the metric system. Standardized by GOST 9150-81.
- Inch. It is also based on a triangle, but with an apex of 55°. It is present on imported parts. As you can see, the difference between metric and tapered threads is in the corners.
- Pipe. It differs from metric by a slightly smaller angle - 55°, and has the same angle from inch. The main difference is that the edges are rounded. And this is fundamentally important. It can be applied to a cylinder (pipe), and then the word “cylindrical” is added to the name. Standardized by GOST 6357-81. When threaded on a cone, it is called a pipe taper thread.
What type of carving is there?
These are connecting threads - for connecting parts. The types of threads that can be found on imported fittings and components can also be useful. This is a Whitworth thread, which is designated BSW if it has a coarse pitch and BSF if it has a fine pitch. It was this standard that was taken as the basis for the development of pipe threads in the USSR. So Whitworth threads and standard manufactured pipe threads are compatible.
Types of threads and their areas of application
There are other profiles, but they are common and very specific. Under normal conditions they are not needed. For general development, let's say that there are also rectangular and trapezoidal shapes.
Where is which one used?
Now about where what type of thread is used. Metric is applied to anchors, bolts, studs, nuts and other fasteners. Applied to a cylindrical surface it does not provide a tight seal, so it is not the best choice for pipelines. However, it is used, and for tightness it is “set” on a winding - tow or fum tape. In addition to plumbing, it is used in assembling frames from round pipes with a threaded connection.
What types of threads are there: profiles and standards
The picture changes when a metric thread is applied to a conical surface. This connection has a high degree of tightness. It is the metric conical thread that is applied to caps and is used in industrial pipelines for transporting gas and liquids that emit volatile substances. In everyday life, the use of conical threads is limited, since special equipment is required for its application.
It is not difficult to guess that pipe threads are used in pipelines. Thanks to the smooth profile lines, even without additional sealing, the connection is airtight. It is this type that is applied to elbows, angles, tees, and other devices that are used in the assembly of plumbing, heating and sewage systems.
Basic information
An inch thread is a type of threaded connection. It is usually applied to concrete or reinforced concrete pipes, although if necessary it can be adapted to process other parts (bolts, screws, rods, electronic parts). This type of carving is widespread in the USA and Great Britain, but it is also used in many other countries (France, Germany, South Korea, Japan, Italy). In Russia, its rules are regulated using GOST standards, and the main regulatory document is GOST 6111-52.
Basic technical characteristics of inch thread:
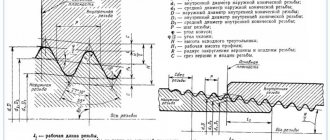
- External diameter. Represents the longest distance between two pipe points. To measure, you can use a ruler, calipers and any other equipment with marked marks.
- Inner diameter. The parameter reflects the longest distance between the highest points of the thread ridges. Standard equipment (rulers, calipers) is also used for measurement.
- Threaded pitch. Represents the distance between adjacent turns of a threaded connection. The thread pitch is usually no more than 3 millimeters, so high-precision rulers or indirect counting techniques are used for measurement.
Inch threads can be cylindrical or tapered. In the case of a tapered connection, the thread maintains the size of the outer and inner diameters along the entire length of the spare part. The threaded pitch has fixed dimensions, and the number of turns is directly determined by the pitch and the length of the diameter. Spare parts with a cylindrical connection are more durable, reliable, and versatile.
In the case of a tapered connection, the thread has a variable diameter. Typically, a tapering diameter model is used, where the diameter at the base is larger than the diameter at the end of the part. Tapered connections can be double marked, when not only the initial but also the final diameter is indicated. Conical inch threads are more durable, less likely to crack, and have an increased shelf life. However, it is more difficult to apply, and cutting errors can seriously degrade the quality of the joint.
Inch thread spread
Despite the spread of the metric system in most countries of the world, the use of inch threads remains very wide. It is used to connect pipeline parts and all related equipment, including pumps, fittings, and plumbing fixtures. Therefore, inch threads are often called pipe threads. It is also used for the manufacture of many fasteners and equipment parts. Therefore, today there are many industries where inch threads are used.
One of the reasons for this state of affairs is that the industrial revolution originates from England, where the inch remains one of the main units of length measurement to this day. Today, the non-metric system, which uses inches, is used in the USA, Great Britain, and a number of other large industrial countries.
In addition, the spread of inch threads is also associated with the ease of use. Measuring tenths of a millimeter can be difficult and reduces accuracy. Inch threads are measured in 1/4 inch increments. This greatly simplifies the designation and accuracy of measurements of threaded elements, and also reduces the number of standard sizes.
