To get a larger harvest, it is not necessary to install a greenhouse; it is enough to build a small greenhouse. It won't take up much space and will be much cheaper.
An excellent solution in this situation would be to build a greenhouse from a profile pipe with your own hands, and you will find the dimensions and drawings in this article. This reliable and durable design will allow you to obtain harvests earlier.
We also suggest that you read the step-by-step instructions on how to make a greenhouse from polypropylene pipes with your own hands.
Advantages of a greenhouse made of profile pipes
In a greenhouse, the main role is played by the frame, so it must be durable and have stiffening ribs that will hold its shape and withstand various loads. The ideal material for making the frame would be profiled metal pipes.
They have a number of advantages:
- ease of processing;
- the ability to create structures of different shapes;
- long service life - metal profile buildings last up to 15 years, and as practice shows, much longer;
- do not require care or protection from pests;
- affordable;
- compatible with any material.
In addition, compared to a wooden structure, construction made from profile pipe-rolling materials is more compact, so placing it on the site will not be difficult.
The only drawback of this structure is the longer construction time.
Selection of design type
Before you start making a greenhouse from profile pipes with your own hands, you need to decide on a design model and sketch out a drawing. After all, the angle of refraction of sunlight depends on the shape of the structure.
The main types of greenhouses made of this material:
- Arched - construction requires special equipment to give the shape. Otherwise, having curved parts of the required size and a drawing, assembling such a greenhouse with your own hands will not be difficult. The arched design creates uniform lighting, regardless of the location of the sun.
The disadvantage of the model is limited functionality, since tall crops along the walls will not be able to grow.
- Single-pitch is a simple option, mounted to the walls of residential or outbuildings. Using this compact model allows you to save not only space, but also building materials.
- A gable or hipped roof is a separate building. In such a structure, better illumination is created for crops, in contrast to a lean-to structure.
Tent - simple design, no curved elements. Therefore, gardeners often install it themselves. In addition, the advantage of a greenhouse with a gable roof is the ability to plant crops of different heights.
It is worth noting that the hipped version of the roof will cost more than the arched one, since installation of the frame requires more material, both main and covering.
- Fedorov’s greenhouse is popularly called “breadbox”; it is easy to make it yourself based on the developed drawing. Suitable for growing seedlings, flowers and vegetables, the only drawback is that it is not intended for tall crops. The design is simple, equipped with a lid that provides access for caring for plants.
Which form is best for a greenhouse?
Each summer resident decides for himself what shape his future greenhouse will be, based on a number of factors.
For example, an arched greenhouse is quite suitable for growing low-growing crops. For tall people, it is better to use a structure in the form of a house.
However, in the case of metal profiles for drywall, building arched greenhouses from it is not the best idea. It will need to be thoroughly reinforced with jumpers and jibs.
If you want to build a greenhouse with your own hands from plasterboard (more precisely from a profile for plasterboard), then it is better to give preference to the shape of the house - a gable structure.
Some people make lean-to greenhouses. They are good as an extension to the house. But gable A-frames, although they are easy to assemble, are better not to do so - there is little usable space inside.
On the other hand, homemade A-shaped greenhouses can be left standing on the site for the winter, because due to the large angles of inclination of the roof, snow simply will not lie on it. Accordingly, the load on the metal frame will be minimal.
How to make a drawing yourself
To make a greenhouse from profile pipe-rolling material, you can use a ground-based or shallow-depth version. Ground-based is convenient because it completely eliminates darkening; it is intended for construction in middle and southern latitudes. In a shallow type of greenhouse, heat is drawn from the ground. However, dark spots form near the walls, which negatively affects plant growth.
When drawing up a drawing of a greenhouse made of profile pipes, it is worth taking into account the removable upper parts, which will provide air access inside. In addition, to make the frame more durable, it is necessary to provide special elements that are fixed along the walls.
A profile with a cross-sectional size of 40×20 mm or 40×40 mm is best suited for the frame, as it has high strength. The optimal wall thickness is 2 mm or more. To make a horizontal screed, you can take a profile with a wall thickness thinner than 1-1.5 mm.
The drawing must indicate the exact dimensions - width, length and height. In addition, the connection points of the main and guide parts should be indicated.
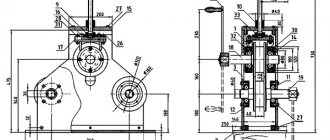
Below is a drawing with dimensions for various types of greenhouses.
In accordance with the greenhouse drawing, which indicates the dimensions, construction costs are calculated and a cost estimate is drawn up. During the calculation process, you should add a 10% reserve in case of damage during transportation or installation.
Drawing of a greenhouse similar to a breadbox
Tools and material
To make the process of installing a greenhouse easier, in addition to the drawing, you need to stock up in advance with the necessary tools that will be needed in the work:
- a shovel - it is needed to level the ground;
- auger - to mount the frame posts;
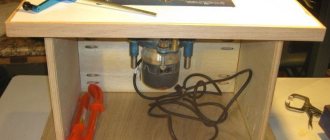
- grinder - you will need it to cut profile pipes;
- screwdriver - necessary for screwing in self-tapping screws;
- pliers and a hammer are an indispensable tool in any construction work;
- measuring accessories - corner, building level and tape measure;
- welding machine - if you are going to weld parts;
- with a hacksaw - if you plan to lay polycarbonate.
It is important to know! It is impossible to cut polycarbonate with a grinder, as it melts; a hand tool is required for cutting metal with small teeth
You will also need wooden pegs and rope.
The correct choice of material plays a big role in the construction of our structure. To calculate the required amount of profile, it is necessary to take into account that the measured length of pipe products sold in stores is 6.05 meters. Based on this value, a drawing of a greenhouse from a profile pipe of the required size is drawn up.
In order to correctly calculate the required amount of material, you need to take into account the design features and geometric parameters of the structure. The length of all frame parts is added up, then the resulting number is divided by the standard length of the profile pipe. This value will determine the meter quantity of the profile.
Step-by-step instructions for building a greenhouse
Before you start building a homemade greenhouse from profile pipe products, you should decide on the site and prepare the place.
SUPER GREENHOUSE - DIY bread box. Part 2
Preparing the area
To build a greenhouse from profile pipes with your own hands, you should start by determining the location of its installation. An important role is played by the type of soil. It is better if the structure is located on sandy, dry soil, where moisture does not accumulate.
In addition, the location of the greenhouse according to the cardinal directions is of great importance in obtaining a good harvest. It is good if the long side is located to the south, so the plants can receive more light from the sun. Also, you need to take into account the design features of the greenhouse:
- single slope - slope of the slope to the south;
- gable and arched - the longitudinal axis of their structure is directed from north to south, the permissible deviation is 15 - 20 degrees.
After choosing a location, the area needs to be prepared. First of all, the perimeter of the future structure is indicated by driven wooden pegs onto which a rope is pulled. Regardless of the chosen model, you should dig a trapezoidal trench to lay biofuel; as it decomposes, it helps to warm the soil.
Foundation
A greenhouse made from profile pipes is a fairly strong structure that is not subject to deformation. To install a greenhouse, it is enough to make a type of columnar foundation from asbestos-cement pipes.
It is done as follows:
- wells are drilled in the ground at the same distance from each other, their diameter is larger than the size of the pipes themselves;
- asbestos pipes are installed in these pits;
- the gap between the pipe and the ground is filled up and compacted with a sand-crushed stone mixture;
- Cement mortar is poured inside the pipe so that there are no voids;
- A metal plate or a piece of reinforcement is immersed in the concrete composition; they will be the connecting link between the foundation and the frame.
It is possible to make a strip foundation or a light bulk foundation to protect the greenhouse from cold air entering inside.
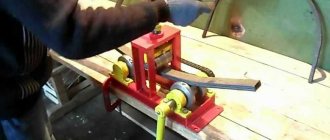
We make arcs for a greenhouse from a profile pipe - 2 ways to bend corrugated pipes
To make your own arched greenhouse structure from a profile pipe, which is pre-cut to the required size, it needs to be shaped into a rigid arc. You can do this procedure by contacting a company that performs such work, where the profile is curved using special equipment. If you plan to do it yourself, then there are two ways you can use.
- How to bend a profile pipe in a “cold” way? There are two options for bending the profile in this way - with and without internal filling:
- If a profile pipe with a thickness of up to 10 mm is used, then the process can be carried out without filler.
- And if you take a profile that is thick, you will need a filler: sand or rosin. In winter, you can pour water inside the pipe and wait until it freezes.
A thick spring is used as a means of bending a profile in a “cold” way, but the diameter must be such that it can be inserted inside the pipe. This material has excellent spring properties, which allows you to easily bend the profile without changing the cross-section.
How to bend a profile pipe radius without a pipe bender. Bending device.
In addition, to give the workpiece an arched shape, you can use bending plates, in the holes of which rods should be placed; they will be a stop when bending. The pipe is placed between two rods, at a distance that corresponds to the level of bending. The profile is bent by moving the workpiece from the center to the edge. This method of “cold” bending is very labor-intensive.
You can use special factory-made pipe benders, manual or stationary.
- Bending technique with preheating. This bending technique is recommended if the thickness of the profile pipes is large. The method is suitable for use at any time of the year. The process looks like this:
- Two plugs are made of wood for both sides of the pipe. In length, it is made 10 times larger than the width of its base. The wide side of the plug should be 2 times larger than the hole in the pipe.
- After this, you need to make grooves in one plug to allow the accumulated gas to escape when heated.
- Now you need to heat up the processed part of the profile.
- Sift and dry the river sand. Then heat it on a metal sheet to 150 degrees until all the moisture has evaporated.
- Install a wood plug without grooves on one side of the pipe.
- Pour heated sand inside through the other end. You should constantly tap the walls of the workpiece so that the sand is compacted well.
- When the pipe is completely filled with sand, install a second plug.
- Mark the bend location on the profile with chalk.
- Firmly fix the pipe in the cleats, placing it on the template.
- Then heat the metal until its color turns red. In this state, it becomes softer and can be given the required shape. This is done with a movement that should be smooth and clear.
- After the profile has cooled, the workpiece is compared with the required template. If everything is done correctly, you can remove the plug and shake out the sand.
Important! The profile, which has welding seams, should be bent so that the connecting line is located on the side. It is not recommended to bend along the weld seam.
how to bend a pipe without a pipe bender for a canopy sugut.net
It is better if all hot bending work is done in one go. Excessive heating of the metal leads to a loss of its strength.
Installation of arches
If you plan to make a collapsible greenhouse with your own hands, then you can connect the arcs and vertical posts using bolts. Opening doors are also attached to them, for example, if the “butterfly” model is selected. For capital construction, it is better to use welding.
It is necessary to cut the posts to which the arcs will be attached. You will need longitudinal strips designed to connect the arcs inserted into the rack. The joints are also secured with crabs or welding.
Important! After welding, it is recommended to treat the seams with a primer, this will increase the reliability of the connections.
The manufactured frame is installed on the foundation and attached to the reinforcement that is fixed in it.
The easiest option is to place the arcs directly on the reinforcement sticking out from the foundation.
Foundation arrangement
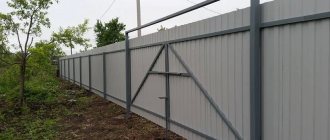
Some readers may have doubts whether a foundation is needed for a greenhouse at all. On the one hand, this is not a heavy building, and the greenhouse is unlikely to sag under its own weight. But for a greenhouse without a foundation, there is always a risk that it will be blown away by the wind. In addition, the base laid under the greenhouse protects plants from drafts, freezing, rodents, insects and other pests.
Before starting to build the foundation, you need to choose the place where the future greenhouse will stand. Ideally, this should be a flat area with a minimum slope, rich soil, no shade from buildings and some kind of shelter from the north winds in the form of a fence or hedge.
Important! Do not place the greenhouse between two houses or next to such a place - this creates a “wind tunnel” effect, that is, constant and strong drafts.
Choosing the right location to install the greenhouse
The simplest and most affordable type of foundation is a timber structure. Arrangement of some other types is possible, but redundant. For your convenience, step-by-step instructions are provided below.
Step 1. Clear the area for the greenhouse from debris, stones and tall vegetation.
Step 2. Make markings. To do this, you can use pegs or pieces of reinforcement and a thread stretched between them.
Marking a site for a greenhouse
Step 3. Determine the condition of the soil. If it is sufficiently solid, then the timber foundation does not need to be deepened. Otherwise, there is a need to construct a trench.
If the soil is hard, then the timber foundation does not need to be deepened.
Step 4. If the soil is soft, then dig a trench along the perimeter of the greenhouse with the width of a beam and a depth of one spade bayonet.
Foundation trench
Step 5. Compact the bottom of the trench and add a layer of sand or gravel. The layer thickness should be 25-30% of the ditch depth.
Step 6. Measure and cut the timber to the length and width of the greenhouse.
Advice! It is advisable to use larch timber as a material for the foundation - it is resistant to rotting and mold.
Larch timber
Prices for larch timber
larch timber
Step 7. Treat the wood with an antiseptic. Alternatively, you can use copper sulfate, bitumen or used motor oil.
Timber treated with bitumen and joined “in half a tree”
Step 8. Assemble the timber into a rectangular box. Connections can be made using dowels or long half-wood self-tapping screws, or using galvanized metal corners.
Fastening beams to corners
Step 9. Transfer the timber box to the trench, lay it there and level it horizontally. To do this, you can use sand, earth or thin planks.
Step 10. Drill through holes in the corners of the timber box and insert 1 m long reinforcing pins there. Drive them into the ground. This is necessary to securely fasten the foundation of the greenhouse so that it will not be blown away by the wind.
In some cases, it is not necessary to drive pins into the wood itself - reinforcement dug into the inner corners can also protect the greenhouse from being toppled over by the wind
Step 11: Fill the gaps between the trench and the foundation with sand, gravel or soil.
Step 12. For additional protection of the timber, the foundation can be covered on top with a layer of roofing felt or other roll waterproofing.
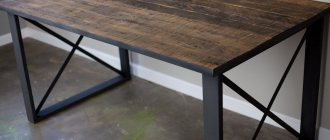
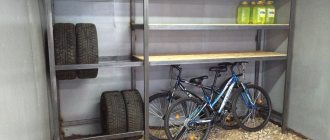
Choosing material for cladding
An important step when constructing greenhouses yourself from profile pipes is the choice of material for the coating. Not only the appearance of the greenhouse, but also the quality of the future harvest depends on it.
There are several main types of material:
- Glass - has high protective properties. A greenhouse covered with glass protects seedlings from frost, while retaining heat well and not blocking the passage of sunlight. All these qualities create excellent conditions for the growth of many crops (peppers, cucumbers, tomatoes). However, there are also disadvantages - high cost, complexity of installation and fragility. Therefore, this material is rarely used for greenhouses in garden beds.
- Polyethylene film is an inexpensive material, but it does not have high strength; in addition, it deteriorates in direct sunlight, so its service life is not long.
- Non-woven material - perfectly transmits sunlight and water, while providing plants with protection from negative atmospheric influences. It is not expensive, but such material is not durable, it will last no more than 5 years. In addition, it is not durable and can be damaged by strong gusts of wind.
- Cellular polycarbonate is a hard polymer that is light in weight and has high strength. It scatters the sun's rays well, which has a beneficial effect on the thermal insulation conditions inside the structure. Today it is often used to make a greenhouse from a profile with your own hands, since working with this material is not difficult if you correctly calculate the required size.
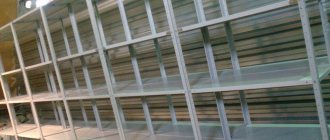
Types of profiles
Strictly speaking, a profile greenhouse is a collective concept. It denotes structures that are noticeably different from each other and are built from many types of metal (and not only) profiles. Some of the profiles were originally manufactured for other purposes, while others were created specifically for the construction of greenhouses. The most popular of them are shown in the table below.
Table. Types of profiles suitable for building greenhouses.
| Title, photo | Description |
| U-shaped or U-shaped profile | Many subtypes of U-shaped profiles, differing in width, wall height and metal thickness. They are used for the construction of various structures, including greenhouses. To combat corrosion, depending on the material, it is galvanized (for steel) or anodized (for aluminum). |
| V-profile | Metal profile of V-shaped section with “shelves” for fastening in the lower part and on the edges. A cheap and easy-to-use product, but inferior in strength to some U-profile options. Created specifically for the construction of greenhouses. Reinforced options may be called W-profiles. |
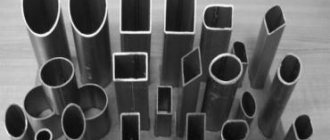
| Profiled pipe | Galvanized steel pipe of rectangular or square section. High levels of strength and reliability. To combat corrosion, it is galvanized or powder coated. |
| CD profile for drywall | Load-bearing ceiling profile (PP) for plasterboard. It has a U-shaped section, bends at the ends. Equipped with corrugations that increase the strength of the product. |
| UD profile for drywall | Guide profile for drywall. It has a U-shaped cross-section and is used to form a frame plane from a CD profile and attach the latter to a wall, floor or ceiling. |
| PVC profile | Profiles made of polyvinyl chloride of U-shaped, square and other sections. It differs from metal analogues in greater flexibility and low cost with less resistance to loads. |
There are several ways to fasten profile elements to each other.
- Bolts and nuts with washers - well suited for profiled pipe, V-shaped and U-shaped structures. They provide ease of subsequent dismantling and reassembly of the greenhouse, but at the same time require preliminary drilling of holes in the profile and careful monitoring of the reliability of the connections.
- Self-tapping screws - used in working with all types of metal profiles, especially CD and UD. For a greenhouse, it is justified to use not “bugs”, but self-tapping screws with a press washer - a thin head will not interfere with the installation of the sheathing. Some of the screws come with drill bits on the ends to facilitate entry into the metal.
- Welding is a reliable and durable permanent fastening. Use only if subsequent dismantling of the greenhouse is not planned. Welding seams require additional protection against corrosion.
- Connectors - a variety of designs used to connect PVC profiles to each other.
Self-tapping screws with press washers
An example of fastening corners with self-tapping screws to a profile
Advice! When choosing a profile for a greenhouse, pay attention to the quality of the anti-corrosion coating, especially on the corners and bends - there it should not have abrasions, stains, foreign inclusions or other defects. Otherwise, the service life of the frame may be significantly reduced due to the gradual destruction of elements affected by corrosion.