Prefabricated racks from profiles
Wooden racks are increasingly being replaced by metal structures. They are used in warehouses, archives, libraries, garages, basements and other premises.
The high strength of the structures allows them to withstand significant loads, the material does not rot, is not susceptible to mold and does not burn. For storing many items and placing them in a certain area, a do-it-yourself profile rack is perfect. The article will tell you how to make it yourself.
Advantages and disadvantages of shelving made from corrugated pipe
The advantage of a wooden shelving is the relative speed of its construction. But fragility and lack of reliability are significant disadvantages, especially if the rack is located in a room with high humidity. This applies to unheated or irregularly heated premises. There, metal, for example a profile pipe, is more suitable as a base.
The metal profile is quite durable, and there are many different options on sale. The rack based on it is also easy and quick to assemble. But tin is susceptible to corrosion in damp rooms; its strength is comparable to wood.
A frame welded from metal corners has good performance. But the cost of the material and the complexity of the work are almost no different from a rack made of profile pipe. But the latter is much better in appearance.
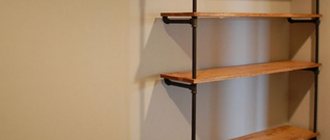
Racks made of metal profiles have incomparably better characteristics. Even the appearance shows that this material is best suited for this type of structure.
Advantages of a rack made of profile pipes:
- High structural strength, ability to store heavy parts.
- Durability in poorly heated or damp areas.
- The design looks more attractive, the racks are thinner, and almost do not interfere with the view and rearrangement of objects.
- Frame mobility. The rack is easy to rearrange and is less bulky.
The profile pipe design also has disadvantages:
- Relatively difficult to manufacture: you must be able to use a welding machine or learn how to fasten parts with bolts.
- The cost of profile material is much higher.
Descriptions of racks made from various materials show that preference should be given to those made from profile pipes. The design is reliable and durable, and building it according to the given drawings and diagrams is not so difficult. I wish everyone to demonstrate their abilities in technical creativity.
Review of ready-made
The modern market offers countless convenient and multifunctional shelving, both wooden and made of metal. Universal designs will fulfill their purpose completely and fit into any garage space. In Ikea stores you can find excellent options made of steel and high-quality wood, complemented by cabinets, drawers, fasteners and hooks for more convenient use.
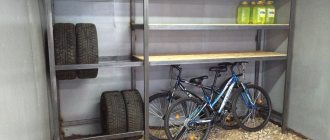
The tire rack is convenient and practical to use in the garage space. Excellent examples can be found in stores, but some craftsmen assemble a similar design themselves, purchasing metal consumables separately: a corner or a profile. Shelves and panels for tools that you can buy or make yourself will be useful.
Which profile pipes are suitable and how many of them will be needed
It all depends on the size and shape of the rack. It is better to use rectangular profile pipes. First, I choose a diagram and drawing of the future shelving so that it fits the room in height and size. Next, you need to decide whether all structural elements will be the same or not. It is better to weld the racks and crossbars from pipes of the same section, but the longitudinal strips are thinner.
Having chosen the desired scheme, I write down all the dimensions of the planks and height posts, their number. Then I calculate the total length of all pipes of each standard size. This will help you buy profile rolled products so that as little scraps as possible remain.
When making the first rack, you will need 21.6 m of 20x40 mm profile pipe. When using rolled products 1.8 m long, 12 pipes will be needed. With a pipe length of 2.7 m, 8 pipes will be needed.
For the second option, depending on the size of the walls, you will need to measure and calculate all pipe lengths. For racks you can use larger profile pipes. Knowing the dimensions of the wall and choosing the distance between the shelves, these dimensions are entered into the template, and then the number of pipes used is calculated depending on the options available for sale.
If the store has pipes of 6, 8, 12 m, then for ease of transportation they can be cut to the required length, so make calculations in advance using the proposed template.
Areas of use
Any furnace design is a whole organism in which all parameters must be coordinated - from the size of the firebox and ash window to the height of the pipe. Cracks that appear in different sections disrupt the sealing of the walls of the chimney, combustion chamber and other areas involved in the removal of combustion products. As a result of such disturbances, cravings become worse, and smoke, which contains many substances hazardous to humans, can penetrate into the home.
Such processes often lead to tragic consequences, because carbon monoxide can cause fatal harm to the body. In addition, damaged stoves are a fire hazard. The most harmless thing that can happen if the seal is broken is that the efficiency of the unit will significantly decrease.
In this video you will learn the pros and cons of sealant:
The traditional method of repairing damage is to putty with clay mortar, but this procedure has a temporary effect and does not provide a lasting seal. In addition, the repaired part must be constantly monitored, because at any moment new cracks may appear at the patch sites. Therefore, a more reliable method of getting rid of cracks is to use special sealants for high temperatures.
Read also: how to work with refractory fireclay clay.
No less important is the sealing of chimney pipe connections made of ceramic or metal, as well as those made of multilayer sandwich panels. Not only the effective operation of structures, but also the safety of the entire room depends on the quality of the docking. In addition, sealants are needed to organize the passage of the chimney pipe through the roof and rafters. Here the compounds are used as an additional element, which fills the gaps between the apron of the frame.
Without such mixtures, it is impossible to completely close all the cracks in the passage of the chimney pipe, so previously bitumen mastic was used for these purposes, or they came up with their own methods of sealing joints.
Furnace restoration:
https://youtube.com/watch?v=RnEDvZYoifg
If depressurization occurs in a metal chimney from a gas-powered boiler, the flame in the gas burner will regularly go out. This problem is quite common when operating gas units. The main reason for such situations is a violation of the sealing at the joints of the chimney sections. In this case, the optimal repair agent is fire-resistant silicone.
How to make a rack from corrugated pipe with your own hands
I use 2 types of fastening when creating such structures. The pipes can be welded together or secured with corners.
Required tools and materials
Depending on the type of fastening, I will describe 2 types of assembly: welding and corner mounting.
- For assembly by welding
The tools you need are a welding machine, a hammer, an angle grinder, a tape measure, a 0.8–2 m ruler (with a level possible), an iron marker or chalk. Consumables include electrodes and metal cutting discs. You can use tin, plywood or other sheet material as flooring.
If the flooring is metal, I “grab” it by welding to the crossbars and racks. If it is made of a different material, then bolts are needed to secure it. In this case, you will need a drill.
IMPORTANT: When working with welding and other electrical equipment, especially in damp areas, you must use a tool that is known to be in good working order. Any damage leading to disruption of the insulation of live parts of the tool requires mandatory and immediate repair. Homemade extension cords and plugs without proper insulation are strictly prohibited.
I would like to pay special attention to the illumination of the object. During welding work, it is better to purchase or borrow several portable lamps from friends. It is advisable to position them so that the light from them falls on the object being processed from both sides. The absence of shadows will ensure vision safety.
Work with a chameleon-type welding helmet must be carried out according to the instructions. I recommend using only a shield with a light filter only for professional welders or those who have experience working with such a tool.
- For assembly on corners
You can do without a welding machine. You will need a grinder, a drill-driver, mounting angles and plates, bolts and nuts, keys, screwdrivers and pliers.
You can make the corners yourself or purchase ready-made ones. When making corners myself, I use sheet metal of the same thickness or maximum 2 times thicker than the walls of the profile pipe.
I use bolts for nuts with a size of 10 mm; for more critical connections I use stronger fasteners. They proceed from expediency: thin ones may not be strong enough, and for thick bolts you will have to drill large holes.
Using a rivet gun is easier and easier to attach tin or plywood to the crossbars. If it is not there, I secure the flooring with bolts.
Drawings and diagrams
In this article I will talk about two types of shelving. One with specific distances, at a height of 1.8 m. The second as a template for use according to the existing wall dimensions. Here it is angular, so it can be used to make 2 walls or parts of them.
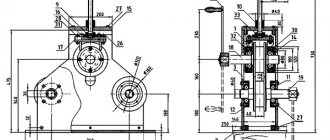
- First option
His drawing is in the photo.
Distance between shelves 410 mm. This is enough for the most used items. The height of the rack is 1.8 m, with a height to the ceiling of about 2.2 m, there is approximately the same amount of space between the shelves. If the room is larger or slightly smaller, this is not significant.
- Second option
There are many varieties of such a rack; its template is shown in the photo.
To assemble, you need to measure the dimensions of the wall and transfer them to the template. It can be printed in several copies and the required dimensions can be specified.
This corner rack can have 3-4 rows of shelves; the latter are not necessary if the ceiling is low. But if the room is large and you need to store a lot, then the top row of flooring is installed. It is better to choose the distances between the posts as multiples of the size of the available rental.
When planning, I make sure to take into account the width of the different sides of the profile pipe: the front one will be narrow, and the crossbars themselves will lie on the wide one.
Build process
You can watch the video on how to assemble the profile structure.
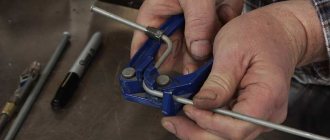
First, I cut the profile pipes of the required sizes for the side structures of the rack and weld them or fasten them with corners.
I start the installation with the side “ladders”. I lay two pipes 1.8 m long in parallel at a distance of 400 mm from each other. On both, I mark the middle with a tape measure. I cut a 400 mm long strip cut with a grinder or taken from already cut ones by welding, like a crossbar of the letter “H”. The top edge of the plank should be below the middle mark by the thickness of the flooring, i.e. the surface of the shelves will be flush with the middle mark. In the diagram this distance is 900 mm.
I assemble it with bolts using the same principle. Correctly calculated dimensions will allow you to avoid mistakes during assembly. When manufacturing identical parts, it is necessary to compare them with each other for safety reasons.
Next, I secure the remaining crossbars; everywhere the distances between the extreme lines of the planks will be 410 mm. When fastening with corners, they are placed below and above, in the inner corners, so that the emphasis and support are on them. The plank will have one bolt in the crossbars - 2. The connection is shown in the figure.
After both side walls are assembled, I place them at a distance of 1400 mm and secure the top bar. If the structure is unstable, then I temporarily fasten the “ladders” with longitudinal strips of greater length, maintaining the distance between the structures as in the diagram. The further sequence is not particularly important.
I accurately set the distances and fasten the remaining parts of the structure. After assembling the frame, I strengthen and fix the shelves.
Useful tips
Shelving is a great way to keep your garage organized.
The specialist gives some tips that will help if you decide to organize the contents of your garage:
- Don't be afraid of costs and wasting time! All this will pay off many times over. Over time, you yourself will understand that organized things will never interfere with your work and will always be at hand.
- You can make or buy a separate rack designed for wheels and tires, a separate one for storing canned jars, a separate stand for gardening supplies, a dial panel on which you can collect keys and screwdrivers. Give free rein to your fantasy and imagination!
- Before you buy or make a rack yourself, draw a drawing, measure the width and height of the place where you want to install the storage system, in short, make sure that the product will fit in the garage and there will be room for a car.
- Remember that wood does not tolerate humidity well, so you should not install wooden racks and shelves where the humidity exceeds 12%.
- Immediately think about what will be on the shelves. Remember that many structures cannot support large items.
- Homemade wooden structures need to be impregnated with an antiseptic to avoid rotting.
- Metal structures are painted or primed to prevent corrosion.
Manufacturing of a stationary storage system
Sometimes it is more practical to make a permanent shelving unit for the garage, that is, an option that is mounted on site, attached to the wall. Let's take a closer look at the assembly diagram of this design:
- Markings are made on the wall for fasteners, holes are drilled and dowels are driven in.
- The metal profile or wooden beams are cut according to the diagram.
- The far racks are fixed to the wall, each measured strictly according to its level.
- The frame is connected by horizontal binders from corners along the width (according to the height of future shelves).
- The front pillars are installed and connected to the side strips on which the shelves will lie.
- The front verticals are fastened, after which they form flooring from boards or lay plywood shelves in the prepared grooves.
Types of cabinets made from plasterboard profiles
In small rooms, shelving made from plasterboard is excellent for dividing space into zones, thereby creating more comfortable living conditions.
A plasterboard rack is a prefabricated structure that is easy to assemble with your own hands. Indoors, a closet can replace the most bulky pieces of furniture.
The functional purpose of plasterboard cabinets is very diverse. There are several types of these necessary and useful structures.
Types of plasterboard shelving and profiles:
- Free standing. They are not attached to the walls, but are freely placed in any part of the room, acting as interior partitions or screens, they zone the room. They are a through lattice structure, in the cells of which decorative interior elements are placed.
- Wall-mounted. This type consists of shelves or niches adjacent to one of the walls of the room at the back. They are the most stable and durable structures; you can safely place home electronics on them: audio systems, TVs, computers, and books.
- Closed. This type replaces cabinets and bedside tables. In everyday life, they are mostly used in the kitchen, as containers where you can store food or as bar counters.
The basis of this design is a frame made of metal profiles, which is sheathed with plasterboard and decorated.
Assembly sequence
The manufacture of a rack from a profile or corner begins with cutting the blanks in accordance with the dimensions according to the drawing. A grinder is used to cut off elements for racks and lintels, as well as shelves. Burrs on the cut should be removed so that they do not interfere with closely placing the parts for welding.
Once everything is cut and cleaned, you can start assembling. It is carried out in the following sequence:
- creating side frames;
- connecting the side frames with longitudinal beams at the top and bottom (a cube or rectangular three-dimensional structure is obtained);
- welding corners under shelf levels;
- attaching additional reinforcement if necessary;
- painting metal and already cut wooden pieces;
- fixing wooden shelves with self-tapping screws.
It is important to assemble the side frames correctly, since the proportionality and evenness of the structure depends on this. To do this, the sides are laid out on a table or floor and a potholder is placed in each corner. The diagonals are measured, and if they are equal, then a second tack is placed on all joints, and after that welding is performed. The error in the difference of diagonals should not exceed 3 mm. The corners are not scalded in a row, but one at a time, to ensure uniform tension in the metal structure.
When both frames are assembled, you need to set them in a vertical position and grab the longitudinal beams in turn: two at the top and two at the bottom. Here you cannot do without an assistant who will hold the metal structure. First you need to set one side, check the diagonals, strengthen the potholders, and scald the corners. Then, in the same sequence, the second side is assembled. At this stage, you can do without checking the diagonals if you establish the correct assembly using a square (90 degrees are required in each corner) and a level on the top beam.
Next, markings are made on the racks for the shelves. The latter can be cooked according to the level. An error of 1-2 mm will not create a strong plane distortion. If it is planned to store heavy elements on one of the shelves, then another longitudinal beam from the profile is welded in the middle of the entire length of the shelf. If a universal rack is being made, then holes for fastening are drilled in the racks and within the “floors” of the structure.
The entire rack needs to be painted to prevent corrosion. A regular primer will do for this. Cut boards or chipboards are also immediately stained. They must be cut across the rack to prevent excessive deflection. When the paint has dried, you can fix the wood to the metal. To do this, holes are drilled in the corner or profile. The board is placed on top, and the self-tapping screw is twisted from below, passing through the metal part and going deeper into the wood.
To make the rack more stable, especially for narrow models, you can provide additional fastening to the wall. To do this, just weld a plate with a hole onto the post closest to the wall and anchor it. This will prevent the entire rack from collapsing in case of overload, and will strengthen the structure.
Choice
First of all, you need to decide on the material for the structure, the final size, which depends more on the room, and the loads that will be placed on the rack. The set that you will receive in the store depends on all this.
The most interesting thing is that some stores may even offer you to assemble this entire structure after delivery, which again is a nice bonus. Personally, I am sure that, if time allows, it is better to assemble the rack that you chose in the store yourself - time passes, and men simply change toys.
Drawings of metal racks for storing workpieces
To make a drawing of a metal rack, you do not need any special skills or knowledge. The main thing is to strictly adhere to the dimensions that your future structure will have, since deviation from them may lead to the fact that when assembled it simply will not fit in the space allotted to it, or it will be smaller in size than required.
The sequence of actions during the assembly process looks approximately as follows:
- Make shelves;
- Attach racks to the shelves;
- Make a “draft version of the design using tacks;
- Check that the angles and dimensions are correct;
- Weld with full seams.