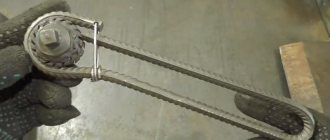
All-terrain vehicle tracks
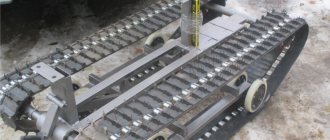
As a rule, tracks for homemade all-terrain vehicles are made from high-strength conveyor belt, which lends itself well to various types of deformation while driving. It does not require special care; all you need is to clean it from dirt from time to time.
The tape contains professional pipes with a characteristic cross-section; it is with their help that the all-terrain vehicle can cover distances in the most unfavorable weather.
So, let's now talk more about creating caterpillars. For work you will need the following materials:
- Bolts and nuts of various shapes and sizes.
- Profiled pipe with cross-section.
- Massive fittings.
- Conveyer belt.
You should also have the following tools in your arsenal:
- Powerful drill.
- Welding machine.
- Big hammer.
- Universal set of wrenches.
- Track pressing machine.
Based on the size of the track, you need to prepare the appropriate bolts and nuts. Next, take the reinforcement and start shaping it into a rounded shape using a crimping machine. Then, using a welding machine, you need to weld the letter V at the top of the reinforcement.
For a more detailed understanding of the steps, we recommend watching a video on how to make caterpillars with your own hands.
After the work has been done, you will have a homemade track that needs to be attached to another track, etc. The result of the work will be a reliable track for an all-terrain vehicle.
Chassis
Light snowmobiles designed for riding on loose snow are equipped with a hinged suspension made from an extended M16 nut. This is a lightweight design with a simple structure that does not provide comfortable driving characteristics of the homemade product.
Snowmobiles on tracks intended to travel on compacted snow must be equipped with shock absorbers (from a motorcycle or moped). Shock absorbers are installed where skis and axles are attached to the frame. The suspension travel is selected so that moving elements do not touch the snowmobile body during operation.
Steering wheel and skis
The steering is output to two front skis according to a scheme structurally similar to the suspension. It is made from a threaded stud installed in an extended M16 nut, rigidly welded to the frame. The steering wheel from a moped or motorcycle (“Minsk”) is used.
In total, the design uses 3 plastic skis from a children's scooter (or homemade ones from 3 mm thick plywood). A pair of front skis is used for taxiing. Skis up to 1 meter long are used and, if necessary, reinforced with a steel pipe and plate.
The third ski is a support ski, used to maintain the belt in working condition. It is shorter than the others, located between the bridges (in the center). A T-shaped beam is attached to the support ski, rigidly welded to the frame. On top of the beam are freely rotating rollers for the tracks. Installation of such a structure is not necessary if the track does not sag.
Construction of bridges
Bridges are located under the loading area. One bridge requires 2 inflatable wheels from a garden cart and a metal rod. The wheels rotate freely and have no drive. In snowmobiles built on the basis of motors from walk-behind tractors, the wheels are inflated halfway. Clamps are welded to the outer ends of the wheels, with the help of which the axles are attached to the frame.
The front axle is stationary, its clamps are rigidly welded to the frame. The rear axle must move freely along the frame as it serves to tension the track. Its clamps provide friction tightening from M10 bolts, securing the bridge in the working position.
views
Do-it-yourself caterpillars for a walk-behind tractor
Publication date: 11/21/15
What can caterpillars be made from?
Nowadays, many people are trying to design and make improvised all-terrain vehicles with their own hands, but it is very problematic to make a caterpillar for a walk-behind tractor, since it must be light and durable at the same time. Below we present several ways to implement this idea.
To make a tracked module for a walk-behind tractor, you can use available tools. The easiest way is to make homemade tracks using a bushing-roller chain and a transport belt.
In order to make a caterpillar with your own hands from these materials, you do not need special tools or machines. In order to extend their service life, homemade tracks made from transport tape and chain can be sewn from the edge with fishing line. When flashing, maintain a step of 1-2 cm.
You can connect the ribbon into a ring in various ways:
- you can use a hinge that will be similar to a piano hinge;
- You can sew the edges of the tape, but this method will not be reliable.
Tip: Select the thickness of the future caterpillar depending on the power of your walk-behind tractor.
For high-power units, you can use tape with a thickness of 7-15 mm. It is also used for agricultural machinery. However, remember that you need to install such a tape carefully, since its weight is quite large.
Tire tracks
The next way to make such a movement unit with your own hands is using old car protectors of a car or tractor. Such a tracked attachment to a walk-behind tractor is quite practical and easy to manufacture. Another advantage of this method is the absence of the need to manufacture special lugs.
First, you need to cut out a tread path from an old tire with your own hands and carefully separate its side surfaces. Cutting off the side surface is quite problematic. This can be done manually using a well-sharpened knife.
However, in this case, the process may take a long time, and it is unlikely that you will cut off the side part efficiently and accurately. An ordinary jigsaw can come to the rescue. It is best to use a fine-toothed file. In order to reduce friction of the jigsaw blade, periodically moisten it with water or a special soap solution.
Once you've removed the sides, remove excess layers from the back of your piece if necessary. This must be done if the resulting path is too hard.
Tip: If you notice that the tread pattern is not suitable, it is better to re-cut new lugs.
The resulting caterpillar is perfect for your walk-behind tractor, since it will initially have a closed circuit, therefore, its reliability will be higher. Among the disadvantages of the tire movement unit is the limited width. Although this disadvantage can be avoided if you use a dual or triple tread.
All-terrain vehicle made of belts and chains
Another simple method is to make a caterpillar from belts with your own hands. This method is distinguished by its simplicity and convenience. To make tracks for a walk-behind tractor from belts, use those with a wedge-shaped profile. They need to be connected together using lugs, which are attached to the belts with screws or rivets.
A caterpillar constructed from old, unnecessary identical chains will be more reliable. They will probably be lying around in your or your neighbors' barn. For one such tape you will need two chains:
- take products of the required size;
- unclench the last links and roll the chains into rings;
- The edges are clamped and welded.
The ring-chains are fastened with homemade lugs made from thick steel (iron) pre-drilled plates. They are placed on the chain links of the same name on both sides and clamped with bolts and nuts.
It is desirable that the plates facing the ground are thick so that the bolt head is completely recessed into it
Snowmobile assembly.
Engines of the Lifan type are very suitable for building snowmobiles; the author decided to use a similar 200 cc engine with 6.5 horsepower, the Sadko GE 200 R.
This engine already comes with a reduction gear (½) and a centrifugal automatic clutch, which is activated when the engine speed increases, which is ideal for homemade snowmobiles, walk-behind tractors, go-karts and other equipment.
The photo shows a Chinese-made Sadko engine.
The snowmobile frame is made of a 25 x 25 profile pipe with a wall thickness of 2 mm.
The caterpillar is made of a conveyor belt 3 mm thick, the width of the belt is 300 mm, the belt itself was cut in half lengthwise at 150 mm.
The tracks are made of plastic water pipe with a diameter of 40 mm and a wall thickness of 5 mm. The pipe is cut lengthwise.
The tracks are screwed to the conveyor belt with M6 bolts with a wide head, the bolts are tightened with a nut through a washer and a screw. The edges of the tape are connected with the same bolts.
Track drive axle.
Guided star from Minsk.
Stars for the caterpillar track from the Buran snowmobile, homemade guide drums.
The support ski removes part of the load from the track; there are guide rollers at the top.
The rear axle moves along the frame along a guide, which allows you to tension the snowmobile track.
The front axle is stationary.
Driven and driven sprockets, as well as a chain from a Minsk motorcycle. Chain drive with a gear ratio of 1 to 3.
Steering rack.
The hinges are made using a threaded connection, nut and stud on M16.
The skis are taken from a children's snowmobile and reinforced with a profile pipe.
The photo shows how the star engages the track track.
Read also: Nozzles for the engraver, which ones are used for what
The seat is made of plywood in the form of a box, in front there is room for a child, in the back for two adults.
Middle support ski.
The equipment is ready for testing.
The snowmobile moves confidently when fully loaded.
In the photo is the author of the homemade product: Evgeniy Venglovsky.
I recommend the author’s interesting video about assembling a tracked snowmobile and testing it.
Making homemade tracks for a walk-behind tractor: photos, videos, recommendations
Many people involved in the manufacture of homemade equipment also develop crawler-mounted all-terrain vehicles and homemade tracks for walk-behind tractors. When bringing this idea to life, people use a variety of solutions. But making tracks remains a big problem for fans of this type of transport.
After all, if an all-terrain vehicle or snowmobile is made with your own hands, then the tracks must be homemade.
Design features of the device
Making homemade caterpillar components for a walk-behind tractor with your own hands allows you to save money on the purchase of factory devices and further operation of the equipment. If everything is done correctly, then self-made tracks for a walk-behind tractor increase the cross-country ability.
Compared to their wheeled counterparts, tracked walk-behind tractors are not as widespread. This is explained simply. Wheel units from Texas, Patriot, Cayman, Viking, Forza are best suited for plowing land. This design is best suited for soil-related work.
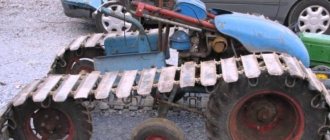
Remaking a wheeled walk-behind tractor is a job consisting of attaching one additional wheel on each side. It turns out to be a four-wheeled walk-behind tractor on which you can put tracks. They can, in turn, be purchased or homemade. Additional wheels can be made removable. This allows you to promptly transform the unit into a standard walk-behind tractor, ideal for working in the garden.
To do this, the wheels are attached to the axle, which are already provided in the design, by means of a rigid or flexible transmission. This solution is considered appropriate, since the need for installing additional fasteners disappears. As for the design of these walk-behind tractors, they fully comply with the parameters of wheeled modifications:
- Engine. It is powerful, four-stroke. It has an axis locking function. Due to this, the tracked walk-behind tractor can turn in place without describing a full circle.
- Transmission. The standard set includes a gearbox, clutch system and gearbox.
- Chassis. Caterpillars are used here. They replace the wheelbase. If a modification is made, then one roll is added to the existing pair of wheels on each side. They put a homemade caterpillar on them.
- Control bodies. Located on the control handle. Includes emergency stop mechanisms and various types of clutch levers.
Before starting your own production, you need to evaluate the offers in stores specializing in the sale of such equipment. Particular attention is paid to the price of certain types of tracks for well-known manufacturers of walk-behind tractors. Let’s say a caterpillar for a Neva walk-behind tractor costs about 28,000 rubles. This is a fully functional snowmobile attachment. You can buy a seat for drivers separately, thanks to which the walk-behind tractor takes on the features of a mini tracked tractor, albeit with less impressive performance characteristics. The technical parameters here are:
- develops a speed of about 18 km per hour;
- The total weight of the console is 37 kg;
- width - 60 cm;
- length - 100 cm;
- height - 34 cm.
Accommodates one driver and one passenger on board. In addition, on sale you can find an attachment to a walk-behind tractor on tracks, which is intended for the Salyut and Agat models. Its cost ranges from 25 to 27 thousand rubles. This design does not provide for attaching a driver's seat. Because of this, some restrictions are imposed on the functional features of this device. But for driving on off-road and snow, such a vehicle is quite suitable.
Online stores offer a large number of different models of snowmobile attachments mounted on tracks to a walk-behind tractor. This indicates the popularity of such models.
Their feature is the ability to control not only with two hands, walking behind a walk-behind tractor, but also while sitting in a folding sleigh. The latter will have to be purchased separately. Considering that the average cost of a set-top box is about 30 thousand rubles, not counting the price of folding sleds, we can say that making tracks yourself can save a lot of money.
How to make homemade tracks on a walk-behind tractor
Here we will look at several ways to make tracks with your own hands, with good performance characteristics.
The simplest version of homemade caterpillars
For light all-terrain vehicles and snowmobiles, tracks can be made from a conveyor belt and a bushing-roller chain. To make such tracks, you don’t have to own a special tool; everything can be done “on your knees.”
To extend the service life of the tape, it is necessary to stitch it along the edges with fishing line, observing a step of 1 centimeter, which will protect the tape from fraying. To connect the ribbon into a ring, you can sew the ribbon at the ends, or use a hinge.
When choosing the thickness of the tape, you should proceed from the engine power. If you use engines from domestic motorcycles, it is enough to take a tape 8-10 mm thick, used on conveyors in agriculture.
This DIY snowmobile track has a good service life and can be easily repaired if necessary.
Repair and tuning
It is better to carry out repairs on models purchased from an official dealer at a service center, since all-terrain vehicles are not cheap, and service repairs are carried out by qualified craftsmen and have an appropriate guarantee. Contrary to the opinion of many users who claim that this model can be easily repaired on its own, and the device itself is not fussy about replacing parts, this is not recommended. Home repairs can cost more money and damage to the device than the services of professionals.
In contrast, an all-terrain vehicle assembled by hand can be serviced at home, since in this case only the assembler himself knows all the nuances of the model and can improve it by replacing parts with those that he considers necessary and suitable, completely or partially changing the design .
You can tune the devices yourself (if it’s a garage invention) or, which would be more preferable for many, hire a team of professionals to upgrade the all-terrain vehicle. This process involves not only changing the paint of the body, but also improving performance from increasing the temperature stability of the engine and increasing power to replacing parts with a complete change in design.
Homemade caterpillar for motorized towing vehicle
It is very common among DIYers to make tracks using car tires. For this purpose, tires with a suitable tread pattern are selected from trucks.
To make such a caterpillar, you need to cut out the sides from the tire and leave the treadmill. This is quite a labor-intensive job that requires a lot of patience, because the tool used is a sharpened shoe knife.
To make the work easier, from time to time the knife blade can be moistened in a soap solution to cut the rubber faster. One option is to use a homemade cutting jig, or use a jigsaw with a fine-tooth file.
After cutting off the sides, if the track is too hard, you can remove the extra layers of rubber inside the resulting ring. If the tread pattern is not suitable for the conditions of use, then a new lug structure is cut.
The undoubted advantage of a homemade caterpillar made from a tire over a caterpillar made from a transport belt is that it is initially a closed loop, and therefore reliable. The disadvantage of this caterpillar is the limited width of the workpiece, which can be corrected by using a double-width option.
Belt tracks
This version of making a caterpillar is attractive for its relative simplicity. To do this, you need to connect belts with wedge-shaped profiles into one whole with screws or rivets, using lugs attached to the belts.
To make holes for the drive sprocket in such a track, you need to make gaps between the belts. You can find many ways to make caterpillars with your own hands - the main thing is to have patience, desire and perseverance - then everything will work out.
Other chassis parts
The rest of the units will be easier. For example, components such as axles and rubber wheels, Buranovsky drive sprockets and protected bearings can be purchased at any specialized store. By the way, it is better to buy inflatable wheels. This technique will be softer on the go. The axle can be taken from a simple garden cart (two-axle). If necessary, you can trim it or, conversely, expand it to suitable technology values. If you are unable to purchase a drive shaft in a store, you can try making one on a lathe. When making your own shaft, make sure that it is sized to accommodate the bearings well.
What kind of homemade caterpillars can there be?
- 1 Methods for making homemade caterpillars
- 2 Home-made caterpillars based on a walk-behind tractor
- 3 Features of the development of a caterpillar mini tractor
- 4 Conclusion
Using a caterpillar is the most common way to increase the maneuverability of any equipment working on unpaved soil. Homemade caterpillars are very popular among the population. There are many developments in this direction. Craftsmen implement various approaches: from well-known, classic solutions, using factory parts, ready-made drawings, and ending with the implementation of their own, non-standard ideas using what is at hand.
A homemade mini caterpillar tractor, compared to its wheeled counterpart, has significantly greater cross-country ability and moving power. This allows you to use mini tractors in any weather conditions, types of terrain, and reliefs.
Necessary materials
As mentioned earlier, to transform the wheeled walk-behind tractors Sadko, Don, Huter, Profi, Plowman, Champion, Carver, Husqvarna into a tracked walk-behind tractor, you will need a fairly powerful engine with axial locking.
Power is important because such a walk-behind tractor will be used on a fairly complex surface, the maneuverability of which requires additional technical data.
Track materials
To summarize a little, we can highlight the main materials that we will need:
- The presence of the walk-behind tractor itself with a gearbox with a powerful 4-stroke engine with axle locking.
- A couple of extra wheels so you can pull the track on them.
- The homemade caterpillar itself, made from available materials.
- Depending on what material will be used in production, we may need two large car tires or transport tape.
Using these materials, you can make a fully functional crawler walk-behind tractor.
At the same time, you can make a full-fledged mini tractor on tracks if you add an additional cargo platform, or use it as an all-terrain vehicle in the snow by adding a platform on skids. In general, there is complete scope for imagination.
Additional Tips
Before making a caterpillar drive for a walk-behind tractor, you need to make drawings and determine the dimensions. They do this so that if a very high homemade caterpillar for a walk-behind tractor is made, it will be necessary to change the center of gravity of the walk-behind tractor. This will inevitably cause problems when turning, as the equipment will fall to one side. To avoid this, the second driven axis must be made longer.
On a note! You can increase the wheel base of a walk-behind tractor. To do this, purchase a bushing. It is placed on the main shaft.
In addition to the rules regarding engine power, they also look at the cooling system:
- Air cooling is ineffective under significant overloads, which will damage the engine.
- It is correct to use water cooling, which has proven to be stable.
Attached attachments to the walk-behind tractor can significantly improve the vehicle's cross-country ability. Therefore, you can diversify the range of operations that a homemade device can handle. To put it another way, the created base in some situations outperforms standard wheels. However, reworking walk-behind tractors may not be suitable for owners of these technical devices. It talks about special requirements for the engine.
The motor comes with good traction. Homemade production is suitable for execution in a garage. That's why a block created in a garage is an excellent replacement for tracked monoblock blocks that are on the market.
